How to Wire an Outdoor Kitchen: The Pro's Safety Checklist
An outdoor kitchen is more than just a grill on a patio. It’s the heart of your backyard, a place for connection, laughter, and creating memories. We’ve seen it time and again: a beautifully designed space transforms how a family lives and entertains. But beneath the stunning countertops and high-end appliances lies a hidden, absolutely critical system—the electrical wiring. Getting this right isn't just about convenience; it's about safety. Period.
Let's be honest, this is the part of the project that’s often underestimated. People get excited about the layout, the finishes, the grill with all the bells and whistles. The wiring? That feels like a boring technicality. Our team has learned over decades of designing and building complex outdoor spaces that the electrical plan is the foundational element that makes everything else possible. A poorly wired kitchen is, at best, a constant frustration and, at worst, a genuine hazard. We're here to pull back the curtain on how to wire an outdoor kitchen correctly, sharing the insights we've gained from countless successful projects.
Why Proper Wiring is Non-Negotiable for Your Outdoor Kitchen
We can't stress this enough: this is not a 'wing it' weekend project. The combination of electricity, water (from sinks, rain, and spills), and flammable materials like propane creates a scenario where cutting corners can have catastrophic consequences. It's a trifecta of risk that demands an unflinching commitment to safety and code.
First, there’s the obvious danger of electrical shock. Outdoor environments are, by nature, wet. Morning dew, a passing shower, a splash from the pool—all introduce moisture. Without the proper protection, like Ground Fault Circuit Interrupter (GFCI) outlets, a simple fault in an appliance could energize the entire metal structure of your kitchen, creating a life-threatening situation. It's a chilling thought, but it's the reality of working with electricity outdoors.
Then there's fire risk. Overloaded circuits, improper wire gauges, and loose connections generate immense heat. When these components are hidden within a structure, often near a gas line for a grill, the potential for disaster is formidable. We've seen the aftermath of DIY jobs gone wrong, and it's a powerful reminder that following electrical code isn't about bureaucracy; it's about preventing the unthinkable.
Beyond the immediate dangers, there’s functionality. You're investing in a beautiful, functional space. The last thing you want is to trip a breaker every time you turn on the rotisserie while the mini-fridge is running. A well-planned system ensures you have ample, reliable power for everything you want to do, from blending margaritas to powering ambient string lights for a late-night gathering. It’s about creating an experience that is seamless, not a source of constant electrical headaches.
First Things First: Planning Your Electrical Layout
Before a single shovel hits the ground, the electrical plan needs to be perfect. This is a core part of our Landscape Design SAN Diego process because the wiring is deeply integrated with every other element, from the foundation to the final finishes.
A great plan starts with a simple question: What will you be powering?
Make a comprehensive list. Don't just think about the big items. Think about everything:
Convenience Outlets: For blenders, slow cookers, phone chargers, speakers.
Task Lighting: Lights directly over the grill and prep surfaces.
Ambient Lighting: Under-counter lights, post lights, overhead lighting.
Entertainment: Outlets for a TV or a sound system.
Once you have your list, we map out their locations on the design. This determines where outlets, switches, and junction boxes need to be placed. Our experience shows it’s always better to have one too many outlets than one too few. You'll thank yourself later. Next comes the load calculation. Each appliance has a specific power draw (measured in amps or watts). We add up the total potential load to determine how many dedicated circuits are needed and what size the main feeder wire from the house needs to be. A common setup involves at least two 20-amp circuits: one for the refrigerator and another for general outlets, with potentially a third dedicated circuit for a particularly high-draw appliance. Overlooking this step is a recipe for constantly tripped breakers.
This is also the moment to think about the future. Are you considering adding a warming drawer in a few years? Maybe a powered pergola? It's dramatically easier and more cost-effective to run an extra conduit now than to tear up your beautiful new patio later. A little foresight goes a long way.
Understanding the Code: The Rules You Can't Ignore
Electrical work is governed by a strict set of rules, primarily the National Electrical Code (NEC) and any local amendments. These codes are not suggestions. They are legally enforceable standards designed to ensure safety. Working with a professional who understands these codes is non-negotiable.
Most jurisdictions will require a permit for this kind of work. The permitting process ensures that your plan is reviewed for code compliance before you start and that the finished work is inspected by a qualified official. This is your assurance that the installation is safe. It’s a critical step that protects you, your family, and the value of your home.
Key code requirements for outdoor kitchens typically include:
GFCI Protection: All 120-volt receptacles in outdoor locations must be GFCI protected.
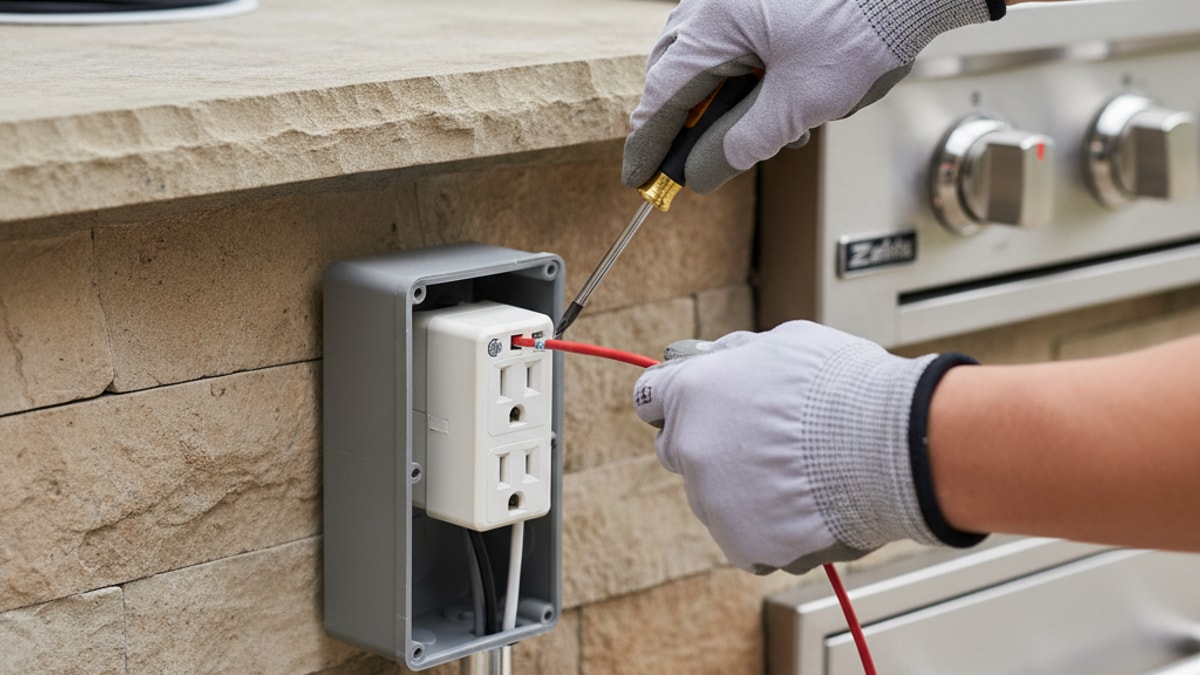
Weatherproof Enclosures: All outlets, switches, and junction boxes must be housed in 'in-use' weatherproof enclosures that protect the connections even when something is plugged in.
Burial Depth: Wires buried underground must be at a specific depth (typically 18-24 inches, depending on the type of conduit used) to prevent accidental damage from future digging.
Proper Conductors: You must use wire that is rated for wet and outdoor conditions.
Navigating the code can be complex, and it’s one of the primary reasons we tell clients that this is not a DIY job for the inexperienced. When our teams build Outdoor Kitchens SAN Diego, we handle all the permitting and inspections. It’s part of delivering a complete, safe, and professional project. If this level of detail feels overwhelming, that's perfectly normal. It's why a comprehensive plan is so important. You can always BOOK MY FREE CONSULTATION with our team to discuss the entire project, from power to patio.
Rewiring Electrical Emergency Services Salt Lake City UT
This video provides valuable insights into how to wire an outdoor kitchen, covering key concepts and practical tips that complement the information in this guide. The visual demonstration helps clarify complex topics and gives you a real-world perspective on implementation.
The Heart of Outdoor Safety: GFCI Protection Explained
We need to talk more about GFCIs. They are arguably the single most important safety device in any outdoor electrical system. A standard circuit breaker protects against overloads and short circuits (which cause fires), but it does very little to protect against electrocution. A GFCI does.
How does it work? It's brilliant, really. A GFCI constantly monitors the flow of electricity in a circuit. It measures the current going out on the 'hot' wire and compares it to the current returning on the 'neutral' wire. They should be exactly the same. If you touch a faulty appliance, a small amount of that current will travel through your body to the ground. The GFCI detects this tiny imbalance—as little as 5 milliamps—and shuts off the power in a fraction of a second. Fast enough to save your life.
There are two main ways to add GFCI protection:
GFCI Receptacle: This is the outlet you’ve likely seen in your bathroom or kitchen with the 'Test' and 'Reset' buttons. The first outlet on a circuit can be a GFCI receptacle, and it can be wired to protect all the other standard outlets 'downstream' on the same circuit.
GFCI Circuit Breaker: This device combines a standard circuit breaker with GFCI protection. It's installed directly in your main electrical panel and protects the entire circuit from that point forward. This is often a cleaner and more robust solution for an outdoor subpanel.
Our team generally prefers using GFCI breakers for outdoor kitchen subpanels. It provides a more comprehensive layer of safety and protects the entire run of wire, not just the outlets. It also means you don't have to worry about an accidental trip at an outlet that might be hidden behind an appliance. You just go to the subpanel to reset.
Choosing Your Weapons: The Right Wire, Conduit, and Boxes
Using materials designed for the harsh outdoor environment is critical. Indoor wiring and components will fail. It's not a matter of 'if,' but 'when.' The constant exposure to moisture, temperature swings, and UV radiation will degrade them quickly, creating a serious safety hazard.
Here's what you need to know:
Wire: The standard for running power underground in conduit is individual THWN-2 rated wire. The 'W' stands for 'Water resistant,' and the 'H' for 'Heat resistant.' It's durable and designed to last for decades in a wet environment like the inside of a conduit. You cannot use standard NM-B (Romex) wire outdoors, even if it's in conduit. It's not rated for wet locations, and its paper fillers will wick moisture, leading to failure.
Conduit: This is the protective pipe that houses your wires. It shields them from physical damage, whether from a shovel strike or shifting ground. The choice of conduit impacts how deep you need to bury it.
Here’s a quick comparison of common conduit types we use:
Conduit Type
Material
Cost
Durability & Use Case
Typical Burial Depth
Schedule 40/80 PVC
Polyvinyl Chloride
Low
Good. Most common for residential underground runs. Easy to work with but offers less physical protection.
18 inches
RMC (Rigid Metal Conduit)
Galvanized Steel
High
Excellent. The toughest option, providing superior physical protection. Often used for exposed runs.
6 inches
IMC (Intermediate Metal Conduit)
Galvanized Steel
Medium
Very Good. A lighter-weight alternative to RMC, still offering great protection.
6 inches
For most residential projects, Schedule 80 PVC is a fantastic choice. It's affordable, corrosion-proof, and provides ample protection when buried at the correct depth of 18 inches.
Boxes and Covers: Every outlet, switch, or splice point must be in a weatherproof electrical box. These are typically heavy-duty cast metal boxes with threaded openings for conduit and sealed gaskets. Crucially, they must be paired with 'in-use' or 'bubble' covers. These covers are deep enough to close and seal completely, even with a cord plugged in, protecting the connection from rain and water spray.
Going Underground: The Art of Trenching and Burying Conduit
Running the power from your house to the kitchen site is often the most labor-intensive part of the job. It involves digging a trench, laying the conduit, and then carefully backfilling.
The first step is always to call 811 or your local utility locating service. Always. This is a free service that marks the location of any existing underground utility lines (gas, water, communications). Hitting one of these lines is incredibly dangerous and can be wildly expensive to repair.
Once the area is marked, the trenching begins. The depth is dictated by the type of conduit you're using. As we mentioned, for PVC, the NEC requires a minimum of 18 inches of cover. We often go a little deeper, to 24 inches, for an extra margin of safety. The trench doesn't need to be wide, just deep enough.
Next, the conduit is assembled and laid in the trench. Long, gentle sweeps are used for any bends; sharp 90-degree angles can make it impossible to pull the wire through later. After the conduit is in place and has passed inspection (if required at this stage), we lay a special 'Caution' warning tape in the trench about 12 inches above the conduit before backfilling. This acts as a visual warning for anyone digging in the area in the future. It’s a small step that adds a huge layer of safety. This phase of construction has to be carefully coordinated with other work, like the installation of footings for Seat Retaining Walls or the base preparation for beautiful new Pavers SAN Diego.
Making the Connections: From the Panel to Your Outlets
With the conduit in place, it's time to pull the individual THWN-2 wires through. This is typically done with a fish tape. You'll pull a black wire (hot), a white wire (neutral), and a green wire (ground) for each 120-volt circuit. If you're running a 240-volt circuit for a larger appliance, you'd pull two hot wires (often black and red), a neutral, and a ground.
At the house, the conduit will terminate at an exterior junction box and then run inside to your main electrical panel or to a new subpanel dedicated to the outdoor area. The new circuit(s) will be connected to the appropriate GFCI breakers. We strongly recommend installing a subpanel for any outdoor kitchen project. It provides a convenient local shut-off for all the outdoor power and makes it easier to add circuits in the future without having to run new wire all the way from the main panel.
At the kitchen end, the wires are run to each weatherproof box. Outlets and switches are then wired up. Every connection must be tight and secure. Loose connections are a primary cause of arcing, heat buildup, and electrical fires. This is meticulous, detail-oriented work. It's not the place to rush.
Beyond the Basics: Integrating Lighting and Special Features
The power you run for your kitchen can do so much more. It's the backbone for creating a truly magical outdoor environment. This is where a holistic design really shines.
Task lighting is essential. We always incorporate lights directly above the grill and prep counters. You need to be able to see what you're cooking, especially at night. But great lighting is about more than just function. A well-designed Landscape Lighting SAN Diego plan adds drama, ambiance, and safety to the entire yard.
We can use that same electrical infrastructure to power:
Under-cap lights on seat walls.
Accent lights highlighting beautiful trees or architectural features.
Path lights to guide guests safely.
Step lights integrated into your deck or patio stairs.
And don't forget other features. That same power can run the igniter for stunning Fire Features, creating a warm and inviting focal point for your evenings. It can power an outdoor television for watching the game with friends or a sound system for setting the perfect mood.
Common Mistakes We See (And How to Avoid Them)
Our team is sometimes called in to fix electrical work that was done incorrectly, and we see the same mistakes over and over. Here are the most common (and dangerous) ones:
Using Indoor Wire (NM-B/Romex) Outdoors: This is the big one. It will fail. It's not a question of if, but when. It is a severe fire and shock hazard.
Shallow Burial: Not digging the trench deep enough. A shovel can easily pierce a conduit that's only buried 6 inches down, leading to a live wire just below the surface.
Skipping GFCI Protection: This is a direct violation of code and removes the single most important life-saving device from the system.
No Weatherproof Covers: Using standard indoor outlet covers outside. The first time it rains, water will get into the outlet, causing a short and a potential shock hazard.
Not Pulling a Permit: This often leads to uninspected, unsafe work that can void your homeowner's insurance and create huge problems when you try to sell your home.
Avoiding these mistakes is simple. Hire a qualified, licensed professional who understands outdoor electrical systems. The peace of mind is worth every penny.
Wiring an outdoor kitchen is a complex and demanding task that forms the invisible foundation of your entire outdoor living space. It requires meticulous planning, a deep understanding of electrical codes, and an unwavering commitment to safety. When done correctly, it provides the reliable, safe power that brings your dream kitchen to life, allowing you to focus on what really matters: enjoying your beautiful new space with family and friends for years to come.
Frequently Asked Questions. Here are some common questions. Find the answers you're looking for below.
Do I need a dedicated circuit for my outdoor kitchen?
Yes, absolutely. We recommend at least two dedicated 20-amp, GFCI-protected circuits. One should be for the refrigerator to prevent it from tripping with other appliances, and the other for general use outlets. High-power appliances may require their own additional circuits.
What is the difference between UF-B cable and individual wires in a conduit?
UF-B (Underground Feeder) cable is a sheathed cable rated for direct burial. While it can be used, we've found that running individual THWN-2 wires inside a conduit provides much better physical protection and makes it significantly easier to add or replace wires in the future.
How many outlets should I have in my outdoor kitchen?
Our experience shows you can never have too many. We recommend placing a duplex receptacle at least every 4-6 feet along the countertop for convenience. It's better to have them and not need them than to be constantly searching for an open outlet.
Can I run the electrical line under a new paver patio?
Yes, and this is the ideal scenario. The conduit should be installed in a properly dug trench before the patio base material and pavers are laid. Trying to add wiring after the fact is far more disruptive and expensive.
What is an 'in-use' weatherproof cover?
An 'in-use' or 'bubble' cover is a deep-profile outlet cover that allows you to close and seal it even when a cord is plugged in. Standard flat covers only protect the outlet when it's not being used, which is inadequate for outdoor kitchens.
Do I need a subpanel for my outdoor kitchen?
While not always strictly required by code for smaller setups, we highly recommend it. A subpanel provides a convenient local disconnect for all outdoor power and makes future expansion (like adding landscape lighting or a pool pump) much simpler.
What is the correct burial depth for electrical conduit?
It depends on the conduit. For PVC, the National Electrical Code generally requires a minimum burial depth of 18 inches. For rigid metal conduit (RMC), the requirement is typically 6 inches because it offers more physical protection.
Can I use an extension cord to power my outdoor kitchen temporarily?
We strongly advise against this for anything other than very temporary, short-term use. Extension cords are not rated for permanent outdoor installation, can be a trip hazard, and are often not the proper gauge to handle the load of kitchen appliances, creating a fire risk.
Does my outdoor grill's igniter need a GFCI outlet?
Yes. Any 120-volt receptacle in an outdoor or wet location, regardless of what it's powering, must have GFCI protection. This includes outlets for grill igniters, rotisseries, and built-in refrigerators.
What kind of lighting is best for over the grill?
For task lighting directly over cooking surfaces, we recommend sealed, weatherproof LED fixtures. They provide bright, clear light, are energy-efficient, and are built to withstand the heat, grease, and weather associated with an outdoor cooking area.
Is it safe to have an outlet near my outdoor sink?
Yes, provided it is a GFCI-protected outlet installed in a proper weatherproof box with an in-use cover. The GFCI is specifically designed to handle situations where water and electricity are in close proximity, shutting off power instantly if a fault is detected.


.webp)
.webp)