Installing a Grill in Your Outdoor Kitchen: A Pro's Walkthrough
An outdoor kitchen isn't just a collection of appliances and countertops. It's a destination. It's the hub of every backyard party, the place where memories are seared in right alongside those perfect grill marks. And at the very heart of that experience, sitting like a throne in its custom-built island, is the grill. Getting that centerpiece installed correctly is more than just a task; it’s the critical step that transforms a simple patio feature into a true culinary command center. It's a project that carries a ton of excitement, but let's be honest, it also carries a significant amount of weight.
Our team has been a part of countless outdoor living projects, and we've seen it all. We’ve seen the triumphant homeowners who planned meticulously and the frustrated ones who had to tear out brand-new stonework because of a simple measurement error. The difference almost always comes down to understanding the nuances of how to install a grill in an outdoor kitchen. It’s not just about dropping a heavy metal box into a hole. It’s a delicate dance of safety regulations, utility connections, and material science. So, before you start cutting into that beautiful new countertop, let's walk through this together, the way a professional would approach it.
Before You Begin: The Non-Negotiable Planning Phase
We can't stress this enough: success is determined long before you ever pick up a tool. The planning phase is where you make the decisions that will dictate the entire installation process. Rushing this part is the single biggest mistake we see. It’s the difference between a seamless project and a series of compounding, expensive headaches.
First, what kind of grill are you working with? This seems obvious, but the implications are huge. A freestanding grill on a cart is one thing, but a built-in unit is a permanent commitment. It becomes an integral part of your kitchen's structure. Your choice of fuel is the next formidable consideration. Natural gas offers incredible convenience—no more last-minute propane tank runs—but it requires a licensed professional to run a dedicated gas line. Propane offers flexibility, but you need to design a safe, ventilated, and accessible cabinet for the tank. Then there are charcoal grills for the purists, which demand careful consideration of heat management and ash disposal, and electric or infrared models that require dedicated, weatherproof GFCI outlets. Each choice sends ripples through the entire design.
This is where a holistic approach, like the kind we champion in our Landscape Design SAN Diego process, becomes invaluable. You're not just planning for a grill; you're planning for utility trenches, for workflow between the grill and the sink, for seating arrangements that keep guests out of the smoke path. It's a comprehensive vision. Think about where the gas or electrical lines will originate. How will they run to the island? Will they have to go under existing Pavers SAN Diego or new concrete? Answering these questions now saves you from cutting into your beautiful new patio later.
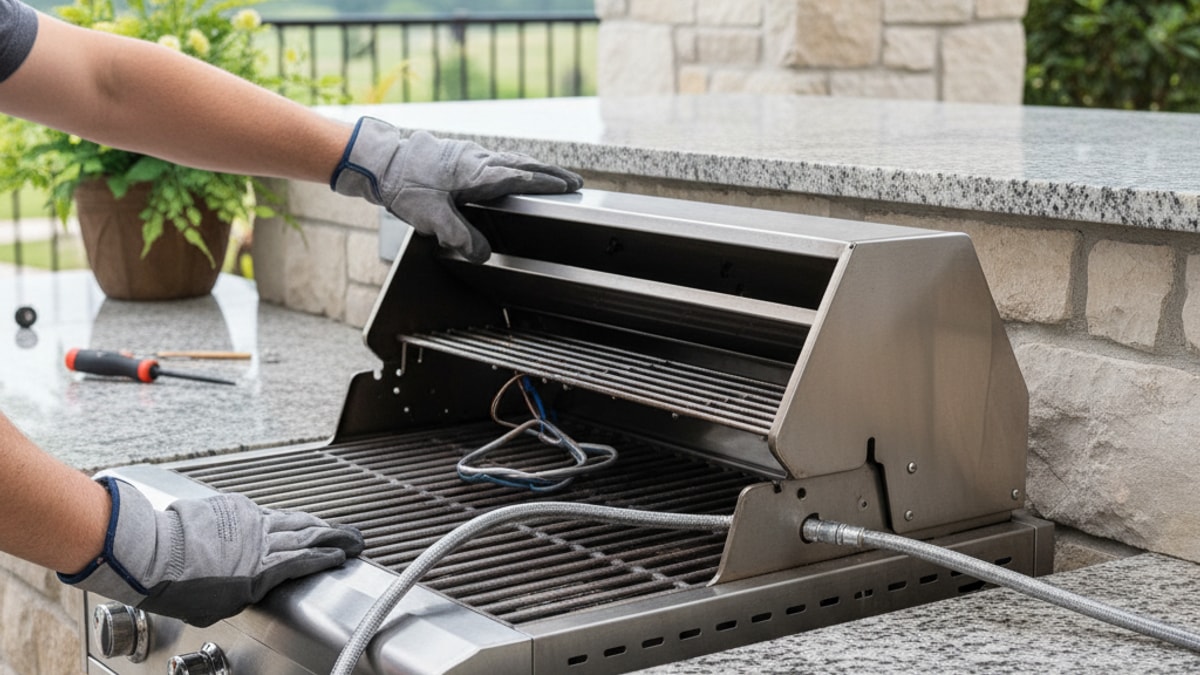
Understanding Your Grill and Countertop Cutout
Every built-in grill comes with what is arguably the most important document in the entire box: the manufacturer's specification sheet, or 'cutout sheet.' This is your bible. It contains the precise, non-negotiable dimensions for the opening in your countertop and island structure. We mean this sincerely: do not deviate from these numbers. Not even by a quarter of an inch.
These dimensions aren't suggestions. They are engineered for proper fit, airflow, and safety. A cutout that’s too small means the grill won't fit—a catastrophic and costly error. A cutout that's too large creates unsightly gaps, compromises the structural support for the heavy appliance, and can even create dangerous heat traps. Measure once. Measure twice. Then have someone else check your measurements before a single cut is made. It’s that important.
Equally critical is the material you're cutting into. Outdoor kitchen islands must be constructed from non-combustible materials. This means a steel frame with cement board is the industry standard. You cannot, under any circumstances, build your island from wood framing if a gas grill is being installed directly into it. The heat generated by these high-performance cookers is immense and the fire risk is simply too high. This is why materials used in our Concrete SAN Diego installations and custom masonry work are specifically chosen for their durability and heat resistance. The countertop itself—be it granite, concrete, or porcelain tile—needs to be able to withstand thermal shock without cracking. A professional design considers all of these material interactions from the very beginning.
The Insulating Jacket: Your Kitchen's Most Important Guardian
Now, let's talk about one of the most frequently overlooked—and most critical—safety components: the insulating jacket (or insulated liner).
What is it? An insulating jacket is a rigid, double-walled stainless steel box that the grill head sits inside of. It creates an air gap, a buffer zone that separates the intense heat of the grill's firebox from the structure of your island. Think of it as a heat shield. Its job is to prevent the heat from transferring to the island materials, which, even if non-combustible, can still be damaged by prolonged exposure to extreme temperatures.
So, when do you need one? The rule is simple and unflinching: if your island structure is made of any combustible materials (like a wood-framed structure, which we strongly advise against anyway), an insulating jacket is mandatory. No exceptions. However, our professional recommendation goes a step further. We advise using an insulating jacket in all installations, even with steel-framed islands. Why? It provides an extra layer of safety, protects your investment in the island's finishing materials (stucco, stone veneer), and ensures you're exceeding code requirements. It's a relatively small upfront cost for absolute peace of mind. Skipping it to save a few hundred dollars is a gamble you never want to lose.
Naples Outdoor Kitchen FL
This video provides valuable insights into how to install a grill in an outdoor kitchen, covering key concepts and practical tips that complement the information in this guide. The visual demonstration helps clarify complex topics and gives you a real-world perspective on implementation.
Let's Talk About Ventilation and Clearance
Fire needs heat, fuel, and oxygen. Your grill has the first two in abundance. Proper ventilation is how you manage the third, along with the byproducts of combustion. This isn't just about smoke; it's about preventing a dangerous buildup of heat and unburned gas.
First, clearance. Your grill's manual will specify the minimum distance required from any combustible surfaces. This includes the wall behind it, any overhanging roofs, and even nearby trees or fences. These are not suggestions. For installations under a covered roof, such as those that might be part of our Patio Covers Pergolas SAN Diego projects, a commercial-grade outdoor vent hood is almost always required by code. It’s the only way to safely exhaust the heat, grease, and carbon monoxide.
Second, island ventilation. This is absolutely crucial, especially for propane models. Propane is heavier than air. If there's a small leak inside your sealed island cabinet, the gas will pool at the bottom, creating a literal bomb. Your island must have vents—typically two, on opposite sides—to allow for cross-ventilation. This allows any escaped gas to dissipate safely. These vents should be installed according to the grill manufacturer's guidelines, usually one high and one low, to promote airflow. Our team has found that this is a detail amateur installers often miss, with potentially devastating consequences.
Step-by-Step: The Installation Process
Alright, you've planned, you've measured, and you've built a safe, non-combustible island. Now for the main event. Here’s a high-level overview of how the installation itself unfolds.
Prepare the Cutout: Using the spec sheet, carefully mark and cut the opening in the countertop. This requires the right tools for the material—a diamond blade on an angle grinder for granite, for instance. The edges should be smooth and clean.
Install the Insulating Jacket (If Used): The jacket is typically installed first. It's lowered into the rough opening in the island structure and secured. The countertop is then often installed over it, with the jacket's flange supporting the countertop edge. The grill will later sit inside this jacket.
Run and Connect Utilities: This is the point where we unequivocally recommend professional help. A licensed plumber should run the natural gas line or hook up the propane regulator. An electrician should install any necessary outlets for rotisseries or lighting. This work must be done to code, period.
Lower the Grill into Place: This is usually a two-person job. Built-in grills are heavy and awkward. Carefully lift and lower the grill head into the prepared opening, ensuring it sits securely on the designated support ledges or the insulating jacket's flange.
Final Connections and Leak Testing: Once the grill is in place, the final connection to the gas line is made. For natural gas, this is a flexible stainless steel gas hose. For propane, it's the hose and regulator. The most critical, non-negotiable step follows: leak testing. Using a soapy water solution, coat every joint and connection in the gas line. Turn on the gas. If you see bubbles forming, you have a leak. Shut off the gas immediately and tighten the connection until the bubbles stop. Never, ever use a flame to check for leaks.
The First Burn-Off: Before you throw on the first steak, do an initial burn-off. Turn the grill on high for 20-30 minutes with the lid closed. This will burn off any residual manufacturing oils and coatings. It will smoke and smell a bit—that's normal. After this, you're ready to cook.
Tools of the Trade: What You'll Really Need
Having the right equipment is paramount. A simple home toolbox might not cut it for a project of this magnitude. Here’s a look at how a DIY setup compares to a professional's kit.
Tool Category
DIY Essentials
Professional's Arsenal
Why It Matters
Measurement
Tape Measure, Level
Laser Level, Digital Calipers
Absolute precision prevents costly recuts and ensures a perfect, level fit. There's no room for 'close enough.'
Cutting
Jigsaw, Circular Saw
Angle Grinder with Diamond Blade, Concrete Saw
Clean, accurate cuts in stone, concrete, or steel framing are impossible without specialized, powerful tools.
Safety
Gloves, Safety Glasses
Respirator, Fire Extinguisher, Gas Leak Detector
Professionals are equipped not just for the job, but for the unexpected. Safety is a system, not just a suggestion.
Utilities
Pipe Wrench, Wire Strippers
Manometer, Multimeter, Pipe Threader
Gas and electrical work demand specialized diagnostic and installation tools for safe, code-compliant connections. This isn't the place for guesswork.
Common Pitfalls We've Seen (And How to Avoid Them)
Over the years, our teams have been called in to fix a few DIY installations gone wrong. Experience teaches you what to look for. Here are some of the most common, easily avoidable mistakes:
Forgetting Drip Tray Access: Many built-in grills have a slide-out drip tray at the front. If you build a lip or overhang on the island finish that blocks this, you'll have an impossible-to-clean mess on your hands. Always check the clearance needed to fully remove the tray.
Misjudging the Countertop Overhang: A slight overhang of the countertop into the cutout opening can look clean, but if it’s too much, it can block the grill lid from opening fully or create a pinch point.
Ignoring Island Ventilation: We mentioned it before, but it bears repeating. We've seen beautiful, expensive islands built like sealed boxes. It's an incredibly dangerous oversight. Vent, vent, vent.
Using the Wrong Materials: Seeing wood framing or standard drywall used anywhere near the grill cavity is a major red flag. Stick to steel studs, cement board, and other non-combustible materials throughout.
Relying on Sealant for Support: The grill should be supported by the structural frame of the island, not held in place by silicone sealant around the edges. The sealant is for weatherproofing, not for bearing the weight of a 150-pound appliance.
Executing a project like this flawlessly is precisely why clients trust us with their complete Outdoor Kitchens SAN Diego projects. It's about seeing the entire picture and knowing where these potential pitfalls lie before they ever become a problem.
Installing a grill in your outdoor kitchen is a truly rewarding project. It’s the final piece of the puzzle that brings your backyard vision to life. It requires careful planning, precision, and an unflinching commitment to safety. While it can be a DIY endeavor for the skilled and well-equipped, there is no substitute for the certainty and security that comes with professional installation. It ensures that the heart of your outdoor living space will beat strongly and safely for years of gatherings to come. Ready to get it right the first time? BOOK MY FREE CONSULTATION and let our team help you build the outdoor kitchen you've always wanted.
Frequently Asked Questions. Here are some common questions. Find the answers you're looking for below.
Do I really need an insulated jacket for my built-in grill?
If your island is made of any combustible materials, an insulated jacket is absolutely mandatory for safety. Our team strongly recommends using one even in non-combustible islands, as it provides superior heat protection for your structure and finishing materials.
Can I install a grill in a wood or composite countertop?
No, you should never install a high-heat gas grill directly into a combustible countertop like wood or composite. The countertop material around the grill must be non-combustible, such as granite, concrete, or stone, to prevent a serious fire hazard.
How much clearance do I need around my built-in grill?
Always follow the manufacturer's specifications. Generally, you'll need significant clearance from any combustible materials, often at least 18-24 inches to the sides and rear, and even more clearance overhead unless you have a proper vent hood.
What is the most important step when connecting a gas grill?
The single most important step is leak testing. After making any gas connection, you must apply a soapy water solution to all joints and watch for bubbles. This simple test is a non-negotiable safety check to prevent dangerous gas leaks.
Why does my outdoor kitchen island need vents?
Vents are a critical safety feature, especially if you use liquid propane. They provide airflow to dissipate any potential gas leaks, which can otherwise accumulate inside the island and create an explosion risk. They also help with heat management.
Can I convert my propane grill to natural gas myself?
While many grills come with conversion kits, we highly recommend having a licensed plumber or certified gas technician perform the conversion and connection. Working with gas lines is dangerous and requires professional expertise to ensure it's done safely and to code.
What's the best framing material for an outdoor kitchen island?
The industry standard and our strong recommendation is galvanized steel framing. It's non-combustible, durable, and resistant to moisture and pests, making it the safest and most long-lasting choice for supporting a built-in grill.
How do I run electricity to my grill island?
Running electrical lines outdoors requires a licensed electrician. They must use conduit suitable for underground burial and install GFCI (Ground Fault Circuit Interrupter) outlets in weatherproof boxes to protect against shock, especially in a wet environment.
Should the grill be the first thing I buy for my outdoor kitchen?
Yes, it's one of the first decisions you should make. The specific model you choose will dictate the island's cutout dimensions, utility requirements, and ventilation needs, influencing the entire design of your outdoor kitchen project.
What is a 'burn-off' and is it necessary?
A burn-off is when you run your new grill on high heat for 20-30 minutes before its first use. It's a necessary step to burn away any factory coatings, oils, or residues from the manufacturing process, ensuring your food tastes great from the very first cookout.
Can my grill sit directly on the island structure?
No, a built-in grill is designed to hang from the countertop cutout, supported by its flange or lip. It should not rest on the bottom of the island structure, as this restricts airflow and creates a heat trap.
What's the difference between a drop-in and a slide-in grill?
A drop-in (or built-in) grill is the most common type, designed to be lowered into a countertop cutout. A slide-in grill is less common and is designed to slide into a front-facing opening in the island, often with a finished trim piece.


.webp)
.webp)