A beautiful paver patio. It’s the centerpiece of so many San Diego dream backyards—the spot for weekend barbecues, quiet morning coffees, and evenings spent under the stars. The appeal is undeniable. It’s a project that feels achievable, a tangible way to expand your living space and add real, lasting value to your Home. But we've seen it time and time again: the weekend warrior who dives in headfirst, only to end up with a lumpy, weed-infested surface that sinks within a year.
That's not going to be you. Our team at Modern Yardz has designed and built countless paver patios across San Diego County, from the rolling hills of Oceanside to the vibrant neighborhoods of Chula Vista. We’ve learned—through decades of hands-on experience—what separates a patio that endures from one that disappoints. It isn't about rushing the process. It's about unflinching attention to detail and a deep understanding of the groundwork. Honestly, it's all about the base. So, let’s talk about how to build a patio with pavers the right way, the way the pros do it.
First, Let's Talk Foundation: Planning and Prep
Before you lift a single shovel, you need a plan. A real one. This is the phase where so many DIY projects go sideways, and it’s a shame because thoughtful planning costs nothing but time. Where will the patio go? How big will it be? What about the slope? These aren't just minor details; they are the architectural DNA of your project. A poorly placed patio can create drainage nightmares, directing water straight toward your home's foundation—a catastrophic and costly mistake.
Our process always starts with a comprehensive site assessment. We look at sun exposure, existing landscape features, and, most critically, water flow. You need to ensure your patio has a gentle, almost imperceptible slope away from any structures—we recommend a minimum of a 1/4-inch drop for every foot of patio length. This is non-negotiable. Get out a level, some stakes, and string to visualize this grade before you ever break ground. It will save you a world of headaches later.
And what about the style? Pavers come in a sprawling variety of shapes, colors, and textures. Are you aiming for a sleek, modern look with large format porcelain pavers, or a more rustic, old-world charm with tumbled concrete cobbles? This decision impacts your budget, your installation method, and the overall feel of your outdoor space. We often advise clients to browse our Blog for inspiration to see how different materials complement various home styles. The choice you make here sets the entire aesthetic tone. Don't rush it.
Finally, check with your local municipality and HOA. Seriously. Some projects, depending on their size and proximity to property lines, may require a permit. The last thing you want is to have to tear out your hard work because of a paperwork oversight. It happens more often than you'd think, and it’s just gut-wrenching.
The Right Tools for an Impeccable Job
Having the right equipment is the difference between a frustrating, back-breaking ordeal and a smooth, professional-grade installation. You can rent most of the heavy-duty items, and our team has found that investing in good quality hand tools pays for itself in precision and ease of use. This isn't the time to skimp.
You're going to need more than just a shovel and a wheelbarrow. A plate compactor is absolutely essential for creating a stable base. A wet saw with a diamond blade is critical for making clean, precise cuts for edges and patterns. And a good set of screed rails will be your best friend when it comes to getting that sand bed perfectly level. We can't stress this enough—don't try to eyeball it.
Here’s a quick rundown of the gear we consider essential on our job sites:
- Excavation: Shovels (flat and pointed), pickaxe or mattock, wheelbarrow, and for larger projects, consider renting a mini-excavator.
- Measurement & Layout: Tape measure, stakes, string line, line level, and a long carpenter's level (4-foot minimum).
- Base Preparation: Plate compactor (a must-rent), hand tamper for tight spots, and a heavy-duty landscape rake.
- Paver Setting: Rubber mallet, screed rails (metal conduit works great), a screed board (a straight 2x4), paver puller, and knee pads. Your body will thank you.
- Cutting & Finishing: A wet saw with a diamond blade for pavers, a masonry chisel and hammer for minor adjustments, and a stiff-bristled push broom for sweeping sand.
This list might seem formidable, but each tool plays a crucial role in achieving that polished, professional look you’re after.
The Most Critical Step: Excavation and Base
Here's where the real work begins. This is the part of the process that is completely hidden in the final product, yet it determines 100% of its success and longevity. We mean this sincerely—the base is everything. A poorly prepared base is a slow-motion failure waiting to happen.
The depth of your excavation depends on your climate and soil type. Here in San Diego, we don't have to contend with the deep frost lines of colder regions, but we do have expansive clay soils in many areas. For a standard pedestrian patio, we recommend excavating 7 to 9 inches below your final desired patio height. This allows for a solid 4 to 6 inches of compacted base material and a 1-inch sand setting bed, plus the height of the paver itself.
Once you’ve marked out your patio area (adding about 6 inches of over-dig on all sides for working room), it’s time to start digging. Ensure the bottom of your excavated area has that same gentle slope you planned for drainage. After digging, the first thing you must do is compact the native soil—the subgrade. Run the plate compactor over the entire area until it's firm and unyielding. This prevents the soil from settling later under the weight of your patio.
Next comes the paver base, typically a crushed stone aggregate. Don’t just dump it all in at once. This is another rookie mistake. You need to add the base material in layers, or "lifts," of about 2-3 inches at a time. After spreading each lift, you need to moisten it slightly (not soak it) and then compact it thoroughly with the plate compactor. You should make at least two passes over each lift in perpendicular directions. You'll continue this process—add a lift, moisten, compact—until you reach your desired base height. The final compacted base should be a rock-solid, monolithic slab. If you can leave a footprint in it, it's not compacted enough.
| Base Material Option |
Best Use Case |
Pros |
Cons |
Our Recommendation |
| Class II Road Base |
Standard for most paver patios |
Excellent compaction, good drainage, widely available. |
Can be heavy and dusty to work with. |
This is our go-to for 95% of residential projects. Its stability is unmatched. |
| Decomposed Granite (DG) |
Walkways, light-use patios |
Creates a very firm surface, natural appearance. |
Can have poorer drainage than aggregate, can track indoors. |
Good for certain aesthetic goals, but requires careful drainage planning. |
| Open-Graded Aggregate |
Permeable paver systems |
Superior drainage, prevents runoff. |
Requires specific permeable pavers and installation techniques. |
A fantastic eco-friendly choice, but it's a specialized system. Not for standard DIY. |
Laying Sand and Setting Pavers
Now for the part that feels like progress. With your base flawlessly compacted, it’s time for the setting bed. This is a 1-inch layer of coarse, washed concrete sand—not playground sand. This layer provides a bed to set the pavers into and allows for minor height adjustments. The key to this step is a process called screeding.
Place your two screed rails (pipes or conduit) on top of your compacted base, parallel to each other. The distance between them should be a little less than the length of your straight 2x4 screed board. Adjust the height of the rails so that they are exactly 1 inch below where you want the bottom of your pavers to be. Now, pile sand between the rails and pull the 2x4 board across the top of them in a sawing motion. This will create a perfectly smooth, level bed of sand. Remove the rails carefully and fill in the voids with sand, smoothing it with a trowel. Never, ever walk on or compact your screeded sand bed.
It's time to lay pavers. Start at a hard edge, like the wall of your house, and work your way outward. Place the pavers gently onto the sand bed—don't slide or push them into place, as this will disturb the sand. Use a click-and-drop method, where you click the paver against its neighbor and then drop it straight down. Use string lines to keep your rows perfectly straight. It's a slow, methodical process. Patience is your friend here.
Inevitably, you'll need to make cuts, especially around the edges. This is where your rented wet saw becomes invaluable. Measure twice, cut once. A clean, precise cut makes the difference between an amateur-looking job and a professional one. It’s one of those finishing details that elevates the entire project.
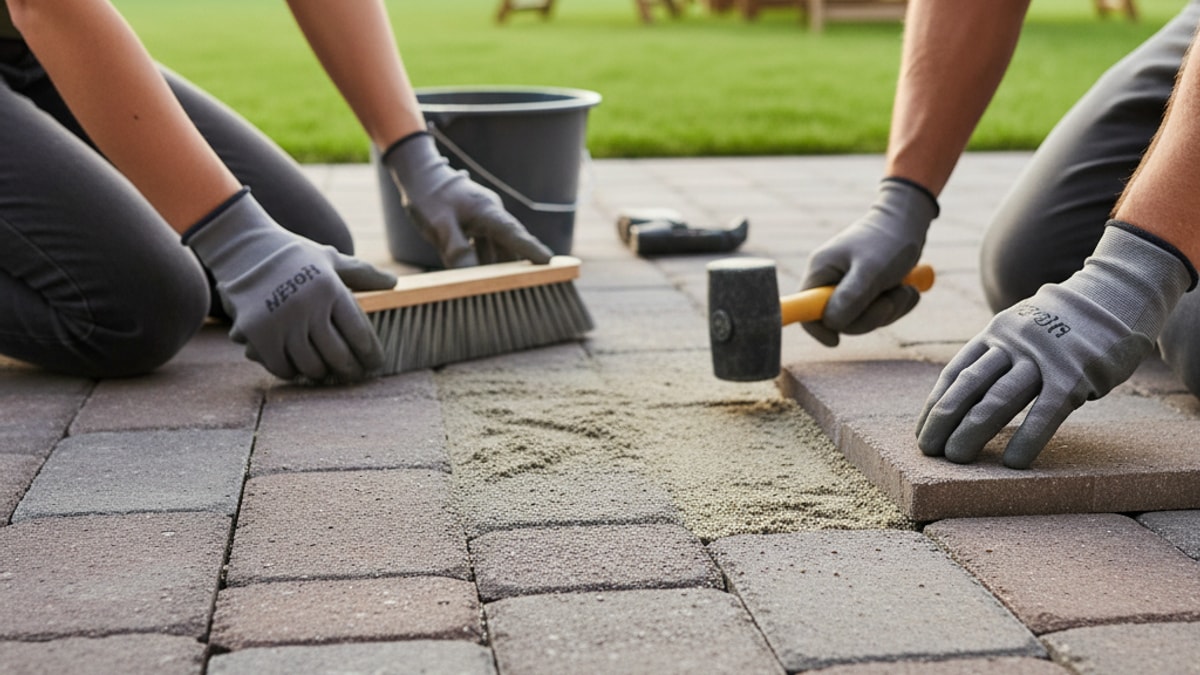
Locking It All In: Edging, Jointing Sand, and Sealing
Your pavers are laid, but the job isn't done. Not even close. Without proper edge restraint, your beautiful patio will slowly creep apart, creating unsightly gaps and losing its structural integrity. You need to install a rigid edge restraint—typically made of heavy-duty plastic or metal—around the entire perimeter of the patio. Secure it into the compacted base (not the sand bed) with long metal spikes every 12 inches.
With the edging in place, it’s time to lock the pavers together. This is done with jointing sand. The modern standard is polymeric sand. This is a fine sand mixed with a polymer binder that, when activated with water, hardens to form a durable yet flexible joint. It resists weeds, deters ants, and prevents the sand from washing out during heavy rains. Sweep the polymeric sand over the entire dry surface of the patio, working it into every joint until they are completely full. Use a leaf blower on a low setting to blow off any excess sand from the paver surfaces—this is critical, as any remaining sand will harden into a permanent haze.
Before you activate the sand with water, you need to do one final compaction. Run your plate compactor over the top of the pavers (using a protective pad to prevent scuffs) to settle them into the sand bed and vibrate the jointing sand deep into the crevices. This step ensures a tight interlock between every paver. After this final compaction, you might need to top off the joints with a little more sand.
Now, follow the manufacturer's instructions for watering the polymeric sand. Typically, this involves misting the patio with a hose nozzle, letting it soak in, and then misting it again. The goal is to activate the polymers without washing the sand out of the joints. Let it cure for at least 24-48 hours before walking on it or placing furniture.
One final, optional step we often recommend is sealing the pavers. A good quality sealant will protect the pavers from stains, enhance their color, and make them easier to clean. It’s an extra layer of protection for your investment. It’s not always necessary, but for a patio that gets a lot of use—especially if you're planning one of our custom outdoor kitchens nearby—it's a very smart move.
Knowing When to Call for Backup
Let’s be honest. Building a paver patio is a physically demanding, technically precise job. While a small, simple square patio can be a rewarding DIY project, the complexity grows exponentially with size, patterns, elevation changes, or the integration of other features like fire pits or retaining walls. Our team is passionate about great landscape design, and we've seen ambitious homeowners get in over their heads. There's no shame in it.
If your project involves significant grading, multiple levels, intricate cutting patterns, or you simply don't have the time and energy for such a grueling task, it’s often wiser—and ultimately, more cost-effective—to bring in professionals. A poorly installed patio can cost more to fix than it would have to install it correctly the first time. The expertise we bring, which you can learn more about on our About page, ensures that every single step, from the unseen base to the final sealed surface, is executed flawlessly.
We provide a full suite of Services, from initial design concepts to complete construction. If you're dreaming of a backyard oasis but feeling overwhelmed by the process of how to build a patio with pavers, let's talk. We can help you navigate the options and create a space that perfectly suits your home and lifestyle. Why not BOOK MY FREE CONSULTATION? We’d be happy to walk you through the possibilities.
Creating a truly exceptional outdoor living space is about more than just laying down some stones. It's about crafting an environment, an extension of your home where you can relax, entertain, and make memories. It requires a vision and a level of execution that comes from years of dedicated practice. If you have questions or want to explore what's possible for your yard, please don't hesitate to Contact our San Diego-based team.
Building a paver patio is a significant undertaking, but the reward is a beautiful, functional, and durable addition to your home that you’ll enjoy for decades. Whether you choose to tackle it yourself with this knowledge or partner with a team of experts, the key is to respect the process. Don't cut corners. Focus on the foundation. And soon enough, you'll be enjoying that morning coffee on the patio you've always wanted.


.webp)
.webp)