How to Build a Brick Patio That Lasts for Generations
A brick patio is more than just an outdoor floor. It's the stage for summer barbecues, the quiet corner for your morning coffee, the foundation for countless family memories. At Modern Yardz, we've designed and built hundreds of them across San Diego County, from the coastal breezes of Oceanside to the sunny backyards of Chula Vista. We’ve seen firsthand how a well-crafted patio can completely transform a home's character and usability. It’s a timeless, classic addition that exudes warmth and permanence.
But that feeling of permanence? It doesn't happen by accident. It's born from meticulous planning and an unflinching commitment to getting the foundation right. Anyone can lay bricks in the dirt—we’ve been called in to fix those projects more times than we can count. Building a brick patio that won't heave, sink, or become a weedy mess in two years requires a professional process. So, we're pulling back the curtain and sharing the exact methods our crews use. This is how you build a brick patio the right way. The way that lasts.
Before You Ever Break Ground: The Planning Phase
Honestly, the success or failure of your patio is often decided before a single shovel of dirt is moved. Rushing this stage is a catastrophic mistake. It’s where you translate your vision into a workable blueprint, and our team has found that a little extra time here saves immense headaches later. We can't stress this enough—plan everything.
First, think about function. How will you use this space? Is it for a large dining table and a grill? A cozy seating area around a fire feature? The function dictates the size and shape. Use a garden hose or spray paint to outline the potential footprint on the ground. Live with it for a few days. Walk around it. Does it feel right? Is there enough clearance for chairs to be pulled out? Does it create a natural flow from your backdoor to the rest of the yard? These are the questions we tackle during our initial Services consultations, and they're critical for you, too.
Next, consider the location's logistics. You need to account for drainage. Water should always slope away from your home's foundation—a non-negotiable rule. We recommend a minimum slope of 1/4 inch per foot. It's subtle enough that you won't feel it, but it’s absolutely essential for preventing water damage. Also, check for underground utility lines. The last thing you want is to hit a water pipe or electrical line. Call 811 to have local utility companies come out and mark their lines. It's a free service and it's the law.
Finally, decide on your brick pattern. This isn't just an aesthetic choice; it impacts the stability of the patio and the number of cuts you'll have to make. Running bond is simple and classic. A herringbone pattern is visually dynamic and incredibly strong—it interlocks the bricks, making it great for high-traffic areas. A basketweave pattern offers a charming, traditional look. Lay out a small section of your chosen bricks in the pattern you’re considering. This gives you a real-world preview and helps you visualize the final product. Getting this right is part of the deep expertise we bring to every project, and it’s something you should pour your attention into.
Choosing Your Bricks: More Than Just Color
Walking into a stone yard can be overwhelming. So many options. But choosing the right brick is about more than just finding a color that matches your house. Bricks are not all created equal, and the type you choose will have a significant impact on the longevity and durability of your patio.
There are two main categories you'll encounter: clay pavers and concrete pavers. Genuine clay bricks are made from fired clay and shale, giving them that classic, rich color that deepens over time. They are incredibly dense and have low water absorption, which makes them highly resistant to staining and weathering. Our experience shows they hold their color exceptionally well, even under the relentless San Diego sun. They are, in our opinion, the gold standard for a timeless look.
Concrete pavers, on the other hand, are made from a mix of concrete and aggregate. They offer a much wider variety of shapes, sizes, and colors, which can be a huge advantage for modern or unique designs. They're also typically more uniform in size, which can make installation a bit more straightforward for a DIY project. However, their color is often pigment-based and can fade over years of UV exposure. They are a fantastic, versatile option, but it's important to understand the trade-offs.
And—let's be honest—this is crucial: make sure you're buying bricks rated for paving. These are specifically manufactured to withstand foot traffic, weather, and ground contact. They're often called "severe weather" (SW) grade bricks. Using a common building brick (the kind used for walls) is a recipe for disaster. They will absorb water, crack during temperature changes, and crumble under pressure. It's a shortcut that will absolutely ruin your project. Always verify that your chosen material is intended for use as a paver.
The Tools of the Trade: What Our Pros Actually Use
Having the right equipment makes the difference between a frustrating, back-breaking ordeal and a smooth, professional-grade installation. You can rent most of the heavy-duty items, and it's well worth the investment. Here's what our crews wouldn't start a job without.
Essential Tools:
Shovels (Flat and Spade): For digging and moving material.
Wheelbarrow: An absolute necessity for hauling dirt, gravel, and sand.
Tape Measure & Level: For ensuring everything is square, properly sloped, and perfectly flat.
Rubber Mallet: For tapping bricks into place without damaging them.
Stakes and String Line: To create your guides and keep your lines perfectly straight.
Hand Tamper: For compacting smaller areas and edges.
Plate Compactor: This is the single most important piece of equipment for a durable patio. It compacts the gravel base into a rock-solid foundation. A hand tamper simply cannot achieve the same level of compaction. We mean this sincerely—don't attempt a patio without one.
Masonry Saw (Wet Saw): For making clean, precise cuts for edges and patterns. A chisel and hammer can work in a pinch, but the results are often rough and unprofessional. A wet saw delivers that impeccable, sharp finish.
How To Install A Brett Paving Brickedge To A Patio
This video provides valuable insights into how to build a brick patio, covering key concepts and practical tips that complement the information in this guide. The visual demonstration helps clarify complex topics and gives you a real-world perspective on implementation.
Step 1: Excavation—The Foundation of Everything
This is where the real work begins. Proper excavation is physically demanding but critically important. You're not just clearing a space; you're creating the vessel that will hold the entire patio system. The depth of your excavation depends entirely on the layers you'll be adding.
Here’s the simple math our team uses for a standard pedestrian patio:
Gravel Base: 4 inches (this is our recommended minimum for San Diego's soil conditions)
Sand Bed: 1 inch
Brick Height: Typically around 2.25 inches
Total excavation depth = 4" + 1" + Brick Height (above grade). So, you'll need to dig down about 7 inches from your desired final patio height. For example, if you want the patio to be 1 inch above the surrounding lawn, you'll need to dig down 6 inches from the current grade.
When excavating, make sure the area is about 6 inches wider on all sides than the final patio dimensions. This gives you room to work and ensures the base material extends beyond the paved edge for maximum support. Use your stakes and string lines to keep the area square and the depth consistent. And remember that slope. The bottom of your excavated area should have the same 1/4 inch per foot slope that your final patio will have. This ensures the entire system drains properly from the bottom up.
Step 2: Building an Unshakeable Base
If the patio is the stage, the gravel base is its concrete foundation. This layer provides drainage and structural support, preventing the shifting and settling that plagues poorly built patios. Get this wrong, and nothing else matters. The entire project will fail.
We use a crushed stone aggregate, often called Class II base rock here in California. It's a mix of different-sized crushed rock and fines that lock together beautifully when compacted. Decomposed granite (DG) can also be used, but we've found that crushed stone offers slightly better drainage over the long term.
Base Material
Pros
Cons
Our Recommendation
Crushed Stone (e.g., Class II Base)
Excellent drainage, superior compaction and interlocking, widely available.
Can be more difficult to level perfectly due to larger aggregate size.
Our top choice. The stability and drainage it provides are unmatched for creating a long-lasting patio foundation.
Decomposed Granite (DG)
Compacts into a very hard, stable surface, easy to grade and level.
Can have slower drainage than crushed stone, may contain more fine dust.
A solid alternative, especially for smaller projects where perfect leveling is a primary concern. Ensure it's well-compacted.
Spread the base material in layers, or "lifts." Don't just dump all 4 inches of gravel in at once. It won't compact properly. We recommend spreading a 2-inch layer, watering it lightly to help the particles settle, and then running the plate compactor over it multiple times. You'll know it's compacted when the machine starts to bounce more than vibrate. Then, add your next 2-inch layer and repeat the process. This meticulous, layer-by-layer approach is what creates an unyielding, monolithic base.
Check for level and slope constantly throughout this process. Use a long, straight 2x4 and a level to ensure your base is perfectly graded. Any imperfections here will be magnified in the final brick surface. This step is tedious, but it's the signature of professional work.
Step 3: Sand Setting Bed—The Secret to a Level Surface
With your rock-solid base complete, it's time for the setting bed. This is a 1-inch layer of coarse, washed concrete sand that the bricks will sit in. Its purpose is twofold: it provides a final, perfectly level surface to work on, and it helps lock the bricks in place from below. Do not use playground sand or fine mason's sand—they hold too much water and won't provide the necessary stability.
To get this layer perfectly uniform, we use a technique called "screeding." You'll need two 1-inch outside-diameter metal pipes (electrical conduit works great). Lay them parallel across your compacted base, a few feet apart. Now, pile your sand between them and use a straight 2x4 to pull or "screed" the sand across the top of the pipes. This removes the excess sand and leaves behind a perfectly smooth, 1-inch-deep bed. Remove the pipes carefully and fill in the indentations with a little extra sand, smoothing it over with a trowel. Work your way across the entire patio area, and be careful not to walk on or disturb the screeded sand.
This is a step that demands patience. A perfectly screeded sand bed is the key to a flat, professional-looking patio without any annoying lips or uneven spots between the bricks.
Step 4: Laying the Bricks—Artistry Meets Precision
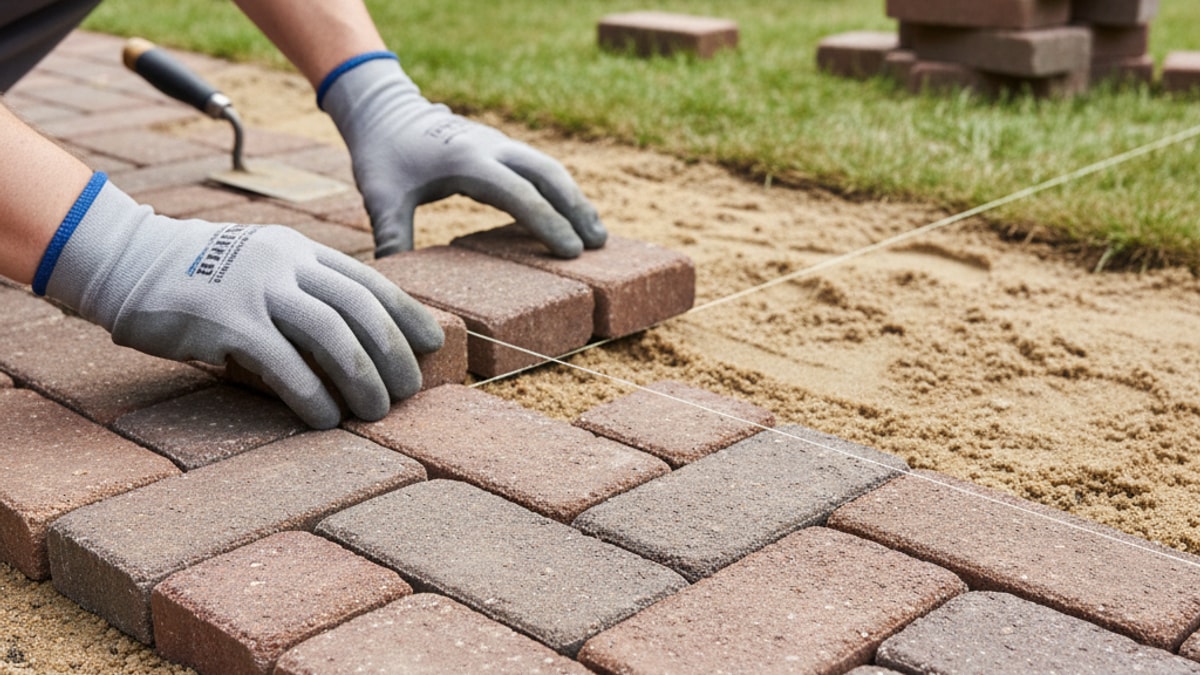
Now, for the part you've been waiting for. This is where your patio truly comes to life. Start in a corner—preferably against the house—and work your way outward. Place the bricks gently onto the sand bed; don't slide them or press them down too hard, as this will disturb the sand. Use your string lines along the edges to keep your rows perfectly straight.
Your chosen pattern will dictate the process. For a running bond, you'll simply lay one row after another, staggering the joints. For a herringbone, you'll be setting bricks at a 45-degree angle to your edge, which requires more careful alignment. Whatever your pattern, work from the top of the pile of bricks you're laying, not from the side. This prevents you from disturbing the sand bed you so carefully prepared.
Leave a small gap of about 1/8 inch between each brick. This space will be filled with jointing sand later to lock everything together. As you lay a section, you can use your rubber mallet to gently tap the bricks level with their neighbors. Place a level across several bricks at a time to check for flatness. It's a slow, methodical process, but the visual reward is immediate and incredibly satisfying. This is the part of our job that blends technical skill with a true sense of craftsmanship, a core value we talk about on our About page.
Step 5: Cutting and Edging—The Professional Finish
Unless your patio is a perfect rectangle designed to fit whole bricks (which is rare), you're going to have to make cuts. This is where renting that wet masonry saw pays for itself. Measure the space for your cut brick carefully, mark it with a pencil, and make your cut. A wet saw will give you a factory-perfect edge that looks clean and intentional.
Once all your bricks are laid and cut, you need to install edge restraints. This is another non-negotiable step. Without edging, the bricks on the perimeter will slowly creep outward, causing the joints to widen and the whole patio to fail. You can use plastic or metal edging designed for pavers, or you can create a concrete toe. We prefer the dedicated paver edging—it's fast, effective, and hidden from view once you backfill with soil or mulch. Secure the edging firmly into the gravel base with the provided stakes.
Step 6: Jointing and Compaction—Locking It All In
Your patio is laid, but it's not finished. The bricks are still just sitting loose on the sand. Now you have to lock them together into a single, unified surface. This is done with jointing sand and a final round with the plate compactor.
For the joints, you have two main options: regular jointing sand or polymeric sand. Regular sand is simple and cheap, but it can wash out over time and will allow weeds to pop through. Polymeric sand is a finer sand mixed with a polymer binder that activates with water. When it hardens, it locks the bricks together tightly, resists erosion, and dramatically inhibits weed growth. For the minimal extra cost, our team almost exclusively uses polymeric sand. The long-term benefits are just too significant to ignore.
Spread the sand over the entire dry surface of the patio. Use your push broom to sweep it back and forth across the bricks until every single joint is completely filled. It's important that the bricks are bone dry for this step, especially with polymeric sand. Once the joints are full, run the plate compactor over the entire patio. This vibrates the bricks, settles them firmly into the sand bed, and helps work the jointing sand deep into the gaps. You may need to sweep more sand in and repeat the process one more time to ensure the joints are packed tight.
Sealing Your Patio: The Final (and Critical) Step
After all that work, you need to protect your investment. If you used polymeric sand, follow the manufacturer's instructions for activating it, which usually involves a light misting of water. Be careful not to use too much pressure, or you'll wash the sand out of the joints.
Once the polymeric sand has cured (typically 24-48 hours), we highly recommend applying a quality paver sealer. A good sealer will protect the bricks from stains (like grease from a grill or spilled wine), prevent fading from UV rays, and make them easier to clean. It can also enhance the color of the bricks, giving them a rich, slightly wet look. It’s the final touch that elevates the project from good to great. Reapply the sealer every 3-5 years to keep your patio looking brand new.
Building a brick patio is a formidable project, but the reward is a beautiful, functional outdoor space that adds tremendous value and enjoyment to your home. It’s a testament to good planning and hard work. If this process feels a bit daunting, that's completely understandable. Achieving a professional result requires expertise, the right tools, and a lot of labor. That's why we're here. If you're in the San Diego area and would rather have a team of seasoned professionals handle it for you, don't hesitate to Contact us. You can BOOK MY FREE CONSULTATION and we'll be happy to discuss your vision.
For more inspiration and ideas on transforming your outdoor space, be sure to check out our Blog. We’re passionate about creating incredible landscapes, and we love sharing what we’ve learned. A well-built patio isn't just an improvement; it's a lifestyle upgrade, and we believe every homeowner deserves one they can be proud of for decades to come.
Frequently Asked Questions. Here are some common questions. Find the answers you're looking for below.
Can I build a brick patio on a slope?
Yes, but it requires careful planning. For a gentle slope, you can grade the base to follow the contour. For steeper slopes, you'll likely need to build a retaining wall to create a level terrace for the patio, which is a more complex structural project.
What's the difference between pavers and bricks?
Clay bricks are made from fired natural clay, offering a classic look and excellent color retention. Concrete pavers are made from a concrete mix, providing a wider variety of shapes and colors. Both are excellent options, but ensure you choose a product specifically rated for paving.
How deep should I excavate for a patio?
Our team recommends excavating about 7 inches below your desired final patio height. This accounts for a 4-inch compacted gravel base, a 1-inch sand bed, and the height of the brick itself. This depth is crucial for stability and proper drainage.
Do I really need to use a plate compactor?
Absolutely. We consider this a non-negotiable tool. A plate compactor ensures your gravel base is uniformly dense, preventing the sinking and heaving that ruins patios over time. A hand tamper simply cannot achieve the necessary level of compaction for a lasting result.
What is polymeric sand and is it necessary?
Polymeric sand is jointing sand mixed with a binder that hardens when wet. While not strictly necessary, we highly recommend it. It locks pavers together, prevents weeds, and resists being washed out by rain, saving you significant maintenance down the road.
How do I prevent weeds from growing between bricks?
The best defense is a properly compacted base, a quality landscape fabric beneath the base, and using polymeric sand for the joints. The polymeric sand creates a hard, durable barrier that makes it extremely difficult for weeds to take root.
What's the best brick pattern for a small patio?
For smaller spaces, a simple running bond or a basketweave pattern can make the area feel larger and less busy. A 45-degree herringbone pattern can also create a sense of spaciousness by drawing the eye along the diagonal lines.
How long should I wait before using my new brick patio?
You can typically walk on the patio immediately after the final compaction. However, if you've used polymeric sand and a sealer, you should wait 24-48 hours before placing heavy furniture on it to allow everything to fully cure.
Is it better to lay bricks on sand or mortar?
For most patios, a 'flexible' base of compacted gravel and sand is superior. It allows for slight ground movement without cracking and provides excellent drainage. A mortared ('rigid') patio is more like a concrete slab and is prone to cracking with ground shifts.
Can I lay a brick patio directly on dirt?
We strongly advise against it. Laying bricks directly on dirt without a proper base will lead to a disastrous result. The bricks will shift, sink, and become uneven within a single season as the ground settles and moisture levels change.
How much does a DIY brick patio cost compared to a professional one?
A DIY project primarily involves material costs and tool rentals, which can be significantly less than a professional installation. However, a professional build includes labor, expertise, heavy machinery, and a guarantee of longevity, which provides immense value and peace of mind.
What maintenance does a brick patio require?
Brick patios are very low-maintenance. We recommend sweeping it regularly, cleaning any stains as they occur, and reapplying a quality sealer every 3-5 years to protect the bricks and joints. An annual power wash can also keep it looking fresh.


.webp)
.webp)