So, you're dreaming of an outdoor kitchen. Grilling under the stars, cocktails on the counter, a perfect hub for family gatherings. The idea of a ready-to-assemble (RTA) kit seems like the perfect shortcut. The marketing is seductive, isn't it? Pictures of happy couples putting together their beautiful new kitchen in what looks like a single, sun-drenched afternoon. They make it seem as simple as building a bookshelf.
Let's be honest, though. As a team that designs and builds outdoor living spaces for a living, we've seen the other side. We’ve been called in to rescue projects that started with that same sunny optimism but quickly got bogged down in the messy reality of site prep, utility lines, and confusing instructions. The question we hear most often is, "How long does it really take to build a ready-to-assemble outdoor kitchen?" The answer is almost always longer than you think, and it has very little to do with how fast you can turn a wrench.
The "Weekend Project" Myth: Setting Realistic Expectations
First, let's clear the air. "Ready-to-assemble" is a manufacturing term, not a timeline guarantee. It means the core components—the steel frames, the cabinet boxes—are prefabricated in a factory to precise specifications. This is a massive advantage over a traditional masonry build, which involves building everything from scratch on-site. An RTA kit absolutely shaves weeks, sometimes months, off the total project time compared to a custom block-and-mortar kitchen.
But it doesn't mean the project is plug-and-play. It's a significant construction project that demands planning, preparation, and precision. Our team has found that the single biggest source of frustration for homeowners is the gap between the advertised "easy weekend build" and the practical reality of the work involved. It’s less like snapping together plastic blocks and more like assembling a sophisticated piece of performance equipment. Every part has a purpose, and the foundation it rests on is everything.
Think of it this way: the kit itself might only take a couple of days to assemble. That's the part everyone focuses on. But the work that makes that assembly possible? That’s where the real time is spent. And that’s what we need to unpack.
Phase 1: The Critical Pre-Assembly Work (Where Timelines Stretch)
This is the part of the process that’s rarely shown in the glossy brochures. It’s the unglamorous but absolutely essential foundation for your project. Honestly, our experience shows that 70-80% of the total project timeline for an RTA kitchen is spent right here, before you even open the first box. Skipping or rushing these steps is the fastest way to a crooked, unstable, and disappointing result.
Site Selection & Professional Design (1-3 Weeks)
You might think this takes an hour. You walk into your backyard, point to a spot, and say, "There." But it’s so much more nuanced. Where is the prevailing wind? Will the afternoon sun bake your grill master? How does it flow with your existing patio and backdoor? Is it close enough to your indoor kitchen to be convenient but far enough away that smoke won't pour into your living room?
This is where a thoughtful Landscape Design becomes invaluable. It's about creating a cohesive space, not just plopping an appliance island in the middle of your lawn. We consider everything from foot traffic to the view from your windows. A well-designed layout can be the difference between an outdoor kitchen you use every weekend and one that gathers dust. Rushing this initial planning phase is a mistake we see all too often.
Permitting and HOA Hurdles (2-8+ Weeks)
This is the timeline killer. The silent variable that can halt a project for months. Depending on your local municipality and the scope of your project, you may need permits for running new gas or electrical lines, for plumbing, or for the structure itself if it's attached to your home or covered. Do not assume you can skip this. We can't stress this enough: unauthorized work can lead to massive fines and even orders to tear down your beautiful new kitchen.
Navigating the bureaucracy of a building department is a formidable task. Then there's the Homeowners Association (HOA). They often have their own set of aesthetic rules and approval processes. Submitting plans, waiting for review, and getting that official stamp of approval takes time. A lot of time. This is a significant, sometimes dramatic, drag on your schedule that has nothing to do with physical labor.
Site Preparation & Foundation (2-7 Days of Labor)
Your RTA kitchen needs a perfectly flat, level, and stable surface to sit on. It cannot be placed directly on grass, dirt, or uneven ground. The entire structure will rack, the countertops will crack, and the doors won't close properly. It's a catastrophic failure waiting to happen.
This means you need a proper foundation. If you have an existing concrete patio in pristine condition, you might be in luck. But for most, this involves significant work:
- Excavation & Grading: Clearing the area, digging down, and ensuring proper slope for drainage.
- Creating the Pad: This usually means pouring a reinforced Concrete SAN Diego slab or installing a base of compacted aggregate for interlocking Pavers SAN Diego. Both are fantastic options, but they are multi-day jobs requiring specialized skills and equipment.
This phase alone can take the better part of a week, including curing time for concrete. This is heavy, back-breaking work that is often far beyond the scope of a casual DIY project.
Utility Rough-ins (3-7 Days)
Unless you're opting for a simple charcoal grill and a cooler, your outdoor kitchen will need utilities. This means running lines for:
- Natural Gas or Propane: For the grill, side burners, or fire features.
- Electricity: For the refrigerator, outlets, and essential Landscape Lighting SAN Diego.
- Water & Drainage: For the sink and ice maker.
This work is not optional, and it's not for amateurs. It requires licensed plumbers and electricians to trench lines, make safe connections, and pass inspections. This phase involves coordinating different tradespeople, which adds another layer of complexity and potential delays to your timeline. It's a critical, non-negotiable element that must be done correctly for safety and functionality.
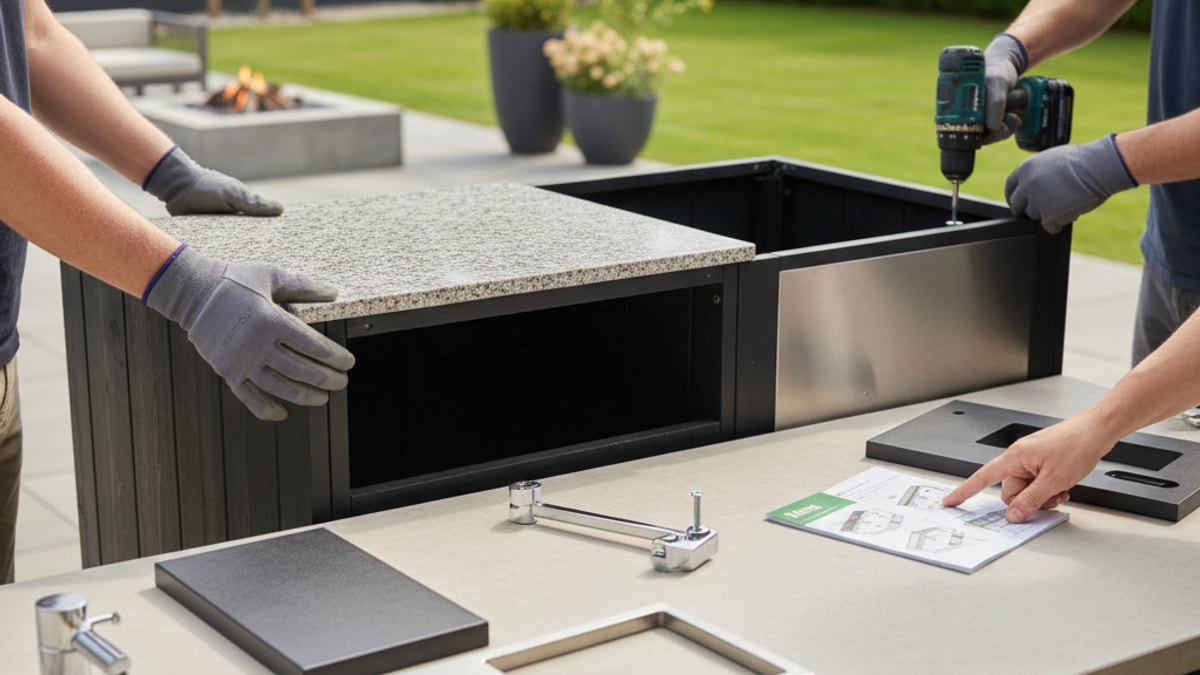
Phase 2: The Actual RTA Kit Assembly (The Fun Part)
Okay, after all that prep work, you’re finally ready to build. Your foundation is perfect, your utility lines are stubbed out and waiting, and the delivery truck has dropped off a pallet of very heavy boxes. Here's what the assembly itself looks like.
Unpacking & Inventory (2-4 Hours)
It’s tempting to tear open the boxes and start building. Don't. Our team has learned this lesson the hard way. Take the time to carefully unpack everything. Lay out all the frames, panels, and hardware. Cross-reference every single piece with the packing list. It’s a soul-crushing experience to be 90% done with the build on a Saturday afternoon only to discover a critical bracket is missing or a panel was damaged in shipping. This simple step can save you days of frustration.
Frame Assembly (1-2 Days)
This is the core of the RTA system. You’ll be connecting the galvanized steel frames together to form the modules of your kitchen island. With two reasonably handy people and clear instructions, this can typically be done in a full day or over a weekend. The key here is precision. Use a level constantly. Check for square. A single frame that’s off by a quarter of an inch can create a cascade of problems with cladding and countertops later. It’s straightforward work, but it demands patience.
Installing Cement Board & Cladding (1-3 Days)
Once the frame is built, you'll attach cement backer board to the exterior. This creates the substrate for your chosen finish material. Then comes the cladding—the stone veneer, brick, stucco, or tile that gives your kitchen its final look. This is where artistry comes in. Cutting stone veneer to fit perfectly, getting tight mortar joints, or applying a smooth stucco finish is a skill. For a DIYer, this can be the most time-consuming part of the assembly, easily taking up a full weekend or more.
Countertop Installation (1 Day, plus a 1-3 Week Wait)
Here’s another hidden delay. For solid surface countertops like granite, quartz, or concrete, the fabricator doesn't just show up with a finished slab. They first need to come to your home to create a precise template after your kitchen base is fully assembled and clad. Once they have the template, it typically takes one to three weeks to cut, polish, and prepare your countertop for installation. The actual installation day is quick—usually just a few hours—but that waiting period in between can be a surprise if you're not prepared for it.
Appliance Installation & Final Hookups (1-2 Days)
This is the final stretch. You’ll be setting your grill, refrigerator, sink, and access doors into their designated cutouts. Then, the licensed electrician and plumber you hired for the rough-in phase will return to make the final connections. They'll hook up the gas line to the grill, connect the water to the sink, wire the outlets, and ensure everything is safe, up to code, and working perfectly. This is the moment it all comes to life.
A Realistic Timeline Breakdown
To make this tangible, let's compare a few scenarios. We've found this helps homeowners visualize the true scope of the project far better than a simple number.
| Task / Phase |
The Ideal DIY (Perfect Site) |
The Realistic DIY (Needs Prep) |
The Professional Turnkey Approach |
| Planning & Design |
1 Week |
2-3 Weeks |
1-2 Weeks (handled by us) |
| Permitting & HOA |
2-4 Weeks |
4-8+ Weeks |
2-8+ Weeks (managed by us) |
| Site Prep & Foundation |
0 Days (existing patio) |
4-7 Days |
2-4 Days (our expert crews) |
| Utility Rough-ins |
2-3 Days |
3-7 Days |
2-4 Days (our coordinated team) |
| Total Pre-Assembly Time |
3-5 Weeks |
9-18+ Weeks |
5-14+ Weeks (Stress-Free) |
| RTA Kit Assembly (Frames) |
1-2 Days |
1-2 Days |
1 Day |
| Cladding & Finishing |
2-3 Days |
2-4 Days |
1-2 Days |
| Countertop Template & Wait |
1-3 Weeks |
1-3 Weeks |
1-2 Weeks (our partnerships) |
| Countertop & Appliance Install |
1-2 Days |
1-2 Days |
1 Day |
| Total Assembly Time |
~2-4 Weeks |
~2-4 Weeks |
~1-3 Weeks |
| GRAND TOTAL PROJECT TIME |
5-9 Weeks |
11-22+ Weeks (3-5 Months) |
6-17+ Weeks (Managed for You) |
See the difference? The actual assembly time is remarkably similar across the board. The real variable—the place where projects live or die—is in the preparation. The "Realistic DIY" scenario, which applies to the vast majority of homeowners, can easily stretch into a multi-month endeavor.
Factors That Can Wreck Your Timeline
Even with the best plan, things can go wrong. Our teams are masters of contingency planning because, in construction, the unexpected is always expected. Here are the most common timeline-busters we see:
- The Weather: A week of solid rain can halt all foundation work. A sudden heatwave can make working with mortar or concrete impossible. It’s the one variable no one can control.
- The "Helper" Problem: You planned the build with a friend or family member. But life happens. They get sick, have other commitments, or simply aren't as skilled as you thought. Suddenly, your two-person job becomes a one-person struggle.
- Shipping Issues: A freight company damages a critical component. The manufacturer forgets to pack the hardware kit. These things happen, and getting replacement parts can take days or even weeks, leaving your project in limbo.
- Scope Creep: This one is insidious. You start with the kitchen, but then think, "You know what would be great? A Patio Covers Pergolas SAN Diego over this! And maybe some Seat Retaining Walls for extra seating." While these are fantastic additions that create a more complete outdoor room, each one adds significant time, complexity, and cost to the project.
The Professional Advantage: Speed, Certainty, and Sanity
Looking at that timeline can be daunting. It's meant to be realistic, not discouraging. It highlights that building an RTA kitchen is a serious undertaking. This is why many homeowners ultimately decide that their time and sanity are worth more than the money they might save on labor.
When you work with a full-service design-build firm like Modern Yardz, you're not just hiring labor; you're hiring a project manager, a logistics expert, and a problem-solver. We streamline the entire process. Our designers create the perfect layout. Our administrative team handles the permits and the HOA submissions. Our dedicated crews for site work, masonry, and installation work in a coordinated sequence, eliminating the dead time spent waiting for different contractors.
Our experience shows that we can execute the entire project—from initial design to final cleanup—in a fraction of the time a typical DIYer can, and without the costly mistakes that can arise from inexperience. We have established relationships with suppliers and countertop fabricators, often shortening those lead times. What might take a homeowner every weekend for four months, our team can often complete in a matter of weeks.
It’s about trading the grueling road warrior hustle of DIY for the peace of mind that comes from knowing it’s being done right, and done efficiently. If you'd rather spend your summer enjoying your new outdoor kitchen instead of building it, you can always BOOK MY FREE CONSULTATION and let our team show you what's possible.
An RTA outdoor kitchen is a phenomenal investment in your home and your lifestyle. It’s a project that brings families and friends together. But going into it with a clear, unvarnished understanding of the true timeline is the most critical first step. Whether you choose to tackle it yourself or bring in professionals, knowing what lies ahead is the key to a project that ends in celebration, not frustration.


.webp)
.webp)