A beautiful paver patio can absolutely transform an outdoor space. It creates a seamless transition from your home to your yard, offering a functional, elegant spot for grilling, relaxing, and making memories. We’ve seen it time and time again across San Diego—a well-designed patio becomes the true heart of the backyard. But the difference between a patio that looks stunning for decades and one that’s a lumpy, weed-infested mess in two years comes down to one thing: the process. It's all in the prep work.
Our team at Modern Yardz has spent years designing and installing custom hardscapes, from sprawling outdoor kitchens to intimate fire pit areas. We’ve learned—often through fixing others’ mistakes—what truly makes a paver installation last. So, we're pulling back the curtain and walking you through exactly how to lay patio pavers using the methods our professional crews follow. This isn't just a quick overview; it's a deep dive into the non-negotiable steps that ensure your hard work pays off. Ready? Let's get to it.
First Things First: Planning Your Paver Masterpiece
Don't even think about touching a shovel yet. Honestly, this is where more than half of all DIY patio projects go wrong. A lack of planning is a catastrophic, yet completely avoidable, mistake. Rushing this stage is like building a house without a blueprint. You might get walls up, but you won't like the result.
First, consider the function. What's the primary use for this space? Is it a cozy nook for two, a sprawling entertainment area, or a simple walkway? The function dictates the size and shape. Use a garden hose or marking paint to lay out the potential footprint on the ground. Live with it for a few days. Walk around it. Place some outdoor furniture inside the lines. Does it feel cramped? Too big? Adjust it until it feels just right. Our design team often reminds clients that flow is everything—how will people move from the house, to the patio, to the rest of the yard?
Now, let's talk about the single most important technical aspect of planning. Drainage. We can't stress this enough. Water is the mortal enemy of a paver patio. If it pools on the surface or erodes the base, your patio is doomed. You must plan for a slope, a very slight, almost imperceptible grade that directs water away from your home's foundation. The industry standard is a drop of about one-quarter inch for every foot of patio length. So, a 12-foot patio should be about 3 inches lower on the far end than it is against the house. This is critical, non-negotiable stuff.
Finally, check with your local authorities and HOA. San Diego has specific regulations, and you might need a permit depending on the size and scope of your project. It's a quick call that can save you a world of headaches later. This is also the time to call 811 to have public utility lines marked. Hitting a gas or water line is a surefire way to turn your weekend project into an emergency.
Gathering Your Arsenal: Tools and Materials
Having the right gear makes all the difference. You can rent the heavy-duty equipment, but the hand tools are worth owning. Here's what our crews at Modern Yardz consider essential for any paver installation.
Essential Tools:
- Shovel (Flat and Spade): For digging and moving material.
- Wheelbarrow: A heavy-duty one. You'll be moving tons of material—literally.
- Tape Measure: For everything.
- Level (4-foot and 8-foot): Crucial for checking your slope and keeping pavers even.
- Rubber Mallet: For tapping pavers into place without damaging them.
- Stakes and String Line: Your best friend for keeping lines straight and grades consistent.
- Hand Tamper: For compacting small areas.
- Plate Compactor: This is a must-rent item. A hand tamper just won't cut it for the base. Don't skip this. We mean it. Compaction is the key to longevity.
- Paver Saw (Wet Saw) or Angle Grinder with a Diamond Blade: For making precise cuts around edges and obstacles. Renting a wet saw is usually the best bet for a clean, professional finish.
- Broom (Stiff Bristle): For sweeping sand into the joints.
- Safety Gear: Gloves, safety glasses, dust mask, and steel-toed boots.
Materials Breakdown:
- Pavers: The star of the show! They come in a dizzying array of styles, colors, and materials—concrete, brick, natural stone. Choose one that complements your home's architecture. Remember to order about 5-10% extra to account for cuts and potential breakage.
- Class II Road Base (or equivalent crushed stone): This is the foundation of your patio. It’s a mix of crushed rock and fines that compacts into a nearly solid, stable base.
- Bedding Sand: Coarse, washed concrete sand is what we use. This is the 1-inch layer the pavers are actually set in. Do NOT use play sand or fine masonry sand; it's too soft and won't drain properly.
- Edge Restraints: These are absolutely mandatory. They can be plastic, metal, or a concrete curb, and they hold the entire system together, preventing pavers from shifting and separating over time.
- Polymeric Sand: This special sand is swept into the joints and then activated with a light mist of water. It hardens to lock the pavers together, prevent weed growth, and resist erosion.
When you're ready to start exploring options, our Services page showcases some of the incredible paver projects we've completed. It might just give you the inspiration you need.
The Hard Part: Excavation and Base Preparation
Alright, this is where the real work begins. The strength and longevity of your patio are built from the ground up, and this stage is 90% of the battle. Skimp here, and you'll be fixing it in a year. We've seen it happen.
The first step is excavation. You need to dig out the entire patio area to a specific depth. But how deep? It depends on your soil and climate. Here in San Diego, our soils can be quite varied, from sandy loam to heavy clay. For a standard pedestrian patio, a good rule of thumb is to calculate the depth like this:
- Paver Height (usually 2 3/8 inches)
- Sand Bedding Layer (1 inch)
- Compacted Base Material (4-6 inches)
So, you’re looking at a total excavation depth of 7 to 9 inches. If the patio will support heavier loads, like a vehicle or a large outdoor kitchen, we recommend a deeper base of 8-12 inches. Use your stakes and string lines to mark out the perimeter and the final height of the patio, making sure to incorporate that crucial quarter-inch-per-foot slope. Dig out all the grass, topsoil, and any large roots until you reach stable subsoil.
Once excavated, you need to compact the native subsoil with the plate compactor. This creates a solid starting point. Go over the entire area at least twice. Any soft spots now will become sunken spots later.
Now, it's time to build the base. This is done in layers, or “lifts.” Don't just dump all 6 inches of your Class II base in at once. It won't compact properly. Add the base material in 2- to 3-inch lifts. Spread it evenly, then use the plate compactor to go over the entire area multiple times until it's rock-solid. You'll repeat this process until you've reached your desired base height. Use your level and string lines constantly to check your grade. This process is tedious, but it’s the single most critical element of the entire project.
| Base Material Option |
Best For |
Compaction |
Cost |
Our Team's Take |
| Class II Road Base |
All-purpose patios, driveways |
Excellent |
$$ |
This is our go-to standard. It's a proven, incredibly stable material that provides superior load-bearing and drainage. The mix of stone sizes locks together perfectly. |
| 3/4" Crushed Stone |
Pedestrian patios, good drainage |
Good |
$$ |
A solid choice, especially in areas needing excellent drainage. It doesn't compact quite as tightly as Class II because it lacks the 'fines' (smaller particles). |
| Paver Base Panels |
Small projects, difficult access areas |
N/A |
$$$$ |
These are lightweight, interlocking panels. They're fast to install and reduce excavation depth, but they're expensive and less proven for long-term stability in all soil types. |
| Sand-Only Base |
Not Recommended |
Poor |
$ |
We strongly advise against this. Sand shifts, washes out, and doesn't provide the structural support pavers need. It's a recipe for a wavy, failing patio. |
Laying the Screed and Setting the Pavers
With your base perfectly compacted and graded, it's time for the sand bedding layer. This is the 1-inch layer that you'll set the pavers into. To get it perfectly level, you'll need to set up “screed rails.” These are typically 1-inch outside diameter metal pipes or conduits. Lay them on top of your compacted base, parallel to each other and about 6-8 feet apart.
Shovel the coarse bedding sand between the rails. Then, take a straight 2x4 and, resting it on the two rails, pull it towards you in a sawing motion. This will “screed” the sand off, leaving a perfectly smooth and level 1-inch bed. Carefully remove the rails and fill in the small trenches with sand, smoothing them with a trowel. Now you have your setting bed. And—this is important—do not walk on or compact this sand layer! You'll be working from the laid pavers backward.
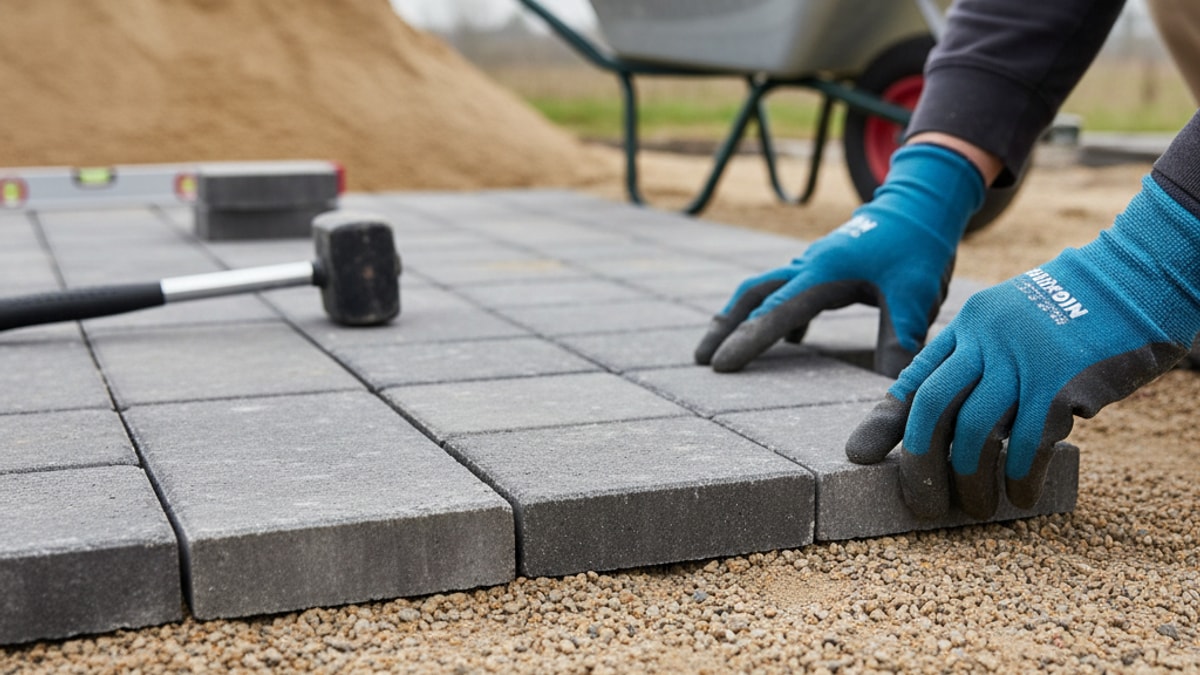
Here’s where the fun starts. Begin laying your pavers in a corner, typically against the house. Place them gently onto the sand bed—don't press or hammer them in yet. They should fit snugly together, but not forced. Most pavers have small spacer bars on the sides to ensure consistent joint lines. Work your way outward in your chosen pattern (herringbone, running bond, basketweave, etc.). Check your alignment with your string lines every few rows to make sure you're staying straight.
It’s a meticulous process. But seeing your design come to life is incredibly rewarding. This is the craft that our team at Modern Yardz has perfected over years of experience, and it's what separates a good patio from an impeccable one. You can learn more about our philosophy on our About page.
Making the Cuts and Installing Edge Restraints
Unless your patio is a perfect rectangle built with pavers of a corresponding size (which is almost never the case), you’re going to have to make cuts. This is where your project goes from looking like a DIY job to a professional installation.
A rented wet saw is the best tool for this. It uses a diamond blade and a stream of water to make clean, precise cuts through dense concrete or stone pavers with minimal dust. Measure the gap you need to fill, mark the paver with a pencil, and carefully guide it through the saw. Always wear your safety glasses!
As you reach the edges of your patio, it's time to install the edge restraints. This is a non-negotiable step. Without them, the pavers at the perimeter will slowly creep outward under pressure, creating widening gaps and causing the whole system to fail. Place the plastic or metal edging directly against the outer pavers and secure it into the compacted base using the long metal spikes provided, hammering them in every 12-18 inches.
This rigid border is what locks everything in place. It's the silent hero of the paver patio, and its importance cannot be overstated. We've been called to repair too many patios where this simple, crucial step was skipped.
The Final Lock-In: Jointing and Compaction
Your pavers are laid, the cuts are made, and the edging is secure. The patio looks almost finished, but the final steps are what truly unite it into a single, solid surface.
First, sweep the entire surface clean of any debris. Then, spread your polymeric sand over the dry pavers. Using a stiff-bristle push broom, sweep the sand back and forth across the surface until every single joint is completely filled. It’s important to get the sand all the way to the bottom of the joints.
Now, you need to run the plate compactor over the top of the pavers. This does two critical things: it settles the pavers firmly into the sand bed, creating a smooth, level surface, and it vibrates the sand deep into the joints, ensuring a tight lock. You’ll want to go over the entire patio a couple of times. Don't worry, the compactor won't crack the pavers.
After compaction, you may notice the joints have settled a bit. That's normal. Sweep more polymeric sand into the joints until they are full again. Then, use a leaf blower on a low setting (or a soft broom) to gently blow all the excess sand off the surface of the pavers. This is a really important detail. Any polymeric sand left on the paver surface can create a hazy film when activated with water. Be meticulous here.
Finally, it's time to activate the sand. Set your hose nozzle to a very fine mist or shower setting. Gently wet the patio, starting at the highest point and working your way down. You want to apply just enough water to saturate the joints without washing the sand out. Follow the specific instructions on the polymeric sand bag, as wetting times can vary. Let it cure for 24-48 hours without foot traffic, and you're done. You've built a solid, interlocking surface that will stand the test of time.
This entire process, from design to the final sweep, is something we live and breathe. It's why our Home page is filled with projects we're proud of. But we also know it's a formidable task for a homeowner. If you're feeling overwhelmed, that's completely normal. Sometimes the best DIY decision is knowing when to call a pro. If you're in the San Diego area and want to discuss your project, you can always Contact us.
To Seal or Not to Seal?
This is a common question we get. Sealing a paver patio is an optional step, but one we often recommend. A good quality sealer can enhance the color and texture of the pavers, protect them from stains (like oil or red wine), and make them easier to clean. It also helps to further harden the joint sand and can inhibit moss or algae growth, which can be a consideration in some of San Diego's microclimates.
If you choose to seal, wait at least 30-60 days after installation to allow any efflorescence (a natural, white, chalky substance) to come out of the pavers. Make sure the patio is perfectly clean and dry before applying the sealer with a roller or sprayer on a calm, overcast day. You'll typically need to reapply it every 3-5 years to maintain protection.
There's a lot that goes into a truly professional paver installation. It's a blend of artistry, engineering, and just plain hard work. While a DIY project can be incredibly rewarding, it requires patience and an unflinching commitment to getting the prep work right. For more ideas and tutorials, you can always check out our company Blog.
And if you've read through this and decided you'd rather spend your weekends enjoying your backyard instead of building it—we get that, too. That's why we're here. The difference between a DIY patio and a professionally installed one often lies in the nuanced details—the precise grading, the flawless cuts, and the deep understanding of how materials behave over time. If you want to ensure a perfect result without the back-breaking labor, we invite you to BOOK MY FREE CONSULTATION. Our team would be happy to walk through your vision and show you how we can bring it to life.


.webp)
.webp)