A pool safety cover isn't just a piece of material you throw over the water in the off-season. It's an engineered safety system. Let's be honest, it's the final, critical piece of the puzzle that provides peace of mind for homeowners, especially those with children or pets. We’ve seen firsthand how a properly installed cover transforms a potential hazard into a secure, protected space. It’s a significant part of a holistic backyard design, as important as the pool itself.
But that feeling of security hinges entirely on one thing: a perfect installation. A cover that’s loose, misaligned, or improperly anchored isn't just an eyesore; it's a failure of the entire system. Over the years, our team has been called in to fix countless DIY installations gone wrong, and the mistakes are almost always the same. This isn't just about following instructions in a box. It’s about understanding the forces at play and respecting the precision required. So, we're pulling back the curtain to show you how to install a pool safety cover the way professionals do it—with meticulous attention to detail.
Why a Professional-Grade Installation Matters
Can you install a pool safety cover yourself? Absolutely. Should you? That’s a more complicated question. The difference between a weekend DIY attempt and a professional installation often comes down to nuance, experience, and the right tools. It’s the difference between “good enough” and truly secure.
We can't stress this enough: the tension is everything. A safety cover works by creating a taut, drum-like surface that can support significant weight. This tension is achieved through a precise grid of anchors drilled into your pool deck. If even a few of these anchors are off by as little as half an inch, it can create wrinkles, uneven stress on the springs, and weak spots in the cover. Over time, this leads to premature wear, stretched material, and a compromised safety barrier. We’ve seen it happen.
Furthermore, the type of decking you have dramatically changes the game. Drilling into poured concrete is a completely different animal than drilling into delicate travertine pavers or wood decking. One wrong move with a heavy-duty rotary hammer can crack an expensive paver, creating a much bigger, costlier problem. Our experience with custom [Pavers SAN Diego] installations and specialized [Concrete SAN Diego] finishes gives us an intimate understanding of how these materials behave under pressure. It's not just about drilling a hole; it's about preserving the integrity of the beautiful outdoor space you've invested in.
Ultimately, a professional installation is an investment in certainty. It’s knowing the job was done to exacting standards, that every anchor is perfectly placed, and that the cover will perform exactly as designed when you need it most. That’s the standard we hold for all our [Pools AND Spas] projects, where safety integration is part of the initial conversation, not an afterthought.
Before You Begin: The Pre-Installation Checklist
Preparation is more than half the battle. Rushing into the drilling phase without a solid plan is a recipe for disaster. Before you even unbox the cover, you need to go through a rigorous pre-installation check. This is the exact process our teams follow on every job site.
First, confirm your measurements. When you ordered the cover, you (or the manufacturer) should have taken precise measurements of your pool. Double-check them. Lay the cover out on your lawn and measure its actual dimensions. Do they match the plan? A cover that's too small is useless, and one that's too large will never achieve proper tension. It sounds basic, but you’d be surprised how often a simple measurement error at the start can derail the entire project.
Next, thoroughly inspect your pool deck. You need at least three feet of solid, unobstructed concrete or paver decking around the entire perimeter of the pool. Look for cracks, chips, or unstable sections. Attempting to drill and set an anchor in compromised material is a fool's errand; the anchor will eventually pull loose, rendering that point on the cover useless. If you find significant issues, they need to be addressed before you can proceed. This is where a comprehensive [Landscape Design SAN Diego] plan becomes invaluable, as it accounts for the long-term stability of all hardscaping from day one.
Finally, read the manufacturer's instructions. Yes, we're giving you our professional method, but every cover brand has its own specific requirements for spring placement, overlap, and anchor spacing. The manufacturer’s guide is your primary technical document. Our guide provides the technique and professional insights to execute those instructions flawlessly. Ignore the manufacturer at your own peril.
Tools of the Trade: What You'll Absolutely Need
A project like this is won or lost based on your tools. Using the wrong equipment won't just make the job harder; it can actively damage your cover, your drill bits, or your deck. Our team uses a specific set of professional-grade tools to ensure precision and efficiency. Here’s a breakdown of what’s essential versus what’s simply helpful.
| Tool Category |
Essential Tools (Non-Negotiable) |
Professional Upgrades (Nice-to-Have) |
| Drilling |
Heavy-Duty Rotary Hammer Drill (SDS or SDS-Plus) |
A corded model for consistent power. |
| Measurement |
3/4" Concrete Drill Bit (for standard anchors), Chalk Line, 100-ft Measuring Tape |
Laser level for confirming deck evenness. |
| Installation |
Anchor Tamping Tool, Installation Rod (for spring tension), Heavy Rubber Mallet, Allen Wrench (for anchor bolt) |
A dedicated spring compression tool. |
| Safety |
High-Quality Safety Goggles, Work Gloves, Knee Pads |
Dust extractor/shop vacuum for drilling cleanup. |
| Marking |
Wax Crayon or Soapstone |
Paint pen for more permanent markings. |
We mean this sincerely: do not attempt this job with a standard cordless drill. You will burn out the motor and barely scratch the surface of the concrete. A rotary hammer is designed for this specific task. It hammers as it spins, pulverizing the concrete and creating a clean, perfect hole for the anchor to sit in. It's a critical, non-negotiable element of the process.
Step-by-Step: How to Install a Pool Safety Cover (The Modern Yardz Method)
Alright, you've done your prep work, and your tools are laid out. It's time to get to work. Follow these steps meticulously, and don't rush. Precision is your best friend.
Step 1: Laying Out and Positioning the Cover
First, unpack the cover and lay it gently over the pool. The label or tag side should be facing up. With a helper, pull the cover across the water so it's floating. Now, position it so the overlap is equal on all sides. For a rectangular pool, this means if you have a 3-foot overlap, you should have 18 inches of cover resting on the deck on each of the four sides. Use your measuring tape. Get this perfect. This initial positioning dictates the placement of every single anchor.
Step 2: Marking the First Anchor Point (The Most Critical Step)
This is where it all begins. Choose one corner of the pool—preferably the one closest to the house or main patio area, as it's a key reference point. Pull the corner strap out straight, in line with the corner of the cover. The goal is to set the anchor so that the spring attached to the strap will be compressed about halfway when it's engaged. A good rule of thumb is to pull the strap taut and mark your drill spot about 18-24 inches from the end of the strap loop. Use your wax crayon to make a clear, bold 'X' on the deck.
Don't drill yet. Just mark it.
Step 3: Drilling the Anchor Holes - A Nuanced Approach
Put on your safety goggles. Insert the 3/4" concrete drill bit into your rotary hammer. Set the drill to hammer mode. Place the tip of the bit directly on the center of your 'X' and begin drilling straight down. Don't force it; let the weight of the tool do the work. You need to drill to the depth specified by the anchor manufacturer, which is typically around 2 inches. A piece of tape wrapped around your drill bit can serve as a handy depth gauge.
Once the hole is drilled, use a shop vac or a can of compressed air to blow out every last bit of concrete dust. This is crucial. Any debris left in the hole can prevent the anchor from seating correctly.
Step 4: Installing the Brass Anchors
Now, take your brass anchor. It consists of two parts: a barrel and a screw insert. Make sure the insert is screwed down into the barrel so it's flush or just below the top. Place the anchor into the clean hole. It should be a snug fit. Use your rubber mallet and the special tamping tool (a steel rod that fits inside the anchor) to gently tap the anchor down until its top lip is perfectly flush with the pool deck surface. It cannot be sticking up, or it becomes a serious trip hazard in the summer.
Once it's flush, use the Allen wrench to turn the center screw clockwise. This flares out the bottom of the anchor barrel, locking it permanently into the concrete. You'll feel it tighten up. Don't over-torque it, just make it snug.
Step 5: Attaching the First Corner and Tensioning
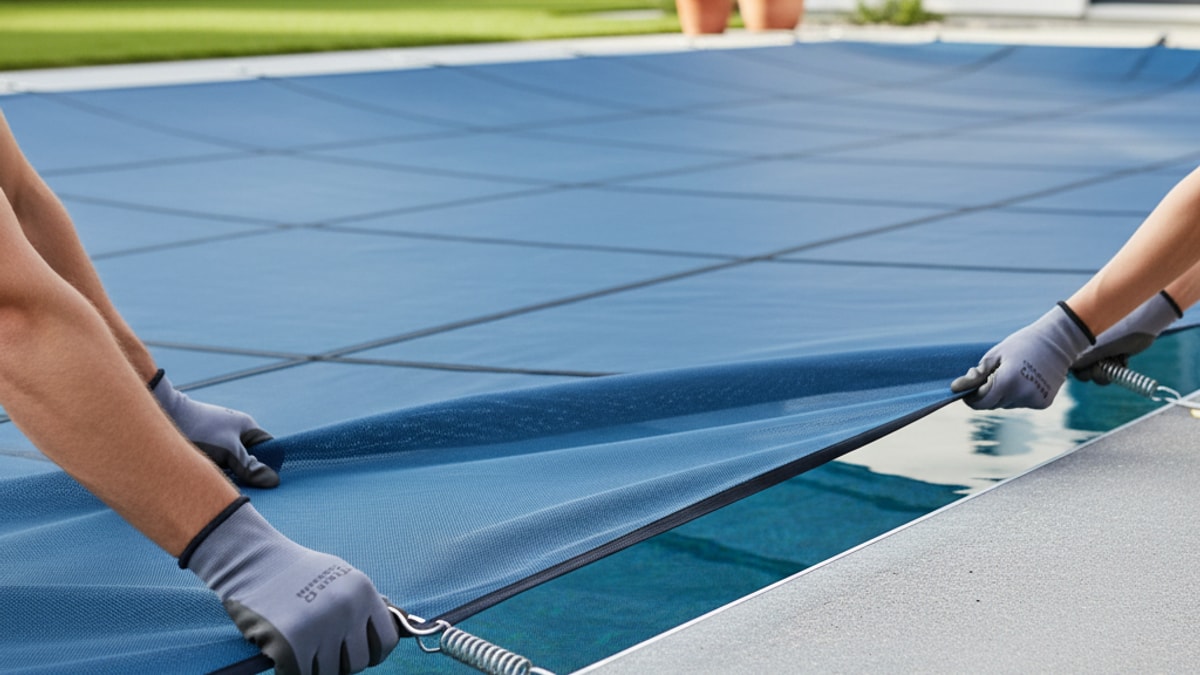
With your first anchor installed, you can attach the first corner. Take the spring that came with the cover and loop it through the corner strap. Use the steel installation rod as a lever. Hook one end of the rod into the loop on the spring and place the other end over the anchor head (which you'll screw up slightly from its flush position). Now, pull back on the rod like a lever. This will stretch the spring and allow you to slip its loop over the anchor head. Release the tension, and your first corner is attached!
Step 6: Squaring the Cover and Marking Subsequent Anchors
This step requires patience. Go to the corner diagonally opposite the one you just anchored. Pull the cover as taut and square as you can by hand. The seams on the cover should run parallel to the edges of the pool. Once it's perfectly square, repeat the process: pull the strap straight out, mark the anchor point, drill, clean the hole, and install the second anchor.
Now you have two opposing corners anchored. This holds the cover in place while you work. Next, do the other two corners, always pulling the cover taut and ensuring it remains square. With all four corners anchored, your cover should be taking shape. Now, you can begin marking and drilling the rest of the anchor points along the sides. Use your chalk line to snap straight lines between the corner anchors. This ensures all your side anchors will be in a perfectly straight row, which is aesthetically critical. Most manufacturers recommend spacing anchors every 3 to 5 feet, but check your manual.
Step 7: Installing the Remaining Anchors and Springs
Now it's just a matter of repetition. Work your way around the pool, marking, drilling, and installing each anchor one by one. Our team's advice is to install all the anchors first before attaching any more springs (beyond the first four corners). This prevents you from fighting against the cover's tension as you work. It’s a workflow we’ve refined over years.
Once all the anchors are in the deck, you can start attaching all the remaining springs. Use the installation rod for leverage on each one. It's a workout, but it's the only safe way to do it. You'll develop a rhythm.
Step 8: The Final Tensioning and Adjustments
With all springs attached, step back and look at the cover. It should be taut, with no major wrinkles or sagging areas. You can make minor adjustments by tightening or loosening the buckles on the straps. The goal is to have all the springs compressed to a similar degree—about 50-60% of their total range. This even distribution of tension is the key to a long-lasting and, most importantly, safe installation.
Common Pitfalls and How to Sidestep Them
Our experience shows that most DIY installation issues fall into a few common categories. Here's what to watch out for.
First, misaligned anchors. This is the big one. If your grid of anchors isn't perfectly square and spaced correctly, the cover will never sit right. It will have wrinkles, and some springs will be over-stressed while others are slack. The solution? Measure three times, drill once. Use a chalk line for perfectly straight rows. Don't eyeball it.
Second, incorrect tension. Too loose, and the cover can sag and collect water, defeating its purpose. Too tight, and you put immense strain on the straps, springs, and anchors, leading to premature failure. The “halfway compressed” rule for the springs is your best guide. It provides enough tension to be safe without over-stressing the components.
Another huge issue we see is damage to the pool deck. This usually happens from using the wrong drill, applying too much pressure, or not paying attention when drilling near the edge of a paver. Go slow, let the tool work, and always ensure you have enough solid material around your drill point to support the anchor. If you're working with a deck that's part of a larger project, perhaps including new [Seat Retaining Walls] or an [Outdoor Kitchens SAN Diego], protecting that investment is paramount.
Finally, ignoring obstructions. Deck drains, ladders, or handrails need to be accounted for. Most cover manufacturers offer special hardware and cutouts for these, but they must be planned for in advance. A last-minute discovery of a handrail in the way can stop the project in its tracks.
Mesh vs. Solid Covers: Which is Right for Your Yard?
Choosing the right type of cover is just as important as the installation. The two main options are mesh and solid, and each has distinct advantages and disadvantages.
A mesh safety cover is lightweight and allows water (rain and snowmelt) to pass through directly into the pool. This eliminates the need for a cover pump and prevents heavy, dangerous puddles from forming on the surface. The downside is that fine silt and sunlight can also get through, which can lead to some algae growth by the time you open the pool in the spring. They are, however, generally considered the highest level of safety because they don't allow any water to accumulate.
A solid safety cover, on the other hand, blocks out everything—water, sunlight, and debris. This means your pool water will be much cleaner and clearer when you open it. The trade-off is that any precipitation that falls on the cover will stay there. You must have an automatic cover pump to remove this water, as even a few inches can create a significant safety hazard. Solid covers are much heavier and can be more cumbersome to handle during installation and removal.
Which one is right for you? It depends on your priorities. Do you value the utmost safety and low maintenance during the off-season? Go with mesh. Do you want the cleanest possible water at opening time and don't mind managing a cover pump? A solid cover might be a better fit. It's a key decision in your overall plan for your [Pools AND Spas] area.
For many homeowners, the complexity of these choices and the precision required for installation make professional assistance a wise choice. It’s about more than just one project; it's about ensuring the safety and longevity of your entire outdoor living space. If you feel the project is beyond your scope, don't hesitate. You can always BOOK MY FREE CONSULTATION with our team to discuss a professional installation.
Properly caring for your cover ensures it will protect your pool for many years. Regularly clear off any leaves and debris, especially before they become a heavy, soggy mess. For solid covers, ensure your cover pump is always working. When you remove the cover for the season, clean it thoroughly with a gentle soap and a soft brush, let it dry completely, and store it in its protective bag in a cool, dry place. A little maintenance goes a long way.


.webp)
.webp)