A pool ladder isn't just a piece of metal; it's the bridge between a relaxing afternoon on the deck and a refreshing dip in the water. It’s a critical safety feature. And when it’s installed incorrectly? Well, it becomes a wobbly, hazardous mess that can damage your beautiful pool deck and, far worse, cause serious injury. Our team has seen it all, from improperly set anchors to ladders that just weren't right for the pool's design. We believe getting this right is non-negotiable.
So, you're ready to tackle this project. That's great. We're here to walk you through the process just like we would for one of our own projects. This isn't just about drilling a few holes. It's about understanding your materials, using the right hardware, and ensuring the final result is as sturdy and reliable as the rest of your backyard oasis. Let's get this done right, together.
Before You Begin: The Non-Negotiable Prep Work
Honestly, the success of your ladder installation is decided before you ever pick up a drill. Rushing this stage is the number one cause of problems down the line. We can't stress this enough: preparation is everything. First, unpack your new ladder and lay out every single piece. Check the parts list against what's in the box. It’s a frustrating, project-halting moment when you realize you're missing a crucial bolt midway through the job.
Read the manufacturer's instructions. Yes, really. Read them twice. While most ladder installations follow a similar pattern, there can be unique requirements for specific models or materials. Those little details matter. Now, let's talk tools. You don't need a full workshop, but having the right tools on hand makes the job smoother and safer. You'll typically need a heavy-duty hammer drill (especially for concrete), a set of masonry drill bits matching the size of your anchors, a tape measure, a pencil or marker, a level, wrenches for tightening bolts, and safety gear like glasses and gloves. Having a can of compressed air or a small brush to clean out the drilled holes is a pro-tip that makes a huge difference in how well your anchors set.
Measurement is the final pillar of preparation. Measure everything. The distance between the ladder posts, the distance from the pool wall, and the planned location on your deck. Mark your drill spots clearly and then double-check them. A common rule of thumb is to place the ladder's edge about 12-15 inches from the inside wall of the pool, but again, defer to your manufacturer's specs. A slight miscalculation here can result in a ladder that's angled improperly or puts undue stress on the anchors and the deck itself. It's a simple step that prevents a world of headaches.
Understanding Your Deck and Ladder Anchors
Not all pool decks are created equal, and the surface you're drilling into dictates your entire approach. Installing a ladder into a solid concrete slab is a completely different animal than mounting it on wooden decking or a sophisticated paver patio. Our experience shows that homeowners often underestimate this. They assume one method fits all. It doesn't.
For a standard poured concrete deck, the process is quite straightforward. You'll be drilling directly into the concrete and setting your anchors. This is the most common and often the most secure foundation. If you have a deck made of pavers, however, you have a more complex situation. You can't just anchor into the paver itself; it doesn't have the structural integrity and will likely crack under the repeated stress. The right way involves cutting out the paver and pouring a small concrete footing underneath it, then anchoring into that footing. It’s more work, but it's the only way to ensure a secure, lasting installation. For wooden or composite decks, you'll need to ensure you're anchoring into the deck's structural joists, not just the surface boards. This often requires adding extra blocking between joists for support.
Then there's the matter of the anchors themselves. These are the critical connection point between your ladder and your deck. Choosing the right one is paramount. Let's be honest, this is crucial. You'll typically encounter two main types: wedge anchors, which expand to grip the inside of the drilled hole, and flanged anchors that are epoxied or cemented in place. Each has its place, and understanding the difference is key to a solid installation that lasts for years.
| Anchor Type |
How It Works |
Best For |
Pro Tip from Our Team |
| Wedge Anchors |
A metal anchor that is hammered into a pre-drilled hole. Tightening a nut on top pulls a cone into a sleeve, expanding it against the concrete. |
Solid concrete decks where removability might be a future consideration (with some effort). |
We've found that drilling the hole 1/2 inch deeper than the anchor length ensures there's room for dust and debris, leading to a much tighter fit. |
| Flanged Anchors (with Escutcheons) |
A socket-like metal piece that is set into a larger hole and secured with hydraulic cement or anchoring epoxy. The ladder legs then slide into these sockets. |
All deck types, especially where a clean, flush-mount look is desired. They're the standard for most new Pools AND Spas installations. |
When using cement, mix it to a thick, peanut-butter-like consistency. This prevents it from running and ensures a strong, void-free bond around the anchor. |
| Deck-Mounted Flanges |
A surface-mounted plate that bolts directly onto the deck surface. Typically used for wood or composite decking. |
Wood or composite decks where you can bolt directly into the underlying structural joists. |
Always use stainless steel lag bolts and washers to prevent rust and corrosion, which can compromise the connection and stain your deck over time. |
Step-by-Step: The Core Installation Process
Alright, you've done your prep work, you understand your materials, and you have your tools ready. It's time to get this ladder installed. We're going to break this down into a clear, methodical sequence. Follow these steps, and you'll have a rock-solid ladder in no time.
Step 1: Precise Marking and Final Placement
First, assemble your ladder's handrails (the top part) if they aren't already. Place the ladder exactly where you want it to be, ensuring it's square to the pool edge and the correct distance from the water wall. Use your level to make sure the handrails are perfectly plumb (vertically straight). This is your last chance to make adjustments. Once you're satisfied, carefully and clearly mark the center of each leg's position on the deck with your pencil or marker. Move the ladder out of the way. You should now have two precise marks on your deck.
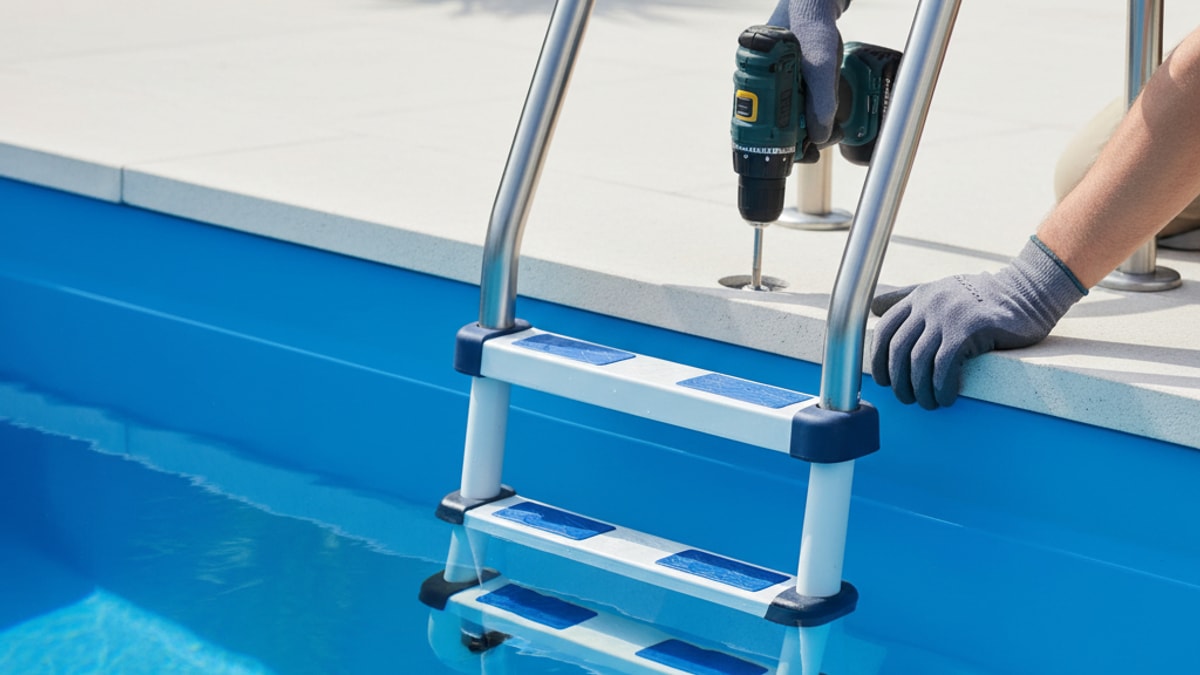
Step 2: Drilling the Anchor Holes
This is where the action begins. Put on your safety glasses. Using your hammer drill and the correctly sized masonry bit, start drilling at your marked spots. Here’s a professional technique we use: begin drilling slowly without the hammer function engaged just to create a small pilot dimple. This prevents the bit from 'walking' or skipping across the surface. Once you have a small indentation, switch on the hammer function and proceed with steady, firm pressure. Don't force it; let the tool do the work.
Drill to the depth specified by your anchor manufacturer. A great trick is to wrap a piece of electrical tape around your drill bit to mark the correct depth. Drill until the tape is flush with the deck surface. Simple, right? Once the holes are drilled, it's absolutely critical to clean them out. Any dust or debris left inside will prevent the anchor from setting correctly. Use a can of compressed air to blow it out, or a wire brush followed by a vacuum. The hole needs to be impeccably clean.
Step 3: Setting the Anchors
Now, this is where it gets interesting, as the method depends on your anchor type.
- For Wedge Anchors: Gently tap the anchor into the clean hole with a hammer until the nut and washer are flush with the deck surface. Then, place the ladder flange over the anchor and tighten the nut. As you tighten, you'll feel the anchor wedge itself securely into the concrete. Don't over-tighten, as this can crack the concrete, but make sure it's snug and immovable.
- For Flanged Anchors (using cement/epoxy): Mix your anchoring cement or epoxy according to the package directions. Fill the drilled hole about halfway with the mixture. Then, insert the anchor socket, twisting it slightly as you push it down to ensure the cement fills all voids around it. The top of the anchor should be perfectly flush with the deck surface. Use a trowel to clean up any excess cement immediately. Crucially, you must let this cure completely. This can take anywhere from a few hours to a full 24 hours. Be patient. Installing the ladder before the cement is fully hardened will ruin the entire installation.
Step 4: Final Ladder Assembly and Installation
While your anchors are curing (if applicable), you can perform the final assembly of the ladder itself. Attach the steps (treads) to the rails, making sure to tighten all bolts securely. Most ladders come with rubber bumpers that rest against the inside pool wall; install these now. They are critical for preventing damage to your pool's liner or plaster finish.
Once the anchors are fully cured and rock-solid, it's time for the final step. Carefully lift the assembled ladder and slide the legs into the anchor sockets. It should be a snug fit. Most systems have a bolt on the side of the anchor flange that you'll tighten to lock the ladder leg in place. Tighten these bolts evenly on both sides. The ladder should now feel completely rigid. There should be zero wobble or play. Give it a firm shake. If there's any movement, go back and check your anchor bolts. This stability is the ultimate test of a successful installation.
Common Pitfalls and How to Sidestep Them
Over the years, our team has been called in to fix a lot of DIY installations that have gone wrong. It's almost always one of a few common, and entirely avoidable, mistakes. Forewarned is forearmed.
The most catastrophic error is improper anchor setting. We've seen anchors set in holes that weren't cleaned out, resulting in a weak bond that fails under load. We've also seen people who didn't wait for the anchoring cement to cure fully. They get impatient, install the ladder, and the first person to use it pulls the anchor right out of the still-soft cement. The solution is simple: clean the holes thoroughly and follow the curing times religiously. No shortcuts.
Another frequent issue is incorrect measurement. Placing the ladder too close to the pool wall puts awkward stress on the structure, while placing it too far away makes it difficult and unsafe to use. This goes back to the prep stage. Measure, mark, and then measure again before you even think about drilling. A few extra minutes here can save you from having to drill a second set of holes, which looks terrible and can compromise the integrity of your deck.
Finally, don't ignore the small stuff. Forgetting to install the rubber bumpers can lead to costly damage to your pool's interior surface. Using the wrong hardware—like zinc-plated bolts instead of stainless steel—will result in rust streaks running down your deck and a compromised connection over time. Every piece included in the ladder kit is there for a reason. Use them.
Safety Isn't Just a Buzzword: It's Everything
We build complex outdoor environments, from intricate Fire Features to sprawling patios with integrated Seat Retaining Walls, and in every single element, safety is the unwavering foundation. Your pool ladder is no different. A properly installed ladder is safe. A poorly installed one is a liability waiting to happen.
Once your ladder is installed, perform a final check on every single bolt and connection point. Make sure they are all tightened to the manufacturer's specifications. Then, cautiously test it. Put your weight on the first step, then the second, feeling for any give or movement. It should feel as solid as a staircase in your home. It's a good practice to re-check the tightness of all bolts after the first week of use, and then again at the beginning of each pool season. Temperature fluctuations and regular use can sometimes cause minor loosening over time. This simple, two-minute check is a critical part of ongoing pool safety maintenance.
Remember that the ladder is part of a larger system of pool safety. It provides a clear and stable exit point from the water, which is essential for swimmers of all ages and abilities. When you're planning your pool area, thinking about access and safety should be just as important as aesthetics. It's a core principle of our entire design philosophy. If this installation process feels overwhelming, or if you're dealing with a complex deck surface like custom pavers, don't hesitate to call in professionals. There is no shame in ensuring the job is done perfectly. In fact, it's the smartest thing you can do.
And that's the reality. A secure ladder provides peace of mind, allowing you and your family to enjoy your pool without a second thought. If you're undertaking a larger backyard transformation and the pool is just one component, getting these details right is what separates a good project from a truly exceptional one. When you're ready to think about the whole picture, you can always BOOK MY FREE CONSULTATION with our design team to explore the possibilities. But for now, take pride in knowing you've installed this critical component with the care and precision it deserves.


.webp)
.webp)