There’s a unique magic that happens when kids play outside. It’s a sensory, messy, and wonderfully chaotic experience that screens just can’t replicate. We’ve seen it time and again in the spaces we design: no matter how beautiful the patio or pristine the pool, kids will always find a corner to make their own. So why not give them a space that’s designed for exactly that kind of imaginative, hands-on fun?
Enter the outdoor play kitchen. It’s more than just a toy; it’s a portal to creativity. It’s a mud pie bakery, a five-star restaurant for beetles, a potion-making laboratory. As landscape designers, our team at Modern Yardz is obsessed with creating outdoor environments that serve the whole family, and we believe a well-designed play area is a critical, non-negotiable element of a truly functional family yard. It encourages independence, sensory development, and a genuine connection with nature. And honestly, it gets the mess out of your actual kitchen.
First Things First: Planning Your Perfect Play Kitchen
Before you start cutting wood or gathering materials, a little bit of strategic thinking goes a long, long way. A play kitchen isn’t just a standalone object; it’s a piece of your backyard’s ecosystem. How it functions and how it looks depends entirely on thoughtful planning. Let’s be honest, this is crucial. You want something that invites play, but doesn't become a safety hazard or an eyesore.
Our experience shows that the best play spaces are those that are seamlessly integrated into the overall flow of the yard. You wouldn't build an adult kitchen without thinking about workflow and location, right? The same logic applies here. Consider visibility first. You'll want to place the play kitchen where you can easily see it from a window or patio seating area. This gives kids the freedom to play independently while giving you peace of mind. Think about the sun, too. Tucking the kitchen under a shady tree or a covered patio can prevent overheating and sunburn during peak sun hours. If you don't have natural shade, this could be a great opportunity to consider a structure as part of a larger project, like our custom Patio Covers Pergolas SAN Diego that can provide shade for multiple zones.
The ground surface is another major consideration. Placing the kitchen on grass will inevitably lead to a giant mud pit. That can be fun, but it's not always practical. A dedicated zone of mulch, smooth pebbles, or even a patch of high-quality Artificial Turf SAN Diego can define the play area and keep things much cleaner. The turf option is fantastic because it’s soft, drains well, and is incredibly durable. It feels like a genuine, purpose-built space.
Finally, think about its relationship to other elements. Does it make sense next to a sandbox? Could it be built against an existing fence or one of your Seat Retaining Walls to save space and create a cozy nook? Thinking through these details is the difference between a random toy dropped in the yard and a feature that elevates your entire outdoor living experience. If you’re struggling to see the big picture, that’s exactly where a professional Landscape Design SAN Diego plan becomes invaluable. We can help you map out a cohesive vision where every element, from the play kitchen to the fire pit, works in harmony. And if that sounds like a path you want to explore, you can always BOOK MY FREE CONSULTATION with our design team.
The Heart of the Matter: Choosing Your Materials
Now, this is where it gets interesting. The materials you choose will dictate the look, longevity, and safety of your outdoor play kitchen. You've got a spectrum of options, from rustic and recycled to sleek and modern. We’ve worked with them all, and each has its distinct personality and practical considerations. We can't stress this enough: choose materials rated for outdoor use.
Pressure-treated lumber is often the go-to for budget-conscious DIY projects. It's readily available and treated to resist rot and insects. It’s a workhorse. The downside? The chemicals used in the treatment process can be a concern for some parents, and it's prone to splintering if not properly sanded and maintained. If you go this route, you must seal it with a high-quality, non-toxic, child-safe sealant. It’s not a step you can skip.
For a step up in both beauty and natural durability, we recommend cedar or redwood. These woods contain natural oils (tannins) that make them inherently resistant to decay and pests. They smell amazing and weather to a beautiful silvery-gray over time, or you can seal them to maintain their rich, warm color. They are more expensive, certainly, but the investment often pays off in longevity and aesthetics. They just look and feel more premium, and they can be designed to complement high-end Outdoor Kitchens SAN Diego for the adults, creating a cohesive design language across your yard.
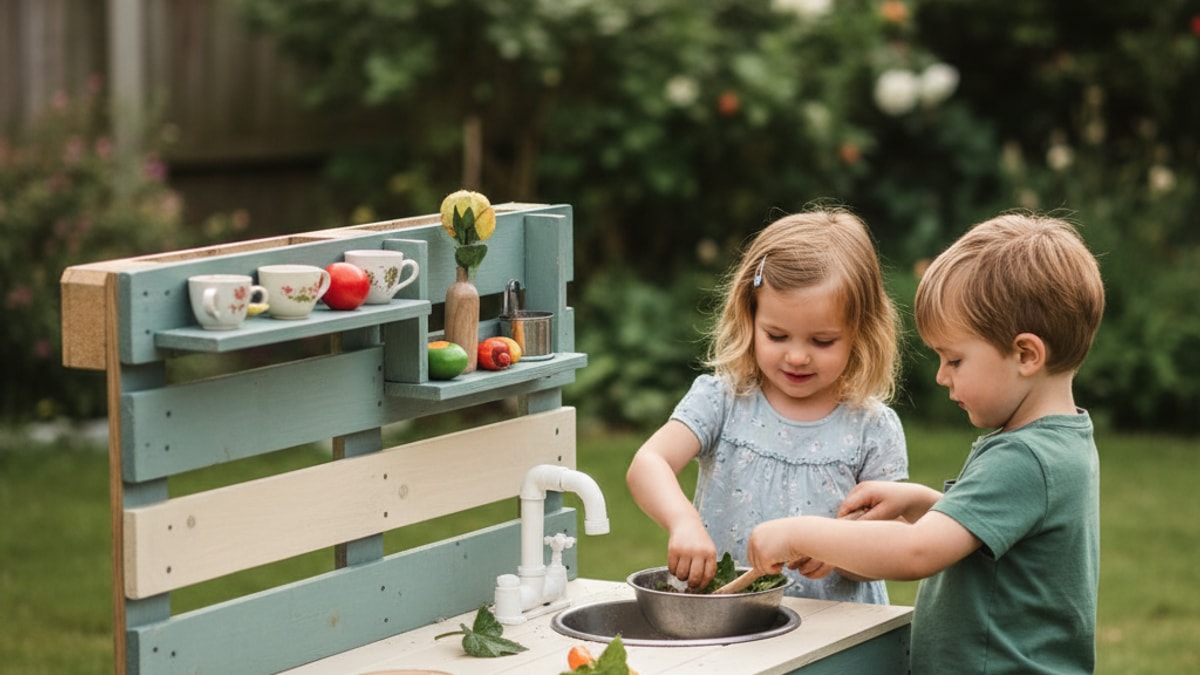
Then there's the upcycled route. This is where you can get really creative. Old pallets, a discarded dresser, a sink vanity from a remodel—these can all be transformed into a charming, one-of-a-kind play kitchen. It’s sustainable and incredibly cost-effective. The major caveat here is safety and prep work. You need to be meticulous about checking for rusty nails, sharp edges, and splinters. Pallet wood, in particular, requires a ton of sanding and a very careful inspection to ensure it wasn't used to transport toxic materials. Always look for the 'HT' stamp, which indicates it was heat-treated, not chemically treated.
Here’s a quick breakdown our team put together to help you compare:
| Material |
Avg. Cost |
Durability |
Safety Considerations |
Maintenance Level |
| Pressure-Treated Wood |
Low |
High |
Chemical treatments; prone to splinters. |
Medium |
| Cedar / Redwood |
Medium |
Very High |
Naturally resistant; less splintering. |
Low to Medium |
| Upcycled Pallets |
Very Low |
Medium |
Must be thoroughly inspected and sanded. |
High (initial) |
| Composite Decking |
High |
Excellent |
No splinters; can get hot in direct sun. |
Very Low |
Ultimately, the right choice depends on your budget, your aesthetic preferences, and how much time you're willing to put into construction and upkeep. There’s no single right answer, only what’s right for your family and your yard.
From a Sketch to a Structure: A Step-by-Step Guide
Alright, you’ve got your plan and you’ve chosen your materials. It’s time to build. This process can be as simple or as complex as you want it to be. You can build a basic mud bar in an afternoon or a deluxe kitchenette over a weekend. For this guide, we’ll focus on a sturdy, classic wooden design that offers a great foundation for customization.
Step 1: Safety and Preparation. Seriously.
Before a single screw is driven, your first job is to make every piece of wood kid-safe. Every edge, every corner, and every surface needs to be sanded until it’s smooth to the touch. Start with a medium-grit sandpaper (like 80-grit) to knock down any rough spots and finish with a fine-grit (like 220-grit) for a silky-smooth feel. Your fingers are your best inspection tool. If it feels even slightly rough to you, it’s a potential splinter for a child. This is a tedious step, but it is absolutely the most important one.
Step 2: Building the Main Frame
Think of this like building a small, sturdy table. A typical play kitchen height for preschoolers is around 20-24 inches for the countertop. You'll need four legs (4x4 posts are great for stability) and a frame for the top made from 2x4s. Cut your legs to your desired height. Then, create a rectangular frame for your countertop. For example, a 48-inch wide by 20-inch deep countertop is a great size. Assemble the frame using weather-resistant deck screws. Attach this frame to the top of the four legs, ensuring everything is square and level. A wobbly play kitchen is a dangerous one. We recommend adding a lower shelf as well; it provides fantastic storage for pots and pans and dramatically increases the structural stability of the whole unit.
Step 3: Creating the Countertop and Backsplash
Once the frame is solid, it's time for the work surface. You can use several 1x6 deck boards laid side-by-side or a single piece of exterior-grade plywood. Cut them to size and screw them securely into the top frame. Now for the backsplash. This is what really makes it look like a kitchen. Attach a taller board (or several boards) vertically along the back of the countertop frame. This is the perfect place to add hooks for utensils, a small shelf for 'spices' (aka pebbles and acorns), or even a fun painted-on tile pattern.
Step 4: Installing the "Appliances"
This is where imagination takes over. A sink is a must-have. Find an inexpensive stainless steel bowl or a plastic basin. Trace its outline on the countertop and use a jigsaw to carefully cut out the hole. Drop the bowl in, and you’ve got a sink! For a faucet, you can use an old one from a remodel, a simple outdoor spigot, or even just a shapely piece of wood. For the stovetop burners, you can paint circles directly onto the countertop, or for a more tactile feel, screw on thin wooden rounds (you can buy these at craft stores). Knobs can be simple wooden drawer pulls that actually turn. An oven can be created by adding a hinged door to the front of the base. It’s these little details that bring the whole thing to life.
Step 5: The Final Finish
Now that it's built, it’s time to protect it and make it beautiful. Choose a finish that is explicitly labeled as non-toxic and child-safe. You can use a clear sealant to let the natural wood grain show through or go wild with color. A bright, cheerful paint color can make the play kitchen a true focal point of the yard. Our design team often suggests using colors that complement the home's exterior trim or the cushions on your patio furniture to create a sense of design cohesion. It’s a small touch that makes the space feel intentionally designed. Once everything is dry, do one final check for any rough spots or sharp edges before you declare it open for business.
Stocking the Shelves and Sparking Imagination
The structure is only half the story. The real play begins when the kitchen is stocked with interesting things to mix, mash, pour, and pretend with. You don’t need to spend a fortune on plastic play food that will just get lost in the yard. The best ingredients are free and provided by nature itself.
Set out buckets for collecting materials: pinecones become crunchy bread, leaves are salad greens, small pebbles are beans, and sand or dirt can be flour. Water is the most essential ingredient. A simple bucket of water with a ladle provides hours of fun. You can also install a simple hand-pump water dispenser or just keep a small watering can nearby. The combination of dirt and water is irresistible—embrace the mud! That's why having a durable, easy-to-clean surface like our Pavers SAN Diego or turf underneath is such a game-changer.
For cookware, thrift stores are your best friend. Old stainless steel pots, pans, muffin tins, and wooden spoons are far more durable and satisfying to play with than their plastic counterparts. They make wonderful noises and feel real to a child. Mount a magnetic knife strip on the backsplash for metal utensils or add plenty of hooks for hanging tools. The more accessible and organized the tools are, the more likely they are to be used.
Good lighting can also extend playtime into the late afternoon and early evening. A few strategically placed fixtures from a professional Landscape Lighting SAN Diego installation can make the area feel magical as dusk sets in, while also ensuring safe play. It transforms the space from just a day-use toy to a part of your evening landscape.
A play kitchen isn't a static object. It should evolve with your child. Add new elements over time—a pretend microwave made from a wooden box, a small herb garden in a pot nearby for 'fresh' ingredients, or a chalkboard for writing out the daily menu. This ongoing engagement is what keeps the space fresh and exciting, ensuring it's a beloved part of your yard for years to come.
Building an outdoor play kitchen is a truly rewarding project. It’s a chance to create something with your own hands that will be the backdrop for countless childhood memories. It’s about more than just the final product; it’s about creating a space that tells your kids it’s okay to get messy, to experiment, and to let their imaginations run wild in the fresh air. And that, in our book, is the very definition of a yard well-lived in.


.webp)
.webp)