An outdoor kitchen isn't just a collection of appliances. It's the heart of your backyard, the centerpiece for countless memories—from sizzling weeknight burgers to sprawling weekend celebrations with friends and family. We've helped hundreds of homeowners design and build these incredible spaces, and we know the sheer joy they bring. But our team also knows the reality that sets in after the party's over: that beautiful, gleaming stainless steel is now facing a relentless assault from grease, fingerprints, and the elements themselves.
Let's be honest, knowing how to clean stainless steel in an outdoor kitchen is fundamentally different from wiping down your indoor toaster. Out there, your equipment is exposed to humidity, pollen, dust, bird droppings, and fluctuating temperatures. It’s a demanding environment. That pristine shine you fell in love with can quickly become a canvas of smudges, water spots, and—worst of all—the dreaded beginnings of rust. But don't worry. We've seen it all, and we're here to share the professional techniques we've honed over years of building and maintaining these outdoor sanctuaries. This isn't just about cleaning; it's about preserving your investment and keeping it ready for the next perfect afternoon.
Why Your Outdoor Stainless Steel Needs Special Attention
First, we need to understand that we're not playing in the same league as your indoor kitchen. The challenges are formidable. Your indoor appliances live in a climate-controlled bubble, protected from the wild swings of mother nature. Your outdoor grill, cabinets, and refrigerator? They're on the front lines, 24/7.
The constant exposure to humidity is probably the biggest adversary. Moisture, especially when combined with airborne particles like salt (even if you're miles from the coast), pollen, and dust, creates a perfect breeding ground for corrosion. This is why you might see tiny rust-colored specks, often called "tea staining," appear on surfaces. It's not that the steel itself is defective; it's that microscopic corrosive particles have landed on the surface and started to oxidize. This is a critical, non-negotiable element of outdoor care.
Then there’s the sheer intensity of use. Outdoor cooking is often a bigger, messier affair. Think smoky marinades, greasy flare-ups, and sauces that seem to splatter with a mind of their own. This grime doesn't just look bad; it can bake onto the surface, becoming incredibly difficult to remove and chemically compromising the steel's protective layer over time. Our experience shows that the grade of the steel makes a significant difference here. Most high-quality outdoor appliances are made from 304-grade stainless steel, which offers excellent corrosion resistance. For coastal areas with high salt content in the air, 316-grade is even better, though less common. When we design our Outdoor Kitchens, we always discuss material quality because we know it's the foundation of longevity.
It’s a different world out there. The sun beats down, rain lashes, and dew settles overnight. Each of these environmental factors tests the mettle of your stainless steel. Without a proper cleaning and protection routine, the material's passive layer—a microscopic chromium oxide film that prevents rust—can be breached, leading to irreversible damage. That's why a proactive approach is not just recommended; it's essential.
Your Essential Cleaning Toolkit: Less is More
Before you start grabbing every chemical under your sink, stop. We can't stress this enough: the wrong tools and cleaners can cause catastrophic, permanent damage to your stainless steel. You can scratch the surface, strip its protective layer, and actually invite rust. The good news is that the best toolkit is surprisingly simple and affordable.
Here’s what our team recommends you have on hand:
- Microfiber Cloths (Lots of Them): You'll need at least three—one for washing, one for rinsing, and one for drying/polishing. Microfiber is soft, absorbent, and won't leave lint behind. It's your single most important tool.
- A Soft Sponge: For areas with caked-on grime, a sponge can provide a little extra scrubbing power without being abrasive. Just make sure it’s a non-scratch variety.
- A Bucket: Simple, but necessary for your warm, soapy water solution.
- A Spray Bottle: Perfect for applying a vinegar-and-water solution for rinsing or tackling hard water spots.
Now, for the cleaners. You don't need a cabinet full of expensive, specialized products. In fact, some of the most effective and safest options are probably already in your pantry.
Things to Use:
- Mild Dish Soap: A few drops in a bucket of warm water is your go-to for routine cleaning.
- White Vinegar: Its mild acidity is fantastic for cutting through grease and removing mineral deposits from hard water.
- Baking Soda: When mixed with a little water to form a paste, it's a gentle abrasive that can lift stubborn stains without scratching.
- Club Soda: The carbonation can help lift dirt and leave a streak-free shine. It's a great final-wipe-down option.
Things to AVOID at All Costs:
- Steel Wool or Steel Brushes: This is the cardinal sin. They will scratch the heck out of your stainless steel and embed tiny iron particles that will rust immediately.
- Abrasive Powdered Cleansers: Many household scouring powders are far too harsh and will permanently dull the finish.
- Chlorine Bleach (and Cleaners Containing It): Chlorine is a formidable enemy of stainless steel. It will cause pitting and staining.
- Oven Cleaner: The caustic chemicals in oven cleaner are designed for porcelain enamel, not stainless steel. They can cause permanent discoloration.
Here’s a quick breakdown of your cleaning agent options:
| Cleaner Type |
Pros |
Cons |
Best For... |
| Mild Dish Soap & Water |
Gentle, inexpensive, readily available |
Not strong enough for baked-on grease |
Routine weekly wipe-downs and general cleaning. |
| Baking Soda Paste |
Mildly abrasive, great stain remover, deodorizes |
Can be messy to apply and rinse |
Tough food spots, light grease, and surface rust. |
| White Vinegar Solution |
Excellent degreaser, removes hard water spots |
Strong smell, must be rinsed thoroughly |
Fingerprints, water stains, and cutting grime. |
| Commercial Stainless Cleaner |
Formulated specifically for the material, often includes a polish |
More expensive, can build up over time |
Deep cleaning, polishing, and adding a protective layer. |
The Routine Clean: Your Weekly Path to Perfection
A little consistency goes a long, long way. A quick, 15-minute wipe-down once a week is infinitely better than a grueling, multi-hour scrub session once a season. This simple ritual prevents grime from building up and allows you to spot any potential issues, like tea staining, before they become major problems.
This is the process we've refined over years. It works.
Step 1: The Initial Wipe-Down
Before you introduce any water, take a dry microfiber cloth and wipe down all the stainless steel surfaces. This removes any loose dust, pollen, and debris. It seems like a minor step, but it prevents you from just turning that dry dust into wet mud that you then have to scrub off.
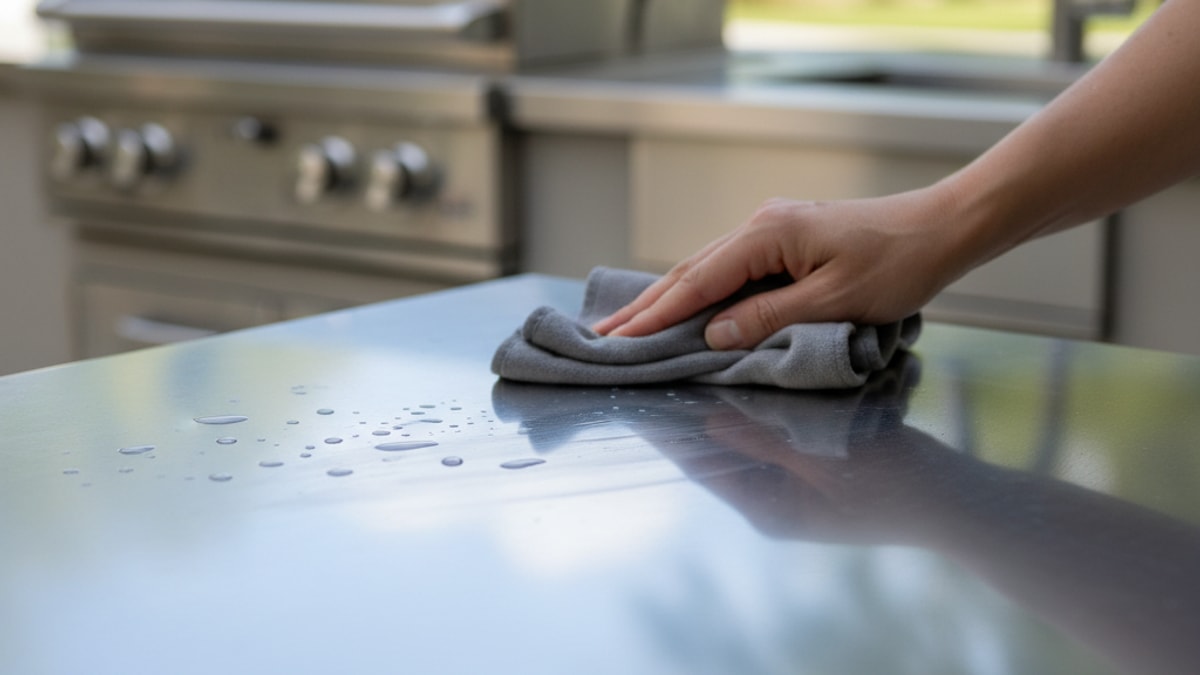
Step 2: Go With the Grain
This is the secret handshake of stainless steel care. We mean this sincerely: it makes all the difference. Look closely at your appliances. You'll see very fine lines running in one direction, either vertically or horizontally. This is the grain. ALWAYS clean, rinse, and dry in the same direction as the grain. Wiping against it can create micro-scratches and push dirt into the tiny grooves, dulling the finish.
Step 3: The Soapy Wash
Mix a few drops of mild dish soap into a bucket of warm water. Dunk a clean microfiber cloth into the solution, wring it out so it's damp but not dripping, and wipe down all the surfaces, always moving with the grain. Don't be afraid to apply a little gentle pressure on grimy spots. For stubborn areas, let the soapy water sit for a minute or two to loosen the dirt.
Step 4: The Critical Rinse
This step is non-negotiable. Soap residue, if left behind, will dry to a hazy film that actually attracts more dirt and dust. You can rinse in two ways. Either use a new, clean microfiber cloth dipped in plain water (wring it out well) or fill a spray bottle with clean water and spritz the surface down. In either case, wipe away all the soap with the grain.
Step 5: Dry, Dry, Dry!
Airdrying is a recipe for water spots and streaks, especially in the sun. Immediately after rinsing, take a third, completely dry microfiber cloth and buff the surface dry. Again, follow the grain. This final step is what brings out that brilliant, factory-fresh shine. It’s comprehensive.
That's it. Simple, right? Making this a weekly habit will keep your outdoor kitchen looking impeccable and dramatically reduce the need for heavy-duty deep cleaning.
Tackling the Tough Stuff: Grease, Grime, and Discoloration
Even with regular cleaning, you're bound to face more formidable challenges. A weekend barbecue can leave behind a battlefield of baked-on sauce and stubborn grease splatters. Here's how to win the war on grime.
For heavy grease, your soapy water solution might not be enough. This is where a 50/50 solution of white vinegar and water in a spray bottle becomes your best friend. Spray it directly onto the greasy areas and let it sit for a few minutes. The acid in the vinegar will start to break down the fat. Then, wipe it away with a damp cloth, moving with the grain. For truly epic grease situations, a dedicated citrus-based degreaser can be used, but always test it on an inconspicuous spot first.
What about those burnt-on food particles on your grill grates and surrounding surfaces? Patience is key. For the surfaces around the grates, a paste of baking soda and water is a fantastic, non-abrasive scrubber. Apply the paste, let it sit for 15-20 minutes, and then gently scrub with a soft sponge (with the grain!). Wipe clean with a damp cloth.
Heat tint—that bluish-gold rainbow discoloration that often appears on grill hoods—is another common issue. It's a natural result of the steel being exposed to high temperatures, causing the protective chromium oxide layer to thicken. While it doesn't harm the steel, some people don't like the look. Specialized stainless steel polishes that contain fine abrasives can sometimes minimize its appearance, but we often advise clients to embrace it as a natural patina that tells the story of many great meals cooked.
The Arch-Nemesis: Preventing and Removing Rust
Nothing causes more panic for an outdoor kitchen owner than seeing the first signs of rust. "But it's stainless!" we hear all the time. The name is a bit of a misnomer; it's stain-less, not stain-proof. As we mentioned, rust on high-quality stainless steel is almost always caused by external factors.
Prevention is your most powerful weapon. Here's what we've learned: success depends on a multi-pronged defense.
- Clean Regularly: This is your first line of defense. By removing corrosive particles (salt, dirt, chemicals), you prevent them from having time to damage the surface.
- Keep it Dry: After cleaning or a rainstorm, dry your appliances. Standing water is a major catalyst for corrosion.
- Use a Protective Cover: When you know you won't be using the kitchen for an extended period, a high-quality, breathable cover is a fantastic investment. It shields the steel from rain, pollen, and debris.
- Apply a Protectant: After cleaning, applying a thin coat of stainless steel polish or even mineral oil can create a barrier that repels water and contaminants. A well-designed outdoor space, often featuring elements like our Patio Covers & Pergolas, also provides a structural layer of defense against the harshest elements.
But what if you already see some surface rust? Don't panic. If it's just light "tea staining," you can usually remove it. Make a paste of baking soda and water, apply it to the rusted spots, and let it sit for about 30 minutes. Then, using a soft cloth, gently rub in the direction of the grain. The mild abrasive action of the baking soda should lift the surface stain. For slightly more stubborn spots, a product like Bar Keepers Friend (the soft cleanser version) works wonders. It contains oxalic acid, which is excellent at dissolving rust. Just be sure to follow the product's directions carefully, rinse thoroughly, and test it on a hidden area first.
If the rust is pitted or deep, it may indicate a more serious issue, and it might be time to consult a professional for refinishing options.
The Final Polish: Protecting Your Investment for the Long Haul
Cleaning removes the dirt, but polishing protects the shine. Think of it as waxing your car. It's the final step that provides a barrier against future assaults and makes the surface look its absolute best. A polished surface is more difficult for water and grease to cling to, which makes your next routine cleaning session that much easier.
You have a few options here. For a quick, eco-friendly polish, a tiny amount of mineral oil or even olive oil on a clean microfiber cloth works surprisingly well. Apply a very thin layer and buff it in, following the grain, until the surface has a uniform luster. A little goes a very long way—too much will just create a sticky surface that attracts dust.
Alternatively, there are dozens of commercial stainless steel polishes on the market. Many of these are excellent and are specifically formulated to leave a streak-free, protective coating. They often come in an aerosol can or a trigger spray bottle. The key is to spray it onto your cloth, not directly onto the appliance, to ensure even application and avoid overspray onto countertops or decking. These polishes are especially great for vertical surfaces like refrigerator doors, as they help repel fingerprints.
The gleam of a perfectly polished outdoor kitchen is truly something to behold, especially in the evening. Proper Landscape Lighting can transform the space, catching the light on the clean steel and turning your patio into a stunning focal point.
It’s All Part of the Bigger Picture
Remember, your stainless steel appliances are just one component of a larger ecosystem. A truly spectacular outdoor living area is a sum of its parts. Grease splatters don't just land on the grill; they can stain the beautiful custom Concrete countertops we install or the elegant Pavers underfoot. When you're cleaning, take a moment to look at the whole picture.
This holistic view is at the core of our philosophy at Modern Yardz. When we undertake a Landscape Design project, we're not just thinking about how it will look on day one. We're thinking about how you'll live in it, use it, and maintain it for years to come. We consider drainage, airflow, sun exposure, and material durability in every single plan. We build spaces designed to last.
Your outdoor kitchen is an investment in your home and your lifestyle. It’s the stage for future memories. Treating its maintenance not as a burdensome chore but as a simple act of preservation ensures that it will continue to be a source of pride and joy. With the right techniques and a little consistency, you can easily keep that stainless steel looking as brilliant as the day it was installed, ready for whatever delicious adventures you have planned.
Keeping your outdoor kitchen looking its best ensures it’s always ready for that next impromptu gathering. If you're still dreaming about creating your perfect outdoor space, our team is here to help. BOOK MY FREE CONSULTATION, and let's talk about bringing that vision to life.


.webp)
.webp)