A pool skimmer looks simple enough. It’s just a rectangular box built into the side of the pool, right? But in our decades of experience designing and building complete outdoor environments, we’ve seen firsthand how this one component can be the difference between a pristine, low-maintenance oasis and a catastrophic, wallet-draining nightmare. Let’s be honest: a poorly installed skimmer is a ticking time bomb. It’s one of the most common—and most devastating—sources of leaks in an inground pool.
That’s why we’re pulling back the curtain. This isn’t just another DIY guide; it’s a detailed breakdown of how to install a skimmer in an inground pool the way a professional does it. We’re talking about the nuances, the non-negotiables, and the trade secrets that ensure a perfect, watertight seal that lasts for the life of your pool. Whether you're a hands-on homeowner tackling a big project or just want to understand what goes into a quality build, you’re in the right place. We believe an informed client is the best partner, so let's get into what makes a skimmer installation successful.
Understanding the Skimmer's Critical Role
Before we touch a single tool, it's essential to appreciate what the skimmer actually does. It's not just a passive leaf-catcher. The skimmer is the primary suction point for your pool's entire circulation and filtration system. It's the mouth of the pool. Its job is to skim debris—leaves, bugs, sunscreen oils, and other floating gunk—off the water's surface before it has a chance to sink and decay. Think of it as the first line of defense in keeping your water clean and clear.
The pump pulls water through the skimmer mouth, into the skimmer basket (which catches the large debris), and then sends it on to the filter. Proper water level is key here; the water should sit about halfway up the skimmer opening for optimal performance. This creates a powerful surface-level current that draws in everything you don't want in your pool. A properly functioning skimmer dramatically reduces the amount of manual scooping and vacuuming you'll have to do. Simple, right?
But its importance is also its biggest vulnerability. Because it’s an opening cut through the very structure of your pool wall, it creates a potential failure point. It's a connection between plumbing, the pool shell (be it concrete, vinyl, or fiberglass), and the surrounding earth. Any imperfection in the installation—a bad seal, a cracked pipe, improper backfilling—will inevitably lead to a leak. And these aren't small drips. We're talking about leaks that can silently drain thousands of gallons of water, destabilize the ground around your pool, and cause massive structural damage to the pool shell and surrounding deck. We can't stress this enough: getting the skimmer installation right is not just important; it's foundational to the integrity of your entire pool project.
Before You Begin: Tools, Materials, and Planning
Preparation is more than half the battle. Rushing into the installation without the right gear and a clear plan is a recipe for disaster. Our team never starts a job without a meticulous layout of every tool and component. Here’s a comprehensive list of what you'll typically need:
Tools & Equipment:
- Shovel and spade for excavation
- Tape measure
- Level (a 24-inch or 48-inch level is ideal)
- PVC pipe cutter or hacksaw
- Deburring tool
- Permanent marker
- Caulking gun
- Rubber mallet
- Trowel for concrete work
- Wheelbarrow or buckets for mixing concrete
- Safety glasses and gloves
Materials:
- The skimmer body and faceplate kit
- PVC pipe (Schedule 40 is standard) in the correct diameter for your pump
- PVC fittings (elbows, couplings, etc.)
- PVC primer (the purple stuff) and medium- or heavy-body PVC cement
- Teflon tape or pipe sealant for threaded connections
- High-quality polyurethane or silicone sealant specifically designed for pools
- Rebar sections for reinforcement
- Bagged concrete mix
- Gravel or crushed stone for backfill
- For vinyl liner pools: Gaskets and stainless steel screws (usually included with the skimmer)
Now, about the skimmer itself. You'll generally choose between two main types, and the right one depends on your pool's size and design.
| Skimmer Type |
Description |
Best For |
Our Professional Observation |
| Standard Mouth |
The traditional, nearly square opening. It's a workhorse found on millions of pools. |
Small to medium-sized residential pools with typical debris loads. |
A reliable choice that gets the job done. It's less conspicuous in the pool wall, which some clients prefer for a minimalist aesthetic. |
| Wide Mouth |
A rectangular opening, significantly wider than it is tall. Offers a larger surface area for skimming. |
Larger pools, pools in areas with heavy leaf fall, or pools with designs that create 'dead spots' in circulation. |
Our team often recommends a wide mouth skimmer. The increased skimming surface is a dramatic improvement in performance, especially on windy days. It's a small upgrade that pays dividends in reduced maintenance. |
Planning also means placement. The prevailing wind direction is your best friend here. We always position skimmers on the downwind side of the pool. Why? Because the wind will naturally push all the surface debris right toward the skimmer mouth. It's like getting a free assist from nature. For larger pools, multiple skimmers are often necessary to ensure complete surface cleaning. A professional Landscape Design SAN Diego plan will map this out perfectly from the start.
Step-by-Step Installation: The Modern Yardz Method
Alright, let's get into the nitty-gritty. This is the process our crews follow. Each step builds on the last, so precision at every stage is non-negotiable.
Step 1: Excavation and Positioning
First, you need to dig. The hole for the skimmer needs to be larger than the skimmer body itself—we recommend at least 6-8 inches of clearance on all sides and below. This space is crucial for plumbing access and for pouring a concrete collar later on.
Once the hole is dug, you'll set the skimmer in place against the pool wall panel or the rebar framework of a concrete pool. This is the moment of truth for leveling. The skimmer must be perfectly level from side to side and have a very slight pitch (we’re talking maybe 1/8 of an inch) forward toward the pool. This tiny forward tilt ensures that water flows into it correctly and prevents air from getting trapped. Use your level meticulously. Check it, double-check it, and then check it again. An unlevel skimmer is a rookie mistake with serious consequences. We've seen it cause air to get sucked into the pump, leading to cavitation and premature equipment failure.
Step 2: Plumbing Connections
With the skimmer securely positioned (you can use temporary braces), it’s time for plumbing. Most skimmers have two ports on the bottom. One will go to the main pump suction line, and the other can be connected to the main drain or plugged. This dual-port design allows for flexibility in how you balance suction between the surface and the pool floor.
Cleanliness is everything here. When connecting PVC pipes, every cut must be clean and square. Use your deburring tool to remove any plastic burrs from the inside and outside of the pipe. Then, apply a liberal coat of purple primer to both the outside of the pipe and the inside of the fitting. The primer cleans and softens the PVC, preparing it for a solvent weld. Immediately follow with an even coat of PVC cement. Push the pipe into the fitting with a slight twisting motion and hold it firmly for at least 30 seconds. A proper solvent weld chemically fuses the two pieces of plastic into one. It’s permanent. A sloppy joint done without primer is just a leak waiting to happen.
Run the plumbing line from the skimmer back toward your equipment pad, ensuring it's properly supported and bedded in gravel or sand to prevent settling.
Step 3: Securing the Skimmer with a Concrete Collar
This step is what separates a professional job from an amateur one. The skimmer cannot just sit in loose dirt. It needs to be encased in concrete, locking it to the pool structure and preventing any movement. We use rebar to physically tie the skimmer to the pool's rebar cage or bond beam.
Mix your concrete to a medium consistency—not too soupy, not too dry. Carefully pour it around and under the skimmer body, filling that 6-8 inch gap you excavated earlier. Be careful not to knock the skimmer out of level during this process. Use a trowel to work the concrete into all the voids, ensuring there are no air pockets. This concrete collar becomes a solid, monolithic block that anchors the skimmer in place forever. It’s a critical part of the overall structure, much like the foundations used for our Seat Retaining Walls or the footings for our custom patios.
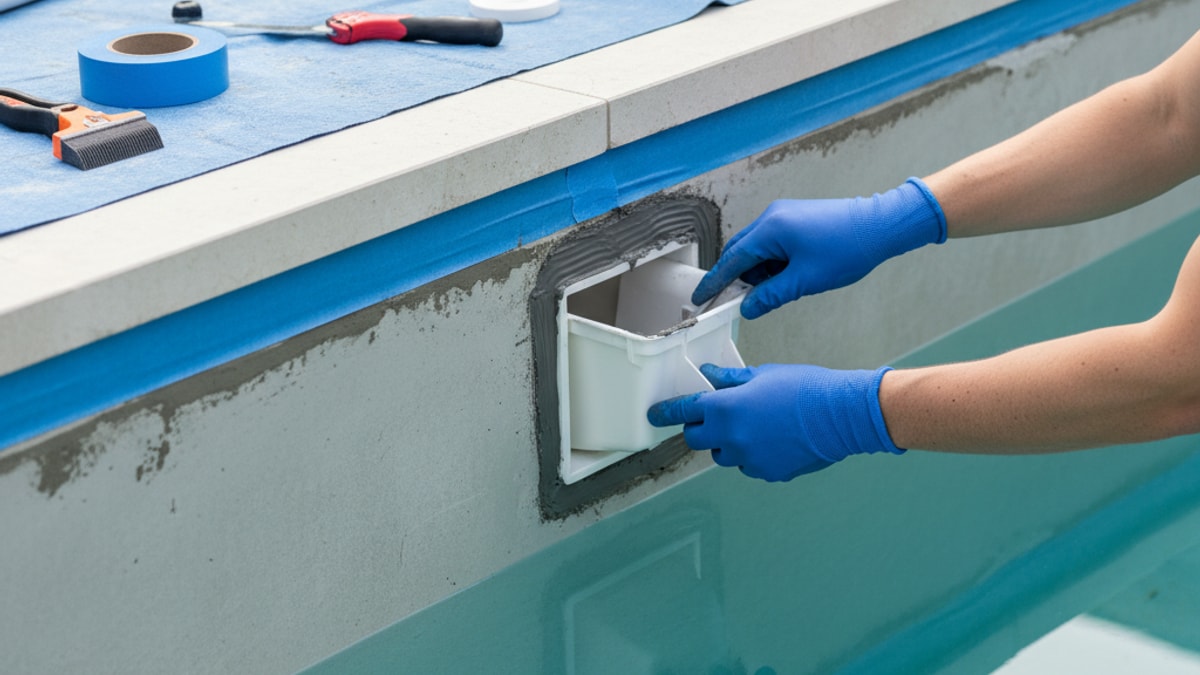
Step 4: Waterproofing and Sealing (For Vinyl Liner Pools)
This is the most delicate part of the operation, especially for vinyl liner pools. Once the liner is installed and hanging in the pool, you'll install the skimmer's faceplate. This involves sandwiching the liner between two gaskets and the skimmer body and faceplate.
Place the first gasket over the skimmer body opening. Carefully align the liner over it, and find the corner screw holes by gently pressing with your finger. Use an awl to puncture the liner at just one corner screw hole. Insert a screw to hold it in place. Now, install the second gasket on top of the liner, followed by the plastic faceplate. Insert all the stainless steel screws and tighten them by hand in a star pattern, like you would when changing a tire. This ensures even pressure across the entire faceplate. We can't stress this enough: do not overtighten! You can crack the faceplate or strip the screw holes. The goal is a snug, uniform seal. Once all screws are snug, you can carefully trim the vinyl out from inside the faceplate opening with a razor knife.
For concrete (gunite/shotcrete) pools, the process involves meticulously sealing the gap between the skimmer throat and the concrete shell with hydraulic cement and specialized pool putty or sealant before the plaster or finish is applied.
Step 5: Backfilling
After your concrete collar has cured (give it at least 24-48 hours), you can backfill the remaining area around the skimmer. Don’t just dump the dirt back in. We recommend using gravel or sand for the first foot or so directly against the skimmer body to ensure proper drainage and prevent frost heave in colder climates. Then, backfill with soil in 6-inch layers, compacting each layer as you go. This prevents the ground from settling later, which could put stress on your plumbing lines and cause a break. It's the same principle we apply when preparing the base for our high-quality Pavers SAN Diego installations.
Common Pitfalls and How to Avoid Them
Our repair teams have seen every possible mistake when it comes to skimmer installations. Frankly, it's often a result of someone cutting corners to save a few hours or a few dollars. Here are the most common, catastrophic errors:
- Improper Leveling: As we mentioned, this is a huge one. A skimmer that's tilted back will trap air, while one tilted too far forward might not skim effectively. Use your level. Trust your level.
- Skipping the Concrete Collar: We’ve seen skimmers just plopped in the dirt. Over time, the ground settles, the skimmer shifts, and the plumbing lines snap. The concrete collar is non-negotiable. It's the anchor.
- Bad Plumbing Joints: Rushing the solvent welding process is a guaranteed future leak. Use fresh primer and cement, ensure full coverage, and hold the joint until it sets. It takes an extra minute per joint, but it saves you from digging it all up later.
- Overtightening the Faceplate: This is a classic DIY mistake on vinyl pools. It feels like tighter is better, but it's not. Overtightening will crack the plastic and ruin the entire skimmer body. Snug and even is the goal.
- Using the Wrong Sealant: Not all caulks and sealants are created equal. You must use a product specifically rated for continuous underwater use and resistant to pool chemicals. Using cheap bathroom caulk will result in a failed seal within a single season.
Integrating the Skimmer into Your Overall Landscape Design
A pool doesn't exist in a vacuum. It's the centerpiece of your backyard, and every element needs to work in harmony. The skimmer, while functional, must also be considered in the grander scheme of your outdoor space. The skimmer lid will be visible on your pool deck, so its placement matters.
When we're in the design phase, we think about traffic flow, seating areas, and aesthetics. We try to place skimmers in less prominent locations where the lid won't be an eyesore or a tripping hazard. This is all part of a cohesive Pools AND Spas design that considers both function and form. The type of decking material you choose, whether it's poured Concrete SAN Diego, elegant pavers, or natural stone, will also influence how the skimmer lid is framed and integrated. A well-designed space makes these functional elements almost disappear, allowing the beauty of the overall landscape to shine through.
When to Call a Professional (And Why It’s Often Worth It)
We've laid out the entire process, and as you can see, it's meticulous and unforgiving. While it's technically possible for a skilled DIYer to tackle this, the stakes are incredibly high. A single mistake can lead to thousands of dollars in repairs, requiring you to excavate the area, break up the concrete deck, and start all over again. It's a difficult, often moving-target objective for someone without years of experience.
The value of hiring a professional lies in the peace of mind that comes from knowing it's done right the first time. We have the specialized tools, the experience to anticipate problems before they happen, and the knowledge of local soil conditions and best practices. We've done this hundreds of times. That muscle memory and expertise are what you're paying for.
If you've read this far and feel a sense of dread rather than excitement, that's perfectly okay. It’s a complex job. This is precisely why we offer comprehensive services that handle every aspect of pool and landscape construction. If you're feeling overwhelmed, it might be time to BOOK MY FREE CONSULTATION with our team. We can discuss your project and show you how a professional installation can provide a lifetime of worry-free enjoyment.
Ultimately, the skimmer is a small part of a much larger system. But its flawless function is absolutely essential to the health and longevity of your pool. Taking the time and care to install it correctly—whether you do it yourself or hire a pro—is an investment that will pay off every single day you enjoy your beautiful, clean, and perfectly functioning swimming pool.


.webp)
.webp)