A sprawling paver patio—it's the cornerstone of a great backyard. It’s where the grill master holds court, where friends gather around a fire pit, and where you kick back with a drink after a long week. It’s more than just stone and sand; it’s an extension of your home. But the gap between dreaming about that perfect patio and actually building one that lasts can feel like a chasm. We’ve seen it countless times across San Diego County: well-intentioned DIY projects that start to sink, shift, or sprout weeds within a year. It’s a frustrating, and frankly, expensive outcome.
That’s why we’re pulling back the curtain. Our team at Modern Yardz has spent years designing and building custom outdoor spaces, and we’ve learned—often through troubleshooting others’ mistakes—what separates a patio that endures from one that disappoints. This isn't just a list of steps. It's our collective experience distilled into a practical blueprint, focusing on the critical, non-negotiable elements of how to make a paver patio correctly. The first time. So grab a coffee, and let's get to work building something you'll be proud of for decades.
It All Starts with a Solid Plan
Honestly, the physical labor is the easy part. The real work—the work that dictates success or failure—happens before you ever pick up a shovel. Rushing this stage is the number one mistake we see. A well-thought-out plan prevents catastrophic errors down the line.
First, envision the space. How will you use it? A dining area needs to be large enough for a table and chairs with room to walk around, while a simple seating area might be smaller. Use a garden hose or spray paint to outline the proposed shape directly on the ground. Live with it for a few days. Does it feel right? Does it interrupt the natural flow of your yard? Making adjustments now is free; making them later involves a jackhammer. It’s a simple step, but it’s foundational.
Now, let's talk about the silent killer of patios: water. Your patio must—we can't stress this enough—slope away from your house foundation. The standard, and what we always implement, is a minimum slope of 1/4 inch per foot. This means for every four feet of patio extending from your house, it should drop by one inch. It's subtle enough that you'll never feel it, but it’s formidable enough to direct a torrential downpour away from your home, preventing water damage that can be devastating. We use a level and string lines to meticulously plan this grade before any digging begins. Don't eyeball it. Ever.
And before you break ground, please make the most important phone call of the project: dial 811. It’s a free national service that contacts local utility companies to mark the approximate location of underground lines for gas, electric, and water. Hitting one of these isn't just an expensive repair; it's incredibly dangerous. Give them a few business days to come out. It's a non-negotiable safety step.
This planning phase is precisely where professional Services can make a significant, sometimes dramatic shift in the outcome. A professional design considers not just the patio itself but its integration with the entire landscape, from lighting to planting to drainage. It’s about creating a cohesive outdoor room, not just a slab of stone.
Gathering Your Arsenal: Tools and Materials
Having the right equipment on hand makes the entire process smoother and safer. You can rent some of the heavier equipment, which is what we recommend for a one-off project. Trying to compact a base with a hand tamper on anything larger than a tiny walkway is a recipe for failure and a sore back. Seriously.
Essential Tools:
- Shovel (both pointed and flat)
- Wheelbarrow
- Tape Measure
- Stakes and String Line
- Line Level or Laser Level
- 4-foot and 2-foot Carpenter's Levels
- Garden Rake
- Push Broom
- Plate Compactor (rent this—it’s worth every penny)
- Two 1-inch outer diameter metal pipes (for screeding)
- 2x4 board (longer than the widest part of your patio)
- Paver Extractor (optional, but a lifesaver)
- Diamond-blade Wet Saw or Paver Splitter (for cuts)
- Safety Glasses, Gloves, and Hearing Protection
Essential Materials:
- Pavers of your choice
- Class II Road Base (or equivalent crushed aggregate)
- Coarse Concrete Sand (not play sand)
- Plastic or Aluminum Paver Edging
- 10-inch Steel Spikes
- Polymeric Sand
Choosing your pavers is the most exciting material decision. They set the entire aesthetic. There are three main families, each with its own character and demands. Our team has worked extensively with all of them, and here’s our honest take on what you're getting into.
| Paver Type |
Pros |
Cons |
Best For |
Our Professional Insight |
| Concrete Pavers |
Huge variety of shapes, colors, and textures. Very durable and affordable. Uniform size makes for easier installation. |
Color can fade over time with sun exposure (a big factor here in San Diego). Can feel less 'premium' than natural options. |
High-traffic areas, modern designs, budget-conscious projects, driveways. |
We've found that high-quality, color-through concrete pavers offer the best long-term value. Cheaper pavers are often just surface-dyed and show wear much faster. |
| Clay Brick Pavers |
Classic, timeless look. Color is baked in, so it never fades—it just develops a richer patina. Very strong. |
More expensive than concrete. Can be more brittle, leading to chipping during cuts. Limited color palette. |
Traditional, colonial, or rustic-style homes. Walkways and classic patios. |
Their non-fading quality is a huge selling point. For homeowners wanting that authentic, old-world feel, there is simply no substitute. They require a bit more care during installation. |
| Natural Stone |
Unmatched natural beauty and variation (travertine, flagstone, slate). Extremely durable and ages beautifully. Each piece is unique. |
The most expensive option. Irregular shapes and thicknesses make installation much more difficult and time-consuming. |
High-end patios, pool decks (travertine stays cool), organic and naturalistic landscape designs. |
This is where craftsmanship truly shows. Creating a level surface from irregular stones is an art. We recommend this for experienced installers or homeowners with immense patience. The result, however, is impeccable. |
The Foundation Is Everything: Excavation and Base Prep
If you take away only one thing from this entire guide, let it be this: your paver patio is only as good as the base beneath it. We spend more time and energy on this step than any other. It’s the unseen hero of a multi-decade patio life. A poor base will fail.
First, excavation. You need to dig out the existing soil to make room for your base materials. How deep? It’s a simple calculation: the height of your paver + 1 inch for the sand bed + 4-6 inches for the compacted base. For a typical pedestrian patio in San Diego's relatively stable soil, a 4-inch base is usually sufficient. If you’re building a driveway or have clay-heavy soil, you’ll want to go for at least 6 inches, maybe more. For a standard 2 3/8-inch paver, that means you’re digging down about 7.5 to 8 inches from your desired final patio height.
As you dig, make sure you're extending the excavated area about 6-8 inches beyond the final patio perimeter on all sides. This gives you a stable foundation for your edge restraints. Use your string lines and level to ensure you’re digging to the correct depth and maintaining that crucial 1/4-inch-per-foot slope.
Once excavated, the first thing you must do is compact the native soil—the subgrade—with the plate compactor. Run the machine over the entire area 2-3 times. This creates a solid, unyielding platform to build upon. Don't skip this. A soft subgrade will sabotage your entire project.
Now, for the base material, typically Class II road base. Start adding it in 2-inch layers (or lifts, as we call them in the industry). Spread a layer, lightly rake it even, and then compact it thoroughly with the plate compactor. You'll know it's compacted when the machine starts to bounce more than vibrate. Then add the next 2-inch lift. Repeat until you’ve reached your desired base depth. This multi-lift approach is critical—trying to compact a single 4- or 6-inch layer all at once is impossible. You’ll only compact the top inch, leaving a soft, spongy mess underneath that will settle and sink over time.
During this process, constantly check your grade with a level. The final compacted base should be a smooth, hard, and perfectly sloped surface. It should feel like concrete. This is your patio's foundation. Make it flawless.
Setting the Stage: Sand Bedding and Screeding
With your rock-solid base complete, it’s time for the sand bedding layer. This is not a leveling layer; the leveling was done with the base. The sand's purpose is to provide a uniform bed to set the pavers into, locking them in place. We use coarse concrete sand for this, never play sand or stone dust, which can hold too much moisture.
Here’s where those two 1-inch metal pipes come in. Lay them parallel to each other on top of your compacted base, about 6-8 feet apart. Shovel sand between them, filling the area slightly higher than the pipes. Now, take your straight 2x4 board, rest it on top of the two pipes, and pull it towards you in a slight side-to-side sawing motion. This is called screeding. It removes the excess sand, leaving a perfectly smooth, exactly 1-inch-deep bed of sand. Remove the pipes carefully and fill in the indentations with a little extra sand, smoothing it with a trowel.
Work in sections, and only screed an area you can lay pavers on without stepping on the sand. This surface is pristine. Protect it. Any footprint or disturbance will telegraph through to the final pavers. It's a meticulous process, but it's what guarantees a flat, professional-looking surface.
The Fun Part: Laying the Pavers
Finally, you get to see your patio take shape. This is where the visual payoff begins, but precision is still paramount.
Start laying pavers from a hard edge, like the wall of your house, and work outwards. If the patio is freestanding, start from a corner, preferably a 90-degree one. Use your string lines set at the final patio height as a guide to keep your lines perfectly straight. Place the pavers gently onto the sand bed—don't slide or push them into place, as this will disturb the sand. Just set them down, straight down. They should fit snugly together, with a small gap (typically 1/8 inch) provided by the spacer bars built into most modern pavers.
Work your way across the patio, following your chosen pattern. Popular options like running bond are straightforward, while patterns like herringbone are more complex and will require more cuts. Speaking of cuts, you'll inevitably need them at the edges. A diamond-blade wet saw (rentable) will give you the cleanest, most precise cuts. A paver splitter is faster and less messy but provides a more rustic, split-face edge. Always wear your safety glasses when cutting.
As you lay the pavers, check your work every few rows with a level to ensure the surface is even. If a paver is too high, you can tap it down with a rubber mallet. If it's too low, pull it up, add a small amount of sand underneath, and reset it. This is your chance to perfect the surface before it's all locked in. This attention to detail is what makes our work at Modern Yardz stand out. We don’t just build patios; we craft them.
Locking It In: Edge Restraints and Jointing Sand
Your pavers are all laid out. It looks like a patio, but it’s not finished. Without something to hold them in, the outside pavers will slowly creep outwards, creating ever-widening gaps. This is where edge restraints come in. They are absolutely non-negotiable.
We recommend using purpose-built plastic or aluminum paver edging. It's flexible enough to handle curves but strong enough to provide rigid support. Place the edging directly against the outside border of your pavers, ensuring the top of the edging sits below the final paver height so it will be hidden by soil or mulch. Secure it by driving 10-inch steel spikes through the provided holes and into the compacted base material every 12 inches.
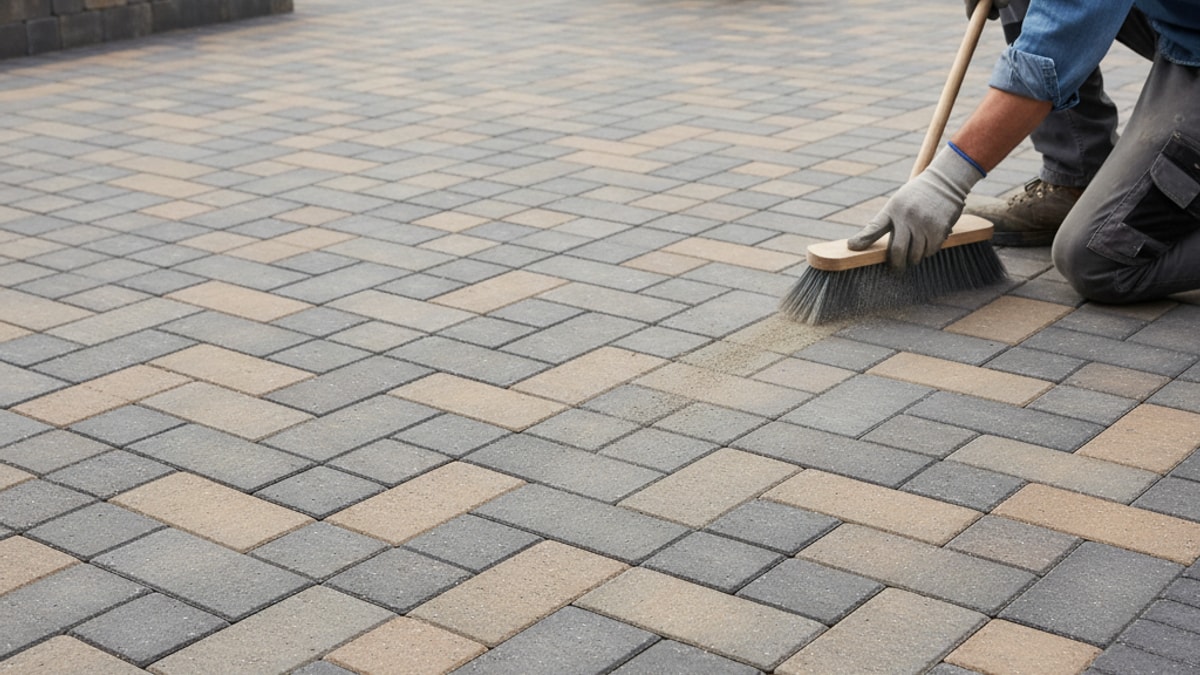
Now for the magic that ties it all together: polymeric sand. This is a fine sand mixed with a polymer binder that hardens when activated with water. It locks the pavers together, prevents weed growth, and resists erosion from rain and insects.
Sweep the dry polymeric sand over the entire surface of the patio, working it into the joints until they are completely full. Then, run the plate compactor over the top of the pavers. This does two things: it settles the pavers fully into the sand bed for a final, even surface, and it vibrates the polymeric sand deep into the joints. You may need to sweep more sand in after this step. Once the joints are full, use a leaf blower on a low setting or a soft broom to remove every last grain of sand from the paver surfaces. This is critical. Any sand left on top will create a permanent, hazy stain when you add water.
Finally, set your hose nozzle to a gentle shower or mist setting. Lightly water the patio, starting at the highest point and working down. You want to apply just enough water to activate the polymers without washing the sand out of the joints. Follow the manufacturer's instructions to the letter—some require a second light watering after a few minutes. Then, stay off the patio for at least 24-48 hours to allow the sand to fully cure and harden.
The Finishing Touch: Sealing and Maintenance
You've built a beautiful, structurally sound patio. The last optional—but highly recommended—step is sealing it. A good quality paver sealer will protect your investment by enhancing the color, preventing stains from spills or leaves, and making it easier to clean. It also adds another layer of protection to the jointing sand.
Wait at least 30-60 days after installation before sealing to allow any efflorescence (a white, chalky deposit) to naturally emerge and be cleaned off. Apply the sealer with a roller or sprayer on a clean, completely dry day. A sealed patio not only looks better but also stands up much better to the elements. For more tips on long-term care, you can always check our Blog where we share ongoing maintenance advice.
When Does a DIY Project Become a Pro Job?
Look, we have immense respect for the dedicated DIYer. But we also believe in being realistic. A small, flat, square patio is a very achievable weekend project. But certain factors dramatically increase the complexity to the point where professional help is not just a convenience, but a necessity for a successful outcome.
If your yard has a significant slope, you're likely going to need retaining walls integrated into the design. If you're dealing with major drainage issues or difficult soil, a professional grading plan is essential. Large, complex, multi-level patios with features like built-in kitchens or fire pits require an immense amount of technical expertise. Our team at Modern Yardz has the engineering knowledge and heavy equipment to tackle these formidable challenges safely and efficiently. You can learn more About our approach and the skilled craftsmen who make these projects come to life.
Knowing your limits is a sign of wisdom, not defeat. If you're feeling overwhelmed or your project involves any of these complexities, don't hesitate to reach out. We're always happy to provide guidance. You can easily Contact our San Diego office to talk through your project. We invite you to BOOK MY FREE CONSULTATION to see how we can bring your vision to life without the stress and uncertainty.
Building a paver patio is a rewarding journey. It’s a project that combines brute force with meticulous detail. By following these steps—especially by obsessing over the base preparation—you can create a stunning outdoor space that serves your family for years. It's about taking the time to do it right, creating a foundation not just of gravel and sand, but for a lifetime of memories.


.webp)
.webp)