How to Build a Screened In Patio That Lasts for Decades
There's a reason so many of us in San Diego dream of the perfect outdoor space. It’s that seamless blend of indoor comfort and outdoor freedom, the ability to enjoy our impeccable weather without the less-than-charming aspects—like mosquitos inviting themselves to dinner or the afternoon sun becoming just a bit too relentless. A screened-in patio isn't just an addition; it's a lifestyle upgrade. It's a quiet morning coffee room, an evening dining spot, a protected play area for the kids. It’s your own private slice of the outdoors, redefined.
But let’s be honest—transforming that dream into a durable, beautiful reality involves more than just a staple gun and a roll of screen. Building a structure that looks like a natural extension of your home, stands up to coastal air, and meets all local codes is a formidable task. Our team at Modern Yardz has spent years designing and constructing these spaces all over San Diego County, from the coastal breezes of Oceanside down to the sunny yards of Chula Vista. We've seen the triumphs and the catastrophic mistakes. So, we're pulling back the curtain to show you how to build a screened in patio the right way. This isn't just a weekend project; it's an investment in your home and your quality of life.
First Things First: Planning, Permits, and Design
Before a single piece of lumber is cut, the most critical work begins. This is the stage where you prevent future headaches, budget overruns, and structures that just don’t feel right. Rushing this part is, in our experience, the number one mistake homeowners make. Don't do it.
First, let's talk about the City of San Diego (and its surrounding municipalities). They have rules. Lots of them. A screened-in patio is almost always considered a permanent structural addition, which means you're going to need a permit. This isn't just bureaucratic red tape; it’s a system designed to ensure your structure is safe, won't collapse in a storm, and meets property line setback requirements. Navigating the permitting process can be a grueling, often moving-target objective. It involves submitting detailed architectural plans that show everything from foundation specs to roof pitch and electrical layouts. Our team has found that having a professional handle this from the get-go saves an incredible amount of time and frustration. A well-prepared permit application is the difference between a smooth start and months of delays.
Now for the fun part—the design. What do you want this space to be? A simple, bug-free zone, or a true three-season room that feels like a part of your Home? Think about flow. How will you enter the patio from the house? How will you access the rest of the yard? Consider the sun's path across your property. A patio with western exposure will get blasted with afternoon heat, so you might want to incorporate a solid, insulated roof rather than just a screen top. Or maybe you want to use a specific type of solar screen to mitigate that. The point is, the design phase should be deeply personal and intensely practical. It’s where our Services truly shine, as we help you envision a space that perfectly complements your home’s existing architecture and your family’s lifestyle.
And—let's be honest—this is crucial: you need to check for underground utilities. Before you dig for footings or a foundation, you must call 811. Hitting a water main or a gas line is a catastrophic, expensive, and incredibly dangerous mistake. It happens more often than you'd think. Just make the call.
The Foundation: The Unseen Hero of Your Patio
You can build the most beautiful structure in the world, but if it's sitting on a shoddy foundation, it's not going to last. The foundation is the critical, non-negotiable element that everything else depends on. You have a few primary options here, and the right choice depends on your existing setup, budget, and local soil conditions.
Many San Diego homes already have a concrete slab patio. If it's in good condition—meaning it's level, free of major cracks, and thick enough—you might be able to build directly on top of it. This is the best-case scenario. However, our experience shows that many existing builder-grade slabs are not sufficient to support the weight of a full roof structure. They’re often just a thin 2-3 inch pour, not the 4-inch reinforced slab needed for a permanent addition. You’ll need to have it professionally assessed. Don’t guess.
If you need a new foundation, a monolithic concrete slab is the gold standard. This involves excavating the area, setting up forms, laying down a vapor barrier and wire mesh or rebar for reinforcement, and then pouring the concrete. It’s a single, solid piece that provides unmatched stability. This is a job that demands precision. The slab must be perfectly level and sloped ever so slightly away from the house for drainage. A poorly poured slab can lead to water pooling, cracked tiles, and an uneven structure. It’s heavy, messy work, and for most people, it's a job best left to the professionals who do it every day.
Alternatively, you could build your patio on a raised deck-style foundation. This involves setting concrete footings deep into the ground (below the frost line, though that’s less of a concern here in Southern California) and then building a sub-structure of pressure-treated joists and beams. This can be a great option for sloped yards or if you want the floor of your patio to be elevated to match the floor level of your house. It also allows for more airflow underneath, which can be beneficial. The trade-off is that it can feel less permanent than a solid slab and requires impeccable measurement to ensure everything is square and level. It's a different kind of precision—the precision of a carpenter rather than a mason.
Framing: Creating the Bones of Your Space
With your foundation set, it’s time to give your screened-in patio its shape. The framing is the skeleton, and its strength and accuracy will dictate the quality of the final product. Your two main material choices are pressure-treated wood and aluminum. Each has its own set of advantages and challenges.
Wood framing offers a classic, traditional look. It's robust, highly customizable, and can be painted or stained to perfectly match your home. We typically recommend using pressure-treated pine for the base plates (anything touching the concrete) and then moving to a higher-quality wood like Douglas fir or cedar for the vertical posts and roof structure. The key is structural integrity. You need to understand load paths—how the weight of the roof is transferred down through the posts and into the foundation. This means using proper headers over wide spans like doorways and ensuring every connection is secure with structural screws or galvanized brackets. Nailing a few 2x4s together just won't cut it. This structure needs to withstand wind, weight, and time.
Aluminum framing, on the other hand, provides a sleek, modern aesthetic and is virtually maintenance-free. It won't rot, warp, or succumb to termites. It’s a lighter material, which can sometimes make installation easier. However, it’s often part of a pre-fabricated kit system, which can limit your design flexibility. While these kits have improved over the years, they can sometimes lack the custom, built-in look that a stick-built wooden frame provides. Our team has found that for a truly integrated and high-end feel that complements a custom home, wood framing often delivers a superior result. But for pure durability and low maintenance, aluminum is a formidable contender.
Here’s a quick breakdown our team put together:
Feature
Wood Framing
Aluminum Framing
Aesthetics
Classic, traditional, highly customizable. Can be painted or stained.
Modern, sleek, clean lines. Limited color options.
Durability
Excellent, but requires maintenance (sealing/painting) to prevent rot.
Outstanding. Resistant to rot, insects, and warping. No maintenance.
Cost
Generally lower upfront material cost, but can be more labor-intensive.
Higher material cost, but often faster installation (especially kits).
Strength
Very strong and rigid when properly engineered and constructed.
Strong and lightweight, but may require specific engineering for large spans.
DIY-Friendliness
More forgiving for experienced DIYers with carpentry skills.
Kit systems can be DIY-friendly, but custom work requires specialty tools.
Regardless of your choice, everything must be plumb, level, and square. Everything. If your walls are out of plumb, your roof won't sit right, and your screen panels will be a nightmare to install. Measure twice, cut once? We recommend measuring three times. Seriously.
This video provides valuable insights into how to build a screened in patio, covering key concepts and practical tips that complement the information in this guide. The visual demonstration helps clarify complex topics and gives you a real-world perspective on implementation.
The Roof: Your Shield from the Elements
The roof does more than just keep you dry; it defines the feel of the entire space. It controls light, heat, and how connected the patio feels to the main house. A simple screened roof is an option, but it offers zero protection from rain or sun. Most people opt for a solid roof.
One of the most popular and aesthetically pleasing options is to tie the patio roof directly into your home's existing roofline. This involves building a traditional rafter system, sheathing it with plywood, and then covering it with the same roofing material as your house (shingles, tile, etc.). This approach makes the patio look like it was part of the original construction—a seamless, beautiful addition. It's also the most complex and expensive option. It requires a deep understanding of roofing, flashing, and water management to ensure you don't create leaks back into your home. This is definitely not a job for a novice.
A more common and cost-effective solution is to use pre-fabricated insulated roof panels. These are essentially structural sandwiches, with an aluminum skin on the top and bottom and a core of high-density foam insulation. They are relatively lightweight, incredibly strong, and provide excellent insulation against the sun's heat—a huge plus in San Diego. They install quickly and create a clean, finished ceiling on the underside. You can even run electrical wiring through built-in channels for ceiling fans and lights. It's a practical, high-performance solution.
Another choice is polycarbonate roofing. These translucent panels let in a ton of natural light while blocking harmful UV rays. It's a great way to create a bright, airy space without the full exposure of a screen roof. They come in clear, tinted, and opaque varieties. The downside? They can be noisy in the rain, and they don't offer the same insulating properties as solid panels, so the space can get warm on a hot day. It’s a trade-off between light and heat control.
All About the Screen: Installing Your Barrier
This is the moment of truth. The screen is what turns a covered porch into a screened-in patio. The quality of your screening job will make or break the user experience. A loose, sagging screen looks terrible and won't keep bugs out. A tight, perfectly installed screen is a thing of beauty.
First, you need to choose your screen material. Standard fiberglass screen is the most common and affordable choice. It's flexible, easy to work with, and does a great job of keeping insects out. For more durability, you can upgrade to aluminum screen, which is more rigid and less prone to tearing, but it can dent or crease if you're not careful. If you have pets, we can't stress this enough—invest in pet-resistant screen. It's a vinyl-coated polyester that is seven times stronger than standard fiberglass and can withstand claws and paws. Finally, for patios that get a lot of direct sun, solar screen is a game-changer. It's a denser weave that can block 80-90% of the sun's heat and glare, keeping your patio significantly cooler.
Most modern screened patios use a spline system. The frame (whether wood or aluminum) has a channel or groove running along the inside edge. You lay the screen over the opening, and then use a special wheeled tool called a spline roller to press a flexible vinyl cord (the spline) into the groove, which locks the screen tightly in place. Then, you trim the excess with a utility knife. It sounds simple. It's not. Getting the screen perfectly taut without creating wrinkles or pulling the frame out of square is an art form that takes practice. Our team has learned—the key is to start at one corner, work your way down one side, then pull the screen taut across the opening before splining the opposite side. It's a process of gentle, consistent pressure.
Don't forget the door! A high-quality screen door that closes securely is essential. A cheap, flimsy door that doesn't latch properly defeats the entire purpose of the room. Invest in a solid door with good hardware and a reliable hydraulic closer.
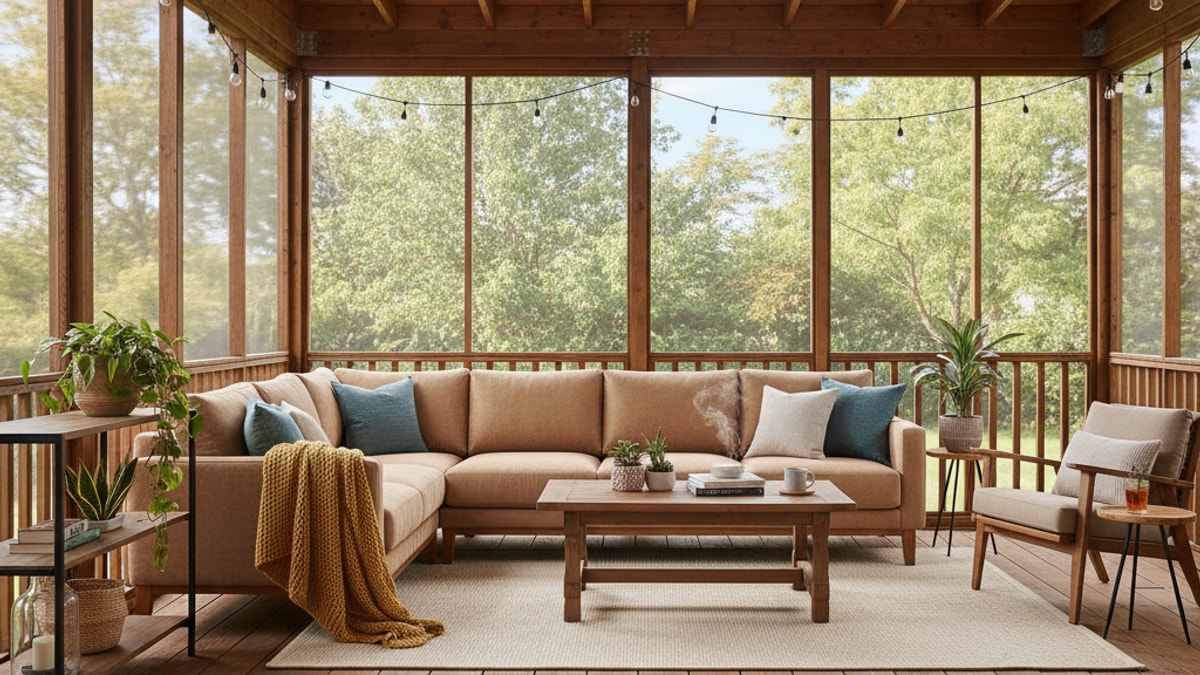
Finishing Touches: From Good to Great
A well-built structure is one thing. A truly inviting living space is another. The finishing touches are what elevate your screened-in patio from a functional addition to your favorite room in the house. This is where you can truly personalize the space and integrate it with your overall landscape design.
Electrical is a big one. At a minimum, you'll want an outdoor-rated ceiling fan for air circulation and some form of lighting. Recessed can lights on a dimmer switch create a wonderful ambiance in the evening. You might also want to add outlets for plugging in a laptop, speakers, or even a small outdoor refrigerator. All electrical work must be done by a licensed electrician using GFCI-protected circuits and weather-resistant boxes. This is a non-negotiable for safety. Our holistic approach, which you can read more about on our About page, always considers these integrated systems from the very beginning of the design process.
What about the floor? If you have a concrete slab, you can leave it as is, or you can enhance it. A high-quality concrete stain or epoxy coating can add color and a durable, easy-to-clean finish. Outdoor tile or pavers can create a more upscale, custom look. If you have a wood deck foundation, you can use traditional decking, composite boards, or even outdoor carpeting for a softer feel. The flooring choice has a massive impact on the room's character.
Finally, think about how this new room connects to the rest of your yard. Does it lead out to an outdoor kitchen or a fire pit area? Does it overlook the pool? A screened-in patio shouldn't feel like a box tacked onto your house; it should be a transitional space that gracefully connects your indoor and outdoor worlds. For more inspiration on creating these connected spaces, feel free to browse our Blog.
DIY or Call the Pros?
So, after all that, the big question remains: can you build a screened in patio yourself? Maybe. If you have extensive, demonstrable experience in carpentry, concrete work, and roofing, and you have a lot of time and patience, it's certainly possible. The satisfaction of building something with your own hands is undeniable.
However, for most people, this is a project that sits firmly in the 'call a professional' category. The sheer number of skills required—permitting, foundation work, framing, roofing, electrical, and finishing—is immense. A single mistake in the foundation or roof flashing can lead to thousands of dollars in repairs down the line. A professional build ensures that the structure is safe, compliant with all codes, and built to last. It's the difference between a project that takes a few weeks and one that drags on for months (or years). It's the peace of mind that comes from knowing it was done right.
If reading this has made you feel a little overwhelmed, that’s perfectly normal. This is a big undertaking. The good news is, you don't have to do it alone. Our team at Modern Yardz is here to help. If you'd like to discuss your vision for a perfect outdoor living space, please Contact us. We'd be happy to talk you through the options and help you BOOK MY FREE CONSULTATION.
A screened-in patio is more than just a home improvement project. It’s a way to reclaim your outdoor space, to create a sanctuary where you can relax and connect with family and friends, all while enjoying the beautiful San Diego climate we're so lucky to have. Whether you build it yourself or partner with a team of experts, it's an investment that will pay dividends in lifestyle and enjoyment for many, many years to come.
Frequently Asked Questions. Here are some common questions. Find the answers you're looking for below.
Do I need a permit to build a screened in patio in San Diego?
Almost certainly, yes. A screened-in patio with a solid roof is considered a permanent structural addition, which requires building permits from the city or county. This process ensures the structure is safe, up to code, and meets all local zoning requirements.
What's the best material for the patio frame?
Both pressure-treated wood and aluminum are excellent choices. Wood offers a classic, customizable look but requires maintenance. Aluminum is virtually maintenance-free with a modern aesthetic, making it a great long-term, durable option.
Can I build a screened room on my existing concrete slab?
It depends. If your existing slab is at least 4 inches thick, properly reinforced, and in good condition (no major cracks), you may be able to build on it. Our team always recommends a professional assessment, as many standard builder slabs are not sufficient to support a full roof structure.
How much does it cost to build a screened in patio?
The cost varies dramatically based on size, materials, roof type, and foundation requirements. A simple, pre-fabricated kit might start in the low thousands, while a custom-built, fully integrated room can be a significant investment. We recommend getting a detailed quote based on a specific design.
What is the best type of screen to use if I have pets?
We can't stress this enough: use pet-resistant screen. It's a vinyl-coated polyester material that is about seven times stronger than standard fiberglass screen. It's specifically designed to withstand scratches and pressure from cats and dogs.
How long does it take to build a screened in patio?
For a professional crew, the actual construction can take anywhere from one to three weeks, depending on the complexity. However, the entire process, including design, engineering, and permitting, can take several months from start to finish.
Should my patio roof match my house roof?
For the most seamless and integrated look, tying the patio roof into your existing roofline and using matching materials is the best option. However, high-quality insulated aluminum panels are a very popular, durable, and cost-effective alternative that still looks fantastic.
How do I keep my screened in patio cool in the summer?
An outdoor-rated ceiling fan is a must for air circulation. We also highly recommend an insulated roof and/or solar screens, which can block up to 90% of the sun's heat, keeping the space significantly more comfortable on hot San Diego days.
What kind of maintenance does a screened in patio require?
Maintenance depends on your materials. An aluminum-framed patio requires very little—just occasional cleaning. A wood-framed patio will need to be re-sealed or re-painted every few years to protect it from the elements. Screens should be gently washed annually.
Can I add electrical outlets and lights to my screened patio?
Absolutely! We highly recommend it. Adding outlets, lighting, and a ceiling fan dramatically increases the functionality of the space. All electrical work must be performed by a licensed electrician using GFCI protection and outdoor-rated fixtures for safety.
What is a spline system for screening?
A spline system is the most common method for installing screens. It involves pressing a flexible vinyl cord, called a spline, into a groove in the frame. This locks the screen material into place, creating a tight and secure fit.
Is a screened patio a good investment for my home's value?
Yes, a well-designed and professionally built screened-in patio is a great investment. It adds valuable, usable square footage to your home and is a highly desirable feature for potential buyers, especially in a climate like San Diego's.


.webp)
.webp)