The edge of a swimming pool is so much more than just a place to sit. It’s the frame for your backyard’s centerpiece, the surface that connects the cool water to the warm patio, and a critical safety feature. That edge is the coping, and installing it correctly is one of the most deceptively complex and crucial steps in any pool project. It’s a job where precision isn’t just a goal; it’s a requirement. A botched coping installation doesn't just look bad—it can lead to premature failure of the pool structure itself.
Over the years, our team at Modern Yardz has installed miles of pool coping. We’ve worked with every material imaginable, on pools of every shape and size. We’ve also been called in to fix countless DIY jobs and projects handled by less experienced crews. That experience has given us an unflinching perspective on what it truly takes to get this right. It’s a blend of art and science, demanding patience, the right tools, and a deep understanding of how materials behave. So, let's pull back the curtain and walk through how to install pool coping the way the professionals do it.
What Exactly is Pool Coping and Why is it So Important?
Before we dive into the 'how,' let’s get grounded in the 'why.' What is this stuff, anyway? Simply put, pool coping is the cap or edging placed on top of the pool's shell wall (known as the bond beam). Think of it as the finishing touch that bridges the pool structure with the surrounding deck or patio. But its role is far from just decorative. It’s a workhorse.
First, there’s safety. The edge of the coping typically overhangs the pool wall slightly, creating a lip. This gives swimmers a secure handhold to grip when entering or exiting the pool, or just when holding onto the side. Most coping materials are also chosen for their non-slip properties, which is a non-negotiable element around a wet environment.
Second, it’s about structural integrity. The coping directs splash-out water away from the pool shell and into deck drains. This prevents water from getting behind the shell, which could cause soil erosion, shifting, and eventually, catastrophic damage to the pool structure and the surrounding deck. It seals the top of the bond beam, protecting the steel rebar within from rust and corrosion. It’s the pool’s first line of defense against the elements.
Finally, there’s the aesthetic component. The coping is what visually defines the shape of your pool. It’s the frame on the painting. The right material and a flawless installation can elevate the entire look of your backyard, seamlessly integrating your custom Pools AND Spas with other hardscape elements. A poor installation, with uneven stones or sloppy grout lines, sticks out like a sore thumb and cheapens the entire investment.
Choosing Your Weapon: A Breakdown of Coping Materials
Your choice of material has a massive impact on the look, feel, and longevity of your pool edge. There’s no single 'best' option—it all depends on your design goals, budget, and tolerance for maintenance. Our team has found that understanding these trade-offs upfront prevents disappointment later.
Here's what we've learned about the most common choices:
Natural Stone: This is the premium choice for a reason. Materials like travertine, limestone, flagstone, and bluestone offer unparalleled natural beauty. Each piece is unique. Travertine is incredibly popular because it stays relatively cool to the touch even in direct sun, a huge benefit for bare feet. However, natural stone is porous and requires regular sealing to prevent staining and water damage. It's also the most expensive option and can be challenging to cut and shape perfectly.
Precast Concrete Pavers: These are engineered for this exact purpose. They are incredibly durable, uniform in shape and size (which simplifies installation), and come in a sprawling variety of colors, textures, and profiles (like bullnose or rough-cut). Many are designed to match specific lines of Pavers SAN Diego, allowing for a perfectly cohesive look between the pool edge and the patio. They offer a fantastic balance of cost, durability, and aesthetic flexibility.
Brick: For a classic, traditional look, brick is a timeless choice. It’s durable and provides excellent traction. The key here is to use coping-specific bullnose bricks, which have a rounded edge for comfort and safety. Standard sharp-edged bricks are not suitable. Brick can be susceptible to spalling (flaking) in freeze-thaw cycles if not properly sealed.
Poured Concrete: This offers the ultimate in customization. Poured-in-place coping is formed and poured as a single, seamless piece around the pool's perimeter. It can be stamped, colored, and textured to match any design, from sleek modern to rustic stone. This is often part of a larger Concrete SAN Diego patio pour. The challenge? It’s a job for seasoned professionals only. The forming process is complex, and there is zero room for error once the concrete starts to flow.
Here’s a quick comparison to help you weigh your options:
| Material |
Aesthetics |
Durability |
Cost |
Maintenance |
| Natural Stone |
Highest-end, unique |
Very Good (with sealing) |
$$$$ |
High (requires sealing) |
| Precast Pavers |
Very Versatile |
Excellent |
$$ |
Low to Moderate |
| Brick |
Classic, Traditional |
Good |
$$ |
Moderate (sealing needed) |
| Poured Concrete |
Highly Customizable |
Excellent |
$$$ |
Low |
The Essential Toolkit: Gathering Your Supplies
Attempting this job without the right equipment is a recipe for frustration and failure. This isn’t a quick weekend project where you can get by with a basic homeowner's toolkit. We’re talking about specialized tools for masonry work. We can't stress this enough: having the right gear makes the difference between a professional finish and a total mess.
Here's a list of the must-haves our crews carry:
- Mixing: A heavy-duty, low-speed drill with a paddle mixer attachment, or better yet, a small mortar mixer. Plus, several 5-gallon buckets for mortar and clean water.
- Setting: A variety of masonry trowels (pointing, margin), a rubber mallet for tapping stones into place without damaging them, and a 4-foot level (and maybe a smaller torpedo level).
- Cutting: A 7-inch or 9-inch angle grinder with a high-quality continuous-rim diamond blade. This is non-negotiable for making the precise cuts needed for corners and curves.
- Measuring & Marking: A good tape measure, a carpenter's square, a chalk line, and a pencil or soapstone for marking cuts.
- Grouting & Cleaning: Grout bags (similar to a pastry bag, for precise application), grout floats, and most importantly, high-quality grout sponges and plenty of clean water.
- Safety Gear: This isn't optional. You need safety glasses or goggles (cutting stone creates dangerous shrapnel), heavy-duty work gloves, hearing protection for the grinder, and quality knee pads. Seriously, your knees will thank you.
The Main Event: Our Step-by-Step Installation Process
Alright, let's get into the nitty-gritty. This is the process our teams follow, refined over hundreds of successful projects. The key is methodical patience. Rushing any of these steps will show in the final product.
Step 1: Prep the Pool Beam Like Your Job Depends On It (Because It Does)
This is the foundation. A clean, stable, and level surface is paramount for a lasting bond. First, the top of the pool's concrete bond beam must be completely free of dirt, dust, loose debris, and any old adhesive or paint. We often use a wire brush or even the grinder to scuff up the surface to give the mortar something to really grab onto.
Next, check for level. Use your 4-foot level across the beam in multiple spots. Are there high or low spots? Minor imperfections can be corrected with the mortar bed, but significant issues may require grinding down high spots or applying a patch material to low spots. The goal is a consistent surface. Finally, lightly dampen the beam with a sponge just before you start setting the coping. A bone-dry concrete beam will suck the moisture out of your mortar too quickly, resulting in a weak bond.
Don't skip this.
Step 2: The Art of the Mortar Mix
A proper mortar mix is everything. Too wet, and your coping will slide around and sink. Too dry, and it won’t bond correctly. The consistency we aim for is like thick, creamy peanut butter. It should hold its shape on the trowel without dripping.
We almost exclusively recommend using a high-quality, polymer-modified thin-set mortar designed for exterior use and heavy materials like stone. The polymers add significant strength and flexibility, which is crucial for an outdoor installation that will experience temperature swings. Follow the manufacturer's mixing instructions to the letter. Mix it, let it 'slake' (rest) for 5-10 minutes, and then give it a final mix before you begin.
Step 3: Laying the First Piece (The Keystone)
Where you start matters. For a rectangular pool, we often start at the center of the longest wall. For a freeform pool, we might start at the tightest radius. The first piece sets the standard for the entire job. It must be perfect.
Apply a generous, even layer of mortar to the beam, about a half-inch thick. Then, 'back-butter' the coping piece itself—apply a thin, uniform layer of mortar to the back. This ensures 100% coverage and a tenacious bond. Carefully place the first stone onto the mortar bed, pressing down firmly with a slight twisting motion.
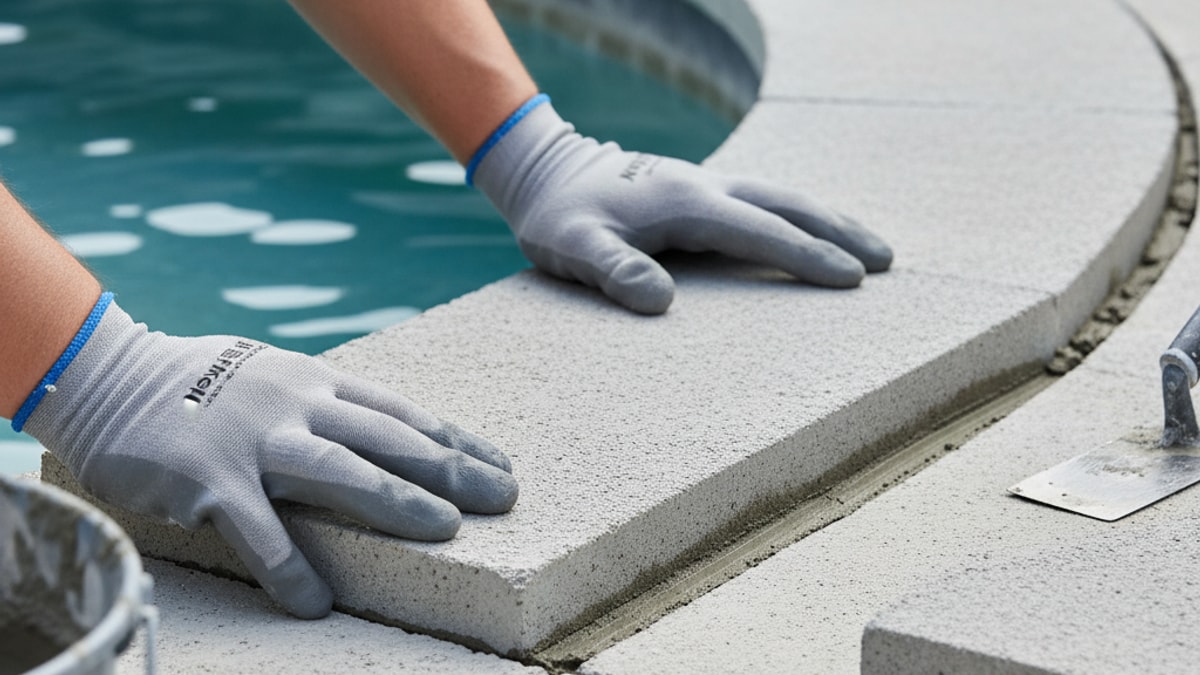
Step 4: Setting and Tapping for Perfection
Now grab your level and rubber mallet. Place the level on top of the coping piece. Is it level front-to-back? Is it level side-to-side? Gently tap it with the rubber mallet to make micro-adjustments until it's perfect. You also want a slight, almost imperceptible slope away from the pool to encourage drainage. We're talking about maybe 1/8 of an inch over the width of the coping. This is a nuanced detail that makes a huge difference.
Once the first piece is set, you repeat the process. Butter the beam, butter the next stone, set it in place next to the first one, and use the level and mallet to bring it to the exact same height and slope. Check your work constantly. Level across each piece individually and across adjacent pieces.
Step 5: Mind the Gaps: Spacing and Joints
The gap between each piece of coping is the grout joint. Consistency is key to a professional look. For uniform materials like precast pavers, you can use tile spacers (typically 1/4" or 3/8") to maintain perfect spacing. For irregular natural stone, it’s more of an art form, requiring a good eye to maintain a visually consistent joint width. These joints aren’t just for looks; they allow for slight expansion and contraction of the materials.
Step 6: Cutting and Shaping—Where Pros Shine
Sooner or later, you'll hit a corner, a curve, or an obstacle like a skimmer box or ladder anchor. This is where the angle grinder becomes your best friend and where DIY projects often go off the rails.
Cutting stone or concrete pavers requires a steady hand and a plan. Mark your cuts carefully. For corners, you'll need to make precise 45-degree miter cuts for a clean, seamless look. For curves, you'll make a series of smaller, straight cuts to follow the radius, then smooth the edge with the grinder. This takes practice. Always wear your safety gear, as this process creates a ton of dust and dangerous silica particles.
Step 7: The Grouting Process
After all the coping is set, you need to let the mortar cure completely. This usually takes at least 24-48 hours, depending on the weather. Don’t rush it. Once cured, it's time to grout.
Mix your grout to a similar 'peanut butter' consistency. We recommend using a grout bag to pipe the grout deep into the joints. This minimizes mess on the face of the coping. Fill the joints until they are flush with the surface. After the grout begins to set up slightly (it will lose its wet sheen), use a pointing trowel or a rounded tool to strike the joints, compacting the grout and creating a smooth, concave finish. This is a critical step for durability.
Step 8: The Final Clean and Seal
Now for the final, painstaking cleanup. After striking the joints, you'll have some excess grout on the stone surface. Use a high-quality grout sponge and a bucket of clean water to gently wipe the excess away. Be meticulous. Change your water frequently. A dirty sponge will just smear a grout haze all over your beautiful new coping.
Let the grout cure for the manufacturer-recommended time (often several days). The very last step is sealing. Applying a quality penetrating sealer to the coping and the grout joints will protect them from stains, water damage, and fading. It’s a simple step that dramatically extends the life and beauty of your installation.
Common Pitfalls and How to Sidestep Them
Our team has been called in to fix a lot of projects. Honestly, we've seen some real disasters. Most of them stem from a few common, avoidable mistakes.
- Improper Preparation: A dirty or uneven bond beam is the number one cause of failure. The coping will literally pop off within a year or two. There's no shortcut here.
- Hollow Spots: This happens from not back-buttering the coping or not getting full mortar coverage. If you tap on a set piece and hear a hollow sound, the bond is weak and it will fail. Pull it up and reset it.
- Inconsistent Grout Lines: This just screams 'amateur.' Take the time to space your pieces carefully. It makes a massive visual difference.
- Incorrect Drainage Slope: Coping that is level or, even worse, slopes toward the pool can trap water and cause problems. That slight outward slope is a professional detail that matters.
DIY vs. Professional Installation: An Unflinching Look
So, can you install pool coping yourself? Maybe. If you have extensive masonry experience, all the right tools, and a formidable amount of patience, it’s possible. But let’s be real: this is one of the most challenging hardscaping projects a homeowner can tackle.
The materials are heavy and unforgiving. The cuts have to be perfect. The consequences of a mistake aren't just cosmetic; they can impact the structural health of your pool. A full coping replacement is a costly and disruptive repair.
When we undertake a project, the coping is just one piece of a complete vision. It’s part of a cohesive Landscape Design SAN Diego that considers how the pool relates to the patio, an Outdoor Kitchens SAN Diego, and even the placement of Landscape Lighting SAN Diego to highlight the water at night. It's about creating a unified, functional, and beautiful space. If this process sounds overwhelming, that's completely understandable. It's what we do every day. If you'd rather leave it to the experts, you can always BOOK MY FREE CONSULTATION to have our team assess your project and discuss the possibilities.
Putting the final edge on a pool is immensely satisfying work when it's done right. That perfectly smooth, uniform line is the signature of quality craftsmanship. It’s the detail that elevates a simple swimming pool into a true backyard oasis, ready for years of enjoyment. It’s the detail that’s worth every ounce of effort.


.webp)
.webp)