A beautiful stone patio. It’s the centerpiece of so many San Diego backyards—the stage for family barbecues, quiet morning coffees, and evenings under the stars. The dream is a sprawling, level surface of gorgeous pavers. The reality, for many ambitious homeowners, can quickly become a weekend project spiraling into a lopsided, weed-infested headache. We’ve seen it happen. And that’s why we’re pulling back the curtain.
Here at Modern Yardz, we’ve spent years designing and building outdoor spaces from Chula Vista to Oceanside, and we know that the difference between a patio that lasts a lifetime and one that fails in a year isn't the stones themselves. It's everything that happens underneath. This isn't just a simple how-to; this is our professional breakdown, sharing the insights our team has gained from countless projects. So, if you’re ready to learn how to lay patio stones the right way, let’s get to work.
The Foundation: Why Your Patio's Base Is Everything
Let's be perfectly clear about something. The most beautiful, expensive patio stones in the world will fail—and fail spectacularly—if they're sitting on a poorly prepared base. It’s the single most critical, non-negotiable element of the entire process. We can’t stress this enough. This is where 90% of DIY projects go wrong.
Why? Because the base is what provides structural integrity. It distributes the load of foot traffic (and maybe patio furniture or a grill) evenly, prevents the stones from shifting or sinking, and—most importantly—it manages water. San Diego’s soil can be tricky; it's often clay-heavy, which expands when wet and contracts when dry. This movement is the mortal enemy of a flat paver surface. A proper base creates a stable, porous buffer zone that mitigates this movement and allows water to drain away freely. Without it, you get heaving, sinking, and those dreaded wobbly stones that trip you up every time.
Our experience shows that a robust foundation isn't just about digging a hole and throwing in some gravel. It’s a multi-layered, meticulously compacted system. It's the unseen hero of your outdoor space. Skimp here, and you're not saving money; you're just pre-paying for future repairs. Honestly, though. It’s that serious.
Your Tools and Materials: A Professional Checklist
Having the right gear doesn't just make the job easier; it makes a professional result possible. You can get by with the bare minimum, but investing in—or renting—the right equipment will pay dividends in both the quality of your work and the health of your back. This isn't just a shopping list; it's an arsenal.
Essential Tools:
- Shovels: You'll need both a flat-head spade for clean edges and a round-point shovel for digging and moving material.
- Wheelbarrow: A good, sturdy one. You'll be moving tons of material—literally.
- Tape Measure & String Lines: For marking out your patio area with precision. Accuracy here prevents a world of pain later.
- 4-Foot Level: Don't trust your eyes. A long level is essential for ensuring your base and your final patio have the correct slope for drainage.
- Hand Tamper: A heavy, flat metal plate on a stick. It's crucial for compacting the base material in corners and along edges where a plate compactor can't reach.
- Plate Compactor: This is a game-changer. Our team considers this a must-have for any patio over 50 square feet. Rent one for the day. A hand tamper just can't achieve the same level of compaction over a large area, and that compaction is what prevents sinking.
- Screed Rails and a Screed Board: These are used to create a perfectly flat sand setting bed. You can use 1-inch metal pipes as rails and a straight 2x4 as the board.
- Rubber Mallet: For tapping pavers into place without cracking them.
- Diamond Blade Masonry Saw: For making intricate cuts around obstacles or for creating curved edges. A paver splitter is faster for straight cuts but less versatile.
- Safety Gear: Goggles, gloves, dust mask, and steel-toed boots. Non-negotiable, especially when cutting stone.
Materials Deep Dive:
The materials you choose for your base are just as important as the tools you use to install them. Here’s a breakdown of what we use on our professional projects.
| Base Material |
Description |
Best For |
Our Team's Take |
| Class II Road Base |
A mix of crushed rock and fines (smaller particles). Compacts to a dense, concrete-like base. |
Virtually all patio and walkway applications. The industry standard. |
This is our go-to. It provides impeccable stability and excellent drainage. It's the professional choice for a reason—it simply works. |
| Decomposed Granite (DG) |
Finer than road base, often used for pathways. Can be stabilized with additives. |
Light-traffic pathways or rustic-style patios. |
We use DG more for decorative pathways than as a structural base for pavers. It can work for very small, light-use areas, but it's less robust. |
| Clean Crushed Rock |
¾-inch crushed rock without the fines. Offers excellent drainage but can be harder to level perfectly. |
Areas with significant drainage issues or for permeable paver systems. |
A fantastic choice for permeable applications. For standard patios, the lack of fines means it doesn't lock together quite as tightly as road base. |
And what about the sand? You'll need two types: a coarse, washed concrete sand for the 1-inch setting bed, and a specialized polymeric sand for the joints between the pavers. Don't mix them up. They serve entirely different—and equally critical—purposes.
The Step-by-Step Process: How We Lay Patio Stones
Alright, let’s get into the nitty-gritty. This is the process our crews at Modern Yardz follow. It's methodical, it's precise, and it delivers results that stand the test of time. We've refined this over years of practice, and it’s what separates a professional installation from an amateur one.
Step 1: Excavation—Digging for Success
First, you dig. But how deep? This is crucial. You need to calculate the total depth by adding up the height of your paver (usually 2 ⅜ inches), the depth of your sand bed (1 inch), and the depth of your compacted base (4-6 inches for a standard patio). So, you're looking at a total excavation depth of 7 to 9 inches.
Before you put a shovel in the ground, call 811 to have public utility lines marked. It’s free and it can prevent a catastrophic accident. Mark your patio outline with stakes and string, and then get to work. As you dig, ensure the bottom of your excavated area has a slight slope away from your house—about a ¼ inch drop for every foot of run. This is your first line of defense for drainage.
This part is pure labor. There’s no shortcut. It’s hard work, but getting it right sets the stage for everything else.
Step 2: The Aggregate Base—Layer by Layer
This is where the magic happens. Don't just dump all your Class II road base in at once. That's a rookie mistake. Our team has found that the key to unshakeable stability is to add the base material in 2-inch “lifts” or layers.
Add your first 2-inch layer of road base and spread it evenly. Then, run the plate compactor over the entire area, making at least two passes in overlapping directions. You want to see the compactor “bounce” a little—that's how you know you've achieved maximum density. Then add the next 2-inch layer and repeat the process. Keep going until you’ve reached your desired base depth (again, a minimum of 4 inches, but we often recommend 6 inches for San Diego's expansive soils). The final compacted base should be incredibly hard and flat, mirroring the slope you established during excavation.
Step 3: The Sand Setting Bed—Screeding Perfection
The sand bed is not for support; its only job is to provide a perfectly level surface to set the pavers into. It's a thin, 1-inch layer. Any thicker, and you risk the pavers shifting over time.
Lay down your screed rails (those 1-inch pipes) on top of your compacted base, ensuring they are level with each other and have the correct slope. Shovel the coarse concrete sand between the rails, and then pull your straight 2x4 (the screed board) across the top of the rails in a sawing motion. This will remove the excess sand, leaving you with a perfectly smooth, 1-inch-deep bed. Remove the rails and carefully fill in the small trenches left behind. Now—and this is important—do not walk on or compact the sand bed.
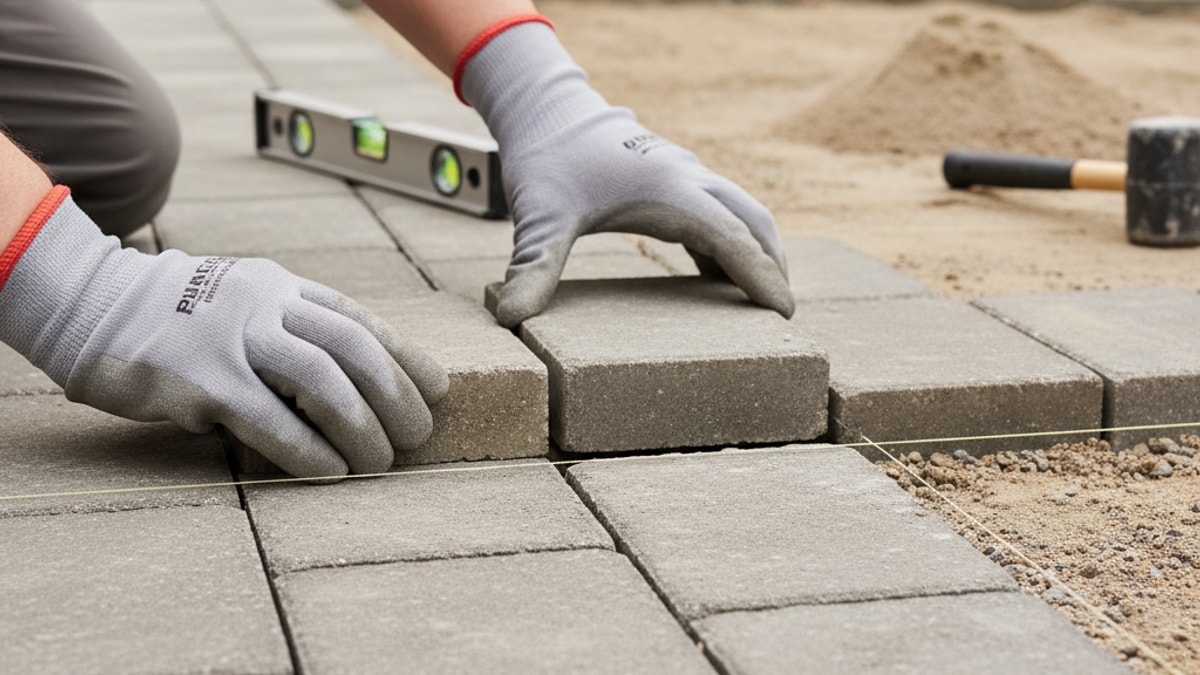
Step 4: Laying the Pavers—Bringing the Vision to Life
Now for the fun part. Start laying your patio stones from a hard edge, like the foundation of your house, or from a 90-degree corner. This ensures your pattern stays straight. Work your way outward, placing the stones gently onto the sand bed. Don't slide them or press them down hard. Just set them in place. Use small spacers if your pavers don't have built-in spacer bars to maintain consistent joint lines.
Use your string lines to check for straightness every few rows. Every so often, use your rubber mallet and a piece of wood (to distribute the force) to gently tap the pavers, setting them into the sand. This is a delicate process—you’re coaxing them into place, not hammering them.
Step 5: The Cuts—Precision and Safety
Inevitably, you’ll reach the edge of your patio or an obstacle and need to cut pavers. This is where a project can look either professional or sloppy. A wet masonry saw with a diamond blade will give you the cleanest, most precise cuts. Measure twice, cut once. Always wear your safety gear, as cutting concrete and stone creates fine silica dust, which is hazardous to inhale.
Step 6: Edge Restraints—Locking It All In
A patio without edge restraints will fail. Period. The lateral forces of foot traffic will cause the outer pavers to creep outwards, opening up joints and creating a mess. We see this all the time. Don't let it be you.
Install commercial-grade plastic or metal edging around the entire perimeter of the patio, securing it into the compacted base with 10-inch steel spikes every 12 inches. The top of the edging should sit just below the final height of your pavers so you can cover it with soil or mulch later.
Step 7: Jointing and Final Compaction—The Finishing Touch
Once all your pavers and edge restraints are in place, it’s time to lock them together. Sweep your polymeric sand across the dry surface of the patio, working it into the joints until they are completely full. Use a leaf blower on a low setting to blow any excess sand off the paver surfaces—any sand left on top can create a permanent haze when activated.
Next, run your plate compactor over the entire patio. This compacts the pavers into the sand bed and helps settle the sand in the joints. You'll likely need to sweep in a little more sand after this step. Finally, follow the manufacturer's instructions for activating the sand, which usually involves a gentle misting of water. This hardens the sand, locking the pavers together and creating a formidable barrier against weeds and ants.
Common Mistakes We See All the Time
Over the years, our team has been called in to repair or replace countless failing patios. The problems almost always stem from a few common, avoidable mistakes. Here's what to watch out for:
- Inadequate Base Depth & Compaction: We've said it before, but it bears repeating. A 2-inch base of uncompacted gravel is a recipe for disaster. It will sink. It will shift. It will fail. Don't cut corners here.
- Incorrect Slope: A perfectly level patio sounds great, but it's a terrible idea. Water will pool on the surface, leading to staining, moss growth, and potential issues near your home's foundation. A slope of ¼ inch per foot is the standard.
- Skipping Edge Restraints: This is a non-starter. Your patio will literally fall apart at the seams without proper edging to hold everything in place.
- Mishandling Polymeric Sand: Leaving a layer of polymeric sand on the paver surface before watering will create a cloudy, permanent haze that's nearly impossible to remove. Follow the instructions on the bag to the letter.
- Choosing the Wrong Paver: Not all pavers are created equal. Some are designed for light foot traffic, while others are thick enough for driveways. Using a thin patio stone in a high-stress application will lead to cracking. Our Services team can help you navigate these choices.
When to DIY vs. When to Call the Pros
So, can you do this yourself? Absolutely. A small, simple, square patio on a flat piece of ground can be a tremendously rewarding DIY project. It’s a great way to get your hands dirty and take pride in your home.
But—and this is a big but—as the project's complexity grows, so does the potential for costly mistakes. Are you planning a large, multi-level patio? Does your yard have a significant slope? Are you dreaming of intricate patterns, curves, or built-in features like a fire pit or seating walls? This is where the value of a professional team becomes undeniable.
We bring the heavy equipment, the years of experience with local soil conditions, and an eye for design that can transform a simple patio into a stunning outdoor living room. We handle the logistics, the material calculations, and the back-breaking labor. Plus, you get the peace of mind that comes with a professional warranty. If you’re weighing your options and want to see what a professional touch could bring to your project, we invite you to BOOK MY FREE CONSULTATION. We'd be happy to walk you through the possibilities and provide a clear plan. You can Contact us anytime.
A patio is a significant investment in your home and your quality of life. Whether you choose to tackle it yourself or bring in a team like ours, the key is to do it right from the ground up. It’s about building something beautiful that lasts. For more inspiration and tips, feel free to browse our Blog. We love sharing what we've learned. Learn more About our mission and team to see why we're so passionate about creating beautiful spaces for San Diego families.
Putting in the work to create a solid foundation, being meticulous with your measurements, and using the right materials will ensure your new patio is a source of pride and enjoyment for many, many years to come. It’s more than just laying stones; it’s building a space for life to happen.


.webp)
.webp)