Your Pallet Outdoor Kitchen Project: A Pro's Honest Guide
The idea is incredibly appealing, isn't it? Taking a stack of humble, discarded shipping pallets and transforming them into the centerpiece of your backyard—a functional, rustic outdoor kitchen. We get it. Our team at Modern Yardz has seen the surge in creative, upcycled projects, and we're all for ingenuity and resourcefulness. It’s the kind of hands-on creativity that builds more than just a structure; it builds pride.
But we also need to be honest. As professionals who build high-end, durable Outdoor Kitchens SAN Diego for a living, we know exactly what it takes for an outdoor structure to withstand the elements, the heat of a grill, and years of family gatherings. So, while we're going to walk you through exactly how to make an outdoor kitchen with pallets, we're also going to give you the unflinching, professional-grade advice you won't find on a five-minute video. This is the stuff we've learned from years in the field. Let's get building.
Why Pallets? The Allure of the Upcycled Kitchen
Let's start with the why. The draw toward using pallets is powerful, and for good reason. First and foremost, the cost. Pallets can often be sourced for free or very cheap, which dramatically lowers the barrier to entry for an outdoor kitchen project. For a homeowner on a tight budget, this is a formidable advantage. It feels like a clever hack, a way to get a luxury feature for a fraction of the price.
Then there’s the aesthetic. A pallet kitchen has an undeniable rustic, shabby-chic charm. It speaks to a desire for authenticity and sustainability. You’re not just building a kitchen; you’re rescuing materials from a landfill and giving them a new, beautiful purpose. It’s a story you can tell your friends as you’re grilling burgers. And we've seen some truly creative designs that lean into this look with fantastic results.
But—and this is a significant but—our experience shows that these benefits come with serious trade-offs. The low cost of materials is often balanced by a high cost in labor. Your labor. Disassembling, sanding, and treating pallets is a grueling, time-consuming task. Furthermore, the inherent inconsistencies in pallet wood make precision construction a difficult, often moving-target objective. And the biggest concern for our team, always, is longevity and safety. Pallet wood is typically soft, untreated pine, not meant for prolonged outdoor exposure. It's susceptible to rot, pests, and warping in a way that professionally selected materials simply aren't. We're not saying don't do it. We're saying go into it with your eyes wide open.
Before You Start: The Critical Safety Check
We can't stress this enough: not all pallets are created equal. Some are perfectly safe for a project like this. Others are a catastrophic liability, treated with toxic chemicals that have absolutely no place near food or your family.
Before you even think about design, you need to become a pallet detective. Look for a stamp on the side of the pallet. This is the IPPC (International Plant Protection Convention) logo, and it tells you the pallet's life story. Your entire project hinges on finding the right kind.
Here’s what we've trained our team to look for, and what you need to know:
Marking
Meaning
Safety for Kitchen Use
HT
Heat Treated
Safe. This is the gold standard. The wood was heated to a specific temperature to kill pests and larvae. It's clean and chemical-free.
MB
Methyl Bromide
DANGEROUS. DO NOT USE. This is a highly toxic pesticide. It can leach from the wood and should never be used for furniture, firewood, or anything that involves human contact.
DB
Debarked
Safe. This simply means the bark was removed. You'll almost always see this in conjunction with another stamp, like HT.
KD
Kiln Dried
Safe. This is similar to HT and indicates the wood was dried to prevent mold. It's a great option.
EUR / EPAL
European Pallet Association
Usually Safe. These are typically heat-treated and built to a high standard. Always double-check for the HT stamp to be certain.
Any pallet with a colored stain (often red or blue) should also be avoided, as these are typically used within specific industries (like pallet rental pools) and you can't be sure of what they've been exposed to. If a pallet has no stamp at all? Leave it. The risk is not worth it. The safest bet is to exclusively hunt for pallets clearly marked with 'HT'. It's the critical, non-negotiable first step.
Sourcing Your Pallets: A Treasure Hunt with Rules
Now that you know what to look for, where do you find these elusive 'HT' pallets? It's a bit of a treasure hunt. Your best bet is to connect with small, local businesses that receive a lot of freight. Think garden centers, hardware stores, pet supply shops, or motorcycle dealerships. They often have stacks of pallets they're happy to get rid of.
Always ask for permission. Don't just take pallets from behind a building—they may be rented or scheduled for return. When you ask, specify that you're looking for clean, heat-treated (HT) pallets for a building project. Most business owners will be happy to help.
As you inspect potential pallets, look beyond the stamp. We recommend rejecting any pallet that shows signs of:
Spills or Stains: You have no idea what was spilled on it. Oil, chemicals, food waste—it's a complete unknown.
Strong Odors: A chemical or musty smell is a massive red flag.
Significant Damage: Cracked boards or splintered wood will compromise the structural integrity of your kitchen.
Be picky. It's far better to spend an extra week searching for good, clean pallets than to build your kitchen out of questionable materials. You'll probably need more than you think, so gather a few extras to account for boards that might split during disassembly.
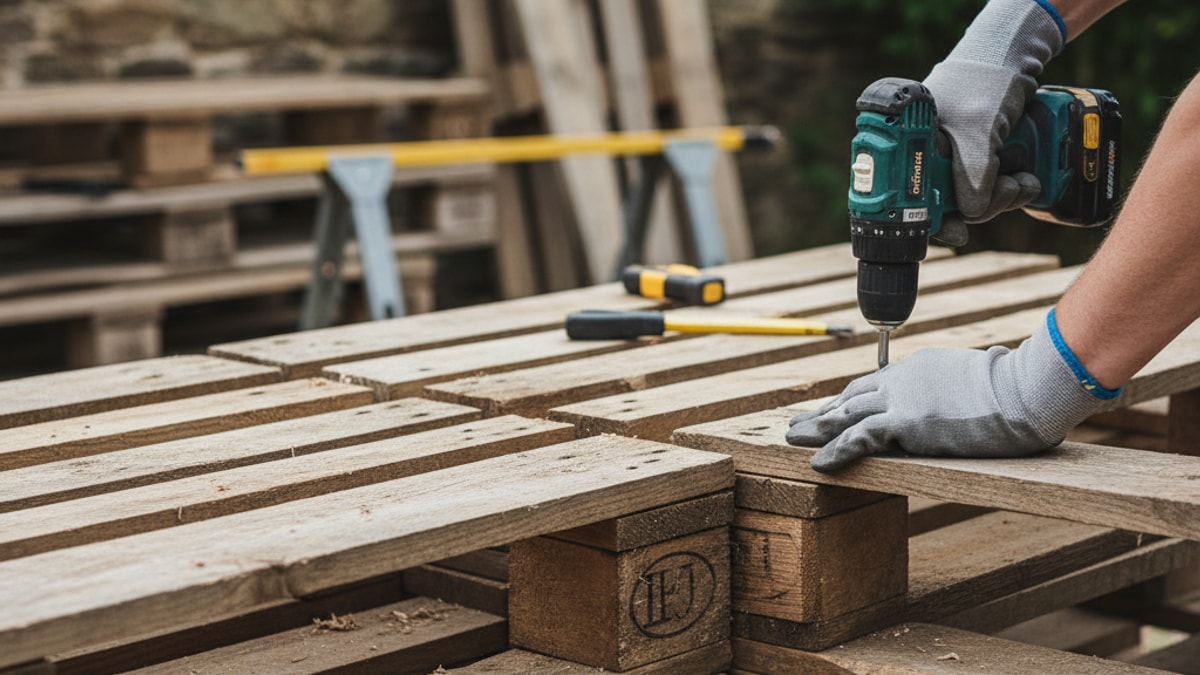
Pallet Wood Bar Part 4 - Sanded Top and Edge
This video provides valuable insights into how to make an outdoor kitchen with pallets, covering key concepts and practical tips that complement the information in this guide. The visual demonstration helps clarify complex topics and gives you a real-world perspective on implementation.
The Blueprint: Designing Your Pallet Kitchen
With your safe, clean pallets secured, the fun begins. But don't just start nailing boards together. A little planning goes a long way. Think about how you use your outdoor space. Where does the grill feel most natural? How much prep space do you actually need? Do you want a sink? A spot for a mini-fridge?
Start by sketching a basic layout. The most common shapes are a simple straight run, an 'L' shape, or a 'U' shape. Consider the 'work triangle' concept from indoor kitchen design—the flow between your grill (cook station), your sink (wash station), and your counter (prep station). You want it to be efficient and intuitive.
Measure your grill and any other appliances you plan to incorporate. Build your design around them, ensuring you leave adequate clearance for ventilation and safety. We've seen DIY projects fail because the grill was crammed into a space that was too tight, creating a serious fire hazard.
This planning stage is also the perfect time to think about the bigger picture. How does this new kitchen fit into your overall backyard? Does it create a natural gathering spot? Does it need better lighting for evening cookouts? Does it connect well to your patio? This is precisely where a professional Landscape Design SAN Diego plan can make a dramatic difference, ensuring your new feature feels integrated, not just plopped down. A cohesive vision elevates the entire space.
Step-by-Step Construction Guide
Alright, you've got your materials and your plan. It's time to build. This process requires patience and a bit of muscle.
1. Gather Your Tools & Materials
Beyond the pallets, you'll need a few things. Having everything on hand before you start will make the process much smoother. Our standard checklist for a project like this includes: a pry bar, a hammer or mallet, a reciprocating saw with a bimetal blade (a lifesaver for stubborn nails), a power drill, an orbital sander, exterior-grade screws of various lengths, heavy-duty L-brackets, a measuring tape, a level, safety glasses, and work gloves. Seriously, don't skip the safety gear.
2. Prepare the Pallets: The Grind Before the Glory
This is the most labor-intensive part, and there are no shortcuts. First, you need to disassemble the pallets. You can either try to pry the boards off, which is difficult and often results in split wood, or you can use a reciprocating saw to cut through the nails between the boards and the blocks. The second method is faster and preserves the boards much better.
Once you have a pile of reclaimed lumber, you need to clean it thoroughly. We recommend a stiff brush and a solution of water and vinegar or a mild detergent. Power washing can also work, but be gentle to avoid damaging the soft wood. Let the wood dry completely for a couple of days.
Now, for the sanding. Every single board needs to be sanded down. Start with a coarse grit (like 80-grit) to remove splinters and roughness, then move to a finer grit (like 120 or 220-grit) for a smoother finish. Yes, it's tedious. But it's the difference between a rustic-chic kitchen and a splinter-filled nightmare.
3. Building the Frame & Base
Your kitchen needs a solid foundation. It cannot just sit on grass. The ground needs to be perfectly level and stable. A bed of gravel is a minimum, but a professionally installed base of Pavers SAN Diego or a poured Concrete SAN Diego slab is a far superior, long-term solution that prevents sinking and wobbling.
For the frame, you'll construct a series of simple boxes from your pallet wood to form the cabinet bases. Use the sturdier 2x4-like pieces from the pallet frame for this. Measure twice, cut once. Assemble the boxes using exterior-grade screws and reinforce the corners with L-brackets. Make sure everything is square and level as you go. Connect the individual cabinet boxes to each other to form your final L or U shape. This interconnected structure will be much stronger.
4. Creating Countertops: Options and Realities
Let's be brutally honest here. Using pallet wood for your main countertop surface is a bad idea. It’s soft, porous, and full of gaps that will trap bacteria and food particles. It's a cleaning and sanitation disaster waiting to happen.
Instead, use the pallet structure as a base for a proper countertop material. You have several options:
Poured Concrete: This is a popular DIY choice. You can build a mold on top of your pallet base and pour your own concrete slab. It's heavy and requires precision, but it delivers a modern, durable surface.
Tile: Large format porcelain tiles laid over a backer board can be a cost-effective and highly customizable option. Ensure you use an exterior-grade grout and sealant.
Stainless Steel: For a more professional look, you can have a sheet of stainless steel custom-cut to fit your base. It's hygienic, durable, and easy to clean.
Butcher Block: If you love the wood look, a proper, thick butcher block slab (sealed for outdoor use) is a much safer and more durable choice than pallet planks.
5. Installing Appliances & Features
When housing a grill, safety is paramount. The area immediately surrounding the grill insert must be built from non-combustible materials. You can't have pallet wood touching the hot exterior of your grill. We recommend using cement backer board as a liner for the grill cavity and ensuring there's plenty of ventilation as per the manufacturer's instructions.
For a sink, you'll need to plan for plumbing. This can be as simple as a garden hose hookup for cold water and a bucket underneath for drainage, or as complex as running permanent supply and drain lines. If you're considering the latter, we strongly advise consulting a professional.
6. Finishing Touches: Sealing, Staining, and Personalizing
Your kitchen is built, but it's not finished. To give it any chance of survival outdoors, you must protect the wood. Apply several coats of a high-quality exterior-grade sealant, stain, or paint. Pay special attention to the end grains of the wood, as this is where moisture is most likely to penetrate. You'll need to re-apply this protective coat every year or two.
This is also where you can add personality. Install hooks for utensils, a bottle opener on the side, or shelving for herbs. Good lighting can transform the space from a daytime cook spot to an evening entertainment hub. Strategically placed Landscape Lighting SAN Diego can highlight your work and create an incredible ambiance.
The Pallet Kitchen vs. a Professional Build: An Honest Comparison
So, you’ve seen what it takes. It’s a significant undertaking. And while a DIY pallet kitchen can be a rewarding project, our team believes it's essential to understand how it stacks up against a professionally designed and built structure. It's not about good versus bad; it's about understanding the investment and the return.
A pallet kitchen is a short-term solution with a rustic aesthetic. With meticulous care, it might last you a few seasons. The upfront cost is low, but the time investment is massive, and the ongoing maintenance is relentless. You're constantly fighting against nature's attempts to reclaim the wood.
A professional build, like the ones we create at Modern Yardz, is a permanent home improvement. It's an investment. We use materials designed to live outdoors for decades: marine-grade stainless steel, powder-coated metals, stone veneers, and granite or concrete countertops. The frame isn't wood; it's typically galvanized steel. The result is a structure that is impervious to rot, pests, and fire. It's an extension of your home that adds real, lasting value to your property. While the initial cost is higher, the total cost of ownership over a decade is often surprisingly competitive when you factor in the replacement and repair costs of a less durable structure. When you're ready to explore a more permanent solution, you can BOOK MY FREE CONSULTATION and our design team can walk you through the possibilities.
Integrating Your New Kitchen Into Your Yard
Whether you build it yourself from pallets or commission a professional masterpiece, an outdoor kitchen should never feel like an afterthought. It should be the heart of a larger outdoor living area.
Think about creating zones. The kitchen is the 'hot' zone. Where is the 'lounge' zone? A comfortable seating area is crucial. This could be a dining table or a more relaxed space with couches and a fire feature. We often incorporate Seat Retaining Walls to provide integrated, casual seating that defines the space. And don't forget shade. An afternoon of grilling is a lot more pleasant under one of our custom Patio Covers Pergolas SAN Diego.
The goal is to create a seamless flow from one area to the next, inviting guests to move around and enjoy the entire yard. It's this thoughtful integration that truly elevates an outdoor space from a simple backyard to a true outdoor living room.
Building a kitchen with pallets is an ambitious and potentially rewarding project. It requires dedication, a healthy respect for safety, and a realistic understanding of the material's limitations. It’s a fantastic way to dip your toes into the world of outdoor living. But if you find that your vision extends beyond the rustic charm of pallets to something more permanent, more polished, and seamlessly integrated into your landscape, that's where we come in. Crafting those dream spaces is what we do best.
Frequently Asked Questions. Here are some common questions. Find the answers you're looking for below.
Are pallet kitchens actually safe for cooking?
They can be, but only if you use the right pallets. You must use pallets stamped 'HT' for Heat Treated, which are chemical-free. Never use 'MB' (Methyl Bromide) pallets, as they are treated with toxic pesticides unfit for use near food.
How long will an outdoor kitchen made from pallets last?
Durability is a major concern. Even with diligent sealing and maintenance, a pallet kitchen is a short-term structure. Our experience suggests you can expect it to last 2-5 years before rot or structural issues become a significant problem.
What's the best countertop material for a pallet kitchen base?
We strongly advise against using pallet wood for the countertop itself due to sanitation concerns. Better options include poured concrete, large format tiles over a backer board, or a custom-cut sheet of stainless steel for a durable and hygienic surface.
How do I weatherproof a pallet kitchen?
Thoroughly sealing every surface is critical. After sanding, apply multiple coats of a high-quality exterior-grade sealant, varnish, or paint designed for outdoor wood. This process will need to be repeated every 1-2 years to protect it from moisture and sun.
Is it hard to disassemble pallets without breaking the boards?
Yes, it can be very difficult. Using a pry bar often splits the soft wood. Our team finds the most effective method is using a reciprocating saw with a long bimetal blade to cut through the nails holding the boards to the support blocks.
Can I put a grill directly into a pallet wood frame?
No, this is a serious fire hazard. The cavity housing the grill must be lined with non-combustible materials like cement backer board. Always follow the grill manufacturer's specifications for clearance and ventilation to ensure safe operation.
Where is the best place to find free, safe pallets?
Try asking at small, local businesses that receive a lot of freight, like garden centers, hardware stores, or powersports dealerships. Always ask for permission and specifically request clean, HT-stamped pallets.
Do I need a special foundation for my pallet kitchen?
Absolutely. Placing it directly on grass will lead to rot and instability. At a minimum, you need a level base of compacted gravel. For a much more stable and lasting foundation, we recommend a concrete slab or professional pavers.
How much does a DIY pallet kitchen really cost?
While the pallets may be free, there are other costs. You'll need to budget for screws, brackets, sandpaper, sealant or paint, and your countertop material, which can be the most expensive component. The biggest cost, however, is your time.
What's the biggest mistake people make with pallet projects?
The most critical mistake is using the wrong type of pallet. Using a chemically-treated 'MB' pallet is dangerous. The second biggest mistake is underestimating the sheer amount of labor required for proper prep work—disassembly, cleaning, and sanding.
Can I add a sink to my pallet kitchen?
Yes, you can. The simplest way is to connect a garden hose for a cold water supply and use a bucket for drainage. For a more permanent solution with hot water and a proper drain, we highly recommend consulting a licensed plumber.


.webp)
.webp)