A pool handrail often feels like an afterthought. It’s one of those final details you get to after the major construction—the excavation, the tile, the decking—is complete. But our team at Modern Yardz has learned over decades of designing and building custom outdoor spaces that these finishing touches are anything but minor. They are the critical, non-negotiable elements that transform a beautiful pool into a truly safe, accessible, and functional oasis for everyone.
Getting it right isn’t just about making it look good. A properly installed pool handrail provides stability for children, older adults, and anyone needing a little extra support getting in and out of the water. A wobbly, improperly anchored rail, on the other hand, is a catastrophic failure waiting to happen. It's a genuine liability. This is about ensuring peace of mind every single time someone enjoys your pool, and that’s a goal we take very seriously.
Why a Properly Installed Handrail is Non-Negotiable
Let's be honest, the primary function of a pool handrail is safety. It’s the first thing people reach for when navigating slick, wet steps. For families with young children or for those who host elderly parents and friends, it’s an indispensable feature that offers confidence and prevents accidents. We’ve seen firsthand how a simple, sturdy handrail can make the difference between a pool being a source of anxiety and a source of joy for every generation.
Beyond the obvious safety benefits, however, lies the integrity of your investment. Your pool and the surrounding deck represent a significant financial and emotional commitment. An improperly installed handrail—one that's drilled incorrectly, poorly anchored, or not sealed—can cause profound, lasting damage. We're talking about cracked concrete, shattered pavers, and water intrusion that can compromise the entire deck structure over time. The repair costs for such mistakes can dwarf the initial cost of a professional installation. It’s a classic case of an ounce of prevention being worth a pound of cure.
And then there's the aesthetic component. The right handrail, installed with precision, complements the design of your pool. It can be a sleek, modern accent or a classic, elegant feature. But a rail that’s crooked, off-center, or surrounded by a messy patch of anchoring cement immediately cheapens the look of the entire space. It screams ‘amateur’ and detracts from the meticulous design work you’ve invested in. In our experience, details like these are what separate a standard backyard from a truly stunning, professionally executed outdoor living environment.
Before You Begin: The Pre-Installation Checklist
Jumping straight to the drilling is one of the biggest mistakes we see homeowners make. A successful installation is 90% preparation. Before a single tool comes out of the box, you need a solid plan. We can't stress this enough: thoughtful planning prevents costly errors.
First, you have to choose the right handrail for your needs and your pool's environment. The most common material is stainless steel (typically grades 304 or 316 for better corrosion resistance), which offers a timeless, durable finish. However, you can also find powder-coated rails in various colors, as well as thermoplastic or polymer options that stay cooler to the touch in direct sun—a significant benefit in warmer climates. Think about the style. Does your space call for a minimalist single-post rail or a more traditional three-bend design? This choice impacts both the look and the installation complexity.
Next, critically assess your deck material. This is a formidable factor. Installing into a freshly poured concrete deck is a completely different challenge than retrofitting a rail into a deck made of delicate Pavers SAN Diego. Concrete provides a solid, continuous base, while pavers require careful drilling to avoid cracking and may necessitate removing a paver to pour a dedicated concrete footing underneath. Wood or composite decks require an entirely different mounting system, usually involving surface-mount flanges and heavy-duty bolts into the support joists. Understanding your foundation dictates your entire approach.
Finally, gather your tools. This isn't a simple screwdriver-and-wrench job. You’re going to need specialized equipment, and skimping here will show in the final result. The quality of your tools, especially your drill and bits, will have a direct impact on the quality of your installation.
| Tool Category |
Essential Tools |
Recommended Pro-Level Tools |
Purpose |
| Drilling |
Heavy-Duty Hammer Drill |
Rotary Hammer Drill with SDS Chuck |
More power for dense concrete. |
| Cutting/Bits |
Masonry Drill Bit (for pilot holes) |
Wet Diamond Core Drill Bit (1.9" or specified) |
Creates clean, perfect holes without chipping. |
| Mixing |
Bucket, Trowel |
Power Mixer Drill Attachment |
Ensures a consistent, lump-free anchoring cement mix. |
| Measurement |
Tape Measure, Pencil/Marker |
Carpenter's Square, Laser Level |
Guarantees perfect alignment and plumb installation. |
| Safety |
Safety Goggles, Gloves, Dust Mask |
GFCI Outlet Adapter, Hearing Protection |
Protects from dust, debris, and electrical hazards. |
| Finishing |
Shop-Vac, Rags, Level |
Small Water Pump (for core drilling) |
Keeps the work area clean and aids in drilling. |
One last, crucial step: check your local building codes. Some municipalities have specific requirements for pool handrails regarding height, placement, and even electrical bonding. A quick search or call to your local building department can save you from having to redo the entire project. It's a five-minute task that can prevent a five-day headache.
The Core Components of a Pool Handrail System
Understanding the anatomy of the handrail assembly is key to a successful installation. It’s not just a bent piece of metal; it’s a system where each part plays a vital role. Knowing what each component does will help you troubleshoot and ensure a rock-solid fit.
- The Handrail: This is the main structural tube, typically made from stainless steel. The shape and size will vary, but the ends that insert into the deck are usually a standard diameter (most commonly 1.9 inches).
- Anchor Sockets (or Anchors): These are the sleeves, usually made of aluminum, brass, or plastic, that are permanently cemented into the deck. The handrail slides into these sockets.
- Wedges and Bolts: Inside each anchor socket is a wedge system. When you tighten the bolt on the side, it expands a wedge against the handrail post, locking it tightly in place and eliminating any wobble. This is what creates the secure, immovable feel.
- Escutcheon Plates: These are the decorative cover plates that sit on the deck surface, concealing the anchor sockets and the surrounding cement work. They provide a clean, finished look. Don't call them 'donuts.' Please.
- Bonding Lug: This is a small metal lug, usually found on the anchor socket or the rail itself, with a hole for a screw. This is the connection point for the electrical bonding wire, a critical safety feature we'll discuss in detail.
- Anchoring Cement: This is not your standard concrete mix. It's a specialized, fast-setting, non-shrinking hydraulic cement designed to expand slightly as it cures, locking the anchor sockets firmly into the drilled holes.
Familiarizing yourself with these parts before you start will demystify the process and make the instructions far easier to follow. It’s the difference between blindly following steps and truly understanding the mechanics of what you’re building.
The Step-by-Step Installation Process: The Modern Yardz Method
Alright, with the prep work done, it's time to get to the main event. We’re going to walk through this process with the precision our professional crews use on every Pools AND Spas project. Follow these steps meticulously, and you’ll achieve a result you can be proud of.
Step 1: Precise Measurement and Marking
This is where perfection starts. Place the handrail on the deck exactly where you want it to be installed. Ensure it's the correct distance from the pool edge (check local codes, but 8-12 inches is common) and that it's perfectly parallel to the coping. Use a carpenter's square to ensure it's not angled. Once you're 100% satisfied with the position, use a sharp pencil or a permanent marker to trace the outside of both handrail posts onto the deck. Now, remove the rail and find the exact center of each circle you traced. This center point is your drilling target. Accuracy here is non-negotiable. If your marks are off, your rail will be crooked forever.
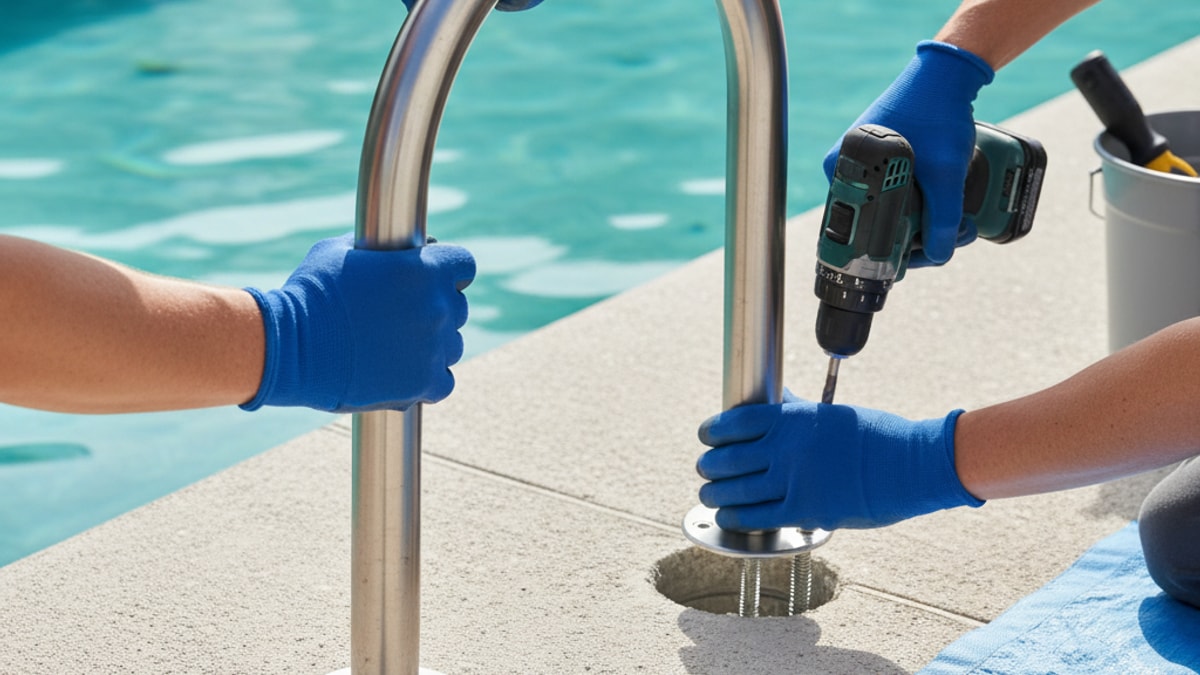
Step 2: Core Drilling the Deck (The Point of No Return)
This is, without a doubt, the most challenging part of the job. For a pristine installation in Concrete SAN Diego, a wet diamond core drill is the only tool we recommend. It’s what the pros use. A standard hammer drill with a masonry bit will create a rough, chipped hole and can easily crack the surrounding area.
Start by creating a small dam of plumber's putty around your marked center point and fill it with water. This water cools the diamond bit and flushes out debris, which is essential for a clean cut and for preserving the life of the expensive bit. Begin drilling with steady, firm pressure. Don't force it. Let the weight of the drill and the diamonds do the work. Keep the drill perfectly plumb (straight up and down). The typical depth required is around 4 inches, but always check the specifications for your anchor sockets. Once you’ve drilled both holes, use a shop-vac to completely clean out all water, dust, and debris. The holes must be immaculate for the anchoring cement to bond properly.
Step 3: Setting the Anchor Sockets
With your holes clean and dry, it’s time to mix the anchoring cement. Follow the manufacturer's instructions to the letter. You're aiming for a thick, paste-like consistency—something like creamy peanut butter. Too thin, and it won't have the strength; too thick, and it will be impossible to work with.
Fill the bottom of the holes about one-third of the way with the cement mixture. Then, slowly insert the anchor sockets, twisting them as you push them down. This ensures the cement fully coats the sides of the anchor and fills any voids. Tap them down gently until the top of the anchor is perfectly flush with the surface of the pool deck. Use a level to check that they are perfectly plumb. This is your last chance to make adjustments. Once that cement starts to set (and it sets fast), they are permanent. Use a wet rag or sponge to meticulously clean up any excess cement from the deck surface immediately.
Step 4: Installing the Handrail and Securing the Wedges
Let the anchoring cement cure completely. We mean completely. This can take anywhere from a few hours to a full 24 hours, depending on the product and the weather. Don't rush this. Patience now prevents a wobbly rail later.
Once cured, slide the escutcheon plates over the handrail posts. Then, carefully slide the handrail posts into the anchor sockets. It should be a snug fit. Now, insert the wedge into the side of the anchor and start tightening the bolt. As you tighten, the wedge will press firmly against the rail post, locking it in place. Alternate between tightening the bolts on both posts a little at a time to ensure even pressure. Keep checking that the rail is straight and level. The goal is zero movement. When you grab that rail and try to shake it, the whole deck should feel like it's moving with it.
Step 5: Electrical Bonding (The Critical Safety Step)
This is the step that most DIY installers miss, and it's arguably the most important for safety. Electrical bonding connects all the metallic components of your pool system (railings, ladders, lights, pump) with a solid copper wire. This equalizes the electrical potential between all items, preventing dangerous stray electrical currents from energizing the water or the rail itself. This is not the same as grounding.
Locate the bonding lug on one of your anchor sockets. You will need to attach a solid #8 copper wire from this lug to the main bonding grid of your pool. This grid is usually a copper wire that runs around the perimeter of the pool shell. If you are retrofitting a rail and can't find the bonding grid, or if you have any uncertainty whatsoever about this process, stop immediately. We mean this sincerely: call a licensed electrician or a professional pool builder. The risk of electrical shock is too great to guess.
Step 6: Finishing Touches
With the rail secure and bonded, slide the escutcheon plates down to cover the anchors. Some have a set screw to hold them in place; others are a simple friction fit. Give the entire rail and the surrounding area a final cleaning to remove any fingerprints or leftover dust. Now, step back and admire your work.
Common Mistakes to Avoid (We’ve Seen Them All)
Over the years, our crews have been called in to fix countless DIY installations gone wrong. Learning from these common errors can save you a world of frustration.
- Drilling Through Rebar: The nightmare scenario. Hitting steel rebar with a core drill can destroy the bit and potentially compromise the structural integrity of your concrete slab. Professionals use rebar scanners or have a deep understanding of standard construction practices to avoid this.
- Using the Wrong Anchoring Material: We've seen people try to use regular concrete, mortar, or even construction adhesives. None of these will work. They will crack, shrink, or fail over time, leading to a loose and dangerous handrail. Use only non-shrinking anchoring cement.
- Misaligned Holes: Even being off by a quarter of an inch can make it impossible to insert the handrail. This often requires over-drilling the hole and starting over, which creates a weaker final bond. Measure three times. Drill once.
- Setting the Anchors Too High or Too Low: If the anchor isn't flush with the deck surface, the escutcheon plate won't sit flat, leaving an ugly gap or a tripping hazard. This small detail makes a huge visual difference.
- Skipping the Bonding: We've said it before, but it bears repeating. This is not an optional step. An unbonded handrail is a serious safety hazard. It's a non-negotiable part of any professional installation.
When to DIY vs. When to Call the Pros
So, can you do this yourself? Maybe. If you're replacing an existing handrail that uses the same anchor placement and you're comfortable with the process, it can be a manageable weekend project. If, however, you’re installing a brand-new rail that requires core drilling into an expensive deck, the stakes are significantly higher.
Ask yourself honestly: Do I own or am I willing to rent a professional-grade core drill? Am I confident in my ability to drill two perfectly plumb and aligned holes in concrete without cracking it? Do I understand electrical bonding and how to connect to my pool's grid safely?
If the answer to any of those is 'no,' we strongly recommend calling in a professional. The cost of a professional installation is a small price to pay for the peace of mind that comes from knowing the job was done right, with the right tools, and in compliance with all safety codes. It's often part of a larger project, and our Landscape Design SAN Diego team incorporates these features seamlessly from the very beginning. A handrail isn't an isolated piece; it's an integrated part of your whole backyard experience. If you're feeling overwhelmed or just want a perfect result without the risk, don't hesitate to BOOK MY FREE CONSULTATION. Our team can assess your specific situation and provide a clear path forward.
Handrail Maintenance: Protecting Your Investment
Your new handrail isn't a 'set it and forget it' item. A little routine maintenance will keep it looking great and functioning safely for years.
For stainless steel rails, regularly wipe them down with a soft cloth and a mild, non-abrasive cleaner to remove water spots and grime. In coastal or high-chlorine environments, you may want to apply a specialized stainless steel wax or protectant a couple of times a year to prevent surface corrosion. For powder-coated or polymer rails, a simple soap and water cleaning is usually all that's needed.
Most importantly, make it a habit to check the rail for stability. At the beginning of each pool season, grab the rail and give it a firm shake. There should be zero give or wobble. If you feel any movement, use the appropriate wrench or key to tighten the wedge bolts inside the anchors. If tightening the bolts doesn't solve the problem, it could indicate a failure in the anchoring cement, which needs to be addressed immediately.
A handrail is a simple machine, but it plays a massive role in the safety and enjoyment of your pool. By installing it correctly and giving it a little care, you ensure it can do its job flawlessly, providing a steady hand and a touch of class to your backyard retreat. It's these details that truly complete the vision for a perfect outdoor living space.


.webp)
.webp)