A beautiful patio can completely transform your outdoor space. It’s the heart of the backyard—the stage for family barbecues, quiet morning coffees, and sunset conversations. Here in San Diego, where outdoor living is part of our DNA, a well-built patio isn’t just a feature; it’s an essential extension of your Home. But the dream of that perfect paver patio often crashes into the formidable reality of the work involved. It’s more than just laying down pretty stones.
Our team at Modern Yardz has spent years perfecting the art and science behind how to lay patio paving across Southern California, from Chula Vista to Oceanside. We’ve seen it all: the triumphs of a perfectly executed DIY project and the—let's be honest—catastrophic failures that result from cutting corners. So, we're pulling back the curtain. We want to share the process our professionals use, not to intimidate you, but to empower you. Whether you decide to tackle it yourself or understand what goes into a professional installation, this is what you need to know.
First Things First: Planning Your Patio Project
Before a single shovel hits the dirt, the most critical work happens on paper. Rushing this stage is the number one mistake we see homeowners make. A lack of planning leads to budget overruns, material shortages, and a final product that just feels… off. It's a recipe for frustration.
First, consider the function. What is this patio for? Is it a sprawling entertainment area with an outdoor kitchen and fire feature, or an intimate nook for a bistro set? The purpose dictates the size, shape, and location. Think about traffic flow from the house. How will people move around the furniture? Where does the sun hit at different times of the day? Our Services always begin with a deep dive into these lifestyle questions because the answers shape the entire design. We’ve found that a patio that isn’t designed around your actual life will rarely get used.
Next up is the aesthetic. This is the fun part. What’s the vibe? Modern and sleek with large-format porcelain pavers? Rustic and charming with tumbled cobblestones? The material choice is huge. It impacts the look, the feel underfoot, the maintenance requirements, and—of course—the budget. We recommend getting physical samples. Hold them. See them in your yard's natural light. A paver that looks great in a showroom can look completely different next to your home’s exterior. This is also the time to think about patterns. A simple running bond is classic and clean, while a herringbone or basketweave pattern can add a ton of visual interest and a more custom feel.
And—we can't stress this enough—check local regulations. In many San Diego communities, there are rules about setbacks (how close you can build to your property line) and impervious coverage (the amount of your lot covered by non-porous surfaces). A quick call to your local planning department can save you a world of headaches down the road. It’s a simple step that is so often overlooked. You don't want to finish your beautiful patio only to be told it violates a local ordinance. Believe us, we've seen it happen.
The Groundwork: Excavation and Base Preparation
This is where the real work begins. It’s dusty, it’s physically demanding, and it’s the absolute, non-negotiable foundation for a patio that lasts. A beautiful surface on a shoddy base will fail. Every single time. The primary enemies of a paver patio are water and ground movement, and this entire stage is about conquering them.
The first step is excavation. You need to dig out the area for your patio to the correct depth. But how deep is deep enough? This depends on a few things: the thickness of your pavers, the depth of your sand setting bed (typically 1 inch), and the depth of your gravel base (the most critical layer). For a standard pedestrian patio, we recommend a minimum of 4 inches of compacted base material. If the patio needs to support heavier loads—like a hot tub or a large outdoor kitchen island—you'll want to go deeper, maybe 6 to 8 inches. So, the formula is simple: Paver Thickness + 1” Sand + 4-6” Gravel = Total Excavation Depth.
And another consideration—slope. Your patio must, must, must slope away from your house foundation to ensure proper drainage. A flat patio is a puddle-prone patio. We aim for a minimum slope of 1/4 inch per foot. It’s subtle enough that you won't feel it when you're walking on it, but it's more than enough to guide rainwater away from your home. We use string lines and a level to set this grade precisely during excavation. It’s an art form in itself.
Once the area is dug out, it’s time to compact the subgrade—that’s the native soil at the bottom of your excavated area. We use a heavy-duty plate compactor for this. The goal is to create a firm, stable surface so the ground itself doesn't shift under your patio. This is especially important with some of the expansive clay soils we find in parts of San Diego. A solid subgrade is the first line of defense against sinking and heaving. After compacting, we lay down a geotextile fabric. Think of it as an insurance policy. This fabric separates your gravel base from the soil below, preventing them from mixing over time and compromising the integrity of the base. It’s a step many DIY guides skip, but for our team, it’s standard practice.
Building the Unseen Foundation
Now for the gravel base. This is the load-bearing layer of the entire system. We use a specific type of crushed stone, typically 3/4-inch angular gravel. The angular, interlocking nature of the stones is key—it allows for incredible compaction and stability. You can't just dump it all in at once. Our process involves adding the gravel in layers, or “lifts,” of about 2-3 inches at a time. Each lift is raked smooth and then compacted thoroughly with the plate compactor until it’s absolutely solid. You'll run the compactor over it multiple times, in multiple directions. It's time-consuming. It's loud. But this meticulous process is what prevents your patio from developing dips and sags years from now.
After the base is compacted to the perfect height and slope, we install the edge restraints. These are rigid plastic, metal, or concrete borders that are spiked into the gravel base around the entire perimeter of the patio. What do they do? They act as a frame, locking the pavers in place and preventing them from shifting or spreading apart over time. Without proper edge restraints, the pavers on the outside edges will inevitably start to creep outwards, creating unsightly gaps. This is another one of those crucial—but often invisible—details that separates a professional job from an amateur one.
Finally, we get to the setting bed. This is a 1-inch layer of coarse, washed concrete sand that goes on top of the compacted gravel base. This is not the same as playground sand. Concrete sand has larger, more angular grains that create a firm bed for the pavers to sit in. We lay down two parallel pipes (screed rails) across the base and use a long, straight 2x4 to pull the sand across them, creating a perfectly smooth, level surface. This screeding process is incredibly important for getting a flat final surface. Once an area is screeded, you can't walk on it—you lay the pavers from the edge, working your way across the pristine sand bed.
Laying the Pavers: Where Art Meets Precision
This is the moment of truth. You're finally ready to learn how to lay patio paving itself. It's the most rewarding part of the job, but it demands patience and a keen eye for detail. Our team always starts from a hard edge, like the wall of the house, and works outwards. We follow the 'click and drop' method: you hold the paver at a slight angle, touch it to the edge of the paver already in place (the 'click'), and then lower it straight down ('drop'). You never, ever slide pavers across the sand, as that will disturb the carefully screeded bed.
It’s all about the pattern. Whether you chose a simple running bond or a complex herringbone, you need to stick to it. We use string lines stretched across the patio area to keep our rows perfectly straight. Even a tiny deviation at the beginning can become a massive, glaring error by the time you get to the other side. Check your lines constantly. Every few rows, step back and look at the big picture. Are the gaps (joint lines) between the pavers consistent? Are your lines straight? It’s much easier to adjust a few pavers than to have to pull up half the patio later.
Inevitably, you’ll need to make cuts, especially around the edges or any curves. This requires a specialized tool. A diamond-blade wet saw is the professional standard. It makes clean, precise cuts and uses water to keep the dust down. You can rent them, but they are formidable machines. A less expensive option for simpler cuts is a masonry chisel and hammer or a handheld angle grinder with a diamond blade. Safety is paramount here—always wear safety glasses, a dust mask, and gloves when cutting pavers.
| Paver Material |
Average Cost (Material Only) |
Durability & Lifespan |
Maintenance Needs |
Aesthetic Appeal |
| Concrete Pavers |
$ - $$ |
Very High / 50+ years |
Low; needs periodic sealing to maintain color. |
Highly versatile; huge range of colors, shapes, and textures. Can mimic natural stone. |
| Clay Brick Pavers |
$$ - $$$ |
Extremely High / 100+ years |
Very Low; color is baked in and won't fade. May require cleaning for moss in shady areas. |
Classic, traditional, warm. Colors are typically in the red, brown, and tan family. |
| Natural Stone |
$$$ - $$$$ |
Varies by stone type; generally very high. |
Varies; some porous stones (like travertine) require regular sealing. |
Unmatched natural beauty; each piece is unique. Offers a high-end, luxurious look. |
The Finishing Touches That Make All the Difference
Once every paver is laid and every cut is made, the job isn't over. These final steps are what lock everything together into a single, unified surface. First, we run the plate compactor over the entire patio (with a protective pad on the bottom to prevent scuffing the pavers). This vibrates the pavers, settling them firmly into the sand bed and creating a level, uniform surface. This step is what creates that smooth, professional finish and slightly bevels the edges of the pavers against each other.
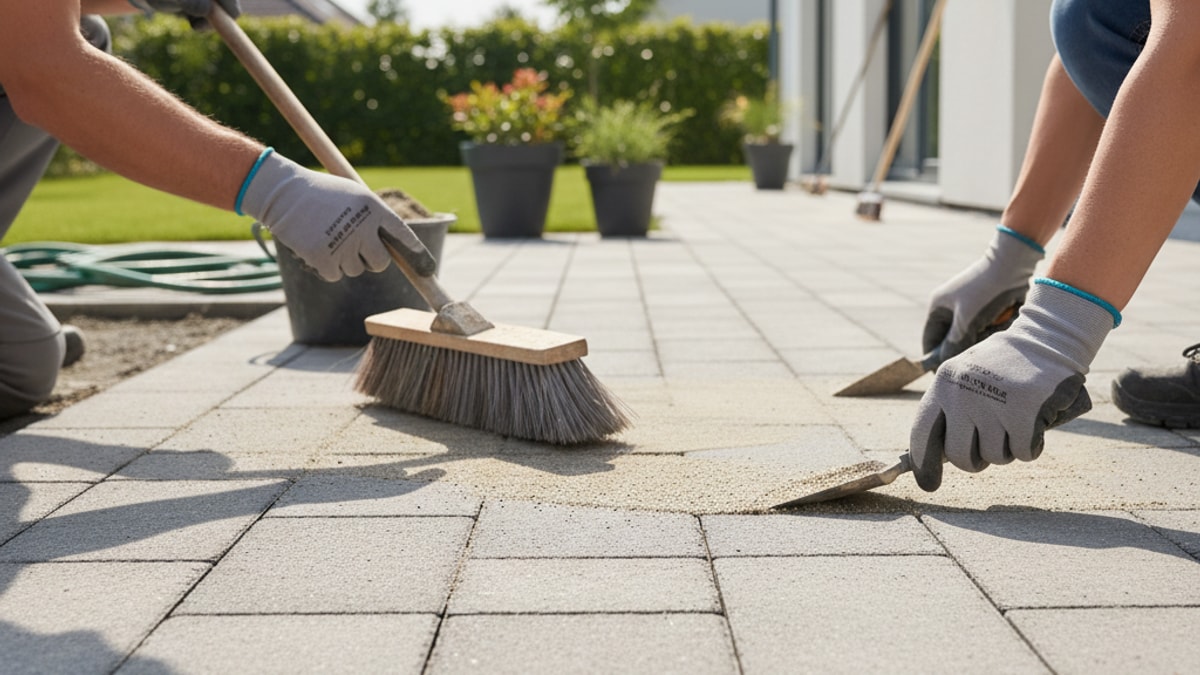
Next comes the joint sand. This is what fills the gaps between the pavers, locking them together horizontally. There are two main options: regular joint sand and polymeric sand. Regular sand is fine, but it can wash out over time and allows weeds or ants to make a home in the joints. For this reason, our team at Modern Yardz almost exclusively uses polymeric sand. This is a special blend of fine sand with a polymer additive. When you sweep it into the joints and then lightly mist it with water, the polymers activate and harden, almost like a flexible mortar. This creates a powerful bond that locks the pavers together, prevents weed growth, and resists erosion from rain and washing.
Applying polymeric sand is a meticulous process. The paver surface must be completely dry. You sweep the sand diagonally across the joints until they are full. Then, you use a leaf blower to blow all the excess sand dust off the surface of the pavers—this is a critical step, as any leftover dust can create a permanent haze when activated. Finally, you gently mist the patio with a hose, allowing the water to soak in and activate the polymers. You let it cure for 24-48 hours, and the result is an incredibly strong, durable, and low-maintenance patio surface.
To seal or not to seal? That’s a common question. Sealing is an optional final step that can enhance the color of your pavers and provide a protective barrier against stains from things like oil, grease, or red wine. It can also make routine cleaning easier. We generally recommend it, especially for patios with outdoor kitchens or dining areas. There are different types of sealers, from natural-look penetrating sealers to wet-look film-forming sealers. The choice comes down to personal preference, but it’s a great way to protect your investment.
It’s a lot of work. There’s no denying it. The process of how to lay patio paving correctly is a testament to the idea that the most important work is often the work that goes unseen. It’s the carefully calculated slope, the meticulously compacted base, and the precisely filled joints that create a space that will host family memories for decades to come. It’s a project that demands respect for the process. But when it's done right, the result is truly something to be proud of.
Our team is built on a foundation of craftsmanship and a deep understanding of what makes outdoor spaces work. The About section of our site talks more about our philosophy, but it boils down to this: we build spaces for life. We hope this deep dive has been helpful, whether you’re lacing up your work boots or looking for the right partner to bring your vision to life. If you're in the San Diego area and feeling that the project is a bit more than you want to take on, don't hesitate to Contact us. We're always here to help. Check out our Blog for more tips and inspiration on transforming your yard.


.webp)
.webp)