An Outdoor Kitchen Sink Without a Drain? Here's How It's Done
You’ve envisioned it a thousand times. The perfect outdoor kitchen, the centerpiece of your backyard oasis. The grill is sizzling, drinks are cold, and friends are gathered around. But there’s one nagging detail that keeps tripping up the dream: the sink. The thought of trenching your pristine lawn, the cost of running plumbing lines, the sheer complexity of it all can feel like a formidable barrier. What if you could have it all without the drain?
It’s a question our team at Modern Yardz hears constantly as we're crafting custom Outdoor Kitchens SAN Diego for homeowners. Many people assume that if you don't have a direct line to your home's sewer system, a functional outdoor sink is off the table. We’re here to tell you that’s simply not true. Installing an outdoor kitchen sink without a traditional drain isn't just possible; it's often a smarter, more flexible, and more cost-effective solution. Let's get into how it's done.
Why Go Drainless? The Surprising Benefits
Let's be honest, the initial motivation for a drainless sink is usually avoiding the cost and chaos of major plumbing work. And that's a fantastic reason. The expense of hiring a plumber to dig trenches and run pipes can be significant, sometimes dramatically shifting the budget of an entire project. But our experience shows the advantages go far beyond the price tag.
You gain unparalleled flexibility. Without being tethered to a fixed drain pipe, your sink can be located anywhere in your outdoor kitchen layout. Want it on a mobile cart? You can do that. Prefer it on a far-flung island to create a distinct prep zone? No problem. This freedom is a game-changer during the Landscape Design SAN Diego phase, allowing for a layout dictated by workflow and aesthetics, not by plumbing limitations.
Then there's the environmental angle. A properly configured drainless system can allow you to capture and reuse 'greywater' for your landscaping. Instead of sending relatively clean water from washing hands or rinsing vegetables down the sewer, you can use it to water ornamental plants and shrubs. It’s a small but meaningful step toward a more sustainable backyard ecosystem. It's simple, it's efficient, and it just makes sense.
Understanding Your Water: The Basics of a Drainless Sink
Before we dive into the 'how-to,' it's crucial to understand that any sink system has two distinct halves: the water coming in (supply) and the water going out (wastewater). The drainless part only deals with the latter.
Fresh Water Supply: The Easy Part
Getting fresh water to your outdoor sink is surprisingly straightforward. The simplest method, hands down, is connecting a high-quality, food-safe garden hose to a nearby outdoor spigot. You can use a Y-splitter at the spigot to keep a regular hose available for other yard tasks. This setup is quick, requires no special tools, and can be disassembled easily for winterization.
For a more permanent and polished look, you can have a dedicated line run from the spigot using PEX tubing. This can be discreetly hidden within the outdoor kitchen structure, providing a clean connection directly to the faucet. While this might require a bit more work upfront, it eliminates the need to connect and disconnect a hose for every use.
Wastewater Management: The Real Solution
This is the core of the drainless sink concept. Instead of a pipe that carries wastewater away to the sewer, you’ll be directing it into a self-contained system. The goal is to capture all the water from the sink in a clean, efficient, and odor-free way. Your main choices boil down to two practical approaches: a portable holding tank or a greywater diversion system. Each has its place, and the right choice depends entirely on your usage habits, budget, and local environment.
The Heart of the System: Choosing Your Wastewater Solution
This is the decision that will define your drainless sink experience. We’ve installed them all, and our team has found that what works for a small bar setup is completely different from what a serious outdoor grill master needs. Let's break down the most viable options.
Option 1: The Simple Bucket System
We have to mention it because it's the most basic starting point. It is exactly what it sounds like: a 5-gallon bucket placed directly under the sink's tailpiece. You use the sink, the water collects in the bucket, and you empty it when it's full. Simple, right?
Frankly, our team rarely recommends this for a permanent outdoor kitchen. It's a workable solution for a temporary party or a potting bench, but it has serious drawbacks for regular use. The capacity is tiny, meaning you'll be hauling a sloshing bucket of dirty water frequently. It’s open to the elements, inviting pests and creating odors. For the beautifully crafted Outdoor Kitchens SAN Diego we build, a bucket just doesn't match the quality and functionality clients expect.
Option 2: The Portable RV/Marine Holding Tank
Now we're talking. This is the gold standard for most residential drainless sink installations. These are sealed, durable plastic tanks—often on wheels—designed for use in recreational vehicles and boats. They come in various sizes, typically from 10 to 40 gallons, and are built to contain wastewater securely without leaks or odors.
The installation is clean. You'll install standard plumbing under your sink, including a P-trap (this is critical for blocking odors from the tank), and run the outlet pipe directly into the tank's intake valve using a secure, sealed connection. When the tank is full, you simply disconnect it, wheel it to an indoor toilet or an RV dump station, and empty it. It’s a closed-loop system that is clean, high-capacity, and surprisingly user-friendly.
We've found this to be the perfect compromise between functionality and simplicity for the vast majority of projects. It provides the experience of a 'real' sink without the commitment of permanent plumbing.
Option 3: The Greywater Diversion System
For the eco-conscious homeowner, this is an elegant and sustainable solution. A greywater system takes the wastewater from your sink and, instead of just storing it, actively uses it to irrigate parts of your landscape. Typically, this involves running the drain line to a mulch basin or a branched drain system that disperses the water slowly into the soil around non-edible plants like shrubs and trees.
This approach requires more planning. You need the right kind of soil that drains well, the right type of plants that will thrive with the extra water, and a landscape with a gentle slope to help with dispersal. We can't stress this enough: you must check your local municipal codes before even considering this option. Some areas have very specific regulations about greywater use. The other major consideration is what goes down the sink. You must commit to using only biodegradable, low-sodium, and phosphorus-free soaps to protect your plants and soil. No grease, no harsh chemicals. Ever.
Feature
Bucket System
Portable Holding Tank
Greywater Diversion
Installation Complexity
Very Low
Low to Moderate
Moderate to High
Initial Cost
Very Low
Low ($50 - $200)
Moderate ($100 - $500+)
Maintenance
High (Frequent Emptying)
Moderate (Periodic Emptying)
Low (System Checks)
Capacity
Very Low (1-5 Gallons)
High (10-40 Gallons)
Unlimited (Dispersal)
Eco-Friendly
Low
Low
High
Best For
Temporary setups, bar sinks
Most residential kitchens
Eco-conscious homeowners with suitable gardens
Live Yard Drain Repair
This video provides valuable insights into how to install an outdoor kitchen sink without a drain, covering key concepts and practical tips that complement the information in this guide. The visual demonstration helps clarify complex topics and gives you a real-world perspective on implementation.
Step-by-Step Installation: Putting It All Together
Alright, you've chosen your system. Now for the fun part. Installing a drainless sink is a very manageable DIY project if you're comfortable with basic tools. Let’s walk through the process.
Step 1: Plan Your Layout
Before you cut anything, finalize the sink's location. Think about your workflow. It should be convenient to your grill and your prep area. Most importantly, ensure you have enough space inside the cabinet or island to house your holding tank or the initial piping for your greywater system. The foundation of your outdoor kitchen, whether it's built on a beautiful bed of Pavers SAN Diego or features sleek Concrete SAN Diego countertops, must be able to accommodate this internal plumbing.
Step 2: Cut the Countertop Opening
Your new sink will come with a paper template. Don't eyeball this. Place the template on the countertop, making sure it's square and positioned exactly where you want it. Trace the outline carefully. Using the appropriate tool for your countertop material (a jigsaw with the right blade for wood or laminate, an angle grinder with a diamond blade for stone or concrete), carefully cut along the traced line. Measure twice, cut once. It's a mantra for a reason.
Step 3: Mount the Sink and Faucet
This part is just like installing an indoor sink. Apply a bead of plumber's putty or silicone caulk around the underside of the sink's lip to create a waterproof seal. Drop the sink into the opening and secure it from below using the provided clips. Next, install the faucet according to its manufacturer’s instructions, feeding the supply lines through the designated holes in the sink or countertop.
Step 4: Connect the Fresh Water Supply
Now, let's get water flowing. Connect your faucet's hot and cold supply lines to a Y-adapter, which then connects to a single line from your water source. If you’re using the garden hose method, this is where you'll attach your food-safe hose. Make sure all connections are snug to prevent leaks.
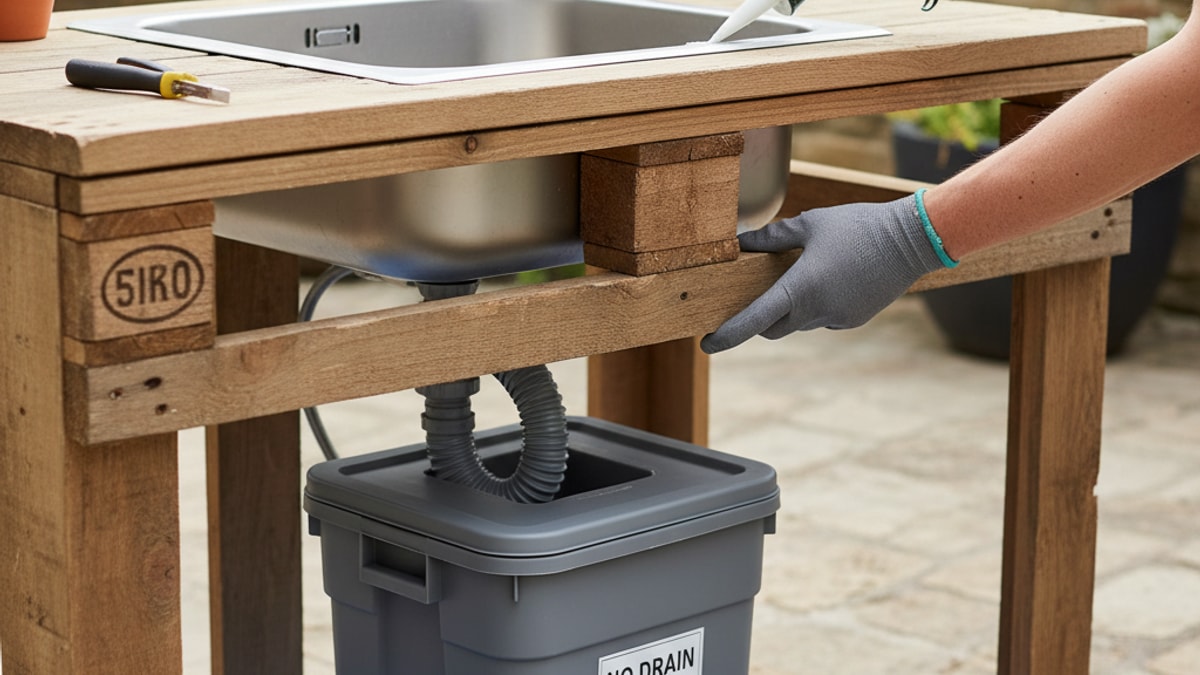
Step 5: Assemble the "Drain" Plumbing
This is where it all comes together. Start by installing the sink strainer in the sink's drain hole. Attach the tailpiece to the bottom of the strainer. Now, install the P-trap. We have to repeat this: do not skip the P-trap! Even with a sealed tank, the P-trap holds a small amount of water that creates a barrier, preventing any potential odors from the tank or pipes from wafting up through your sink drain. It’s a non-negotiable element.
From the outlet of the P-trap, you'll run your final drainpipe. This can be a flexible hose or a rigid PVC pipe. Route it to the inlet of your portable holding tank or bucket. Ensure the connection is secure and sealed. For a holding tank, this usually involves a threaded fitting or a rubber grommet that creates an airtight seal. That's it. You now have a fully functional drainless sink.
Pro Tips from the Modern Yardz Team
Over the years, we've picked up a few crucial insights that make the difference between a drainless sink that's a minor inconvenience and one that's a seamless part of your outdoor kitchen.
Tip 1: Odor Control is Everything. A P-trap is your first line of defense. Your second is using RV tank treatment enzymes or chemicals in your holding tank. These products are designed to break down waste and neutralize odors. A few capfuls after each time you empty the tank will work wonders.
Tip 2: Plan for Winter. Even in milder climates, you can get a surprise frost. Before winter sets in, you need to winterize the system. It's simple: disconnect the water supply hose and let it drain completely. Open the faucet to let any water in the lines and faucet itself drain out. Empty your holding tank. This prevents water from freezing, expanding, and cracking your pipes or faucet.
Tip 3: See the Bigger Picture. Your sink is a key component, but it's part of a larger system. How will you use the kitchen at night? Integrating Landscape Lighting SAN Diego is crucial for both safety and ambiance. Will you be cooking in the hot sun? A well-placed structure from our Patio Covers Pergolas SAN Diego service can provide essential shade. A truly spectacular outdoor space is a cohesive design where every element works in harmony.
Tip 4: Use the Right Materials. We can't stress this enough. For the sink itself, insist on 304-grade stainless steel. It offers the best corrosion resistance for outdoor environments. For the faucet, choose one specifically rated for outdoor use. It will have more durable finishes and components designed to withstand UV rays and temperature swings.
What NOT to Put Down Your Drainless Sink
This is just as important as the installation itself. A drainless system is not a garbage disposal. You must be mindful of what goes down it to ensure it remains functional and odor-free.
First and foremost: no grease. Bacon grease, burger drippings, and heavy oils are the absolute enemy. They will congeal in your tank, creating a foul-smelling sludge that is incredibly difficult to clean. Scrape greasy plates and pans into the trash before rinsing.
Second, minimize solid food scraps. Use a high-quality sink strainer to catch any particles, and empty it into your compost or trash bin. The less solid material that gets into your tank, the easier it will be to empty and the less chance you'll have of odors developing.
Finally, avoid harsh chemicals. Bleach, ammonia-based cleaners, and conventional drain openers can damage the plastic of the holding tank and are catastrophic for a greywater system. Stick to simple, biodegradable dish soaps.
The convenience of an outdoor sink transforms how you use your backyard. No more running back and forth to the house to wash hands, rinse vegetables, or clean utensils. It elevates an outdoor cooking area into a true outdoor kitchen. The fact that you don't need a conventional drain line shouldn't stop you from realizing that vision. With a well-planned system, you can achieve full functionality with a fraction of the cost and complexity.
If you're ready to move from planning to building, our team is here to help you design the perfect outdoor space that integrates every feature seamlessly. Why not BOOK MY FREE CONSULTATION and let's talk about what's possible for your backyard?
Frequently Asked Questions. Here are some common questions. Find the answers you're looking for below.
Can I connect a garbage disposal to a drainless outdoor sink?
We strongly advise against it. Garbage disposals introduce a large volume of solid organic matter that will quickly fill and clog a portable holding tank, creating significant odor and cleaning problems. It is completely incompatible with a greywater system.
How often do I need to empty a portable holding tank?
This depends entirely on your usage and the tank's size. For a family doing regular outdoor cooking, a 20-gallon tank might need to be emptied every 2-4 weeks. For lighter use, it could be much longer.
Is it safe to use a standard garden hose for the sink's water supply?
It's crucial to use a hose specifically labeled as 'potable' or 'drinking water safe.' Standard garden hoses can leach harmful chemicals into the water, so always choose a food-grade hose for this purpose.
What kind of soap is best for a greywater diversion system?
You must use soaps that are biodegradable, low in sodium, and free of phosphates and boron. Look for products specifically marketed as 'plant-friendly' or 'greywater safe' to protect your soil and plants.
Can I have hot water at my drainless outdoor sink?
Yes, you can. The easiest way is to use a small, electric point-of-use water heater installed in the cabinet beneath the sink. It connects to your cold water supply line and provides hot water on demand.
Do I really need a P-trap if my holding tank is sealed?
Absolutely. Our team considers it a non-negotiable part of the installation. The water barrier in the P-trap provides a crucial, constant defense against any odors from wastewater that might be sitting in the pipe or the tank itself.
What size holding tank do you recommend for an average family?
In our experience, a tank in the 15 to 25-gallon range offers the best balance of capacity and manageability. It's large enough to avoid constant emptying but still easy enough to wheel around when it's time to drain.
How do I deal with food particles if I don't have a disposal?
A good sink strainer is your best friend. Scrape all plates and cookware into a trash can or compost bin before rinsing them in the sink. The strainer will catch any remaining small particles, and you should empty it regularly.
Will a drainless sink attract pests?
If you use a sealed holding tank system and keep the area clean, it will not attract any more pests than a standard outdoor kitchen. An open bucket system, however, is a clear invitation for insects and other critters.
Can I build the drainless sink system into a wooden outdoor kitchen island?
Yes, absolutely. Just ensure the cabinet housing the tank and plumbing is well-ventilated to prevent moisture buildup and is built with weather-resistant materials to ensure longevity.
Is a portable tank difficult to empty when it's full?
Most modern portable tanks, often called 'tote tanks,' are designed with convenience in mind. They have large wheels and integrated handles, making them surprisingly easy to roll, even when full. It's similar to moving a wheeled suitcase.


.webp)
.webp)