Flawless Stone Veneer for Your Outdoor Kitchen: An Expert How-To
An outdoor kitchen isn't just a place to grill. It's the heart of your backyard, the hub for summer gatherings, and the centerpiece of your outdoor living space. And nothing elevates that centerpiece from simply functional to absolutely stunning quite like stone veneer. It adds texture, permanence, and a rugged elegance that painted concrete or stucco just can't match. But the thought of installing it yourself can feel... formidable.
We get it. Our team has designed and built countless Outdoor Kitchens SAN Diego over the years, and we've seen the dramatic transformation that stone veneer brings. We've also seen the common pitfalls that can turn a dream project into a frustrating ordeal. That's why we're pulling back the curtain. This isn't just a list of steps; it's a blueprint built from our on-the-ground experience, designed to help you understand not just the 'how' but the 'why' behind each stage. Getting this right means creating a feature that will stand the test of time, weather, and countless family barbecues.
First Things First: Why Stone Veneer?
Before we dive into trowels and mortar, let's talk about why you're making a fantastic choice. Stone veneer offers a compelling blend of aesthetics and practicality that's almost perfectly suited for an outdoor kitchen. It provides the timeless look of full-bed stone without the immense weight, structural requirements, or prohibitive cost. It's durable, fire-resistant (a critical feature around a hot grill), and stands up exceptionally well to the elements.
More than that, it's about character. Each stone has a unique shape and color profile, allowing you to create a look that's truly your own, whether you're aiming for a sleek, modern stacked stone look or a rustic, old-world fieldstone vibe. It’s a design element that integrates beautifully into a larger Landscape Design SAN Diego plan, tying the kitchen into other hardscape elements like Seat Retaining Walls or a nearby fire feature.
Natural Stone vs. Manufactured Stone Veneer
One of the first decisions you'll face is choosing between natural thin stone veneer and manufactured (or 'cultured') stone veneer. There's no single 'right' answer—it all depends on your budget, aesthetic goals, and installation preferences. Our experience shows that both can produce breathtaking results when installed correctly.
Let's be honest, the debate can be intense. Purists love the authenticity of natural stone, while pragmatists appreciate the consistency and cost-effectiveness of its manufactured counterpart. We've used both to great effect. Here’s a breakdown to help you decide.
Feature
Natural Thin Stone Veneer
Manufactured Stone Veneer
Material
Quarried, real stone (like granite, limestone, slate) cut into thin profiles.
A concrete mixture poured into molds and colored with mineral oxide pigments.
Appearance
Each piece is unique. Colors and textures are authentic and can't be perfectly replicated.
Highly consistent in shape, size, and color. Can look repetitive up close.
Weight
Heavier, typically 13-15 lbs per square foot.
Lighter, usually 8-12 lbs per square foot, making it easier to handle.
Cost
Generally more expensive, both for materials and potentially for labor due to its irregularity.
More budget-friendly. The consistency often speeds up the installation process.
Durability
Extremely durable and colorfast. The color is through the entire stone.
Durable, but the surface color can chip off if struck hard, revealing the concrete beneath.
Installation
Can be more challenging due to irregular shapes and sizes. Requires more cutting and fitting.
Easier to install. Many systems include pre-made corner pieces and consistent flat pieces.
Our team often recommends manufactured stone for DIY projects due to its predictability. However, if authenticity is your non-negotiable priority and you have the budget, nothing beats the real thing.
Your Toolkit: Gathering the Essentials
Walking onto a job site without the right tools is a recipe for disaster. It’s inefficient and, frankly, unsafe. Before you even think about mixing mortar, do a full inventory. Having everything ready and within arm's reach makes the entire process smoother.
Here’s what you’ll need:
Safety Gear (Non-Negotiable): Safety glasses are a must. A dust mask is critical when cutting stone or mixing mortar. Heavy-duty work gloves will save your hands.
Angle Grinder with a Diamond Blade: This will be your primary tool for cutting and shaping both natural and manufactured stone. A wet saw also works exceptionally well, especially for minimizing dust, but an angle grinder is more versatile for small, intricate cuts.
Trowels: You'll need a few. A standard masonry trowel for applying mortar, and a smaller pointing trowel for detail work and filling joints.
Mason's Hammer: This is useful for chipping away small pieces of stone for a perfect fit.
5-Gallon Buckets: Get several. You'll need them for mixing mortar, holding water for cleaning, and carrying your stone pieces.
Heavy-Duty Drill with a Paddle Mixer: Mixing mortar by hand is a grueling, often inconsistent process. A paddle mixer ensures a smooth, lump-free consistency every time. Trust us on this one.
Level: A 4-foot level is ideal for checking your horizontal courses and ensuring everything stays plumb (perfectly vertical).
Tape Measure & Carpenter's Pencil: The fundamentals. Measure everything.
Grout Bag: This looks like a heavy-duty pastry bag and is the cleanest, most efficient way to apply grout between the stones.
Stiff-Bristled & Soft-Bristled Brushes: The stiff brush is for cleaning tools and striking joints; the soft one is for brushing away excess mortar without smearing it on the stone face.
Sponges & Clean Water: Essential for the final cleanup.
Natural Stone Cladding Installation Process In Site 2022
This video provides valuable insights into How to Install Stone Veneer on an Outdoor Kitchen, covering key concepts and practical tips that complement the information in this guide. The visual demonstration helps clarify complex topics and gives you a real-world perspective on implementation.
Step 1: The Critical Surface Preparation
This is it. The single most important phase of the entire project. We can't stress this enough: a flawless stone veneer installation rests entirely on an impeccably prepared surface. Any shortcuts taken here will, without question, lead to failure down the road—we've seen it happen. The goal is to create a surface that the mortar can mechanically bond to, securely and permanently.
Your approach will depend on your kitchen's existing structure. Is it bare concrete block (CMU), cement board, or a painted or sealed surface?
For Bare Concrete Block or Unpainted Cement Board: This is the ideal scenario. The surface is already porous and ready for a strong bond.
Clean It Thoroughly: Use a stiff brush and water to scrub away any dust, dirt, or efflorescence (those chalky white deposits). If there's any grease from a previous grill, you must use a concrete degreaser. Mortar will not stick to oil. Let it dry completely.
For Painted, Sealed, or Wooden Surfaces: You cannot apply mortar directly to these. It will fail. You must install a new substrate system.
Install a Weather-Resistant Barrier (WRB): Start by attaching two layers of a high-quality WRB, like Grade D building paper or a house wrap. Overlap all seams by at least 6 inches, shingle-style, so water always flows down and out. This prevents any moisture that gets behind the stone from reaching the kitchen's core structure.
Attach Metal Lath: Next, fasten galvanized metal lath over the WRB. The lath is a metal mesh that acts as a skeleton for the mortar to grab onto. Use galvanized roofing nails or screws with washers every 6-8 inches, ensuring it's fastened securely into the studs or solid blocking. The lath should feel tight, with no sagging or loose spots. Make sure the lath's 'cups' are facing up to catch the mortar.
Once your surface is ready (either cleaned concrete or freshly installed lath), it's time for the scratch coat.
Step 2: Applying the Scratch Coat
The scratch coat is a 1/2-inch thick layer of mortar applied over the entire surface. It provides the perfect textured base for your stone veneer.
Mix a batch of Type S or Type N mortar according to the manufacturer's instructions. You're looking for a firm, workable consistency. Using your masonry trowel, apply the mortar to the wall, pressing firmly to ensure it goes through the metal lath and makes solid contact with the WRB behind it. Work from the bottom up, covering the entire area.
Once the wall is covered, it's time to 'scratch' it. While the mortar is still wet but firming up, take a mason's rake or even just a scrap piece of metal lath and drag it horizontally across the surface. This creates rough grooves that will give the stone's mortar something to lock into.
Now, you have to wait. This is the hard part. The scratch coat needs to cure for at least 24 to 48 hours before you can even think about sticking stone to it. Don't rush this. A properly cured scratch coat is the foundation of your entire project.
Step 3: The Art of the Dry Layout
While your scratch coat is curing, you can get started on one of the most creative parts of the process: the dry layout. Don't just pull stones from the box and stick them on the wall. That leads to weird color clusters, awkward patterns, and a ton of wasted material.
Lay out a 10-20 square foot section of stone on a tarp on the ground near your kitchen. Mix pieces from different boxes to ensure a good blend of colors and sizes. Arrange them just as you'd want them to appear on the wall. This lets you visualize the final product and make adjustments.
Our professional installers spend a surprising amount of time on this step. They're looking for a balanced, natural appearance. They mix large 'field' stones with smaller 'filler' pieces. They ensure that long, straight edges aren't lined up, which can create unnatural-looking horizontal or vertical lines. This is your chance to be an artist. Play with the arrangement until it feels right.
Step 4: Mixing Mortar and Setting the Stone
Alright, the scratch coat is cured, and your layout is planned. It's time for the main event.
Mix your veneer mortar (we recommend a polymer-modified blend for superior adhesion and flexibility, especially outdoors) to a creamy, peanut-butter-like consistency. It should be stiff enough to hold its shape on the trowel without sliding off. A critical pro-tip: after the initial mix, let the mortar 'slake' or rest for 5-10 minutes, then give it a final, quick remix. This allows the chemicals to fully activate and results in a much stronger bond.
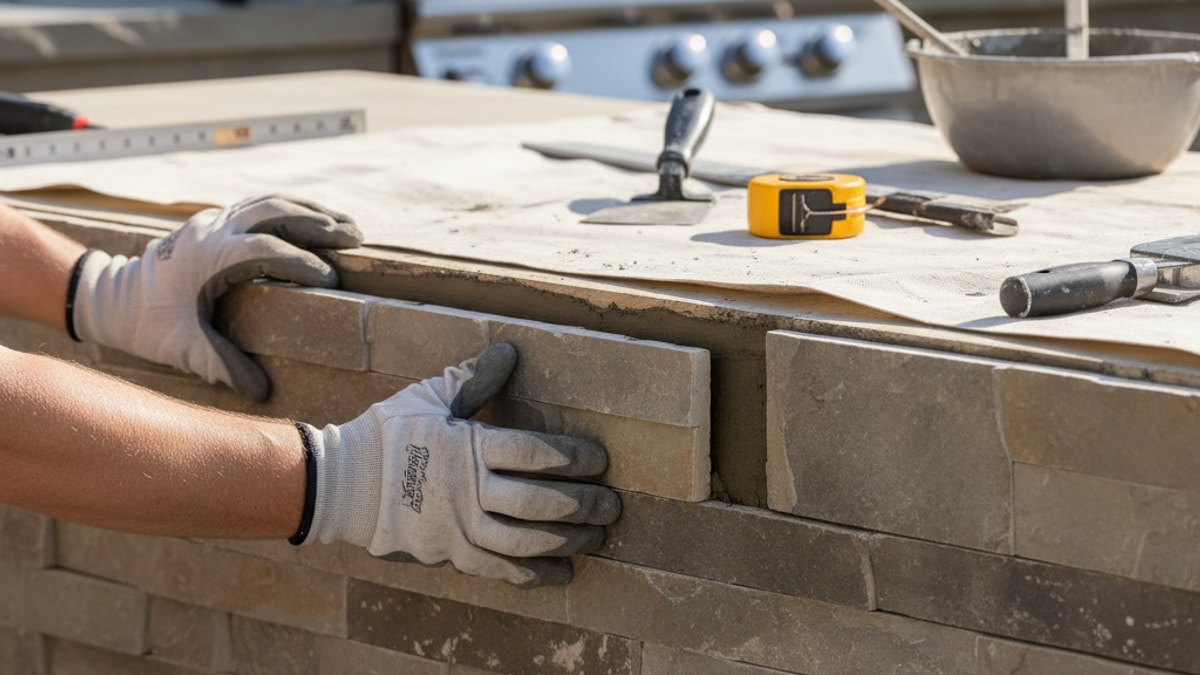
Start at the bottom corners and work your way up. Corner pieces go on first, as they establish the finished edges of your project. Alternate the long and short legs of the corner pieces as you move up the wall for a more authentic look.
For each stone, apply about a 1/2 to 3/4-inch layer of mortar to the back—a technique called 'back-buttering'. Make sure the entire back of the stone is covered, edge to edge. Then, press the stone firmly against the scratch-coated wall with a slight wiggling motion. You should see a little bit of mortar squeeze out around the edges. This is a good sign; it means you've achieved full coverage and a solid bond.
Hold the stone in place for a few seconds until you feel it grab. Use your level frequently to check your work. While you're not aiming for the perfect lines of brickwork, you want the overall installation to be level and plumb.
Continue setting the 'field' stones, working from your dry layout. Maintain consistent spacing between the stones for your grout joints. This space can vary depending on the style—a tight-fit or dry-stack look will have minimal gaps, while a fieldstone look might have wider, more irregular joints. Refer to the stone manufacturer's recommendations.
Step 5: Cutting and Fitting
Inevitably, you'll reach areas—around outlets, vents, or at the end of a wall—where a full stone just won't fit. This is where your angle grinder or wet saw comes in.
Measure the space carefully and mark the stone with your pencil. Wearing your safety gear, make slow, steady cuts. It's often better to make several shallow passes rather than trying to cut through the entire stone in one go. For manufactured stone, you can often score it and snap it, but a grinder gives you a cleaner edge.
Always try to hide your cut edges. Position them on the bottom of a course, against a corner, or next to another stone where they'll be less noticeable. The goal is to make every piece look like it was naturally meant to be there.
Step 6: Grouting and Finishing
After all the stones are set, you need to let the mortar cure for another 24-48 hours before grouting. Grouting fills the joints between the stones, locking them together and giving the project a finished, professional look.
Mix your grout to a slightly looser consistency than your setting mortar—think thick yogurt. Fill your grout bag and twist the top closed. Squeeze the grout deep into the joints, making sure to overfill them slightly. Avoid getting grout on the face of the stones. It’s a pain to clean off once it dries. Work in a manageable section, about 10-15 square feet at a time.
Wait for the grout to become 'thumbprint-hard'—when you can press your thumb into it and it leaves an impression without sticking to your finger. This timing is crucial and can vary wildly based on temperature and humidity. Now, use your pointing trowel or a specialized jointing tool to strike the joints, scraping away the excess grout and shaping it to your desired depth and profile.
Once the joints in your section are tooled, use a soft-bristled brush to gently sweep away any loose crumbs of grout from the wall and stone faces.
Step 7: The Final Clean and Seal
Let the entire project cure for several days, or as recommended by the mortar/grout manufacturer. There may be a light haze or some stubborn mortar smudges on the stone. You can clean these off using a specialized masonry cleaner and a stiff brush, following the product's directions carefully. Always test the cleaner on a spare piece of stone first.
Finally, the last step that so many people skip: sealing. For an outdoor kitchen, a high-quality silane/siloxane sealer is not optional. It’s essential. It will protect your beautiful new stone from water penetration, stains from grease splatters, and freeze-thaw cycles that can cause catastrophic damage over time. Apply one or two coats with a sprayer or roller, and your investment will be protected for years to come.
Installing stone veneer is a project that demands patience and attention to detail, but the payoff is immense. It's a challenging but incredibly rewarding process that adds massive value and jaw-dropping curb appeal to your home. Taking the time to do it right ensures you're not just building an outdoor kitchen; you're creating a lasting work of art that will be the backdrop for memories for years. And if you find yourself needing a partner to bring the whole vision together, don't hesitate to BOOK MY FREE CONSULTATION. We're here to help.
Frequently Asked Questions. Here are some common questions. Find the answers you're looking for below.
Can I install stone veneer directly over painted brick?
No, you should never apply mortar directly to a painted or sealed surface. The bond will fail. You must either sandblast the paint off completely or install a new substrate system with a weather-resistant barrier and metal lath.
What's the difference between Type S and Type N mortar?
Type S mortar has a higher compressive strength and is generally recommended for applications at or below grade and where extra durability is needed, like for stone veneer. Type N is a general-purpose mortar suitable for most above-grade brickwork but Type S is often the better choice for adhering heavy veneers.
How long do I really need to wait for the scratch coat to cure?
We recommend a minimum of 24 hours, but 48 hours is even better, especially in cooler or more humid weather. Rushing this step compromises the bond between the scratch coat and the setting mortar, which can lead to delamination of the stone later on.
Do I need to seal manufactured stone veneer?
Yes, absolutely. Especially in an outdoor kitchen environment. Sealing protects the stone's colored surface from grease stains and helps prevent water absorption, which can cause fading and efflorescence over time.
What's the best way to clean stone veneer after installation?
For general cleaning, use a soft-bristled brush and a mild detergent. For tougher mortar haze, use a designated masonry cleaner, but test it on a hidden area first as some cleaners can discolor the stone. Avoid acid-based cleaners on manufactured stone.
Is natural stone veneer better than manufactured stone?
Neither is inherently 'better'—it depends on your priorities. Natural stone offers unparalleled authenticity and durability, while manufactured stone is more lightweight, consistent, and budget-friendly. Both can create a beautiful, long-lasting finish.
My mortar is drying too fast. What can I do?
Working in direct sun or high wind can cause mortar to dry too quickly. Try to work in the shade or erect a temporary screen. You can also lightly mist the scratch coat with water just before applying the setting mortar to slow down the curing process.
What is the ideal grout joint size for stone veneer?
This depends entirely on the style of stone. For a dry-stack look, the stones are fitted tightly together with no visible joint. For other styles like fieldstone or ledgestone, a 1/2-inch to 1-inch joint is common. Always check the manufacturer's recommendations for your specific product.
Can I do this project in the winter?
We strongly advise against it. Mortar and grout need to cure at temperatures above 40°F (4°C) for at least 24-48 hours. Installing in freezing temperatures can ruin the mortar's integrity and cause a complete bond failure.
What causes the white, chalky substance I see on some stone walls?
That's called efflorescence. It's caused by water-soluble salts migrating to the surface of the masonry as water evaporates. It can often be brushed off, but its presence may indicate a moisture issue behind the stone, highlighting the importance of a proper weather-resistant barrier.
How do I handle an outside corner?
Most stone veneer systems offer L-shaped corner pieces that wrap around the corner for a seamless, authentic look. You should always install these first, alternating the direction of the long and short legs as you work your way up the wall to create a natural-looking staggered pattern.


.webp)
.webp)