A new pool liner can completely transform your above ground pool, taking it from tired and worn to sparkling and new. It's a fresh start. But let's be honest, the thought of how to install an above ground pool liner can be intimidating. We've been in the landscape design and construction business for a long time, and we’ve seen it all: the flawless DIY victories and the catastrophic, wrinkle-filled failures. The difference between the two almost always comes down to preparation and patience.
This isn't just another checklist. This is our team's collective experience, distilled into a process you can actually follow. We're going to walk you through the steps the professionals take, highlighting the critical details that are so often overlooked in other tutorials. Tackling this project yourself can be incredibly rewarding, saving you money and giving you a huge sense of accomplishment. You just need the right game plan. So, let's get started.
Before You Begin: The Critical Prep Work
Jumping the gun is the single biggest mistake you can make. Our team can't stress this enough: the success of your liner installation is decided long before you even open the box for the new liner. It's all in the prep work. Rushing this stage is a surefire recipe for wrinkles, leaks, and a whole lot of frustration. So, take a deep breath and focus on getting the foundation right.
First, check the weather forecast. This is a non-negotiable. You need a warm, sunny, and calm day. Ideally, you're looking for temperatures between 70 and 85 degrees Fahrenheit. Why? The vinyl liner needs that warmth to become pliable and flexible, allowing it to stretch slightly and conform perfectly to the pool's shape. Trying to install a cold, stiff liner is like trying to fold a piece of plywood. A little bit of sun is your best friend here. Conversely, avoid extremely hot days, as the liner can overstretch, and avoid windy days at all costs. A gust of wind can turn your giant, unfolded liner into an uncontrollable sail, potentially damaging it or the pool wall.
Next, gather your tools and materials. There’s nothing worse than getting halfway through a step only to realize you’re missing something essential. Here's a list our crews typically have on hand:
- Utility Knife & Extra Blades: For cutting the old liner and making precise cuts for your skimmer and return.
- Duct Tape: The universal problem-solver. You'll need it for sealing vacuums and patching small holes.
- Shop-Vac: This is the professional secret weapon for getting a wrinkle-free finish. Don't skip this.
- Cordless Drill/Driver: For removing and reinstalling top rails and faceplates.
- Clothespins or Small Clamps: To temporarily hold the new liner in place.
- Shovels & Rakes: For working with the sand base.
- Push Broom: Used upside down, it's great for final smoothing of the sand.
- Level & Tamper: To ensure your pool base is perfectly flat and compacted.
- Replacement Gaskets: Always install new gaskets for the skimmer and return jet. Reusing old, compressed gaskets is asking for a leak.
- Pool Cove: We'll get into this more, but it's essential for protecting your liner.
- A Helper: This is not a one-person job. An extra set of hands is invaluable for unfolding and positioning the liner.
With your tools ready, it's time to drain the pool completely. Use a submersible pump to get the water out, directing it to a suitable drainage area away from your home's foundation and your neighbor's property. Once it's empty, you can get in and remove the old liner. Take your utility knife and carefully cut it into manageable strips. It makes removal much easier. Be cautious not to slice the pool wall. Remove the skimmer and return faceplates, then pull the old liner out and set it aside.
Perfecting the Pool Floor: The Foundation of Your Install
Now that the old liner is out, you have a clear view of the pool's foundation. This is the canvas for your new installation, and it needs to be impeccable. Any imperfection here—a small rock, a root, a lump of sand—will be glaringly obvious and felt underfoot once the new liner is in and filled with water. It can even lead to premature punctures. Don't rush this.
Start by inspecting the entire floor. Remove any rocks, twigs, or debris. If your pool is on a concrete pad, like many of the ones we incorporate into our Concrete SAN Diego patio projects, sweep it thoroughly. If it's a sand base, now is the time to re-work it. We often find that years of use have created low spots and compacted areas. Add new, clean masonry sand as needed and use a rake to spread it evenly. The goal is a perfectly smooth, two-inch base across the entire floor.
Next comes one of the most crucial, yet often misunderstood, components: the pool cove. The cove is a gentle, angled wedge of material at the point where the pool floor meets the wall. Its job is to eliminate the sharp 90-degree angle, preventing the liner from being stretched and stressed in that corner, which is a common failure point. You have two primary options here.
| Feature |
Pre-Formed Foam Cove |
Hand-Packed Sand Cove |
| Installation Speed |
Fast; typically has a peel-and-stick adhesive backing. |
Slow; requires careful shaping, packing, and tamping. |
| Consistency |
Perfectly uniform angle and height around the entire pool. |
Can be inconsistent and lumpy if not done by a pro. |
| Durability |
Excellent; it's waterproof and resists erosion, insects, and rodents. |
Prone to washouts from small leaks and can be a target for burrowing animals. |
| Cost |
Higher initial material cost, but a worthwhile investment. |
Lower material cost (sand is cheap), but higher labor and risk. |
| Our Recommendation |
The superior choice for longevity and liner protection. It's what we use. |
A traditional method, but our experience shows it fails far more often. |
Frankly, we always recommend pre-formed foam coving. The consistency and durability are just unmatched. Once your cove is in place, do one final pass on the sand floor. A great trick our team uses is to lightly mist the sand with a garden hose to make it easier to pack, then use a tamper to compact it. For the final, perfectly smooth finish, turn a wide push broom upside down and gently glide it across the surface. It works beautifully.
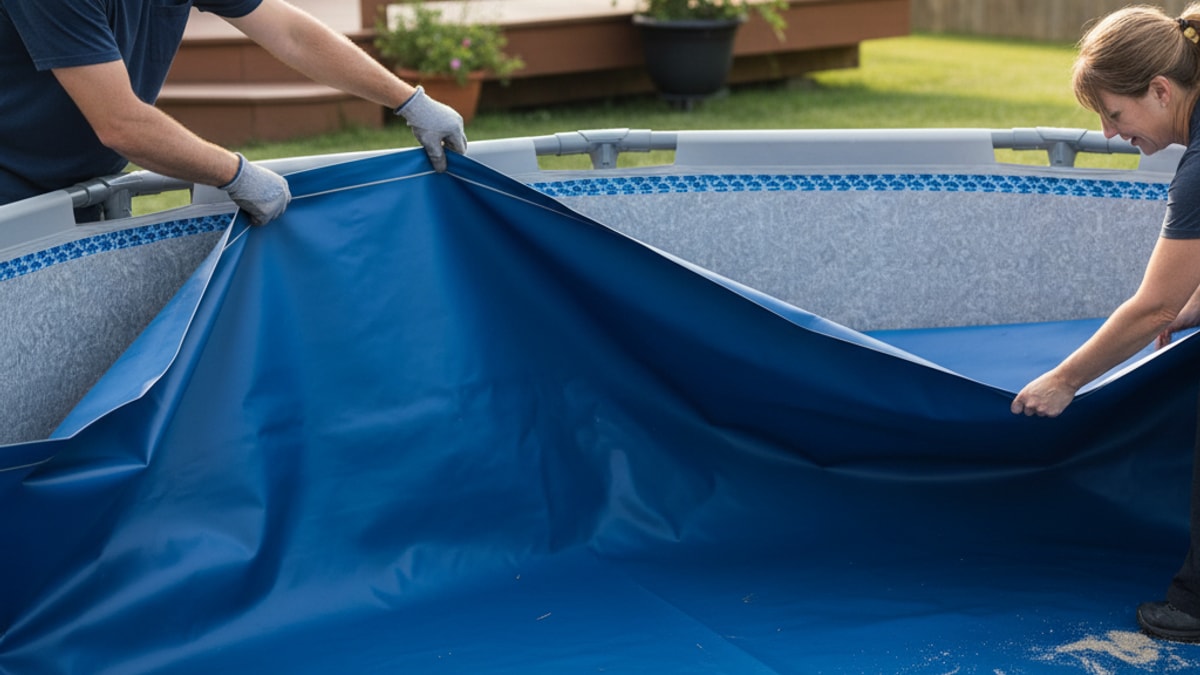
Unpacking and Positioning the New Liner
This is the moment you've been working toward. With your base perfected, it’s time to introduce the new liner. Bring the box into the center of the pool before you open it. This minimizes the risk of snagging it on something outside the pool. Carefully open the top of the box, being mindful not to let your utility knife blade go too deep and slice your brand-new liner. That's a catastrophic error we've unfortunately heard about too many times.
With a helper, gently lift the liner out and begin to unfold it. It will likely be folded like a map. Find the edges and work your way out. The sun you waited for will now start to do its job, slowly warming the vinyl and making it more manageable. As you unfold, be careful not to drag it across the floor; lift and place it. Dragging can disturb your perfectly smoothed sand base.
Now for the most important part of this step: alignment. Most round and oval pool liners are cut with seams. You'll see a seam that defines the transition from the floor to the wall. Your goal is to get that bottom seam perfectly centered and equidistant from the pool wall all the way around. This initial positioning is what determines whether your liner will have an even, balanced stretch or unsightly wrinkles and stress points. Take your time here. Nudge and adjust it until the alignment is perfect. It will pay huge dividends later.
The Three Main Liner Types: Overlap, Beaded, and Unibead
Not all liners attach the same way. Understanding your liner type is critical for the next steps. There are three main styles, and each has its own installation nuance.
Overlap Liners: This is the most common type for entry-level above ground pools. As the name suggests, you simply pull the vinyl up and over the top of the pool wall. It's held in place by plastic strips called coping. The main advantage is that they are more forgiving if your pool's exact dimensions are slightly off. The challenge? It can be very tricky to get an even, uniform look all the way around, and you have to trim the excess vinyl on the outside.
Beaded Liners (Standard Bead): These liners have a thick, wedge-shaped bead running along the top edge. The pool wall has a corresponding track, called a bead receiver, that the liner snaps into. This provides a very clean, professional look and makes installation much more straightforward. You don't have to worry about pulling it evenly. The downside is that you must have the correct size liner for your pool; there is no room for error. The bead must match the track perfectly.
Unibead/J-Hook Liners: These are the most versatile. A Unibead liner comes with a hook on the top edge that looks like a 'J'. This J-hook can be hung directly on the top of the pool wall, much like an overlap liner but far cleaner. The brilliant part is that this hook is often perforated. If you have a bead receiver track, you can simply tear off the J-hook portion, revealing a standard bead underneath that can be snapped into the track. It's two-in-one.
Knowing which type you have dictates how you'll secure it to the wall before the next big step. A well-thought-out project, like those in our Landscape Design SAN Diego portfolio, considers these details from the start to ensure the pool is not just functional but seamlessly integrated into the overall aesthetic.
Setting the Liner: The Shop-Vac Method
Here it is. The single most effective professional trick for a wrinkle-free liner installation. Using a shop vacuum creates a suction seal that pulls the liner into place against the walls and floor before you add the water. It essentially shrink-wraps the liner to the pool's interior, allowing you to see and fix any wrinkles while they are still easy to manage.
First, gently lift the liner and drape it over the walls (for overlap) or snap it into the bead track (for beaded/unibead). Don't install all the top rails yet. Use clothespins or clamps to hold it in place if needed, or just secure a few sections of the top rail to keep it from falling in.
Next, locate your skimmer opening. You're going to feed the hose of your shop-vac through this opening, down between the pool wall and the new liner. You want the end of the hose to be about a foot off the pool floor, pointing toward the floor. Now, use your duct tape to completely seal the skimmer opening and the return jet opening from the outside, ensuring the only place air can be pulled from is from behind the liner. Make it airtight.
Ready? Turn on the shop-vac. You'll almost immediately see the magic happen. The liner will begin to pull tight against the walls and floor as the air is sucked out from behind it. It's incredibly satisfying to watch. As it tightens, you may need to get in the pool (barefoot or with soft-soled shoes!) and gently push any remaining wrinkles from the center of the pool out toward the edges. The suction makes this surprisingly easy. Don't turn the vacuum off.
Filling the Pool and Making the Cuts
With the shop-vac still running and your liner looking beautifully smooth, you can start filling the pool. Place your garden hose in the center of the pool on a piece of cardboard or an old towel to prevent it from disturbing your sand base. The goal is to get about 6 to 12 inches of water in the pool. This water weight is what will permanently lock the liner into its final position.
Once you have that base of water, you can turn off and remove the shop-vac. The water pressure has now taken over the job of holding the liner in place. At this point, you can securely install all the top caps and rails around the pool's perimeter. The liner is set.
Continue filling the pool. The next, and most nerve-wracking, step is cutting the holes for the skimmer and return jet. We can't say this loudly enough: DO NOT MAKE THESE CUTS UNTIL THE WATER IS AT LEAST HALFWAY UP THE POOL WALL. The liner is still stretching slightly as it fills, and cutting too early can result in a tear. Wait until the water level is just 2-3 inches below the bottom of the skimmer opening.
To install the faceplates, take the skimmer faceplate and its new gasket. Align it with the screw holes on the outside of the pool wall and use an awl or a sharp screw to poke the first hole through the liner. Screw in the first screw. Then, do the same for the screw on the opposite side. This secures the plate and liner. Now, install the rest of the screws, making them snug but not overly tight. With the faceplate securely in place, take your sharp utility knife and carefully cut out the vinyl from the inside of the faceplate opening. Repeat this exact process for the return jet fitting.
This final stage is often part of a much larger backyard transformation. Imagine stepping out of your newly lined pool onto a stunning deck of custom Pavers SAN Diego as evening sets in, with perfectly placed Landscape Lighting SAN Diego creating a magical ambiance. That's the difference between a simple pool and a true outdoor oasis. It’s about seeing the complete picture, which is our entire philosophy behind designing custom Pools AND Spas.
Common Mistakes We See (And How to Avoid Them)
Over the years, our team has been called in to fix a few DIY installations gone wrong. The mistakes are almost always the same. Here's what to watch out for:
- Ignoring the Weather: Being impatient and installing on a cold or windy day. This leads to a stiff liner that won't seat properly and wrinkles that never come out.
- Skimping on the Base: Rushing the floor prep. Every little bump or pebble will feel like a boulder underfoot and can cause a pinhole leak down the road.
- Forgetting the Cove: Not installing a cove is the leading cause of liner failure at the seam where the wall meets the floor. It's a critical stress point.
- Cutting Too Early: Getting anxious and cutting the skimmer and return holes before the pool is mostly full. This can lead to the liner tearing under the weight of the water.
- The Box Cutter Slice: Accidentally slicing the new liner while opening the box. It happens more than you'd think. Open the box with care, away from the liner itself.
Learning how to install an above ground pool liner is a project that demands precision and patience. But by following these steps and avoiding the common pitfalls, you can achieve a professional-quality result that will provide years of enjoyment. It's about taking the time to do it right, creating a backyard feature you can truly be proud of. And if you ever feel like the project is just one piece of a bigger dream for your yard, from Outdoor Kitchens SAN Diego to a cozy fire pit, don't hesitate to reach out. We can help you put all the pieces together. You can even BOOK MY FREE CONSULTATION to discuss the possibilities.
Taking on a project of this scale is a significant commitment, but the final result—a sparkling, inviting pool ready for summer—is more than worth the effort. It's the centerpiece of your backyard, a place for family, fun, and relaxation. Getting the installation right ensures that centerpiece is beautiful and durable for a long, long time.


.webp)
.webp)