A swimming pool is the centerpiece of a backyard oasis, but what makes it truly function is hidden from view. It's the sprawling, intricate network of pipes, valves, and fittings that keeps the water crystal clear and inviting. We're talking about the plumbing. And let's be honest, for many homeowners, the thought of how to install pool plumbing is where the dream of a DIY pool project hits a formidable wall of reality. It seems complex, unforgiving, and one small mistake could lead to a catastrophic, water-logged nightmare buried under tons of concrete and earth.
We get it. Our team has spent years designing and building these systems from the ground up. We've seen impeccable installations that hum along silently for decades, and we've been called in to fix disastrous attempts that failed within weeks. The difference isn't magic; it's a combination of meticulous planning, the right materials, and an unflinching commitment to proven techniques. This isn't just about connecting pipes. It's about understanding hydraulics, flow rates, and creating a closed-loop system that is both powerful and efficient. So, let’s pull back the curtain and walk through the process our professionals use, step by step.
Before You Glue a Single Pipe: The Planning Phase
We can't stress this enough: the success of your pool plumbing installation is determined long before you ever pick up a PVC cutter. The planning phase is everything. A well-thought-out schematic is your roadmap to an efficient, low-maintenance, and serviceable system. A poor plan? That's a direct route to frustration, high energy bills, and costly future repairs.
First, think about hydraulics. This is the science of moving water, and it's the core principle of your pool's circulation. Your goal is to move the entire volume of your pool's water through the filter system at least once or twice a day (known as turnover). To do this efficiently, you need to minimize resistance. Every 90-degree elbow, every unnecessary bend, and every undersized pipe adds friction, forcing your pump to work harder. The harder it works, the more electricity it consumes and the shorter its lifespan. We always design our systems with large-radius, sweeping turns instead of sharp 90-degree fittings wherever possible. It’s a small detail that makes a dramatic difference in performance.
Your equipment pad location is another critical, non-negotiable element of the plan. Where will the pump, filter, heater, and any automation systems live? It needs to be accessible for maintenance, preferably on a solid concrete pad, and positioned to minimize the total length of your pipe runs. Longer runs equal more friction and less efficiency. A comprehensive Landscape Design SAN Diego plan integrates the equipment pad seamlessly into the overall yard layout, ensuring it's both functional and discreet.
Finally, you need to create a detailed plumbing schematic. Seriously. Draw it out. Map every single line: the suction lines coming from the skimmers and main drains, and the pressure lines (or return lines) going back to the pool jets and water features. Label every valve. Plan for future additions. Thinking of adding a heater or a water slide down the road? Stub out the plumbing for it now. It's infinitely easier to add a capped-off pipe during the initial installation than it is to cut into concrete and dig up the yard later. This foresight is a hallmark of professional work.
Gathering Your Arsenal: Tools and Materials
Once your plan is locked in, it's time to assemble your toolkit and materials. Using the right stuff is non-negotiable. Cutting corners here will almost certainly lead to leaks. Here’s what we at Modern Yardz consider essential for the job:
Tools of the Trade:
- PVC Pipe Cutter: A ratcheting cutter provides clean, square cuts. A hacksaw can work in a pinch, but you must be diligent about deburring the edges.
- Deburring Tool: Absolutely essential for cleaning the inside and outside edges of a fresh cut. A simple handheld tool or even a utility knife will work.
- PVC Primer and Cement (Glue): Use a heavy-duty, fast-setting cement rated for pressure applications. Always use the primer—it cleans the pipe and begins the chemical process that fuses the plastic.
- Tape Measure & Marker: For precise measurements. Remember the old rule: measure twice, cut once.
- Adjustable Wrenches/Channel Locks: For tightening threaded fittings.
- Teflon Tape or Pipe Dope: For sealing threaded connections, like those on your pump and filter.
- Shovels & Trenching Tools: You'll be moving a lot of earth.
Materials Breakdown:
The vast majority of residential pool plumbing is done with rigid PVC (polyvinyl chloride) pipe. It’s strong, durable, and relatively inexpensive. But not all PVC is created equal.
| Pipe Type |
Best Use Case |
Pros |
Cons |
| Schedule 40 Rigid PVC |
The industry standard for most pool plumbing runs—both suction and pressure sides. |
Widely available, strong, cost-effective, excellent flow characteristics. |
Not flexible, requires precise measurements and fittings for turns. |
| Schedule 80 Rigid PVC |
Often used for high-stress areas like connections to heaters or in commercial applications. |
Thicker walls, higher pressure rating, more durable. |
More expensive, slightly reduced internal diameter can affect flow. |
| Flexible PVC |
Can be used for suction lines in some regions, or for tight, complex bends. |
Reduces the need for fittings, good for navigating obstacles. |
More susceptible to crushing, can be damaged by termites, not recommended for pressure lines underground. |
Our professional recommendation is almost always to use Schedule 40 rigid PVC for the entire system. While flexible PVC might seem easier, our experience shows it's less durable over the long term, especially when buried. The reliability of a fully rigid pipe system is simply unmatched. It forms the backbone of the high-quality Pools AND Spas we build for our clients.
The Heart of the System: The Equipment Pad
Think of the equipment pad as your pool's command center. A logical, spacious, and well-organized layout here will make your life as a pool owner so much easier. A cramped, chaotic mess of pipes will be a constant source of frustration.
Here’s the typical flow of water through the equipment:
- Pump: Water is pulled from the pool via the suction lines and enters the pump's strainer pot.
- Filter: The pump pushes the water into the filter (cartridge, sand, or D.E.) to remove debris.
- Heater/Chiller (if applicable): After being filtered, the water flows through the heater.
- Sanitizer (if applicable): From there, it may go through an inline chlorinator or salt cell.
- Return Lines: Finally, the clean, treated water is pushed back to the pool through the return lines.
When plumbing the pad, arrange the equipment in that logical order. Leave plenty of space around each component for future service or replacement. You don't want to have to cut out plumbing just to change a filter cartridge. We also install unions on either side of every piece of equipment. These fittings allow you to easily disconnect the pump or filter without cutting any pipes. It's a simple step that saves immense headaches later.
Valves are your friends. Use ball valves or 3-way valves to direct the flow of water. You should be able to isolate every line and every piece of equipment. This allows you to, for example, shut off the skimmer line to vacuum the pool to waste, or to bypass the heater when it's not in use. Proper valve placement gives you complete control over your system.
Digging In: Trenching and Pipe Layout
This is where the hard labor begins. Your trenches are the pathways for your pool's circulatory system, and they need to be prepared correctly.
All plumbing lines should be buried at least 18-24 inches deep, and sometimes local codes dictate even deeper. This protects the pipes from surface activity and temperature fluctuations. The trench bottom should be smooth and free of any sharp rocks or roots that could puncture a pipe over time. We often lay a bed of sand or fine gravel in the bottom of the trench to cushion the pipes.
When laying the pipe, follow the schematic you created. Support the pipe every 3-4 feet with blocking or hangers to prevent sagging. Over time, an unsupported pipe can develop a 'belly' that traps water and air, hindering flow. All horizontal suction lines—the ones running from the skimmers and main drain to the pump—should have a slight, continuous slope downhill toward the pump. This helps prevent air pockets from forming and ensures the pump can prime itself easily.
Remember what we said about hydraulics? This is where it plays out. Use large, sweeping 90-degree elbows instead of tight, standard 90s. If you need to make a more complex turn, use two 45-degree fittings instead of one 90. Every little bit helps to reduce friction and improve the efficiency of your system. It’s this attention to detail that separates a professional job from an amateur one.
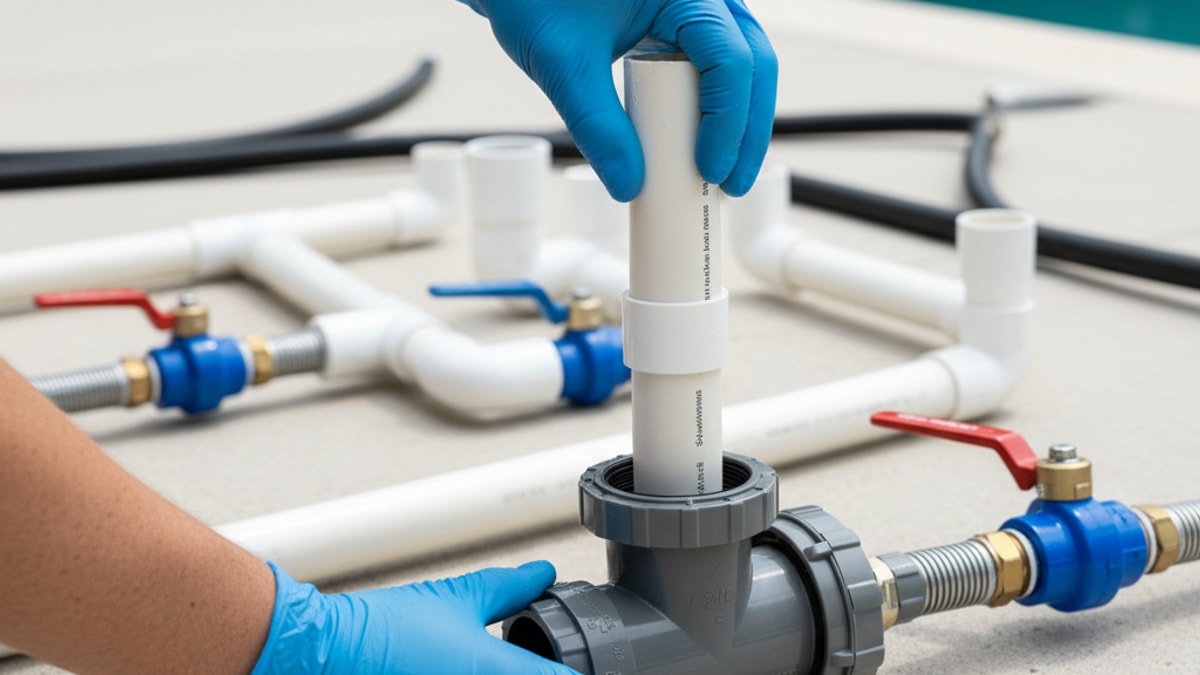
Making the Connections: Cutting, Priming, and Gluing PVC
This is the most technique-sensitive part of the entire process. A bad solvent weld (the technical term for a glue joint) will fail. It's not a matter of if, but when. And a leak underground is a truly catastrophic failure.
Follow these steps religiously for every single joint:
- Cut the Pipe: Make a clean, perfectly square cut using a PVC cutter. A crooked cut will prevent the pipe from bottoming out in the fitting socket, creating a weak point.
- Deburr and Chamfer: This is a step people always skip, and it's a huge mistake. Use a deburring tool to remove all the plastic burrs from the inside and outside of the pipe's cut edge. Then, slightly bevel the outside edge. This prevents the sharp edge from scraping all the cement off the inside of the fitting as you push it in.
- Dry Fit: Always test fit the pipe and fitting first. The pipe should fit snugly into the socket, going about halfway to two-thirds of the way in. Mark the pipe and fitting with a marker so you know how far to insert it and can check for proper alignment after gluing.
- Prime: Apply a liberal amount of purple primer to the outside of the pipe end and the inside of the fitting socket. The primer should be wet when you apply the cement. Its job is to clean the surfaces and soften the PVC, preparing it for the solvent weld.
- Cement: Work quickly. Apply a full, even layer of PVC cement to the outside of the pipe and a thinner layer to the inside of the fitting. Don't be shy with it on the pipe, but don't let it puddle inside the fitting.
- Connect: Immediately insert the pipe into the fitting with a slight twisting motion—about a quarter turn. This helps spread the cement evenly. Push it all the way in until it hits the bottom of the socket. Hold it firmly in place for at least 30 seconds. The chemical reaction creates pressure that can try to push the pipe back out. You have to hold it to prevent this.
That's it. A properly primed and cemented joint chemically fuses the two pieces of PVC into one. It's incredibly strong. Let the joints cure for the manufacturer's recommended time before you even think about introducing water or pressure.
The Suction Side vs. The Pressure Side: A Critical Distinction
The plumbing on the suction side (from the pool to the pump) operates under a vacuum, while the pressure side (from the pump back to the pool) is under, well, pressure. This distinction matters.
Any leak on the pressure side will spray water out. It's usually obvious and relatively easy to spot (if it's not buried). But a leak on the suction side will suck air in. This is far more insidious. An air leak can starve the pump of water, causing it to lose prime and potentially burn out its motor. It will also introduce air into the filter and reduce overall circulation. These leaks can be notoriously difficult to find. This is why every joint on the suction side, from the skimmer all the way to the pump, must be absolutely perfect.
The Moment of Truth: Pressure Testing Your Lines
Never, ever backfill your trenches until you have pressure tested the entire plumbing system. Skipping this step is gambling with your entire investment. We mean this sincerely: it is one of the most critical steps in the entire process.
Once all the glue joints have fully cured (usually 24 hours), you'll need to cap off all the lines at the pool shell and at the equipment pad. You'll then install a pressure testing rig, which is essentially a pressure gauge and a Schrader valve (like on a tire) attached to one of the lines. You'll use an air compressor to slowly pressurize the system with air—typically to about 30-35 PSI. Never use water for this initial test, as pressurized air is much safer if a joint fails.
Once pressurized, you let it sit. For at least 24 hours. The pressure should not drop at all. If it does, you have a leak. Now begins the painstaking process of finding it. You can use a spray bottle with soapy water on all the exposed joints to look for bubbles. If it's underground, it's much harder, which is why you hope you did everything right the first time. Once you've confirmed the system holds air pressure, you can repeat the test with water for final verification before you backfill.
Finishing Touches: Backfilling and Beyond
Once you've passed your pressure test with flying colors, it's time to bury your work. Backfill the trenches carefully, especially the first foot of soil around the pipes. You don't want a large rock falling from the top of the pile and cracking a pipe. It's best to 'bed' the pipes by filling and tamping soil around and under them by hand first.
This is also the stage where the plumbing integrates with the rest of your backyard vision. The pipes leading to the pool shell will soon be encased in the pool's bond beam and the surrounding deck. This makes the initial installation your one and only chance to get it right. It's why we meticulously coordinate our plumbing work with the construction of other elements, like the solid foundation needed for a beautiful Concrete SAN Diego patio or deck that will surround your new pool.
Learning how to install pool plumbing is a formidable task. It requires patience, precision, and a deep understanding of the forces at play. While it can be a rewarding DIY project for the meticulously prepared, the margin for error is razor-thin and the consequences of a mistake are significant. For a project of this importance, where the plumbing is the literal lifeblood of your investment, professional expertise is invaluable. It ensures the job is done right, to code, and built to last a lifetime.
If you're considering a new pool or a major renovation, don't leave the most critical system to chance. Our team has the experience to design and install a plumbing system that's as robust and efficient as it is invisible. We invite you to BOOK MY FREE CONSULTATION to discuss how we can bring your entire backyard vision to life, from the pipes in the ground to the final shimmering water surface.


.webp)
.webp)