A swimming pool should be a source of relaxation, not a constant chore on your to-do list. Yet, for many homeowners, the daily ritual of turning the pool pump on and off feels like just that—a chore. You forget one morning, and the water starts to get a little cloudy. You leave it running too long, and your electricity bill reminds you of the oversight. It's a frustratingly manual process in an otherwise automated world. This is precisely why installing a pool filter timer is one of the single best upgrades you can make to your pool system. It's a game-changer.
Here at Modern Yardz, we design and build complete outdoor environments. We've seen firsthand the significant, sometimes dramatic shift in a homeowner's experience after automating this one simple task. It’s not just about convenience; it’s about efficiency, consistency, and protecting the investment you've made in your backyard oasis. This guide is a distillation of our team's collective experience. We're going to walk you through how to install a pool filter timer, not just the 'how' but the 'why' behind each step. We’ll cover the safety protocols we insist on, the tools you'll need, and the common pitfalls to avoid. Let's get started.
Why a Pool Timer is a Non-Negotiable Upgrade
Let’s be honest, this is crucial. Before we even touch a wire, it's important to understand the profound impact this small device has. It’s not just a gadget. It’s the brain of your pool’s circulatory system, and installing one moves your pool from a manual-labor liability to a self-managing asset. The benefits are immediate and compelling.
First, and most obviously, is the energy savings. Pool pumps, especially older single-speed models, are formidable energy hogs. Running one indiscriminately is like leaving a refrigerator door wide open. A timer allows you to run the pump for the exact amount of time needed to turn over your pool’s water volume—and not a minute more. You can schedule it during off-peak electricity hours, a strategic move that can slash your utility costs. Our experience shows that a properly programmed timer can reduce a pump's energy consumption by 50-75%. That's real money back in your pocket, month after month.
Second is water quality. Consistency is the secret to crystal-clear, healthy pool water. Sporadic, inconsistent filtration creates an environment where algae and bacteria can gain a foothold. By ensuring your pump and filter run for a set period every single day, without fail, you maintain a stable, sanitized environment. This means less shocking, less skimming, and less fighting off that dreaded green haze. The water is simply cleaner and safer, day in and day out. It's a foundational element of the pristine Pools AND Spas we build for our clients.
Finally, there's the sheer convenience. Your time is valuable. You shouldn't have to structure your day around your pool pump's schedule. A timer liberates you from that responsibility. Going on vacation? Your pool stays clean. Busy work week? No problem. The timer is your silent, diligent pool operator, working tirelessly in the background. This level of automation is a cornerstone of modern outdoor living, allowing you to simply enjoy the space, whether you're lounging by the water or entertaining guests in your Outdoor Kitchens SAN Diego.
Before You Begin: Safety and Preparation
We can't stress this enough: working with electricity is serious business, especially in a wet environment like a pool equipment pad. Safety isn't just a suggestion; it is the absolute first step. Before you even buy a timer, you need to commit to a safety-first mindset.
Your number one action item is to completely de-energize the circuit. This means going to your home's main electrical panel and switching off the breaker that controls your pool pump. Don't just flip it. Put a piece of tape over it with a note saying "DO NOT TURN ON." If your breaker box has a lockout mechanism, use it. Once the breaker is off, go back to the pump and try to turn it on. It shouldn't do anything. But we don't trust that alone. The next step is to use a multimeter or a non-contact voltage tester to verify that there is absolutely no power at the wires you'll be working on. Test every wire. Then test your tester on a known live outlet to make sure it's working. This two-step verification is what the pros do. It's non-negotiable.
Next, gather your tools and materials. Having everything on hand before you start prevents frustrating trips to the hardware store mid-project. Here’s a typical checklist our team uses:
- The Pool Timer: Make sure it matches your pump's voltage (120V or 240V) and is rated for the horsepower.
- Screwdrivers: You'll need both a Phillips head and a flathead.
- Wire Strippers/Cutters: Essential for clean, safe connections.
- Pliers: A pair of linesman's pliers is incredibly useful.
- Multimeter/Voltage Tester: For the critical safety check we just discussed.
- Conduit and Fittings: If you need to run new electrical lines. PVC is common for outdoor applications.
- Electrical Wire: Ensure it’s the correct gauge (thickness) for the circuit's amperage and is rated for outdoor/wet conditions (THWN-2 is a common type).
- Conduit Glue and Primer: For PVC conduit connections.
- Mounting Hardware: Screws and anchors appropriate for the surface where you'll mount the timer box.
- Level: To ensure the timer box is mounted straight. It just looks better.
Taking 30 minutes to prepare your tools and workspace will save you hours of headache. It's a simple discipline that separates a smooth installation from a chaotic one.
Choosing the Right Timer for Your System
Not all timers are created equal. Walking into a pool supply store or browsing online reveals a sprawling variety of options, and picking the wrong one can lead to immediate failure or, worse, a damaged pump motor. The choice primarily boils down to two factors: the type of timer technology and the electrical requirements of your pump.
There are three main categories of timers you'll encounter. Our team generally recommends digital or smart timers for new installations due to their flexibility and efficiency, but mechanical timers still have their place.
| Feature |
Mechanical Timer |
Digital Timer |
Smart Timer |
| Mechanism |
Physical clock motor with trippers |
Electronic screen with button programming |
Wi-Fi connected, app-controlled |
| Programming |
Set On/Off times with physical tabs |
Multiple daily schedules, more precise |
Full app control, remote access, integration |
| Pros |
Inexpensive, simple, durable |
Highly accurate, multiple programs, battery backup |
Ultimate convenience, weather integration, energy monitoring |
| Cons |
Imprecise, limited schedules, can lose time |
More expensive, can be complex to program |
Most expensive, requires Wi-Fi, potential connectivity issues |
| Best For |
Budget-conscious owners with simple needs |
Homeowners wanting precision and flexibility |
Tech-savvy owners wanting total control & optimization |
Beyond the technology, the single most critical specification is the voltage. Pool pumps run on either 120V or 240V. You absolutely must match your timer to your pump's voltage. There is no workaround. Installing a 120V timer on a 240V circuit will instantly destroy the timer and create a dangerous electrical situation. How do you know your voltage? Check the label on the pump motor itself; it will be clearly listed. You can also check the breaker in your electrical panel—a double-pole breaker (two switches linked together) almost always indicates a 240V circuit.
This level of technical detail is why a professional eye can be so valuable. During our Landscape Design process, we conduct a full site analysis that includes assessing the existing electrical infrastructure to ensure all new components, from timers to Landscape Lighting SAN Diego, are perfectly matched and safely integrated.
The Step-by-Step Installation Process
Alright, the power is off, your tools are ready, and you've selected the perfect timer. It's time to get to work. We're going to break this down into a clear, methodical process. Don't rush. Read each step, understand it, and then execute it.
Step 1: Confirm Power is OFF (Yes, Again)
We're going to say it one more time because it's that important. Use your voltage tester at the pump's wiring connection point to be 100% certain there is no electricity present. Safety is an action, not a hope.
Step 2: Choose and Prepare the Mounting Location
The timer needs a secure home. Choose a flat, sturdy vertical surface like a wall or a solid post, typically within a few feet of the pump. It should be easily accessible for future programming but also somewhat protected from direct, punishing sun and sprinkler spray. Most timer boxes are weather-resistant, but they aren't submarines. Hold the empty timer box against the wall, use your level to get it straight, and mark your screw holes. Then, mount the box securely using the appropriate hardware.
Step 3: Disconnect the Pump and Run Conduit
Now you'll disconnect the existing electrical conduit that runs from the power source directly to the pump. This power line will now be routed into your new timer box first. You'll then run a new, separate piece of conduit from the timer box out to the pump. This creates the new electrical path: Power Source -> Timer -> Pump.
Use the knockouts on the bottom of the timer box for your conduit connections. This helps prevent water from getting in. Secure the conduit fittings tightly. This is where the real work begins. The line from your breaker panel will go into the 'LINE' side of the timer, and the new line running to the pump will come out of the 'LOAD' side.
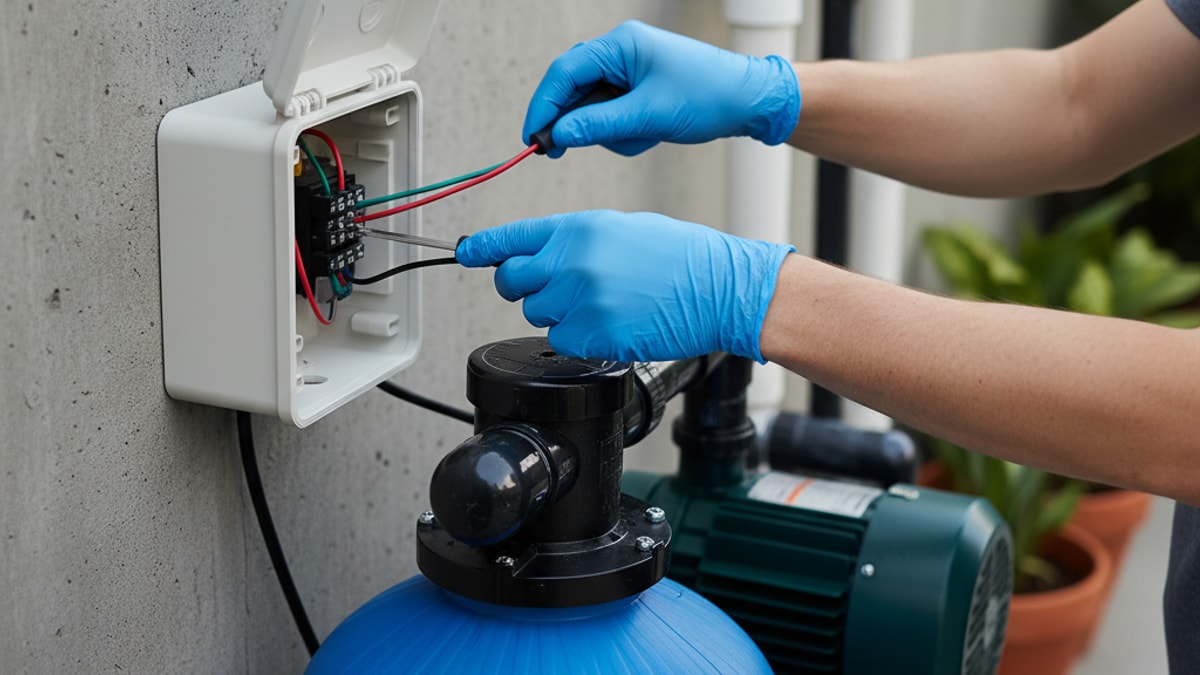
Step 4: Wiring the Timer
Open the timer's front panel. Inside, you will see a terminal block with several screws. They will be clearly labeled. This is the heart of the operation. While specific layouts vary by model, the principle is universal:
- LINE Terminals: This is for the incoming power from your breaker panel. You will connect the hot wires (usually black and red for 240V, just black for 120V) and the neutral wire (white, if present) to the terminals labeled 'LINE 1' and 'LINE 2'.
- LOAD Terminals: This is for the outgoing power going to your pump. You will connect the wires from the new conduit you ran to the pump to the terminals labeled 'LOAD 1' and 'LOAD 2'.
- GROUND Terminal: This is a critical safety connection. You will see a green screw. All the bare copper or green-insulated ground wires from both the LINE and LOAD sides must be securely connected to this grounding screw. Do not skip this. The ground wire is what protects you from electric shock in case of a fault.
To make a connection, strip about a half-inch of insulation from the end of each wire. Loosen the corresponding terminal screw, insert the bare wire fully, and then tighten the screw down firmly. Give the wire a gentle tug to ensure it's secure. A loose connection can arc and create a fire hazard. We've found that clean, tight connections are the hallmark of a professional job. It’s the kind of detail we obsess over in every aspect of our work, from laying Pavers SAN Diego to wiring complex systems.
Step 5: Setting the Timer Mechanism
With the wiring complete, it's time to set up the clock and schedule.
- For Mechanical Timers: You'll see a 24-hour dial. Pull the dial outward and rotate it until the current time of day aligns with the stationary pointer. Then, identify the small metal 'trippers' on the dial. You'll have a set of 'ON' trippers and 'OFF' trippers. Attach an 'ON' tripper at the time you want the pump to start and an 'OFF' tripper at the time you want it to stop. You can set multiple run times per day if needed.
- For Digital Timers: This is more like setting a digital alarm clock. You'll use buttons to set the current time and date. Then you'll enter a programming mode to create schedules, specifying the start and stop times for different days of the week if you wish.
Once programmed, carefully place all the wires back inside the box, ensuring they aren't pinched, and close and secure the timer's cover.
Powering Up and Final Checks
The moment of truth. Go back to your main electrical panel and turn the breaker back on. Return to the timer. Most timers have a manual override switch. Test it first. You should hear a solid 'clunk' as the relay engages and your pump should roar to life. Turn it off manually. Now, set the switch to 'AUTO' mode. Wait for the clock to reach your programmed 'ON' time. The pump should start automatically. Let it run past the 'OFF' time to ensure it shuts down as scheduled.
Congratulations. You've successfully automated your pool filtration system. It's a genuinely rewarding DIY project that pays dividends in both your wallet and your free time. This single component is a huge step toward the kind of effortless, integrated backyard living we champion at Modern Yardz. It’s about making sophisticated systems, like our custom Fire Features, feel simple and intuitive to use.
When to Call a Professional
Now for a dose of reality. While this guide is comprehensive, installing a pool timer is not for everyone. Your safety is paramount, and there is no shame in calling for professional help. If at any point you feel uncertain, stop. That's the sign.
Consider calling an electrician or a professional pool service company if:
- You are uncomfortable working with electricity at all.
- Your wiring looks old, brittle, or doesn't match the standard colors.
- You open the panel and see a confusing mess of unlabeled wires.
- You don't own or know how to use a multimeter.
- You simply don't have the time or patience to tackle the project.
At Modern Yardz, the installation of all electrical components for our Pools AND Spas projects is handled by licensed professionals. It's part of our commitment to quality and safety. We integrate everything seamlessly, so the technology just works, letting you focus on enjoying your new space. If you're contemplating a larger backyard project and this all feels a bit overwhelming, we invite you to BOOK MY FREE CONSULTATION. Our team can discuss how we can create a beautiful, functional, and fully automated outdoor environment for you.
Automating your pool pump is a fantastic step toward a smarter, more efficient backyard. It’s a project that empowers you as a homeowner, saving you time and money while ensuring your pool remains a sparkling centerpiece for your home. It’s about taking control and making your outdoor space work for you, not the other way around. And that's a goal worth investing in.


.webp)
.webp)