How to Make an Outdoor Mud Kitchen Your Kids Will Absolutely Love
There's a certain kind of magic that happens when kids are given a patch of dirt, a little water, and permission to get messy. It’s primal. It’s creative. It’s the kind of unstructured play that seems to be fading away in our highly scheduled world. At Modern Yardz, we spend our days designing sophisticated outdoor living areas—think elegant Outdoor Kitchens SAN Diego and serene Pools AND Spas—but our team has a massive soft spot for the simpler joys. And honestly, few things bring more pure, unadulterated joy to a backyard than a well-made mud kitchen.
So, you're thinking about how to make an outdoor mud kitchen. Excellent. You've come to the right place. We've seen firsthand how a dedicated space for messy play can transform a corner of a yard into the epicenter of a child's imagination. It’s more than just a toy; it’s a laboratory, a bakery, a potion-making station, and a five-star restaurant all rolled into one. This isn't just about building a wooden box with a bowl in it. It's about creating an invitation for creativity, sensory exploration, and countless hours of screen-free fun.
Why a Mud Kitchen? (It’s Way More Than Dirt and Water)
Let's be honest, the initial appeal for many parents is simply containing the mess. And yes, a mud kitchen does that beautifully. But the real value runs so much deeper. Our experience in comprehensive Landscape Design SAN Diego has taught us that every element in a yard should have a purpose, and the purpose of a mud kitchen is profound.
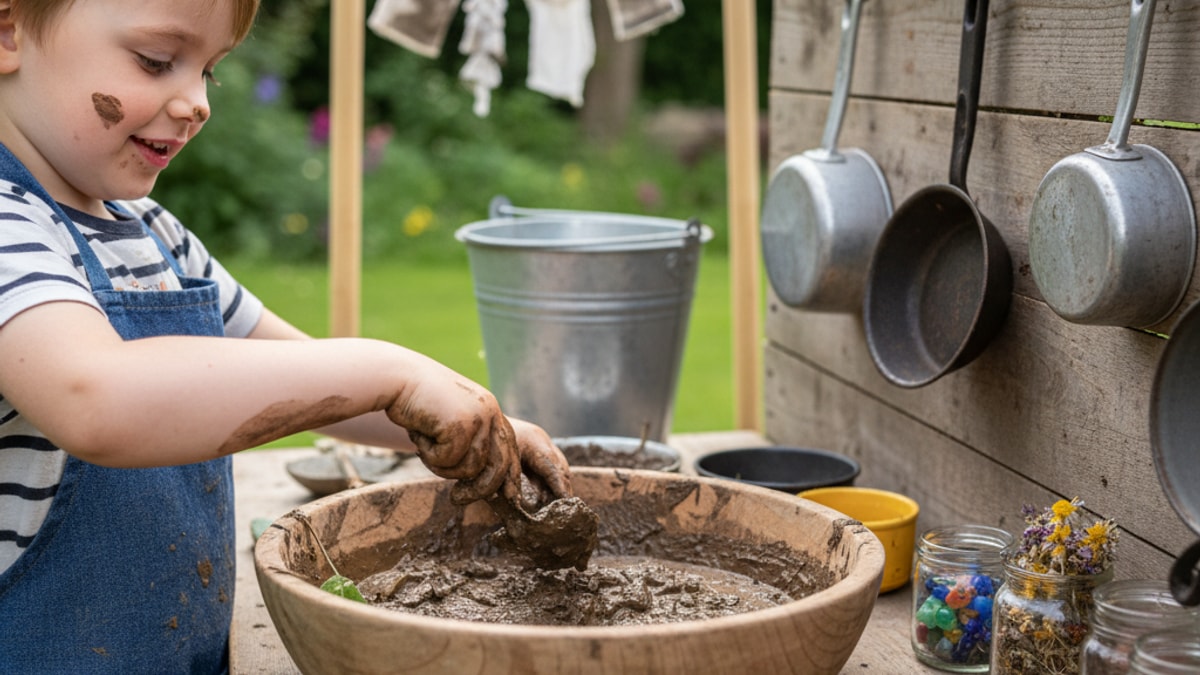
It’s a powerhouse for child development. Seriously. Kids aren't just making mud pies; they're engaging in complex sensory experiences. They feel the texture of the mud, the coolness of the water, the roughness of a pinecone. They're unknowingly conducting their first science experiments, learning about cause and effect (what happens when you add more water?), and developing fine motor skills by scooping, pouring, and mixing. They're collaborating, negotiating roles—'You be the chef, I'll find the ingredients!'—and building a rich, imaginative world entirely of their own making. It’s the raw, unfiltered essence of learning through play.
We can't stress this enough: providing opportunities for this kind of play is one of the greatest gifts you can give your children. It fosters a connection with nature, builds resilience (it's okay to get dirty!), and sparks a kind of creativity that no app or video game can replicate. It’s a small investment for a truly massive return in childhood development and happy memories.
Planning Your Perfect Mud Kitchen
Before you start cutting wood and gathering supplies, a little planning goes a long way. Just as we map out every detail of a new patio or Fire Features, thinking through your mud kitchen's design and location is a critical, non-negotiable step. A well-placed mud kitchen gets used constantly; a poorly placed one gathers cobwebs.
First, consider the location. Where is the best spot? You'll want a place that's close enough for easy supervision but not so close that flying mud becomes a permanent feature on your sliding glass door. Our team recommends finding a spot near a water source, like an outdoor spigot. This saves you from lugging buckets of water back and forth a dozen times a day. Trust us on this one. You also need to think about the ground surface. Placing it on a lawn will inevitably create a permanent mud pit that kills the grass. A much better solution is to place it on a bed of mulch, wood chips, or even a small, dedicated pad of Pavers SAN Diego. This defines the play zone and makes cleanup significantly easier.
Sun exposure is another key factor. A spot with morning sun and afternoon shade is often ideal. You don't want your little chefs baking in the hot afternoon sun. If your yard lacks natural shade, this could be a great opportunity to think about a small shade sail or even a strategically planted tree as part of a larger landscaping vision.
Finally, think about size and scale. The kitchen should be built for its primary user: your child. The countertop height should be comfortable for them to stand and work at, typically around 20-24 inches off the ground for preschoolers. Don't build a massive, sprawling kitchen if you only have a small corner to work with. A simple, well-designed station is far more effective than a clunky, oversized one that dominates the space. It’s all about proportion and flow, principles we apply to every project we undertake.
Gathering Your Materials: Upcycled vs. New
Now for the fun part: deciding what your mud kitchen will be made of. This is where your creativity (and resourcefulness) can truly shine. You don't need to spend a fortune to create something amazing. In fact, some of the most charming and well-loved mud kitchens we've seen were built from reclaimed materials.
There are three main paths you can take: the upcycled route, the pallet project, or the from-scratch build using new lumber. Each has its pros and cons, which we've broken down for you.
Can be difficult to find the right piece, may require significant modification and reinforcement, potential for lead paint on older items.
Fantastic if you're handy and patient. Look for old potting benches, small dressers, or entertainment centers. Always sand thoroughly and seal with a non-toxic finish.
Shipping Pallets
Very low cost or free, rustic aesthetic, modular and easy to deconstruct for wood.
Requires a lot of work to break down, wood can be rough, splintery, and of questionable quality. You MUST ensure the pallet is heat-treated (HT), not chemically treated (MB).
A popular DIY choice, but proceed with caution. We recommend this only if you can source clean, HT-stamped pallets and are prepared for the intense labor of sanding every single surface to make it safe for little hands.
New Lumber
You control the exact size and design, wood is clean and straight, easier to work with, provides a sturdy and long-lasting result.
Highest material cost of the three options.
For a truly durable and safe mud kitchen that will last for years, this is the route we recommend. Using pressure-treated lumber for the frame and cedar or redwood for the countertops and shelves ensures longevity.
No matter which path you choose, you'll need a few core components: a sturdy frame, a countertop surface, and a "sink." The sink can be as simple as an old stainless steel mixing bowl or a plastic wash basin dropped into a cutout in the counter. You'll also want to gather screws, nails, and the necessary tools: a saw, a drill, a level, and a measuring tape. And don't forget sandpaper. Lots and lots of sandpaper.
Creative 3-in-1 wood stove, Ideas from cement and brick
This video provides valuable insights into how to make an outdoor mud kitchen, covering key concepts and practical tips that complement the information in this guide. The visual demonstration helps clarify complex topics and gives you a real-world perspective on implementation.
The Step-by-Step Build: From Frame to Faucet
Okay, you've got your plan and your materials. It's time to build. We're going to walk through the process for a simple but incredibly sturdy from-scratch build using new lumber, as this method offers the most control and the best long-term results. The principles, however, can be adapted for any material.
Step 1: Build the Frame This is the backbone of your kitchen. We're aiming for a simple box frame. A good size for a starter kitchen is about 48 inches long, 20 inches deep, and 22 inches high. Cut four legs from 2x4 lumber to your desired counter height (e.g., 22 inches). Then, cut four horizontal pieces for the front and back aprons (e.g., 45 inches, to fit between the legs) and four for the side aprons (e.g., 17 inches). Assemble two rectangular side frames first, then connect them with the front and back aprons using weather-resistant deck screws. Use a level. Constantly. A wobbly mud kitchen is a frustrating and unsafe mud kitchen.
Step 2: Add the Countertop and a Lower Shelf With your frame built, it's time to add the surfaces. For the countertop, you can use several 1x6 deck boards laid side-by-side. Cut them to length (48 inches) and screw them directly into the top of your frame. Leave a tiny gap between boards to allow for water drainage. This is a critical detail. Now, add a lower shelf about 6-8 inches from the ground. This adds immense stability to the structure and provides fantastic storage for pots, pans, and buckets of mud. Use the same method as the countertop, attaching boards to the lower aprons of your frame.
Step 3: Install the Sink This is what makes it a kitchen! Place your bowl or basin upside down on the countertop where you want it to go. Trace around it with a pencil. Now, draw a second line about a half-inch inside your first line—this will be your cut line, ensuring the lip of the bowl rests on the countertop instead of falling through. Use a jigsaw to carefully cut out the hole. Smooth the edges with sandpaper and drop your sink into place. Voila!
Step 4: Create the Backsplash and Shelving A tall back piece not only looks great but also provides a place for hooks and shelves. Attach two taller 2x4s (e.g., 48-50 inches high) to the back legs of your frame. You can then run a few 1x6 boards horizontally between these uprights to create a backsplash. Add a small shelf above the countertop for storing spices (pebbles, leaves, flower petals) and utensils. This is where you can get creative. Add hooks for hanging whisks and ladles. Maybe even a small chalkboard for writing the daily specials. Let your imagination run wild.
Step 5: Sand, Finish, and Seal We cannot overstate the importance of this final step. Go over every single surface, edge, and corner with sandpaper, starting with a medium grit and finishing with a fine grit. The goal is a completely smooth, splinter-free surface. This is a non-negotiable safety measure. Once everything is silky smooth, it's time to protect the wood. Choose a non-toxic, child-safe outdoor sealant or paint. A clear sealant will let the natural wood grain show through, while a bright coat of paint can add a playful pop of color to your yard. Apply at least two coats, allowing each to dry completely. This waterproofing is essential for longevity, a principle we adhere to whether we're building a play structure or one of our custom Patio Covers Pergolas SAN Diego.
Accessorizing and Stocking Your Kitchen
The structure is built, but the real fun is just beginning. Stocking the kitchen is what brings it to life. You don't need to buy expensive, purpose-built toys. A trip to a thrift store is often all you need.
Look for old pots, pans, muffin tins, baking sheets, and plastic or metal utensils. Whisks, ladles, spatulas, and measuring cups are all fantastic additions. Avoid anything breakable like glass or ceramic. Plastic food containers, funnels, and squeeze bottles also make great tools for play. Your own kitchen is a great source—what are you planning to get rid of? It might find a glorious second life as a mud pie maker.
Beyond the hardware, the best ingredients are found right in your backyard. Create little buckets or bins for different natural materials: pebbles, sand, leaves, flower petals, pinecones, twigs, and, of course, a designated supply of good-quality dirt (topsoil works great). A dedicated water source, whether it's a drink dispenser with a spigot, a small rainwater barrel, or just a durable watering can, completes the setup.
Integrating Your Mud Kitchen into the Landscape
As a design-build firm, we believe that even playful elements should feel cohesive with the overall landscape. You've built a beautiful mud kitchen; now let's make it look like it truly belongs in your yard. The goal is to make it feel like an intentional feature, not a piece of clutter.
One of the best ways to do this is by creating a dedicated zone around it. As mentioned earlier, a foundation of mulch or wood chips is practical and visually defines the space. For a more permanent and polished look, a small patio made from pavers or even smooth Concrete SAN Diego can create a durable, all-weather play surface. This approach is fantastic because it contains the mess and prevents the surrounding area from turning into a swamp.
Consider the planting around the kitchen. Surrounding the area with hardy, non-toxic plants can soften the edges and integrate it beautifully. Think about planting a small herb garden nearby—mint, rosemary, and lavender are durable and provide wonderful sensory elements for the kids to incorporate into their creations. Proper Landscape Lighting SAN Diego can even extend playtime on long summer evenings, casting a magical glow over the little chef's station.
For an even cleaner play environment, especially in smaller yards, installing high-quality Artificial Turf SAN Diego adjacent to the mud kitchen zone can be a game-changer. It provides a soft, clean surface for kids to transition to after they're done with their muddy creations, and it eliminates the problem of tracking dirt and grass into the house. It's about creating a holistic, functional, and beautiful space for the entire family.
Safety Considerations We Never Overlook
Building something for your children carries a special responsibility. At Modern Yardz, safety is at the forefront of every design, from the structural integrity of our Seat Retaining Walls to the materials we choose for play areas. Here are the critical safety checkpoints for your DIY mud kitchen:
Structural Stability: The kitchen must be rock-solid. It should not wobble, tip, or lean, even when a child hangs on it. A wide base and a lower shelf, as described in our build guide, are key to achieving this.
Splinter-Free Surfaces: This is paramount. Thoroughly sand every single piece of wood that your child might touch. Run your own hands over it to check for any rough spots.
Non-Toxic Finishes: Only use paints, stains, and sealants that are certified as non-toxic and child-safe. Kids will be kids, and you can bet that at some point, their hands (and maybe a utensil) will go from the mud kitchen to their mouths.
Avoid Pinch Points: Be mindful of where you place hooks or add moving parts. Ensure there are no spots where little fingers could get pinched or trapped.
Safe Materials: If you're upcycling, be absolutely certain the item is free from lead paint (common in furniture made before 1978) and other hazardous materials. If using pallets, triple-check that they are stamped "HT" (heat-treated) and not "MB" (methyl bromide), which is a toxic pesticide.
Taking the time to address these safety points isn't just good practice; it's essential for peace of mind. You want to create a space where your kids can play freely without you having to worry.
Building an outdoor mud kitchen is more than just a weekend project. It’s an investment in your child's happiness, creativity, and connection to the natural world. It's a testament to the idea that the best backyards aren't just beautiful to look at; they're designed to be lived in, played in, and cherished. If this project inspires you to rethink what's possible for your entire outdoor space, our team is always here to help you dream bigger. You can always BOOK MY FREE CONSULTATION to explore the possibilities.
Frequently Asked Questions. Here are some common questions. Find the answers you're looking for below.
What is the best type of wood to use for an outdoor mud kitchen?
We recommend using weather-resistant woods like cedar, redwood, or pressure-treated pine. Cedar and redwood are naturally resistant to rot and insects, while pressure-treated lumber is chemically treated for maximum durability. Always cap pressure-treated wood with non-treated boards for the countertop surface.
How can I provide water to the mud kitchen without a hose?
A large drink dispenser with a spigot is a fantastic, self-serve option for kids. You can also use a small rain barrel with a tap or simply provide a large watering can or bucket that you refill as needed. The key is making the water accessible for them.
What's the best way to manage the mess around the mud kitchen?
Creating a dedicated zone is crucial. Place the kitchen on a surface like mulch, wood chips, or pavers rather than grass. This contains the mud and makes cleanup much easier. Having a small hand brush and dustpan nearby also encourages kids to help tidy up.
How do I make a DIY mud kitchen safe for my toddler?
Safety is paramount. Ensure the structure is extremely sturdy and won't tip over. Meticulously sand all surfaces to prevent splinters, and only use certified non-toxic, child-safe paints and sealants. Avoid any small, loose parts that could be a choking hazard.
Should I anchor the mud kitchen to a fence or wall?
If your design is tall or you have concerns about stability, anchoring it to a secure structure like a fence or wall is a great idea. Use sturdy L-brackets to ensure it's firmly attached and cannot be pulled over by an adventurous child.
How high should the countertop of the mud kitchen be?
The ideal countertop height depends on your child's age and height. For preschoolers (ages 3-5), a height of about 20-24 inches is typically comfortable. It's best to measure your child's waist height and aim for a counter that's right around there.
What kind of 'mud' is best for a mud kitchen?
Clean, sterile topsoil or potting soil (without added chemicals or fertilizers) is the best choice. You can buy bags of it from any garden center. Avoid using dirt from random parts of your yard, as it may contain sharp rocks, pesticides, or other unknown elements.
How do I prevent the wood on my mud kitchen from rotting?
Start with rot-resistant wood and apply at least two coats of a high-quality outdoor waterproof sealant. Re-applying the sealant every year or two will significantly extend its life. Also, ensure the design allows for good drainage so water doesn't pool on the surfaces.
Can I build a mud kitchen from upcycled furniture?
Absolutely! Old potting benches, small dressers, or nightstands can be transformed into fantastic mud kitchens. Just be sure to inspect them for stability, sand them thoroughly to remove old paint or splinters, and ensure they are structurally sound before letting children play on them.
Where is the best place in the yard to put a mud kitchen?
The ideal spot is in a shaded area, close to a water source, and on a surface that can handle mess (like mulch, not your best lawn). It should be visible from the house for easy supervision but not so close that mud splatters become an issue for your home's exterior.
Do I need a real faucet for my mud kitchen?
No, a real faucet isn't necessary and can add a lot of complexity. A simple drop-in bowl for a sink and a separate water source like a drink dispenser or watering can works perfectly and gives kids more control over their water usage.


.webp)
.webp)