There's something uniquely satisfying about a brick outdoor kitchen. It feels permanent, substantial. It speaks of long summer evenings, the sizzle of food on the grill, and laughter echoing across the yard. Unlike prefabricated kits that can feel a bit flimsy, a structure built from brick has a certain gravity to it—a sense of place that instantly elevates your entire backyard. It’s not just an appliance station; it’s an architectural feature.
Our team has designed and built countless outdoor living spaces, and we've seen firsthand how a well-executed brick kitchen becomes the true heart of the home. But let’s be honest: learning how to build an outdoor kitchen with brick is a formidable undertaking. It’s a project that demands precision, patience, and a healthy respect for the materials. We’re here to pull back the curtain and share what we’ve learned over the years, walking you through the process from the ground up so you can decide if this is a challenge you’re ready to tackle, or one where bringing in seasoned pros makes all the sense in the world.
Why Choose Brick? It’s More Than Just Looks.
Sure, the classic, rustic, or even industrial aesthetic of brick is a huge draw. It’s incredibly versatile. But the real reasons we so often recommend brick to our clients go far deeper than surface-level style. This is about building something that lasts. For generations.
First, there’s the unflinching durability. Brick is ridiculously tough. It laughs at harsh weather, resists fire, and isn't bothered by pests. A properly constructed brick kitchen island isn't something you'll need to replace or repair every few years. It's a permanent fixture, a legacy piece for your property. This is especially important when you consider the investment in high-end grills, sinks, and refrigeration that will be housed within it. You need a structure that can protect that investment.
Then there's the low-maintenance aspect. Once built and sealed, a brick kitchen requires very little upkeep. A simple wash-down now and then is usually all it takes to keep it looking great. It won’t rot like wood or dent like some metal sidings. It just… endures. Our experience shows that homeowners consistently underestimate how much they'll appreciate a low-maintenance feature down the line, especially when it’s the centerpiece of their outdoor entertaining space.
Finally, brick works beautifully with almost any other material. It pairs elegantly with sleek granite countertops, rustic wooden pergolas, or modern stamped concrete patios. This versatility is a designer's dream. It allows a brick kitchen to feel integrated and intentional within a broader vision, connecting seamlessly with other elements like custom Pavers SAN Diego walkways or even the home’s exterior. It’s a foundational element that ties the entire yard together.
Before You Lay a Single Brick: The Planning Phase
We can't stress this enough: success is forged in the planning stage. Rushing this part is the single biggest mistake we see DIY enthusiasts make, and it can lead to catastrophic, often irreversible, problems. A beautiful kitchen in the wrong spot is still a failure. So, slow down. Think. Measure twice, then measure again.
First, consider the location. Where will this kitchen live? You want it close enough to the house for convenience (who wants to carry trays of food across the entire yard?) but far enough away that smoke from the grill isn't billowing into open windows. Pay close attention to prevailing winds. You don’t want your seating area to be constantly downwind of the grill. Also, think about sunlight. An area that gets blasted by the afternoon sun might be unbearable to cook in during the summer months. This is where a well-placed structure from our Patio Covers Pergolas SAN Diego collection could be a game-changer. And, critically, you must be aware of underground utility lines—gas, water, electrical, and irrigation. Hitting one of those is a disaster.
Next up is the layout. The function of your kitchen dictates its form. Are you a weekend warrior who just needs a grill and some counter space? Or are you an aspiring pitmaster planning to host large gatherings? Think about the classic 'work triangle'—the logical flow between your grill (hot zone), sink (wet zone), and refrigerator (cold zone). An L-shape or U-shape layout often works best to create an efficient cooking environment. Sketch it out. Use chalk or spray paint on the ground to physically map out the footprint. Walk around in the space. Does it feel cramped? Is there enough room for guests to mingle without getting in the cook's way?
Then, you have to choose your appliances before you finalize the design. This is a non-negotiable rule. You can’t build the structure and then hope to find a grill that fits the opening. You need the exact manufacturer's specifications for every single built-in component: the grill, side burners, access doors, drawers, refrigerator, and anything else you plan to include. These cut-out dimensions are the blueprint for your brickwork. Getting this wrong means either tearing out perfectly good masonry or being stuck with an appliance that doesn't fit.
And finally, the unglamorous but essential part: permits. Most structural additions, especially those involving gas and electrical lines, will require a permit from your local building authority. Don't skip this. Building without a permit can result in hefty fines, orders to tear down your work, and major problems when you eventually sell your home. Navigating this process is a core part of our comprehensive Outdoor Kitchens SAN Diego service, because we know how daunting it can be for homeowners.
Gathering Your Arsenal: Tools and Materials
With a solid plan in hand, it’s time to assemble your materials and tools. The quality of your materials will directly impact the longevity and look of your kitchen. This isn’t the place to cut corners.
Your primary choice is the brick itself. There's a surprising amount of variation, and the right choice depends on both aesthetics and function.
| Brick Type |
Best Use Case |
Key Characteristics |
Our Recommendation |
| Faced Clay Brick |
Main structural walls, veneers |
Comes in many colors/textures. Very durable and weather-resistant. The classic choice. |
Excellent all-around option for the main body of the kitchen. Offers the most design flexibility. |
| Common Brick |
Internal, unseen courses |
Less uniform in color and shape. More affordable but not as aesthetically pleasing. |
Use for inner layers if you're building a double-wythe wall to save on costs. Not for exterior surfaces. |
| Fire Brick (Refractory) |
Lining grill cavities, pizza ovens |
Dense, heavy brick designed to withstand extremely high temperatures without cracking. |
Absolutely essential for any area exposed to direct, intense heat. Do not substitute with regular brick. |
| Concrete Brick |
General construction |
Uniform in size and color. Can be a cost-effective alternative to clay. |
A solid choice, but be aware it may not have the same timeless character or color variation as traditional clay brick. |
Beyond the bricks, you’ll need mortar. For an outdoor, load-bearing structure like this, we recommend Type S or Type N mortar. Type S offers higher strength, which is ideal for structures that will support heavy countertops and appliances. You'll also need sand and cement if you're mixing your own, or you can buy pre-mixed bags. And don't forget wall ties if you're building a cavity wall or adding a veneer.
For the foundation—the absolute bedrock of your project—you'll need concrete, gravel for a sub-base, and steel reinforcement like rebar or wire mesh. We've seen projects fail simply because the foundation was an afterthought. The ground shifts and settles; a robust, steel-reinforced foundation from our Concrete SAN Diego projects ensures your kitchen won't crack and heave along with it.
Your tool list will be extensive: a heavy-duty wheelbarrow, mortar hoe, multiple buckets, a brick trowel, a pointing trowel, a brick hammer, a masonry saw with a diamond blade (renting is a good option), a 4-foot level, a framing square, string lines, and safety gear like gloves and glasses. This is a serious construction project.
The Foundation: Your Kitchen’s Unsung Hero
Let’s dig in. Literally. A floating island of bricks on a flimsy base is doomed. You need a proper poured concrete slab foundation that extends below the frost line if you're in a cold climate. For most regions, a 4- to 6-inch thick slab on a compacted gravel base is sufficient.
The process starts with excavation. You'll mark out the exact footprint of your kitchen and dig down about 8-10 inches. The goal is to remove all the topsoil and organic matter until you reach stable subsoil. Then, you'll add and compact a 4-inch layer of crushed gravel. This base is crucial for drainage; it prevents water from sitting under your slab, which can cause heaving and cracking.
Next, you’ll build the formwork, typically with 2x4s or 2x6s, creating a mold for your concrete. Make sure the forms are perfectly level and square. This is your last chance to get the shape and dimensions exactly right. Inside the form, you'll lay down your steel reinforcement. A grid of rebar, tied together and propped up on small chairs so it sits in the middle of the concrete pour, provides immense tensile strength. It’s what keeps the slab from cracking under the immense weight of the brick structure.
Mixing and pouring the concrete is hard, fast work. For a small slab, you might be able to mix it in a wheelbarrow or with a rented mixer. For anything larger, ordering a short load from a ready-mix company is well worth the cost. Once poured, you'll need to screed it level, float it to bring the fine aggregate to the surface, and then finish it with a steel trowel for a smooth surface. Then comes the waiting. Concrete doesn't 'dry'; it cures. This chemical process takes time, and you should let the slab cure for at least a week—ideally longer—before you even think about putting the weight of bricks on it.
Let’s Build: Laying the Brick Courses
This is where the artistry begins. But it’s an art governed by the strict rules of physics and geometry.
Your first course of bricks is the most important one. It sets the precedent for the entire structure. We recommend doing a 'dry run'—laying out all the bricks for the first layer without mortar—to check your spacing and layout, accounting for the mortar joints (typically 3/8 inch). Once you're confident, you'll snap chalk lines on your cured slab to guide you. Perfect right angles are your best friend here.
Mixing the mortar to the right consistency is a skill in itself. Too wet, and it will squeeze out everywhere, making a mess and creating weak joints. Too dry, and it won't bond properly to the bricks. Our masons always say it should be like thick, creamy peanut butter. It should hold its shape on the trowel but be workable enough to spread easily.
Now, you lay the first course. Spread a bed of mortar on the slab, 'butter' the end of each brick with mortar, and press it firmly into place, tapping it down with the handle of your trowel until it's perfectly aligned with your string line and level. Scrape off the excess mortar that squeezes out. Check for level and plumb constantly. And we mean constantly. After every single brick.
As you build up, you'll use a running bond pattern, where the joints of each course are staggered. This isn't just for looks; it distributes the load and creates a much stronger wall. For the corners, you'll alternate the direction of the bricks on each course to create a solid, interlocking weave. As you get a few courses high, you’ll need to 'tool' the mortar joints. Using a concave jointer tool, you press the semi-hardened mortar to create a dense, curved finish that sheds water and looks professional. This step is critical for weather resistance.
When you reach the height for an appliance opening, you'll need to bridge the gap. This is done with a steel lintel—a piece of angle iron that supports the weight of the bricks above the opening. It must be sized correctly for the span and load, and it must be set perfectly level in a bed of mortar. This is another area where professional experience from a team that builds Seat Retaining Walls and other structural elements really pays off.
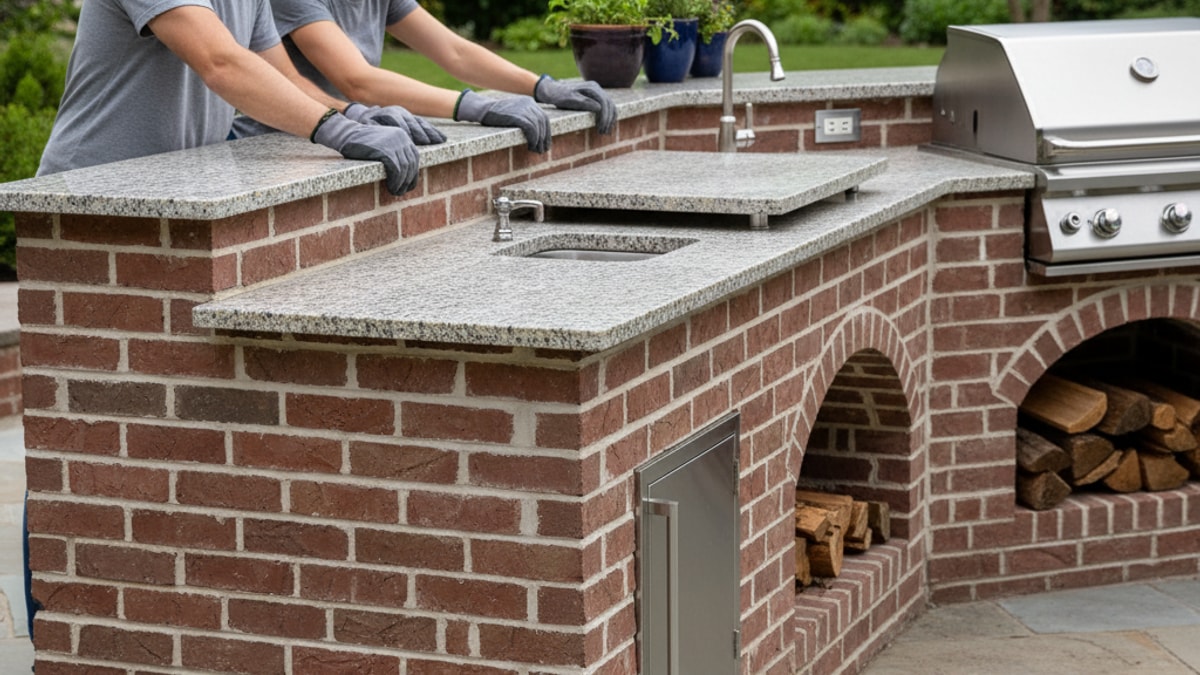
Countertops and Finishing Touches
With the brick structure complete and cured, you're on the home stretch. The countertop is the work surface and a major design element. Granite is a popular and excellent choice for its durability and resistance to heat and stains. Poured-in-place concrete countertops offer a modern, industrial look, while large format porcelain tiles can be a more budget-friendly option. Whatever you choose, ensure it's rated for outdoor use and properly sealed against the elements.
Installation will depend on the material, but it generally involves applying a strong construction adhesive or thin-set mortar to the top of the brickwork and carefully setting the countertop slabs in place. This is often a two- or three-person job due to the weight of the materials.
Finally, it's time for the utilities. This phase is almost always best left to licensed professionals. Running a gas line for the grill requires a plumber who understands local codes and can perform pressure tests to ensure there are no dangerous leaks. Running electrical for a refrigerator, outlets, or task lighting requires a licensed electrician. Proper outdoor wiring, GFCI protection, and weatherproof boxes are not optional—they are critical for safety. This is also the perfect time to integrate a holistic lighting plan. Well-placed Landscape Lighting SAN Diego can transform your kitchen from a daytime cooking spot into a dramatic nighttime entertainment hub.
The Pro vs. DIY Dilemma: A Frank Discussion
Can you build a brick outdoor kitchen yourself? Absolutely. People do it. But it is a difficult, often moving-target objective. It requires a significant amount of time, a wide range of skills (excavation, concrete work, masonry, carpentry for framing openings), and a great deal of physical strength. Masonry is back-breaking work.
Let’s be honest, the potential for error is high. An out-of-square foundation, uneven brick courses, or improperly supported openings are not just cosmetic flaws; they are structural defects that can lead to failure down the road. We've seen DIY projects where thousands of dollars in materials were wasted because a fundamental step was missed early on.
Working with a professional design-build firm like ours removes that risk. It transforms the project from a stressful, all-consuming job into an exciting creative process. Our comprehensive Landscape Design SAN Diego process ensures every detail is considered before a shovel ever hits the ground. We handle the permits, the engineering, the material sourcing, and the coordination of all the trades—masons, plumbers, electricians. You get the benefit of our years of experience and the peace of mind that comes from knowing the job is done right, to code, and built to last a lifetime.
If this deep dive has you feeling more intimidated than inspired, don't worry. That's a completely normal reaction. Building something this permanent is a huge responsibility. That's why we're here. You can always BOOK MY FREE CONSULTATION to discuss your vision with our team, and we can show you what's possible.
A brick outdoor kitchen is an investment, whether you build it yourself or hire it out. It’s an investment in your property's value, but more importantly, it's an investment in your lifestyle. It's about creating a destination in your own backyard—a place for connection, celebration, and making memories that are as solid and enduring as the bricks themselves.


.webp)
.webp)