So, you’re thinking about how to lay a paver patio. Fantastic choice. There’s something uniquely satisfying about transforming a patch of grass or a neglected corner of your yard into a beautiful, functional outdoor living space. It’s a project that promises weekend barbecues, quiet morning coffees, and a significant boost to your home's curb appeal. We get it—the allure of a DIY project is strong. You get to build something tangible with your own hands.
But our team at Modern Yardz has also seen the other side of that coin. We’ve been called in to rescue more than a few ambitious DIY projects across San Diego County, from Chula Vista to Oceanside. A patio that sinks, pavers that shift, or drainage that floods a foundation—these are the all-too-common results of a project that started with enthusiasm but lacked a professional roadmap. This isn't meant to discourage you. It’s meant to empower you. We're pulling back the curtain and sharing the exact process our professional crews use, so you can tackle this project with the knowledge and confidence of an expert.
Before You Even Dig: The Crucial Planning Phase
Honestly, the success or failure of your paver patio is often decided before a single shovel of dirt is moved. The planning phase is everything. Rushing this step is a recipe for a headache-inducing, budget-busting ordeal. We can't stress this enough—take your time here.
First, think about the design. Where will the patio go? How big will it be? What shape? Use a garden hose or marking paint to outline the potential footprint on the ground. Live with it for a few days. See how the sun hits it at different times of the day. Does it feel right? Does it flow with the rest of your yard? This is where professional landscape design can make a dramatic difference, turning a simple square slab into an integrated part of your outdoor ecosystem. Our Services often start with exactly this kind of holistic thinking, considering foot traffic, furniture placement, and future additions like a fire pit or outdoor kitchen.
Next up: utilities. This is a critical, non-negotiable safety step. Before you dig anywhere, you must call 811 or visit call811.com. It's a free service that will have local utility companies come out and mark the location of any underground lines—gas, water, electric, cable. Hitting one of these isn't just an inconvenience; it can be dangerous or even catastrophic. Don't guess. Don't assume. Just make the call.
Finally, let's talk about materials and budget. Pavers come in a sprawling variety of styles, colors, and materials—concrete, clay brick, natural stone like flagstone or travertine. Each has its own aesthetic, durability, and price point. Concrete pavers are the workhorse of the industry—versatile, durable, and relatively affordable. Natural stone offers an unparalleled high-end look but comes with a premium price tag and can be more challenging to install. Your choice here will define the look and feel of your space, so it’s worth spending time exploring options. Don't forget to budget for the materials you don't see, like the base rock, sand, edge restraints, and tool rentals. These often add up to a significant portion of the total cost.
Gathering Your Arsenal: The Right Tools & Materials
You can’t build a masterpiece with the wrong tools. Having everything you need on hand before you start will make the entire process smoother and safer. It’s the difference between a fluid, productive weekend and a frustrating series of trips back to the hardware store.
Here’s a rundown of what our crews consider essential:
Tools:
- Shovels (round and flat): For digging and moving material.
- Wheelbarrow: An absolute back-saver. You'll be moving tons of material—literally.
- Tape Measure & Marking Paint/Stakes: For accurate layout.
- String Line & Line Level: To keep your edges straight and your slope consistent.
- 4-foot and 2-foot Levels: For checking level and slope constantly.
- Hand Tamper: For compacting small areas.
- Plate Compactor: This is the big one. We mean this sincerely—rent one. A hand tamper is not a substitute for compacting the base. It’s like trying to cook a steak with a lightbulb. It just won’t work.
- Screed Rails (1” metal conduit or similar) & a straight 2x4: For creating a perfectly flat sand bed.
- Rubber Mallet: For tapping pavers into place.
- Diamond Blade Masonry Saw (wet saw is best): For making clean cuts on pavers.
- Push Broom: For sweeping sand.
- Safety Gear: Gloves, safety glasses, hearing protection (especially for the saw and compactor), and steel-toed boots.
Materials:
- Pavers: Calculate your square footage (length x width) and add 10-15% extra for cuts and mistakes.
- Class II Road Base (Crushed Aggregate Base): The foundation of your patio. We'll get into depth calculations next.
- Coarse Washed Concrete Sand: The 1-inch setting bed for the pavers.
- Edge Restraints: Plastic, metal, or concrete edging to lock the pavers in place. Don't skip this.
- 10-inch Spikes: To secure the edge restraints.
- Polymeric Sand: A special sand with a polymer additive that hardens to lock pavers together and prevent weeds.
- Paver Sealer (Optional but recommended): To protect from stains and enhance color.
To help you choose the right paver, here's a quick comparison our team often shares with clients:
| Paver Type |
Pros |
Cons |
Best For |
| Concrete Pavers |
Highly durable, huge variety of shapes/colors, cost-effective, uniform size for easy installation. |
Color can fade over time without sealing, can feel less 'natural' than stone. |
Patios, walkways, driveways; modern and traditional designs. |
| Clay Brick Pavers |
Classic, timeless look; color is baked in and won't fade; permeable options available. |
Can be more brittle and prone to chipping, limited color palette, can be more expensive than concrete. |
Historic homes, English garden styles, traditional walkways. |
| Natural Stone |
Unmatched natural beauty, each piece is unique, extremely durable and long-lasting. |
Most expensive option, irregular shapes require more skill to install, can be slippery when wet. |
High-end patios, pool decks, luxury outdoor living spaces. |
The Foundation: Impeccable Excavation & Base Prep
If you take away only one thing from this entire guide, let it be this: the longevity of your paver patio is 90% dependent on the quality of its base. This is not the place to cut corners. A poorly prepared base is a guarantee of future failure. It will sink, heave, and shift. It’s that simple.
First, you need to excavate. The big question is always, “How deep?” The formula our team uses is: the thickness of your paver + 1 inch of sand + 4-8 inches of compacted base. For a standard pedestrian patio in San Diego's relatively stable soil, a 4-6 inch compacted base is usually sufficient. For a driveway or areas with poor, clay-heavy soil, you'll want to go for a more robust 8-12 inches. Let’s assume a 2.5-inch paver for a walkway. You'd dig: 2.5" (paver) + 1" (sand) + 6" (base) = 9.5 inches deep. Dig out the entire area to this uniform depth. And another consideration—you need to account for slope.
Your patio must slope away from your house foundation to ensure proper drainage. A good rule of thumb is a 1/4 inch drop for every foot of run. So for a 12-foot patio, the far end should be 3 inches lower than the end against your house. Use your string lines and a line level to set this grade before you start digging and check it constantly.
Once excavated, compact the native soil (the subgrade) with the plate compactor. Get it firm. Then, begin adding your Class II road base in “lifts.” This is a crucial professional technique. Don’t just dump all 6 inches of gravel in at once. It will never compact properly. Add the base in 2-3 inch layers, watering it down slightly (to the consistency of damp, not muddy, soil) and compacting each layer thoroughly with the plate compactor. You should make at least two passes over each lift. You’ll know it’s compacted when the compactor starts to “bounce” on the surface. The final, compacted base should be a rock-solid, smooth, and precisely graded surface. This is the unyielding platform that will support your beautiful patio for decades.
The Sand Bed: Your Meticulous Leveling Layer
With the formidable base complete, it’s time for the sand bed. This is not the structural layer; its purpose is to provide a perfectly level bed to set the pavers into and to accommodate for tiny variations in paver thickness. We recommend using coarse, washed concrete sand—not play sand or masonry sand, which are too fine and will wash away.
This is where your screed rails come into play. Lay your two 1-inch outside-diameter pipes or conduits on top of the compacted base, parallel to each other and about 6-8 feet apart. Now, dump the sand between them. Using a long, straight 2x4, rest the board on top of the two rails and pull it towards you in a sawing motion. This is called “screeding.” It will remove the excess sand and leave you with a perfectly smooth, exactly 1-inch-thick bed of sand. Remove the rails carefully and fill in the voids with sand, smoothing them with a trowel.
Here's what we've learned—be meticulous here. Once the sand is screeded, do not walk on it or disturb it. Work backwards from a corner so you are always standing on the area you are about to lay pavers on, not on the pristine sand bed. Any footprint or disturbance will telegraph through to the final paver surface.
Laying the Pavers: Bringing the Pattern to Life
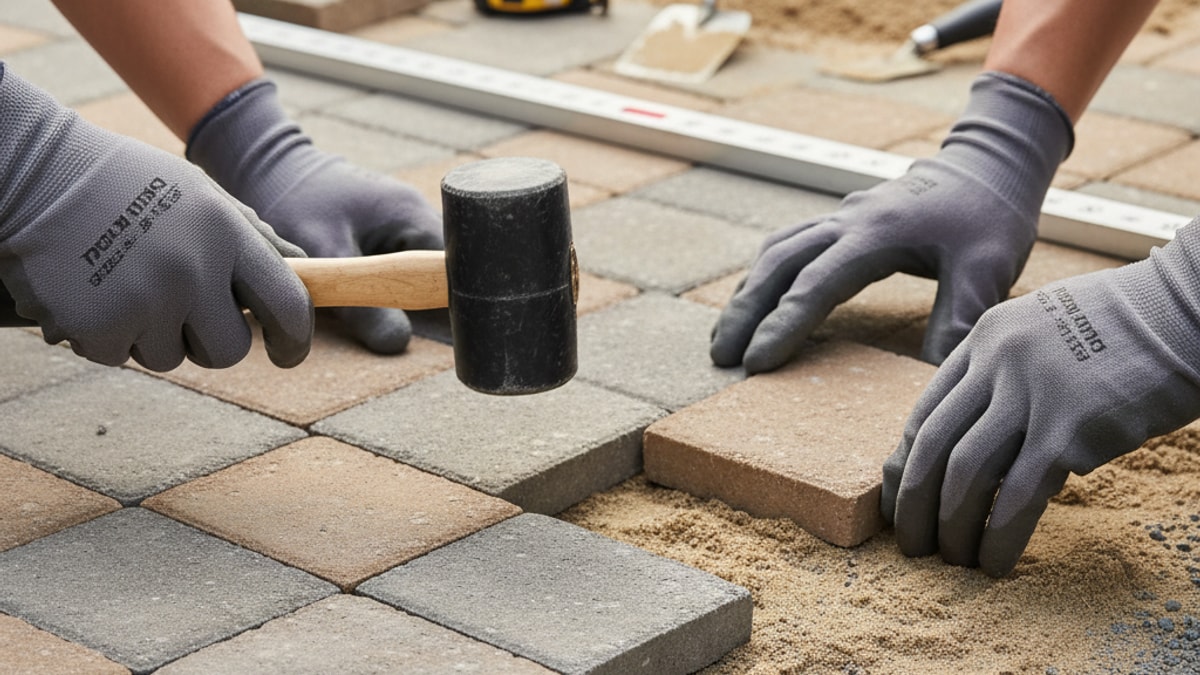
Now for the fun part—actually laying the pavers. It's like putting together a giant, heavy puzzle. Start at a hard edge, like the wall of your house, and in a corner (preferably a 90-degree corner). Lay the pavers down gently onto the sand bed. Don’t slide them or press them down hard; just set them in place. The goal is to place them straight down. They should be snug against each other, but not forced together. Most pavers have small spacer bars on their sides to create a consistent joint line automatically.
Work your way outward, following your chosen pattern (running bond, herringbone, and basketweave are popular choices). Use string lines stretched taut along the edges to keep your lines perfectly straight. Check for levelness across the pavers as you go. If a paver is slightly high, you can tap it down gently with a rubber mallet. If it’s low, pull it up, add a small amount of sand underneath, and reset it.
Inevitably, you’ll need to make cuts, especially along the edges. This is where the diamond blade masonry saw is essential. Measure twice, mark your paver with a pencil, and cut once. Always wear your safety glasses and a mask when cutting, as it creates a lot of dust (a wet saw dramatically reduces dust and is what our pros use). Lay the cut pieces into place to complete the pattern. This part of the process really showcases the value of a well-thought-out project, which you can see in examples all over our Home page.
Finishing Touches That Make All the Difference
You've laid all the pavers, and it looks like a patio. But you're not done yet. The finishing steps are what lock everything together into a durable, interlocking system. Skip these, and your pavers will drift apart over time.
First, install your edge restraints. These are absolutely mandatory. They act as the frame of the picture, holding everything in and preventing the pavers from spreading outwards. Whether you use plastic edging, aluminum, or a concrete toe, secure it firmly against the outside edge of the pavers by hammering 10-inch spikes through the restraint and into the compacted base every 12-18 inches.
Next, you’ll do an initial compaction. Run the plate compactor over the entire surface of the laid pavers. This one final pass settles them firmly into the sand bed, creates a level, uniform surface, and begins the interlocking process. It's a vital step for a professional finish.
Now, it's time for the magic ingredient: polymeric sand. Unlike regular sand, this sand contains polymers that, when activated with water, harden and bind the paver joints. This locks the pavers together, prevents weeds from growing through, and resists erosion from rain and washing. Sweep the dry polymeric sand over the entire surface of the patio, working it into the joints until they are completely full. Then, use a leaf blower on a light setting to blow all the excess sand off the surface of the pavers. This is critical—any sand left on top will harden into a hazy film. Once the surface is perfectly clean, gently mist the patio with a garden hose on a “shower” setting. You want to wet the sand, not blast it out of the joints. Follow the manufacturer's instructions for watering and curing times.
Finally, consider sealing your patio. While not strictly necessary for many concrete pavers, a good quality sealer can enhance the color, protect against stains from oil or wine, and make cleaning easier. It's a step we usually recommend to San Diego homeowners to protect their investment. For more tips on long-term maintenance, our Blog is a great resource.
Knowing When to Call the Professionals
Learning how to lay a paver patio is one thing; executing it is another. It's a grueling, physically demanding job that requires precision at every stage. You'll be lifting hundreds of pounds of material, spending hours on your knees, and operating heavy machinery.
So, when does it make sense to call in a team like Modern Yardz? If you have a large or complex design with curves, multiple levels, or integrated features like seating walls or fire pits, a professional touch is invaluable. If your site has significant drainage challenges or poor soil, getting the engineering right is paramount. Or—let's be honest—if you simply value your time and want a guaranteed, warrantied result without sacrificing your weekends for the next two months. Our team, which you can learn more about on our About page, has the experience and equipment to do the job efficiently and flawlessly.
We're passionate about creating beautiful, enduring outdoor spaces for our San Diego neighbors. If you’ve read this far and feel that the DIY route isn't for you, we're here to help. We can take your vision and turn it into a reality. Feel free to reach out and Contact our design team. We'd be happy to discuss your project and help you understand the possibilities. Why not BOOK MY FREE CONSULTATION and let us show you what we can build together?
A well-built paver patio is more than just an addition to your home; it’s an investment in your lifestyle. It’s a space for connection, relaxation, and making memories. Whether you decide to take on the challenge yourself or partner with a professional, we hope this guide has given you the confidence and knowledge to ensure your project is a resounding success.


.webp)
.webp)