A beautiful paver stone patio. It’s the cornerstone of so many dream backyards—the spot for summer barbecues, quiet morning coffees, and evenings with friends around a fire pit. It’s a tangible extension of your home. But the path from a patch of grass to a pristine, level patio is paved with—well, a lot of hard work and technical details that can make or break the entire project. We’ve seen it happen time and time again.
Here at Modern Yardz, we've designed and built countless paver patios across San Diego County, from the rolling hills of Oceanside to the vibrant neighborhoods of Chula Vista. We understand the unique challenges our local soil and climate present. So, we're not just going to give you a quick checklist. We're pulling back the curtain on the professional process, sharing the insights and non-negotiable steps our team follows to build patios that last for decades. This is how to install a paver stone patio the right way.
Before You Even Dig: The Planning Phase
Honestly, the most catastrophic patio failures we've seen didn't start with a misplaced stone. They started with a lack of planning. Rushing this stage is a recipe for regret. It’s the difference between a functional outdoor living space and an expensive, lumpy mistake.
First, you need a vision. What is this patio for? Is it a sprawling entertainment area with an outdoor kitchen, or an intimate circle for a small fire feature? The function dictates the form. Sketch it out. Use garden hoses or spray paint to outline the actual footprint in your yard. Live with it for a few days. Does the size feel right? Does it flow with the rest of your yard? This is the moment to make changes, not when you’re halfway through digging. Our comprehensive Services always begin with this deep design discovery, because a solid plan prevents costly revisions later.
Then comes the paver selection. This isn't just about color. You're choosing the very character of your space. And—let's be honest—this is crucial.
| Paver Type |
Pros |
Cons |
Best For |
Our Team's Take |
| Concrete Pavers |
Huge variety of shapes, sizes, and colors. Durable and cost-effective. |
Color can fade over time with intense sun exposure. |
Versatile for modern, traditional, and rustic styles. Driveways, walkways, and patios. |
The workhorse of the industry. We use them in the majority of our projects for their reliability and design flexibility. A fantastic choice for most San Diego homes. |
| Clay Brick Pavers |
Classic, timeless look. Color is baked in and won't fade. |
More expensive than concrete. Can be more brittle and prone to chipping. |
Traditional, colonial, or historic-style homes. Walkways and classic patios. |
Nothing beats the authentic color of a true clay brick. If your home's architecture demands that classic look, it's worth the investment. |
| Natural Stone |
Unmatched natural beauty; each piece is unique. Extremely durable. |
Highest cost. Irregular shapes can make installation more complex. |
High-end, luxurious projects. Patios, pool decks, and areas where a premium look is desired. |
Flagstone, travertine, and bluestone create a truly one-of-a-kind surface. It’s a formidable material that makes a significant statement. |
Finally, the technical prep. Before a single shovel hits the dirt, you absolutely must call 811 to have underground utility lines marked. We can't stress this enough. Hitting a gas or water line is a disastrous, dangerous, and expensive mistake. It’s a free service and it’s the law. Also, check with your local San Diego municipality about permit requirements, especially for larger patios or those involving retaining walls.
Gathering Your Arsenal: Tools and Materials
You wouldn’t build a house with just a hammer, and you can’t build a proper patio with just a shovel. Having the right equipment is non-negotiable. It’s about more than convenience; it’s about achieving a professional result.
The Essential Tools:
- Excavation: Flat and pointed shovels, a sturdy wheelbarrow, and a digging bar for tough soil or roots.
- Measurement & Leveling: Tape measure, a long 4-foot level, string lines, and stakes.
- Base & Sand Prep: A steel rake, screed boards (2 metal pipes or straight 2x4s), and a hand tamper. For any patio larger than a tiny landing, we strongly recommend renting a plate compactor. It’s a game-changer.
- Paver Setting: A rubber mallet, a diamond-blade wet saw or a paver splitter for cuts, safety glasses, and gloves.
The Critical Materials:
- Pavers: Calculate your square footage (length x width) and add 10% for cuts and waste. Trust us on this. You don't want to be three pavers short on a Sunday afternoon.
- Class II Base Rock: This is the foundation. It's a specific mix of crushed stone that compacts tightly to create a stable, permeable base. Don't just use gravel. In our experience with San Diego's expansive clay soils, using the correct base material is the single most important factor in preventing heaving and sinking.
- Bedding Sand: Coarse, washed concrete sand. Not play sand. This 1-inch layer is what you'll actually set the pavers into.
- Edge Restraints: Plastic, aluminum, or concrete restraints that are spiked into the base to keep your pavers from shifting outward. They are not optional.
- Polymeric Sand: A fine sand with a polymer additive that binds together when wet, locking pavers in place and preventing weed growth.
- Paver Sealer (Optional but Recommended): A liquid sealer to protect against stains and enhance color.
The Foundation: Excavation and Base Prep
This is where patios are made or broken. Period. The part you'll never see again is the part that determines everything. A poorly prepared base will lead to sinking, wobbling, and catastrophic failure down the road. It’s all about depth and drainage.
First, calculate your excavation depth. The formula is simple: Depth = Paver Thickness + 1 inch (Sand Bed) + 4-6 inches (Compacted Base). For a standard 2 3/8" paver, you're digging down about 8 inches. For patios that will see heavy use or are built on particularly poor soil, we often go with a 6-inch base. It’s grueling work, but it’s the best insurance policy you can have for your project.
As you dig, you must establish a slope for drainage. Water is the enemy of a paver patio. You need to direct it away from your home's foundation. The standard is a 1/4-inch drop for every foot of run. So for a 12-foot patio, the far edge should be 3 inches lower than the edge against your house. Use your string lines and a line level to ensure this slope is consistent across the entire excavated area. It's a subtle detail with massive implications.
Once excavated, your first job is to compact the native soil itself—the subgrade. Use the plate compactor to create a firm, solid bottom. This prevents the base rock from just sinking into loose dirt over time. It’s an extra step many DIY guides skip, and it’s a mistake.
Building the Unseen Structure: Base and Sand Layers
Now you build it back up. Start bringing in your Class II base rock. But don't just dump it all in at once. This is a critical professional technique. You need to add the base in “lifts” of 2 to 3 inches at a time. Spread a layer, moisten it slightly with a hose (this helps with compaction), and then run the plate compactor over it until it's completely solid. Repeat this process until you’ve reached your desired base depth.
Why in lifts? Because a plate compactor can only effectively compact a few inches of material at a time. Dumping in 6 inches of rock and running the compactor over the top will only solidify the surface, leaving a soft, unstable layer underneath that will settle and shift later.
With your base perfectly compacted and sloped, it’s time for the bedding sand. This 1-inch layer is what allows for the final leveling of the pavers. Lay your two screed pipes or boards parallel on top of the compacted base, making sure they are perfectly level with each other (or following the desired slope). Dump the sand between them and pull a straight 2x4 across the top of the pipes. This will create a perfectly smooth, 1-inch-thick bed of sand. Remove the pipes and carefully fill in the voids with sand, smoothing with a trowel. Do not walk on or compact this sand bed. It needs to be loose for setting the pavers.
Our team has found that a perfectly screeded sand bed is the difference between a professional patio and a lumpy, amateur-looking one. It’s meticulous, but it pays off.
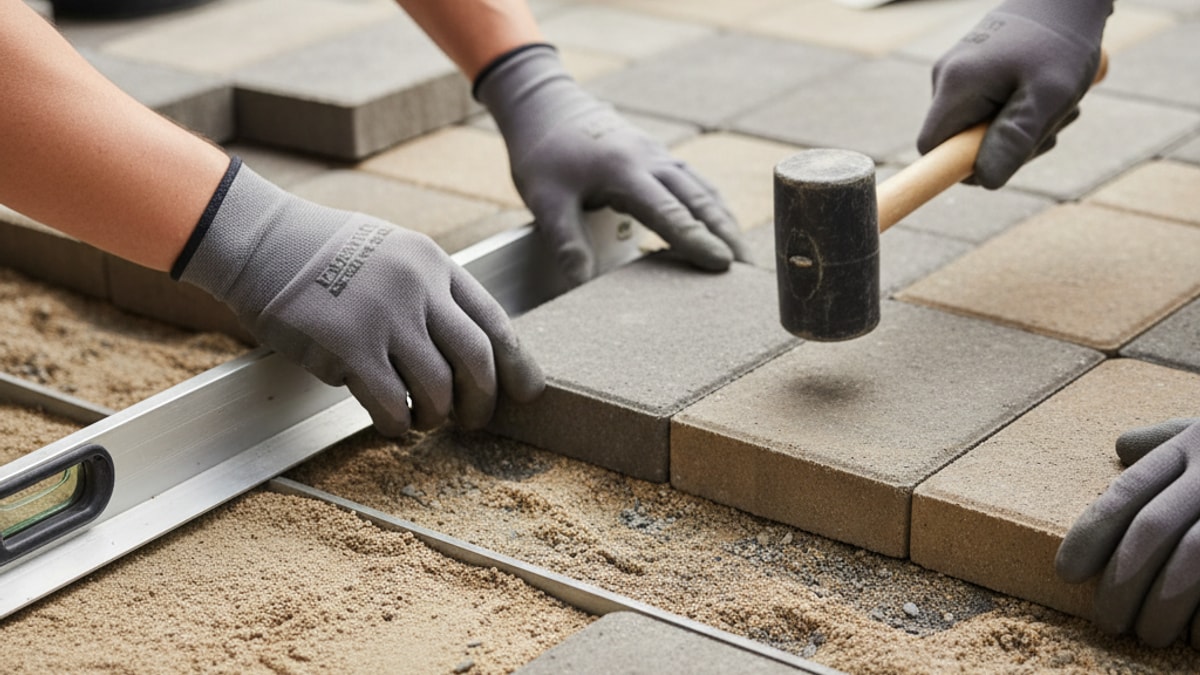
The Main Event: Laying the Paver Stones
Here's where your vision starts to become reality. It’s also where patience is paramount. Start laying pavers from a hard edge, like the foundation of your house, and work outwards. This ensures your lines stay straight. If you're starting in the middle for a circular pattern, use string lines to create a perfect 90-degree angle as your guide.
Place the pavers gently onto the sand bed. Don't slide them into place, as this will disrupt the sand underneath. Use a “click-and-drop” method: touch the edge of the paver to the one next to it, and then lower it straight down. This maintains the small gaps needed for the jointing sand.
Work from on top of the pavers you’ve already laid to avoid disturbing the sand bed. Check your lines and levelness frequently. Every few rows, use your 4-foot level to ensure the surface is flat and maintaining the correct slope. Small adjustments can be made with a rubber mallet, gently tapping high pavers down.
Inevitably, you will need to make cuts. A diamond-blade wet saw (which you can rent) provides the cleanest, most precise cuts. A paver splitter is faster but creates a rougher, more rustic edge. Always wear safety glasses and a mask when cutting pavers—the dust is no joke. For more design ideas and pattern inspiration, our Blog is full of projects we've completed here in San Diego.
Locking It All In: Edging, Sand, and Compaction
Your patio looks great, but it’s not finished. It's just a collection of loose stones sitting on sand. Now, you have to lock it all together into a single, unified surface.
First, install your edge restraints around the entire perimeter of the patio. These are secured into the compacted base layer with long metal spikes. This rigid border is what prevents the pavers from creeping outwards under pressure, which is the primary cause of joint failure and wobbly edges. We can't overstate how important this is.
Next comes the polymeric sand. The surface of your pavers must be completely dry. Sweep the sand over the patio, working it into the joints with a push broom until they are completely full. Then, use your plate compactor (with a protective pad to avoid scuffing the pavers) to run over the entire patio. This does two things: it provides the final setting of the pavers into the sand bed, and it vibrates the polymeric sand, settling it deep into the joints.
After that first compaction, you’ll notice the sand level has dropped in the joints. Sweep more sand in, repeating the process until the joints are full again, with the sand about 1/8 inch below the paver surface. Then, use a leaf blower on a light setting to blow all the excess sand and dust off the paver surfaces. This step is critical—any sand left on top will create a permanent haze when you add water.
Finally, activate the polymers. Set your hose nozzle to a very fine mist or shower setting. Lightly mist a 10x10 foot section at a time. The goal is to get the joints wet, not to flood the patio. Too much water too fast can wash the polymers out of the sand, rendering it useless. Follow the manufacturer's instructions to the letter.
The Finishing Touch: Sealing and Curing
After the polymeric sand has fully cured (typically 24-48 hours), you have the option to seal your patio. While not strictly necessary, we highly recommend it here in sunny Southern California. A good quality sealer will protect your pavers from stains (think spilled wine or grease from the grill), prevent fading from our relentless UV exposure, and can enhance their color, giving them a rich “wet look” if desired.
Ensure the patio is perfectly clean and dry before applying sealer. Use a paint roller to apply a thin, even coat. Don’t let it pool. A second coat may be needed, but wait for the first to dry completely. And then, the hardest part: stay off of it. Let it cure for the time recommended by the manufacturer before moving furniture back on. Patience here will ensure a beautiful, lasting finish.
When to Call the Pros (And Why It’s Often Worth It)
We've just walked you through a formidable project. It requires careful planning, specialized tools, and a ton of physical labor. Can you do it yourself? Absolutely. Should you? That’s a more nuanced question.
Consider the scale. A small 10x10 foot square is a manageable weekend project. A sprawling 500-square-foot multi-level patio with curves and seat walls is an entirely different beast. Think about your time, your physical ability, and the cost of renting or buying all the necessary equipment. Sometimes, the perceived savings of DIY can be eaten up by mistakes, rentals, and the sheer value of your time.
Our team at Modern Yardz brings decades of collective experience to every project. We know the soil, we have the professional-grade equipment, and we've refined our process to be ruthlessly efficient. You can learn more about our philosophy and the team behind the work on our About page. We handle the logistics, the heavy lifting, and the technical details so you can simply enjoy the final result.
If reading this guide felt more overwhelming than inspiring, that’s perfectly okay. This is complex work. Building beautiful, functional outdoor spaces is our passion. If you'd like to discuss your project with us, you can BOOK MY FREE CONSULTATION. We’d be happy to talk through your vision and provide a clear path forward. You can also reach out directly through our Contact page.
Building a paver patio is an investment in your home and your lifestyle. Whether you tackle it yourself with this guide in hand or partner with a professional team like ours, the key is to respect the process. A strong foundation, meticulous preparation, and a little patience will result in a stunning outdoor space that you and your family will enjoy for years to come. It’s more than just a patio; it's the future setting for countless memories.


.webp)
.webp)