A paver patio feels like more than just an addition to your home; it’s a foundational shift in how you experience your outdoor space. It’s the stage for weekend barbecues, the quiet spot for a morning coffee, the safe zone for kids’ chalk art. We’ve seen it time and time again across San Diego County—a well-executed paver patio doesn't just add value, it adds a whole new dimension to life at home. And while the allure of a DIY installation is strong, the path is littered with pitfalls that can turn a dream project into a frustrating, uneven mess.
That's why we're pulling back the curtain. Our team at Modern Yardz has spent years designing and building custom outdoor environments, and we’ve learned—often through fixing others’ mistakes—what separates a patio that lasts a lifetime from one that’s a lumpy headache in two years. This isn't just a list of steps. This is our process, honed by experience with Southern California's unique soil and climate. We're going to walk you through how to install a paver patio the right way, with the unflinching detail and pro insights you won't find on a quick video tutorial.
Before You Even Dig: The Planning Phase is Everything
Honestly, the most catastrophic mistakes we see happen right here, before a single shovel of dirt has been moved. Rushing this stage is a recipe for disaster. A great paver patio is 80% planning and preparation and 20% actually laying the stones. It’s a critical, non-negotiable element of success.
First, let's talk design. What's the purpose of this space? Is it an intimate dining area for four or a sprawling entertainment hub for neighborhood parties? The function dictates the size and shape. Use a garden hose or marking paint to lay out the perimeter on the ground. Live with it for a few days. Walk around it, place some outdoor furniture in the space, and see how it feels. Does it flow with the rest of your yard? Is it big enough? Too big? Adjust it until it feels absolutely right. Our team often finds that homeowners initially underestimate the space they need—better to discover that now.
Next, and we can't stress this enough, you must consider drainage. Water is the number one enemy of a paver patio. Your patio must have a slight, almost imperceptible slope to direct rainwater away from your home's foundation. The standard we work with is a 1/4-inch drop for every foot of length. So, a 12-foot patio should be 3 inches lower on the far end than it is against the house. Use a level and stakes to plan this slope meticulously. Ignoring this is asking for pooling water, foundation issues, and a compromised base. It's a simple calculation that saves you from a world of formidable problems down the road.
Finally, call 811. Before you dig anywhere, you are legally required to call the underground utility location service. It’s free, and it can prevent a catastrophic—and incredibly expensive—accident. They'll come out and mark the location of any buried gas, water, and electrical lines. Don't even think about skipping this.
Gathering Your Arsenal: Tools and Materials
Having the right equipment is the difference between a smooth, professional job and a grueling, frustrating ordeal. You can rent the heavy-duty items, but don’t skimp. Trying to get by without the proper tools will cost you more in time and effort than you'll ever save in rental fees.
Here's the essential list our crews rely on:
- Excavation: Shovels (flat and pointed), pickaxe (for that dense San Diego clay), wheelbarrow, and for larger projects, a sod cutter or mini-excavator rental.
- Measurement & Layout: Tape measure, marking paint, stakes, string line, and a 4-foot level (a shorter one won’t give you an accurate read on the slope).
- Base Preparation: Hand tamper for small areas, but a plate compactor is non-negotiable for the main base. This machine is the MVP of the entire project.
- Screeding: Two 1-inch outer-diameter metal pipes (conduit works perfectly) and a long, straight 2x4.
- Paver Setting: Rubber mallet, pry bar for adjustments, and a diamond-blade wet saw or a paver splitter for cuts. We've found a wet saw gives cleaner, more precise cuts, especially for intricate patterns.
- Safety Gear: Gloves, safety glasses, hearing protection (especially for the compactor and saw), and steel-toed boots. Your well-being is paramount.
When it comes to materials, the math has to be precise. Measure the square footage of your planned patio (length x width) to calculate your needs. Always add a 5-10% overage for cuts and mistakes. It’s far better to have a few extra pavers left over than to run out mid-project.
You'll need:
- Pavers: The star of the show. So many styles, colors, and textures to choose from.
- Class II Road Base: This is a specific mix of crushed stone and fines that compacts into a rock-solid, stable foundation.
- Bedding Sand: Coarse, washed concrete sand. Not play sand—it’s too fine and will wash away.
- Edge Restraints: Plastic, steel, or concrete restraints are essential to keep your pavers from shifting and spreading over time.
- Jointing Sand: Regular joint sand or, our strong recommendation, polymeric sand, which hardens to lock pavers in place and inhibit weed growth.
The Groundwork: Excavation and Site Prep
This is where the real work begins. It’s sweaty, back-breaking, and absolutely crucial. The depth of your excavation is determined by the total height of your materials: the compacted base, the sand bed, and the paver thickness itself.
For a standard pedestrian patio in a place like San Diego, a good rule of thumb is to excavate 6-7 inches deep. This accommodates about 4 inches of compacted base, 1 inch of bedding sand, and the typical 2 3/8-inch paver. If your patio will support heavy loads like a vehicle or an outdoor kitchen, you'll need a much deeper base—closer to 8-10 inches. Use your string lines, set to the final height and slope of the patio, as your guide. Measure down from the string to ensure your excavation depth is consistent across the entire area.
The goal is a uniformly flat and compacted subgrade. Once you've removed all the soil, grass, and roots, you need to compact the native soil underneath. Yes, you compact the ground before you add any base material. This is a step amateurs often miss. We use the plate compactor to make at least two passes over the entire excavated area. This prevents the ground itself from settling later on, which would take your beautiful patio down with it.
Building a Bulletproof Foundation: The Base Material
If the patio is the house, the base is the concrete foundation. A weak base guarantees a failed patio. There are no shortcuts here. That Class II road base is your best friend. It’s a mix of different-sized aggregates that lock together under compaction to create an incredibly stable, permeable foundation.
You'll add the base material in lifts—or layers—of about 2 inches at a time. Don't just dump all 4 inches in at once and hope for the best. It won't compact properly. Spread a 2-inch layer, lightly moisten it with a hose (think damp, not saturated), and then run the plate compactor over it multiple times in different directions. You’ll see the material settle and tighten. Then, add your next 2-inch lift and repeat the process. This painstaking method ensures you achieve maximum density. The base should be as hard as a rock when you’re done.
Our experience shows that this is where most DIY projects go wrong. An insufficiently compacted base is a ticking time bomb. It will settle unevenly, creating dips and humps in the paver surface within a year or two. Don’t be timid with the plate compactor. It’s your most important tool.
Here’s a quick comparison of base options our team considers, especially for our more advanced Services like projects with significant water management needs.
| Base Type |
Composition |
Best For |
Compaction |
Permeability |
| Class II Road Base |
Crushed aggregate with fines |
Standard patios, walkways, driveways |
Excellent, locks tightly |
Low to Moderate |
| Open-Graded Base |
Clean, angular crushed stone (e.g., 3/4") |
Permeable paver systems, high-drainage areas |
Good, relies on stone interlock |
Very High |
| Sand Base |
Coarse sand only |
Very light-duty, temporary paths (Not Recommended) |
Poor, prone to shifting |
High |
For 99% of residential patios in our region, Class II base is the unequivocal champion. It provides the stability needed to withstand the test of time.
The Art of Screeding: Creating a Perfect, Level Surface
With your base compacted to perfection, it’s time to create the sand bed. This is not another layer of foundation; its sole purpose is to provide a smooth, level surface to set the pavers into. It should be exactly 1 inch thick. No more, no less.
This is where those two metal pipes come in. Lay them parallel to each other across the compacted base, about 6-8 feet apart. Shovel your coarse concrete sand between them, piling it slightly higher than the pipes. Now, take your straight 2x4 and, resting it on the two pipes, pull it towards you in a sawing motion. This is called screeding. It removes the excess sand, leaving a perfectly smooth, 1-inch-deep bed. It's oddly satisfying.
Work in sections. Screed an area, carefully remove the pipes, and fill in the small trenches they leave behind with a little extra sand, smoothing it with a trowel. A crucial point—once you’ve screeded an area, do not walk on it or disturb it in any way. You'll work from the laid pavers inward to avoid messing up your pristine sand bed.
Laying the Pavers: Where Your Vision Takes Shape
Finally, the fun part. Start laying your pavers in a corner, typically against the house, and work your way outward. Place the pavers gently onto the sand bed—don't press them or wiggle them in. Just set them down. They should sit flush against each other, with small built-in spacer bars creating a consistent joint line. Use your string lines as a guide to keep your rows perfectly straight.
Your chosen pattern (herringbone, running bond, basketweave) will dictate the process. Whatever the pattern, work from multiple pallets of pavers at once. This is a pro tip that ensures you blend any slight color variations between pallets for a natural, consistent look. A patio laid from one pallet at a time can sometimes look blocky or patched.
Check your work constantly. Every few rows, use your level to ensure the surface is even and maintaining the correct slope. Small height adjustments can be made with a gentle tap from a rubber mallet. If a paver is too low, you can lift it and add a pinch of sand underneath. It’s a meticulous process, but precision here pays off with an impeccable final result. This is the kind of detail our team at Modern Yardz obsesses over, and you can learn more about our philosophy on our About page.
Making the Cuts: Handling Edges and Obstacles
Unless your patio is a perfect rectangle designed to the exact dimensions of your pavers (which is almost never the case), you're going to have to make cuts. This is what separates a professional-looking job from an amateur one.
Using a wet saw with a diamond blade will give you the cleanest, most precise cuts. Mark your paver with a pencil, put on your safety gear, and let the saw do the work. Don't force it. A paver splitter is a faster, dust-free option, but it creates a more rustic, chiseled edge. The tool you choose depends on the aesthetic you're after.
Take your time with cuts around curves, vents, or posts. Create cardboard templates if needed to get the shape just right before you commit to cutting a paver. These finishing touches make a significant, sometimes dramatic, impact on the final quality.
Locking It All In: Edge Restraints and Jointing Sand
Your patio might look finished, but without edge restraints, it's just a collection of loose stones waiting to drift apart. Edge restraints are installed around the entire perimeter of the patio, directly against the pavers. They're staked into the compacted base with long, 10-inch steel spikes to hold everything tight. Once they're installed, you can backfill against them with soil and sod for a seamless look. This is a critical step for longevity.
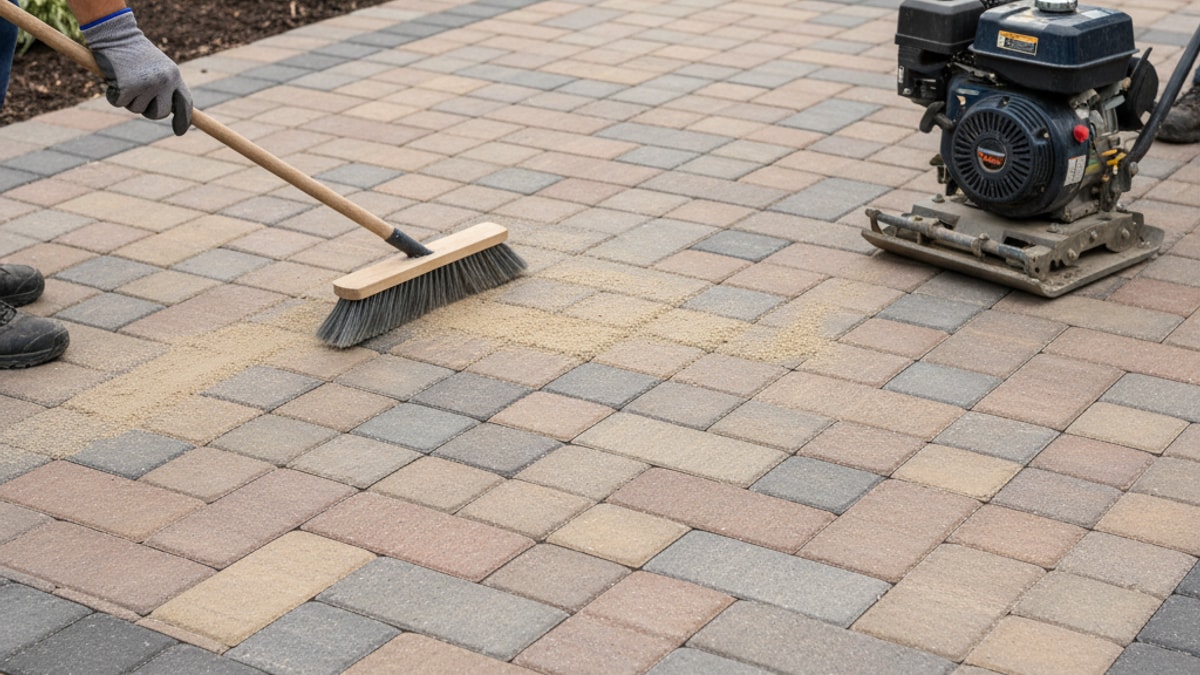
Now, for the magic that locks it all together: the jointing sand. We strongly recommend using polymeric sand. It’s a fine sand mixed with a polymer binder that activates with water. You'll sweep the dry sand into the joints, making sure they are completely filled. Use a leaf blower on a low setting to blow any excess sand off the paver surfaces—any residue left on top will harden into a hazy film. And—let's be honest—this is crucial. Haze is very difficult to remove.
Once the surfaces are clean, you'll gently shower the patio with water, following the manufacturer's specific instructions. This activates the binders, which harden over the next 24-48 hours to create a firm, durable joint. This not only locks the pavers together but also dramatically reduces weed growth and ant hills. It's a game-changer.
The Finishing Touch: Compaction and Sealing
One last pass with the plate compactor is needed. This time, you'll run it over the top of your finished pavers. This final vibration settles the pavers into the sand bed, locks the joints tight, and creates a perfectly smooth, interlocked surface. You must use a protective pad or a piece of plywood between the compactor and the pavers to prevent scuffing or cracking.
After the polymeric sand has fully cured (check the bag, but it's usually 24-48 hours), you have the option to seal your patio. Is it necessary? In the relentless San Diego sun, we believe it is. A good quality paver sealer will protect against stains (from spilled wine or grill grease), prevent fading from UV rays, and can enhance the color of the pavers. It also makes them easier to clean. You'll typically need to re-apply it every 3-5 years, but it's well worth the effort to protect your formidable investment.
Installing a paver patio is a serious undertaking, but the pride and satisfaction of creating a beautiful, functional outdoor space with your own two hands are immense. It's a project that demands patience and precision at every single step. If you've read through this and feel excited, you're ready. If you feel a bit overwhelmed, that's completely normal too.
Our team is here to help San Diego homeowners bring their visions to life, whether it's through expert advice on our Blog or by taking on the entire project from start to finish. We handle everything from initial design to the final sweep of sand. If you'd rather spend your weekends enjoying your yard instead of building it, we get it. Feel free to explore our full range of work on our Home page. When you're ready to transform your space without the sweat, you can Contact our design team directly.
This process, when followed diligently, will give you a patio that not only looks incredible but is built to last for decades. It's an investment in your home and your lifestyle. If you're ready to take the next step and discuss your project with a professional, we invite you to BOOK MY FREE CONSULTATION. We'd love to hear what you have planned.


.webp)
.webp)