A paver patio isn't just an addition to your backyard; it's a transformation. It’s the stage for weekend barbecues, the quiet spot for your morning coffee, the foundation for an outdoor kitchen where memories are grilled to perfection. Here in San Diego, where the weather practically begs us to live outdoors, a well-built patio extends your home's footprint in a significant, sometimes dramatic, way. But here's the unvarnished truth we've learned after years of designing and building across the county—the difference between a stunning patio that lasts for decades and a lumpy, weed-infested headache is all in the details. It's about what happens underneath the pavers.
So, you’re thinking about how to create a paver patio. Fantastic. It's a rewarding project that can fundamentally change how you use your property. We get it. We've helped countless homeowners turn dusty patches of yard into their personal oasis. This isn't just another generic tutorial. This is the culmination of our team's experience, the hard-won lessons from countless projects from Chula Vista to Oceanside. We’re going to walk you through the process the way the pros do it, focusing on the non-negotiable steps that ensure your hard work pays off for years to come. You can see the results of this meticulous approach on our Home page.
First Things First: Planning is Everything
Before a single shovel hits the dirt, you need a plan. A real plan. Winging it is the fastest route to a costly and frustrating redo. Our team can't stress this enough—meticulous planning is the single most important phase of the entire project. What does that actually involve? It's more than just picking a spot.
First, consider the function. What is this patio for? Is it a sprawling entertainment area designed for a large dining table and grill, or a cozy, intimate circle for a fire pit? The purpose dictates the size and shape. Use a garden hose or marking paint to lay out the proposed perimeter on the ground. Live with it for a few days. Walk around it. Place some outdoor furniture in the space to get a feel for the scale. Does it feel cramped? Or maybe unnecessarily vast? Adjust until it feels right. This simple step can save you a world of regret.
Next up is drainage. This is a critical, non-negotiable element that DIYers often overlook, leading to catastrophic results. Water is the enemy of a paver patio. You must ensure that water flows away from your home's foundation and doesn't pool on the patio surface. The standard rule is a slope of at least 1/4 inch per foot. You'll need a level and string lines to plan this gradient meticulously. Our experience shows that San Diego's varied topography, from coastal plains to inland hills, means a one-size-fits-all approach to drainage just doesn't work. You have to read the land. For complex properties or significant slope issues, this is where professional Services can be invaluable.
Finally, check with your local authorities and HOA. San Diego, like many cities, has regulations regarding lot coverage and permeable surfaces. Some projects might require a permit. A quick call to the city's building department can clarify any requirements and prevent potential fines or forced teardowns later. It's a boring step, we know. But it's essential.
Gathering Your Arsenal: Tools & Materials
Alright, you've got a solid plan. Now it's time to gear up. Creating a paver patio requires more than a shovel and some ambition. Having the right tools makes the job smoother, safer, and yields a far more professional result. You can rent the heavy-duty equipment for a weekend, which is what we recommend for most homeowners.
Essential Tools:
- Excavation: Shovel, wheelbarrow, grub hoe (for tough soil), and potentially a sod cutter.
- Measurement & Layout: Tape measure, marking paint, string lines, stakes, and a 4-foot level.
- Base Preparation: Hand tamper for small areas, but a plate compactor (rent this!) is absolutely crucial for a solid base.
- Paver Laying: Rubber mallet, screed boards (simple 1" pipes work great), and a pry bar for adjustments.
- Cutting: A diamond-blade wet saw or a masonry saw (another rental) is necessary for clean, precise cuts around edges and obstacles. A hammer and chisel can work for rough splits, but the finish won't be as clean.
- Safety Gear: Gloves, safety glasses, steel-toed boots, and ear protection, especially when using the compactor or saw.
Materials Breakdown:
- Pavers: The star of the show. They come in a staggering variety of shapes, sizes, colors, and textures. Concrete pavers are durable and versatile, while natural stone like flagstone or travertine offers a more organic, high-end look.
- Base Material: Typically Class II road base or a similar crushed aggregate. This is the structural foundation.
- Bedding Sand: Coarse, washed concrete sand (not playground sand). This is the 1-inch layer the pavers are set in.
- Edge Restraints: Plastic, steel, or concrete restraints that are spiked into the base to keep the pavers from shifting outward.
- Joint Sand: Polymeric sand is our go-to recommendation. It contains a binder that hardens when wet, locking pavers together and inhibiting weed growth.
Step 1: The Excavation—Digging for Success
This is the most physically demanding part of the project. There's no way around it. You need to dig, and you need to dig deep enough to accommodate the entire cross-section of your patio system. A common, disastrous mistake is not digging deep enough.
So, how deep is deep enough? You calculate it by adding up the layers:
- Paver Height: Typically 2 3/8 inches (60mm).
- Sand Bed: 1 inch.
- Gravel Base: 4-6 inches for pedestrian patios. For driveways or areas with poor soil (like some of the clay-heavy areas in San Diego), we often go 8-12 inches deep.
Let’s say you're building a standard patio. You'll need to excavate roughly 7-9 inches below your final desired patio height. Remember to account for that 1/4 inch per foot slope you planned earlier! Use your string lines as a guide to ensure your excavated area has the correct pitch for drainage. Once you've dug out the area, your goal is to have a smooth, firm, and properly sloped subgrade. Tamp it down thoroughly. Any soft spots now will become sinkholes later.
Step 2: The Unsung Hero—Building a Bulletproof Base
If the pavers are the face of your patio, the base is its spine. A weak base guarantees failure. We've been called in to repair too many sunken, heaving patios where the problem was a poorly installed base. It's not glamorous work, but it is absolutely foundational to a project's longevity.
Start by laying your gravel base material in "lifts"—or layers. Don't just dump all 6 inches in at once. It won't compact properly. We recommend spreading a 2-3 inch layer, watering it lightly (to help with compaction), and then running the plate compactor over it multiple times. You need to go over every square inch, overlapping your passes, until the base is unyielding. Then, add the next 2-3 inch lift and repeat the process. Your final, compacted base should be a rock-solid, uniformly graded platform. Tap it with a hammer; it should feel like concrete.
Here’s a quick look at common base materials our team encounters:
| Material |
Pros |
Cons |
Best For |
| Class II Road Base |
Excellent compaction, industry standard, widely available. |
Can be heavy and difficult to move by hand. |
The go-to choice for almost all professional paver applications. |
| Recycled Concrete |
Often more affordable, good for the environment. |
Compaction quality can vary; may contain rebar fragments. |
Budget-conscious projects where material consistency is less critical. |
| Decomposed Granite (DG) |
Creates a very firm surface, good for pathways. |
Can be dusty, may not drain as well as larger aggregate. |
More suitable for pathways or as a top layer, not a primary structural base. |
Step 3: Screeding the Sand Bed—The Precision Layer
With your base perfectly compacted and sloped, it's time for the bedding sand. This is not another structural layer; its purpose is to provide a smooth, level bed to set the pavers into. This layer should be exactly 1 inch thick. No more, no less.
How do you achieve that perfect uniformity? With screed rails. Lay two 1-inch outer-diameter pipes parallel to each other across your compacted base. Shovel the coarse concrete sand between them, then pull a straight 2x4 across the top of the pipes. This will scrape off the excess sand, leaving a perfectly smooth, 1-inch-deep bed. Remove the pipes and carefully fill in the voids with sand, smoothing with a trowel. Now, this is crucial—do not walk on or compact the sand bed. It needs to remain loose for setting the pavers.
Step 4: Laying the Pavers—Where Art Meets Engineering
This is the moment you've been waiting for. The visual payoff. But precision is still paramount. Start from a hard edge, like the wall of your house, or a 90-degree corner. This gives you a stable starting point.
Place the pavers gently onto the sand bed. Don't slide them or press them down hard. Just set them in place, edge to edge. Most pavers have built-in spacer bars that create a consistent joint line. Work your way outward, laying the main field of your patio first. Check your lines every few rows with a string line to make sure they're staying straight. It's incredibly easy for rows to start drifting, and a small deviation now will look like a glaring mistake by the end. Use a rubber mallet to gently tap pavers into alignment as needed.
Don't worry about the edges just yet. Lay all the full-sized pavers you can within your designated area. The cuts will come next. And a quick note on patterns—a running bond is the simplest, while herringbone patterns provide more interlocking strength, which is why we often recommend them for driveways. Our About page talks more about our design philosophy, which always balances aesthetics with long-term structural integrity.
Step 5: The Final Cuts—Making It All Fit
No patio is a perfect rectangle. You'll have edges, curves, and obstacles like downspouts or vents to cut around. This is where a rented wet saw is your best friend. It makes clean, precise cuts that give your project a truly professional finish.
Measure twice, cut once. It's a cliché for a reason. Mark your cut lines on the paver with a pencil. When using the saw, go slow and let the blade do the work. Always wear your safety glasses—this is non-negotiable. For curves, you might need to make a series of smaller, straight cuts to approximate the arc. It's tedious work, but the result is an impeccable, custom fit.
Step 6: Locking It In—Edge Restraints and Joint Sand
Your pavers are laid, cut, and perfectly placed. Now you have to make sure they stay that way. The entire field of pavers is a floating system, and without something to hold it all together, it will creep outward and separate over time. This is the job of edge restraints.
Install your chosen edge restraints (we typically use the heavy-duty plastic kind) directly against the outer pavers, securing them into the compacted gravel base with long metal spikes every 12 inches or so. This creates a rigid frame that contains the entire system.
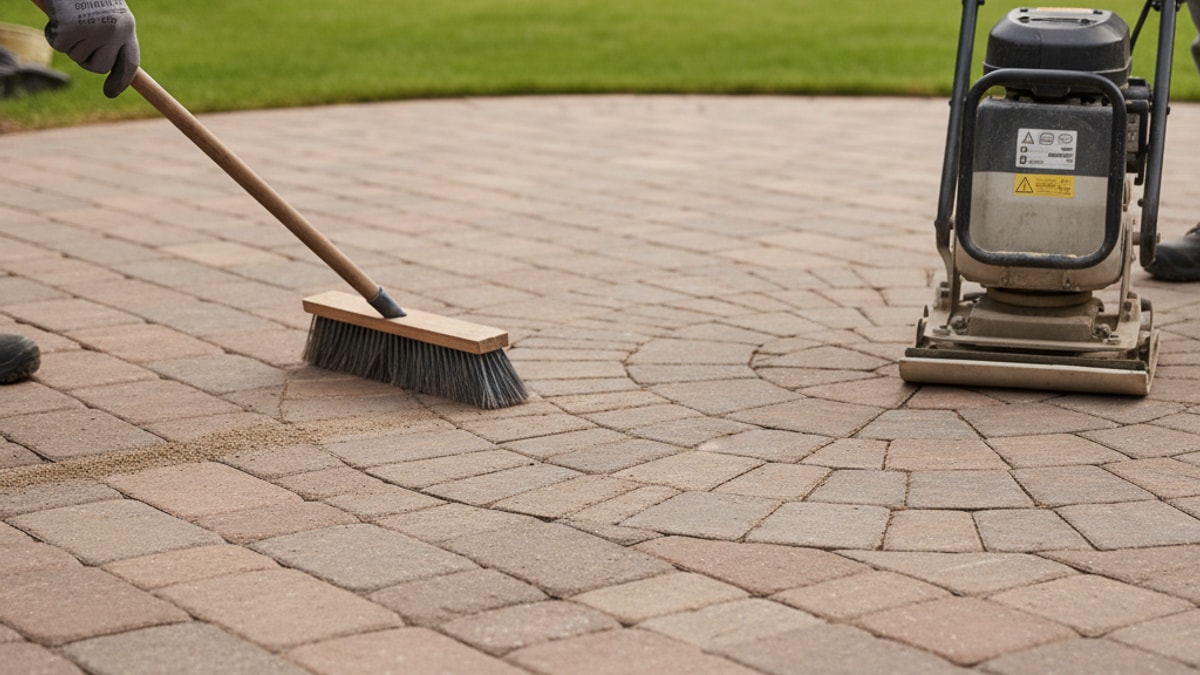
Once the frame is secure, it's time for the joint sand. Sweep your polymeric sand over the entire dry surface of the patio, working it into the joints with a push broom until they are completely full. Don't skimp on this. The sand is the key that locks all the individual pieces together into a single, flexible pavement. After the joints are filled, use a leaf blower (on a low setting) or a soft broom to remove all the excess sand from the surface of the pavers. Any sand left on top can create a hazy film when activated with water. Honestly, this is a step where taking your time pays huge dividends.
Step 7: The Grand Finale—Compaction and Sealing
You’re almost there. Before you activate the polymeric sand, you need to run your plate compactor over the entire patio. This one final pass does two things: it settles the pavers firmly into the sand bed for a level surface, and it vibrates the joint sand deep into the joints, ensuring a tight lock.
Now, follow the manufacturer's instructions for the polymeric sand precisely. This usually involves misting the patio with a garden hose nozzle set to 'shower'. You want to wet the sand enough to activate the polymers but not so much that you wash it out of the joints. Typically, two or three light passes are required. The sand will then harden over the next 24-48 hours, creating a firm yet flexible joint that resists both weeds and erosion.
To seal or not to seal? We almost always recommend it. A good quality sealer will protect your pavers from stains (think spilled wine or grease from the grill), prevent fading from the intense San Diego sun, and make them easier to clean. It also enhances their color, giving them a rich 'wet look' or a more subtle matte finish, depending on the product you choose. Wait at least 30-60 days after installation before sealing to allow any efflorescence (natural salts) to escape the pavers.
DIY vs. Hiring a Pro: An Honest Look
So, can you create a paver patio yourself? Absolutely. Is it a simple weekend project? Absolutely not. It's heavy, technical, and unforgiving of shortcuts. The biggest variables are your time, your physical ability, and your tolerance for detailed, meticulous work.
Doing it yourself can save you money on labor, which is a significant part of the cost. However, you'll need to factor in tool rental fees, material delivery costs, and the value of your own time. A mistake—especially in the base preparation—can lead to a complete failure that costs more to fix than it would have to hire a professional in the first place.
When you hire a team like Modern Yardz, you're not just paying for labor. You're investing in experience, efficiency, and peace of mind. We have the right equipment, the knowledge of local soil conditions, and a crew that can often complete in days what might take a DIYer weeks. We handle the logistics, the material sourcing, and the heavy lifting. Most importantly, we guarantee our work. If you're weighing your options or just want to understand the scope of your project better, we're always here to help. You can easily BOOK MY FREE CONSULTATION through our site to discuss your vision.
Building a paver patio is a formidable undertaking, but the reward is a beautiful, functional outdoor living space that will serve you and your family for decades. It's an investment in your home and your lifestyle. Whether you decide to take on the challenge yourself or bring in experts, understanding the process is the first step to success. For more ideas and inspiration, feel free to browse our Blog for other landscaping projects.
It all comes down to building it right from the ground up. The beauty you see on the surface is a direct result of the hard, unseen work that lies beneath. If you’re ready to transform your yard and want it done right, don't hesitate to Contact our team. We're passionate about creating incredible outdoor spaces for our San Diego neighbors.


.webp)
.webp)