A beautifully crafted deck isn't just a home improvement project; it's a lifestyle upgrade. It's the stage for summer barbecues, the quiet spot for your morning coffee, the front-row seat to your kids playing in the yard. We get it. The allure of building your own patio deck is powerful—the satisfaction, the potential cost savings, the bragging rights. It’s a compelling vision. Our team at Modern Yardz has spent years turning those visions into stunning realities across San Diego, and we've learned a thing or two about what it really takes.
So, you’re asking yourself how to build a patio deck. It's a question loaded with possibilities and, let's be honest, a fair bit of complexity. This isn't just about screwing some boards together. It’s about creating a safe, durable, and beautiful structure that adds genuine value to your home and your life. We believe in empowering homeowners with real, unfiltered knowledge. That’s why we’re pulling back the curtain and sharing our professional blueprint—the critical steps, the non-negotiable details, and the insider wisdom that separates a weekend project from a lasting masterpiece.
Is a DIY Deck Build Really for You?
Before you rent a power auger and order a truckload of lumber, we need to have a frank conversation. We've seen the weekend warrior shows, and they make it look deceptively simple. The reality? Building a deck is a significant, sometimes formidable, construction project. It demands more than just enthusiasm. It demands precision.
First, consider the skills involved. This isn't beginner-level carpentry. You'll need to be comfortable with precise measurements, complex cuts (especially for stairs and railings), and understanding structural loads. Are you confident you can make a structure that is perfectly level, square, and—most importantly—safe for your family and friends? A wobbly deck isn't a charming quirk; it's a catastrophic failure waiting to happen. We can't stress this enough. Our experience shows that foundational mistakes made early on are almost impossible to correct later without a complete tear-down.
Then there's the sheer physical labor. You're going to be digging deep holes for footings, hauling 80-pound bags of concrete, and lifting heavy lumber. It’s grueling work, especially under the San Diego sun. And the time commitment? A properly built deck is not a two-day affair. For a moderately sized deck, you should realistically budget several weekends, if not more. We’ve been called in to rescue more than a few half-finished projects from homeowners who simply ran out of steam or time. Honestly, the cost of fixing mistakes often eclipses the savings of a DIY attempt. It's a tough pill to swallow.
Phase 1: Meticulous Planning and Design
Every successful project our team undertakes begins long before the first shovel hits the dirt. The planning phase is everything. Rushing this step is the single biggest mistake you can make.
First up: location and size. Don't just think about the deck itself; think about how it connects to your home and your yard. How will you use the space? Is it for a large dining table, a cozy seating area, or a combination? Watch the sun's path over your yard for a few days. Where is the shade in the afternoon? Where does the morning light hit? The flow from your back door to the deck and then down to the yard needs to feel natural. This kind of thoughtful integration is a cornerstone of our Services, because a deck should feel like an organic extension of your home, not a clunky attachment.
Next, the design. Will it be a simple, single-level rectangle, or a more dynamic multi-level creation with built-in planters and benches? Think about railings, stairs, and overall aesthetics. Do you want a modern look with clean lines and cable railings, or something more traditional? Sketch it out. Use online design tools. The more detailed your plan, the smoother the process will be. And—this is crucial—create a realistic budget. Factor in lumber, hardware, concrete, tool rentals, and permits. Then add a 15-20% contingency fund. You will need it.
Finally, let's talk about the least glamorous but most critical part of planning: permits. In San Diego, any deck over a certain height or size absolutely requires a permit. This involves submitting detailed plans to the city for approval. You'll need to be compliant with local building codes regarding footing depth, joist spacing, railing height, and property setbacks. Navigating this bureaucracy can be a significant headache, and it's a major reason clients choose to work with a professional team like ours. We handle all the permitting, ensuring your project is fully compliant and safe from day one.
Phase 2: Choosing Your Decking Materials
This is where your deck's personality truly comes to life. The material you choose impacts not just the look, but the cost, longevity, and maintenance schedule for years to come. It’s a big decision.
| Material Type |
Average Cost (Material Only) |
Maintenance Level |
Typical Lifespan |
Key Characteristics |
| Pressure-Treated Pine |
$ |
High |
10-15 years |
Most affordable option. Requires annual sealing/staining to prevent rot, warping, and splintering. |
| Cedar / Redwood |
$$ |
Medium |
15-20 years |
Naturally resistant to insects and rot. Beautiful color but is a softer wood prone to dents. Still requires regular sealing. |
| Composite (Trex, etc.) |
$$$ |
Very Low |
25-50+ years |
Made from recycled plastic and wood fibers. Won't rot, warp, or splinter. Huge color variety. Higher initial cost. |
| Exotic Hardwoods (Ipe) |
$$$$ |
Low |
40-75+ years |
Extremely dense and durable. Naturally resistant to almost everything. Premium look, but very expensive and difficult to install. |
Pressure-treated (PT) lumber is the old standby. It’s affordable and widely available. However, it's not the most stable wood and demands relentless maintenance—sanding, cleaning, and re-staining every year or two—to keep it from looking haggard and splintering.
Cedar and Redwood are a step up. They offer a gorgeous, rich color and have natural tannins that help resist rot and bugs. They’re beautiful, but they are softer woods, making them more susceptible to scratches and dents from furniture or pet claws. They still need to be sealed to maintain their color and protect against the elements.
Composite decking has become incredibly popular, especially here in Southern California. The appeal is obvious: it’s virtually maintenance-free. No staining, no sanding, no splinters. Just a simple cleaning with soap and water. Our team has found that while the upfront cost is higher, the total cost of ownership over the life of the deck is often lower than wood when you factor in the recurring cost and labor of maintenance. The color options are vast, and the technology has improved dramatically to mimic the look of real wood.
Exotic hardwoods like Ipe (pronounced ee-pay) are the top of the line. This stuff is so dense it barely floats. It's naturally impervious to almost everything and can last a lifetime. The downside? It's incredibly expensive and so hard that you have to pre-drill every single screw hole, making installation a slow, painstaking process.
Phase 3: The Foundation—Getting the Footings Right
If you take away only one thing from this entire article, let it be this: your deck is only as strong as its foundation. Period. Everything rests on the footings, and there are no shortcuts here.
It all starts with a precise layout. Using batter boards and mason's string, you'll create a grid that marks the exact center of every footing. Measure your diagonals to ensure your layout is perfectly square. We mean perfectly. A small error here will compound and become a massive headache when you start framing.
Once marked, it’s time to dig. The holes for your concrete footings need to be dug below the frost line to prevent heaving in colder climates. While San Diego doesn't have a deep frost line, you still need to dig deep enough to hit stable, undisturbed soil, and local codes will dictate the required depth and diameter. This is hard, physical work.
Next, you'll place cardboard form tubes (like Sonotubes) into the holes and mix your concrete. This is another step where DIYers can get into trouble. Mixing concrete is messy, and you need to work fast before it starts to set. You need to pour all your footings at once to ensure a consistent result. As you fill the forms, you'll set J-bolt post anchors into the wet concrete, ensuring they are perfectly level and aligned with your string lines. This is a non-negotiable, critical element for a stable structure.
Phase 4: Framing Your Deck Structure
With your concrete footings cured, it’s time to build the skeleton of your deck. This is where it starts to take shape, and it’s also where structural integrity is paramount.
The first piece of the puzzle for an attached deck is the ledger board. This is the framing member that fastens directly to your house. It must be attached with heavy-duty structural screws or lag bolts into the house's rim joist—not just the siding. And—we cannot overstate this—it must be properly flashed. Flashing is a metal or vinyl barrier that prevents water from getting between the ledger and your house, which can lead to catastrophic rot and water damage inside your home. We've seen the devastating consequences of improper flashing, and it's an expensive fix.
From the ledger board and a parallel outer beam (which sits on your posts), you'll install the joists. These are the horizontal members that support the deck boards. They are typically spaced 16 inches on center (sometimes 12 inches for certain composite materials). Each joist must be attached with galvanized steel joist hangers for a secure connection. Every piece of the frame must be level and square. Use a builder's level constantly. Check for square constantly. A fraction of an inch off here will be painfully obvious when you lay your deck boards.
Finally, you'll install rim joists around the perimeter of the frame to cap it off and add blocking between the joists for extra rigidity. The result should be an incredibly strong, stable, and perfectly flat grid. This is the unseen hero of your deck project.
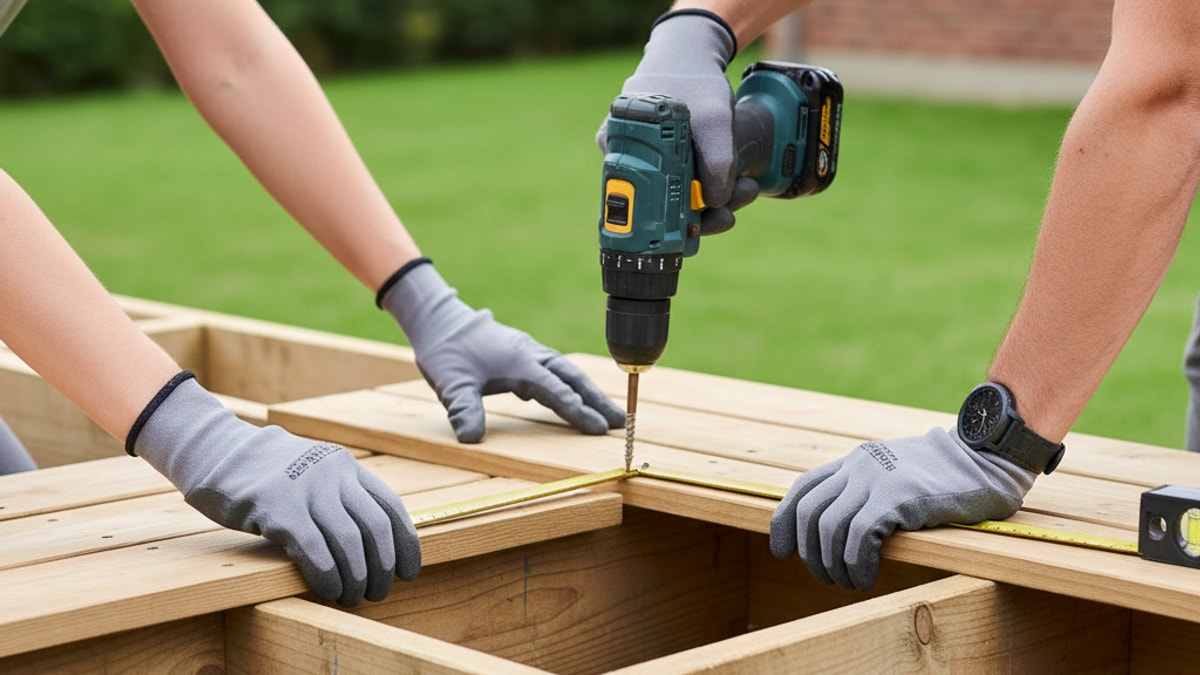
Phase 5: Laying the Deck Boards
This is the moment you've been waiting for. It's the most visually rewarding part of the process, but precision is still the name of the game.
Before you lay the first board, you need to decide on your fastener system. The traditional method is face-screwing, where you drive screws through the top of the board into the joists below. It's strong and straightforward, but you'll see every screw head. For a cleaner, more high-end look, consider a hidden fastener system. These are clips that fit into grooves on the side of the deck boards, creating a flawless, screw-free surface. It’s the preferred method for the modern, seamless designs you see on our Home page.
Whichever you choose, use high-quality, coated or stainless steel deck screws. This is especially important in coastal San Diego communities to prevent corrosion from the salt air.
You'll start by laying your first board, ensuring it's perfectly straight, and then work your way across the frame. A consistent gap between boards is essential. This allows for water drainage and gives the boards room to expand and contract with changes in temperature and humidity. Small plastic spacers can help you maintain a perfect gap.
As you go, you'll need to make precise cuts to fit boards around railing posts or other obstacles. Let the ends of your boards run a little long over the edge of the frame. Once all the boards are down, you can snap a chalk line and make one final cut with a circular saw for a perfectly clean, straight edge. It's a pro tip that makes a world of difference.
Phase 6: Finishing Touches—Stairs, Railings, and Extras
Your deck isn't complete—or safe—without stairs and railings. This is often the most challenging carpentry of the entire project.
Building stairs requires some careful math. You need to calculate the total rise (vertical height) and run (horizontal distance) to determine the number of steps and the height (riser) and depth (tread) of each one. The measurements must be exact and consistent for the stairs to be safe and comfortable to use. Cutting the stair stringers—the saw-toothed frames that support the steps—is an art form that requires a high degree of skill.
Railings are just as important. Building codes have strict requirements for railing height (typically 36 inches or more) and the spacing between balusters or spindles (must be less than 4 inches) to prevent children from falling through. There are countless styles to choose from, from classic wood balusters to sleek metal or cable rail systems that preserve a view.
This is also the time to think about the final aesthetic touches. Adding fascia boards to hide the framing gives the deck a polished look. You might also consider integrating features like landscape lighting, which can transform the space at night, or planning for a future outdoor kitchen or fire pit. Thinking about these integrated elements from the start is part of our core philosophy, and you can learn more About our holistic approach to outdoor design.
When It's Time to Call the Professionals
We've covered a lot of ground. How to build a patio deck is a complex question with a very involved answer. If you've read this far and feel a growing sense of dread rather than excitement, that's perfectly okay. It's a sign that you understand the gravity of the project.
If you're uncertain about structural requirements, daunted by the permit process, or simply don't have the dozens of hours this project requires, it’s time to call in a professional. At Modern Yardz, this is what we do. We take the entire burden off your shoulders. Our process begins with a deep conversation about your vision and ends with a flawlessly executed outdoor living space built to the highest standards of safety and craftsmanship. We handle the design, the permits, the materials, and the construction.
For more ideas and inspiration on what's possible, feel free to browse our Blog. When you’re ready to discuss your project without any pressure, our team is here to listen. You can Contact us anytime to start the conversation.
A new deck is a significant investment in your home. It’s a place where memories will be made for years to come. Whether you decide to take on the challenge yourself or entrust it to experts, our sincere hope is that it's built the right way—safely, beautifully, and durably. A well-built deck is more than just wood and screws; it's a foundation for a better life outdoors. Ready to build that foundation the stress-free way? We encourage you to BOOK MY FREE CONSULTATION with our design team today.


.webp)
.webp)