That old sliding patio door. It’s been a faithful workhorse, but maybe its time has come. Perhaps it’s sticking, fogged up between the panes, or just feels hopelessly dated. Or maybe you have a much grander vision—a seamless transition to a new outdoor living space, a stunning set of LaCantina doors, or even walling up the opening altogether for a new room layout. Whatever the reason, you're here because you’re asking, “how do you remove a patio door?” And our team at Modern Yardz is here to tell you—it’s a totally doable project, but one that demands respect, the right tools, and a solid game plan.
We’ve been part of countless landscape transformations across San Diego, from Chula Vista to the coast, and many of them start right here, with the removal of an old door. It’s the symbolic first step in breaking down the barrier between inside and out. But before you grab a sledgehammer (please don't), it’s critical to understand the process. This isn’t just about demolition; it’s a careful deconstruction. Doing it right prevents costly damage to your walls, flooring, and exterior, and sets you up for a smooth installation of whatever comes next. We’ve seen the aftermath of jobs gone wrong, and we want to help you avoid the common pitfalls. So, let’s walk through this the way a professional would.
Before You Even Touch a Tool: The Planning Phase
Honestly, the most critical work happens before a single screw is turned. This is the strategy session, and skipping it is a recipe for a weekend-long headache. First, ask yourself the big question: what is the ultimate goal? Are you replacing the door with a similar-sized unit? Upgrading to a wider, multi-panel system? Or are you eliminating the doorway completely? Your answer dictates the entire scope of the project. A simple swap is one thing; widening the opening involves structural changes—headers, king studs, jack studs—that are absolutely not in the DIY playbook unless you have serious construction experience. If your plans involve changing the size of the opening, this is the moment to pause and consult with a professional. Our Services include comprehensive design that accounts for these very structural considerations.
Next, get acquainted with your existing door. What material is it? Aluminum? Vinyl? Wood? Each has its own quirks. Older aluminum doors in coastal areas like La Jolla can be practically welded in place by years of salt air and corrosion. Wood doors might have hidden rot that extends into the subfloor. Take precise measurements of the rough opening—that’s the space from stud to stud and from the header to the subfloor. Don't just measure the door itself. You’ll need these numbers for the replacement or for calculating the materials needed to frame it in. Check the surrounding area. Is there electrical wiring for an outdoor light nearby? A hose bib? An outlet? Know where your utilities are before you start swinging a pry bar.
And—let's be honest—this is crucial: assess your own skill level and resources. Do you have a strong helper? A patio door's glass panel can weigh anywhere from 70 to well over 150 pounds. This is not a one-person job. Period. We can't stress this enough. Dropping one of these panels isn't just a mess; it's a catastrophic safety hazard. If you have any doubts about your ability to handle the weight or the technical aspects of deconstruction, it's a sign to call for backup. The goal is a successful project, not a trip to the emergency room or a call to a drywall repair specialist.
Assembling Your Arsenal: The Right Tools for the Job
Showing up to a job with the wrong equipment is a professional sin. For a DIYer, it’s the difference between a clean removal and a mangled wall. You don't need a workshop full of tools, but you do need the right ones. We’ve found that having the essentials laid out and ready to go makes the entire process smoother and safer. Here's a breakdown of what our team considers non-negotiable versus what’s simply nice to have.
| Tool Category |
Essential Tools |
"Nice-to-Have" Upgrades |
| Safety Gear |
Safety Glasses, Heavy-Duty Gloves, Closed-Toe Boots |
Steel-Toed Boots, Knee Pads |
| Screwdrivers |
#2 Phillips Head, Flat Head (various sizes) |
Impact Driver with multiple bits |
| Prying/Demo |
Flat Pry Bar, Cat's Paw, Hammer |
A longer wrecking bar (for more leverage) |
| Cutting |
Utility Knife (with fresh blades) |
Oscillating Multi-Tool, Reciprocating Saw (Sawzall) |
| Measurement |
Tape Measure, Level |
Laser Level |
| Cleanup |
Tarps/Drop Cloths, Shop Vacuum, Heavy-Duty Trash Bags |
Wheelbarrow for debris |
The reciprocating saw (often called a Sawzall) is a game-changer, especially for cutting through the old nails or screws that hold the door frame to the house framing. You can do it with a pry bar and a lot of muscle, but the saw makes for a much cleaner—and faster—extraction. An oscillating multi-tool is another pro favorite; it’s perfect for surgically cutting sealant or making precise cuts in trim without damaging the surrounding drywall.
The Step-by-Step Takedown: A Detailed Walkthrough
Alright, you've planned your attack and gathered your tools. It’s go-time. We’re going to break this down into manageable phases. Work deliberately, and don't rush. Rushing is when things break and people get hurt.
Step 1: Prep the Zone
Before anything else, create a clean, safe work environment. Move all furniture, rugs, and decor at least 10-15 feet away from the door, both inside and out. Lay down heavy-duty tarps on the floor inside and on the patio outside. This isn't just about dust; you’ll be dealing with old sealant, chunks of drywall, and potentially broken glass. Taping the tarps down at the edges is a pro move to prevent them from shifting.
Step 2: Remove the Screen Door
This is your warm-up. It's simple, right? Most screen doors simply lift up and out of their tracks. Sometimes, you might need to adjust the rollers at the top or bottom with a screwdriver to give you enough clearance. Just turn the adjustment screw counter-clockwise to retract the wheels, lift the door up into the top channel, and swing the bottom out towards you. Set it somewhere safe and out of the way.
Step 3: Liberate the Sliding Panel
This is the first major hurdle and the one that requires your helper. The active, sliding panel is held in place by its own weight and the rollers on its track. Open the door about halfway. You and your partner should get a firm grip on the vertical sides of the door frame. Ready? On the count of three, lift straight up. You should feel the rollers clear the track at the bottom. Once it's up, tilt the bottom of the door in towards you and carefully lower it. Now, walk it away and set it down gently on a tarp, preferably leaning against a wall where it can't fall.
Our experience shows this can sometimes be tricky. If the door doesn't lift out easily, the rollers might be extended too far. Look for adjustment screws on the bottom edge of the panel (sometimes hidden under plastic caps). Turning these can retract the rollers, giving you the wiggle room you need. Don't force it. If it feels stuck, there's a reason.
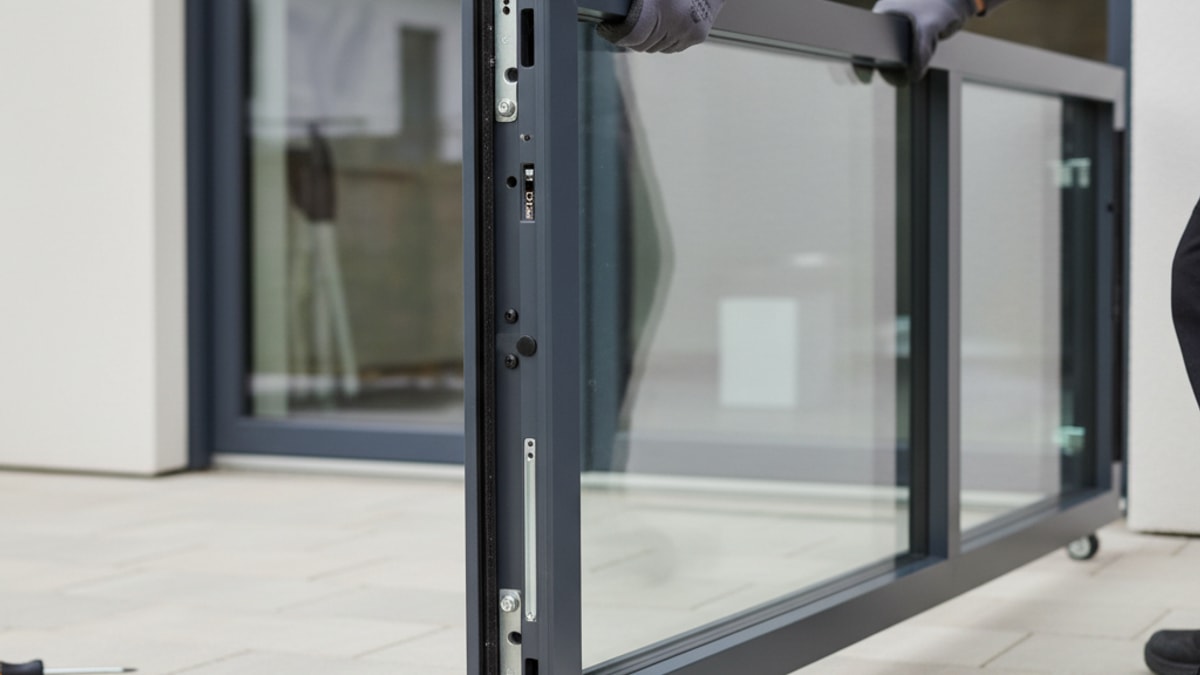
Step 4: Tackle the Fixed Panel
Now for the stationary panel. This one is a bit more of a puzzle because manufacturers secure them in different ways. It’s not just sitting in the track; it's mechanically fastened. Your mission is to find those fasteners. Look for brackets at the top or bottom holding it to the frame. You might find screws driven through the frame itself, pinning the panel in place. Often, there's a threshold piece or an interior stop that needs to be removed first. Carefully pry these pieces off with your flat bar.
Once you've located and removed all the screws and brackets—and double-checked for any you might have missed—the removal process is similar to the sliding panel. With your helper, try to slide it towards the center of the opening, then lift it up and out just like the first one. This panel is often caulked in place around the exterior, so you may need to run your utility knife around the perimeter to break the seal before it will budge.
Step 5: Deconstruct the Frame
With the glass panels out, all that's left is the aluminum or vinyl skeleton—the frame. This is where the real demolition begins, but it should still be controlled. Start by removing any remaining trim or interior casing. Use a utility knife to score the caulk line between the trim and the wall for a cleaner separation. Then, gently work your pry bar in to pop it off.
Now, for the frame itself. It's held in place by nails or screws driven through the “nailing fin” on the exterior and into the wall studs. You have two options: pry it out or cut it out. Prying can cause a lot of damage to the surrounding drywall and stucco. Our team almost always opts for cutting.
Here’s how: use your reciprocating saw with a long metal-cutting blade. Carefully slide the blade into the gap between the door frame and the wall studs. You’re not cutting the wood; you’re cutting the metal nails or screws that are holding it in place. Work your way all around the perimeter—top, sides, and bottom. Once all the fasteners are cut, the entire frame should be loose enough to pull out in one piece. This technique—which we've refined over years on projects from our Home base in San Diego—is the secret to minimizing collateral damage.
Common Pitfalls and How to Sidestep Them
Every project has potential traps. Removing a patio door is no different. We’ve seen DIY projects get derailed by some common, and entirely avoidable, issues. Here’s what to watch out for.
- The Discovery of Water Damage: This is the big one. Once the frame is out, you have an unflinching view of the subfloor and wall framing. Look for discoloration, soft or spongy wood, or any signs of mold. Water has a nasty habit of finding its way in around old, failing patio doors. If you find significant rot, this is a full stop. The damaged wood must be cut out and replaced before you can proceed with any new installation. This is often where a simple project becomes a complex repair job.
- Underestimating the Stucco/Siding Cut-in: The exterior side of the door is sealed against the weather. This usually means it's integrated with your home's stucco or siding. When you remove the frame and its nailing fin, you'll be left with a gap. Planning how you'll patch this and properly waterproof the new installation is a critical, non-negotiable element of the job. Botching the waterproofing is how you end up with the water damage we just talked about.
- Ignoring a Non-Level Opening: Don't assume your house is perfectly square and level. It isn't. When the old door is out, use your level to check the sill, the header, and the side jambs. An out-of-plumb opening will make installing a new door an absolute nightmare. Shimming a new door correctly requires a level opening to start with.
- The Weight. Seriously. Again.: We’re mentioning it again because it’s the most common point of failure and injury. People try to muscle the panels out alone, they lose their grip, and the panel shatters. It’s a dangerous explosion of glass. Always, always have a capable helper.
What Comes Next? Beyond the Empty Opening
Congratulations, you have a big, beautiful hole in your house! Now what? The empty space is a canvas. This is where the real transformation begins, and it’s the part of the job our team at Modern Yardz gets most excited about. The possibilities are what drive our entire About philosophy—creating seamless, beautiful, and functional outdoor spaces.
You could be installing a sleek new sliding door that glides with the touch of a finger. Or maybe you're making a dramatic shift with a folding or multi-slide door system that completely erases the wall, creating an incredible indoor-outdoor flow perfect for a new outdoor kitchen or entertaining space. This single change can completely redefine how you use both your interior and exterior living areas. We've seen it transform homes.
If you're closing the opening, you'll be framing a new wall, adding insulation, sheathing, drywall, and siding. This is a fantastic opportunity to rethink your interior layout. Perhaps that wall is the perfect spot for a new entertainment center or some statement art.
Whatever your next step, this is the perfect time to think bigger. Don’t just replace the door; reimagine the space. Look through our Blog for inspiration on how these transitions can lead to incredible new patios, fire features, and more. The removal of that old door is just the first domino to fall in creating the backyard of your dreams.
When to Call in the Professionals
There's a fine line between a challenging DIY project and a potential disaster. Knowing when to cross it and pick up the phone is a sign of wisdom, not defeat. If you pull out your old door and find extensive rot, that’s a professional job. If the wall above the door is load-bearing and you want to install a wider door, that is absolutely a professional job requiring an engineer or experienced contractor.
If you get halfway through and feel overwhelmed by the complexity, or if you simply don’t have the time to do it right, that's the perfect time to bring in an expert. We handle these kinds of projects every day. We can assess the situation, manage any structural needs, ensure perfect waterproofing, and install your new door flawlessly. It's what we do. If you're standing there looking at a hole in your wall and aren't sure what to do next, we encourage you to Contact us. Sometimes the best tool for the job is a phone call.
Removing a patio door is an empowering project. It’s a tangible, impactful upgrade to your home. With the right preparation and a healthy dose of caution, you can absolutely tackle it. But remember that it’s often the first step in a much larger, more exciting journey of transforming your living space. If you're ready to explore what's possible for your San Diego home, we'd love to help you envision what comes next. Feel free to BOOK MY FREE CONSULTATION, and let’s talk about turning that opening into an opportunity.


.webp)
.webp)