A sprawling, beautiful paver patio. It’s the centerpiece of so many dream backyards here in San Diego—the stage for family barbecues, quiet morning coffees, and evenings under the stars. The appeal is undeniable. And for the ambitious homeowner, the call of DIY can be strong. We get it. There's a certain pride in building something with your own two hands. But our team has also seen the unfortunate aftermath when a project like this goes wrong—uneven surfaces, weeds bursting through the joints, catastrophic drainage issues. It’s a mess.
So, before you rent a compactor and order a mountain of gravel, let's talk about how you build a patio with pavers the right way. We’re not just talking about the steps; we’re talking about the why behind each step. This is the knowledge our crews at Modern Yardz bring to every project, from Chula Vista to Oceanside. It’s the difference between a patio that looks good for a season and one that becomes a lasting, integral part of your home. This is our professional playbook, shared with you.
First Things First: Planning Your Paver Patio
Honestly, the success or failure of your patio is often decided before a single shovel hits the dirt. The planning phase is a critical, non-negotiable element of the process. Rushing this part is a recipe for headaches later on. We've seen it happen time and time again.
First, think about the purpose. Is this a cozy spot for two or an entertainment hub for twenty? The function dictates the size and shape. Use a garden hose or marking paint to lay out the potential footprint on your lawn. Live with it for a few days. Walk around it. Place some outdoor furniture in the space to get a real feel for the scale. Does it feel cramped? Or perhaps unnecessarily large? This simple visualization can prevent a costly miscalculation. It’s a small step that pays huge dividends.
Next up—and we can’t stress this enough—you need to think about logistics. Where will materials be delivered? That pile of gravel and sand needs a home that won't destroy your lawn or block your driveway. You also need to consider your local regulations. Some projects may require permits, especially if they involve significant grading or retaining walls. And—most importantly—you must call 811 before you dig. This free national service marks the approximate location of underground utility lines. Hitting a water main or gas line is a catastrophic, dangerous, and expensive mistake. Don't risk it.
Finally, let's talk about the stars of the show: the pavers themselves. The options can feel overwhelming. Concrete pavers offer incredible versatility in shape, color, and texture. Natural stone like flagstone or travertine provides a timeless, organic look. Clay brick pavers deliver that classic, traditional charm. Your choice impacts not just the aesthetic but also the budget and installation complexity. Our Services often involve helping clients navigate these choices, ensuring the material aligns with both their vision and the architectural style of their home. It's more than just picking a color; it's about creating a cohesive outdoor environment.
The Unseen Hero: Building a Rock-Solid Foundation
Here’s a truth our team lives by: a paver patio is only as good as its base. You can have the most expensive, beautiful pavers in the world, but if the foundation is weak, the project is doomed. This is where most DIY projects fail, and it's where professional expertise really shines.
The process begins with excavation. You need to dig out the soil within your marked patio area to the correct depth. How deep? This depends on your soil type and climate, but for a standard pedestrian patio in Southern California, we typically recommend digging down 7 to 9 inches. This allows for a 4-6 inch layer of compacted base material, a 1-inch layer of sand, and the height of the paver itself. It sounds like a lot of digging. It is.
Once excavated, the next step is to compact the subgrade—the native soil at the bottom of your trench. You’ll need to rent a plate compactor for this. A solid, unyielding subgrade prevents the entire patio from settling over time. After compacting the soil, you’ll lay down a geotextile fabric. Think of this as an insurance policy. It separates your gravel base from the soil below, preventing them from mixing over time and compromising the structural integrity of your foundation. It’s a step many amateurs skip, and it’s a significant mistake.
Now for the base material itself. We use a crushed aggregate, often called Class II road base. You'll add this in 2-inch layers (or lifts), watering it lightly and compacting each layer thoroughly before adding the next. This meticulous process creates an incredibly dense, stable, and interlocking foundation. This is the backbone of your patio. You want it to be perfect.
And—this is crucial—your base must have a slope. We're talking about a gentle grade of about one-quarter inch of drop for every foot of length, angled away from your house's foundation. This is your drainage system. Without it, water will pool on your patio or, even worse, run back toward your home, potentially causing severe water damage. Achieving this consistent, subtle slope is an art form. It requires careful measurement with level lines and a bit of finesse. Honestly, though, getting this part right is what separates the pros from the amateurs.
The Bedding Layer: Creating a Perfect Canvas
With your rock-solid base complete, it's time for the bedding sand. This isn’t just any sand from the playground. We recommend using coarse, washed concrete sand. It has angular particles that lock together beautifully. This layer serves one primary purpose: to provide a smooth, level bed in which to set the individual pavers. It accounts for the tiny variations in paver thickness, ensuring a flat, uniform final surface.
You'll want about a 1-inch layer of sand spread evenly over your compacted base. The trick to getting it perfectly level is a technique called screeding. You'll need two parallel pipes or rails laid on top of your base. You then pour the sand between them and pull a straight 2x4 board across the top of the rails, dragging away the excess sand. This leaves you with a perfectly smooth, flat surface. Once an area is screeded, you remove the pipes and carefully fill in the voids with more sand, troweling it smooth. Whatever you do, don't walk on the screeded sand! You’ll have to start over. Patience is the name of the game here.
The Main Event: Laying Pavers Like a Pro
This is the part everyone looks forward to—seeing the patio come to life. Before you start, you need to decide on a pattern. The pattern isn't just for looks; it also contributes to the strength and stability of the surface, especially for driveways.
| Paver Pattern |
Aesthetic |
Installation Difficulty |
Stability |
Best For |
| Running Bond |
Classic, simple, linear |
Easy |
Good |
Patios, walkways |
| Herringbone |
Dynamic, elegant, formal |
Moderate |
Excellent |
Driveways, high-traffic areas |
| Basketweave |
Textured, traditional, charming |
Moderate |
Good |
Patios, courtyards |
| I-Pattern |
Interlocking, geometric |
Difficult |
Excellent |
High-load areas, commercial |
| Random/Ashlar |
Natural, organic, rustic |
Difficult |
Good |
Large patios, natural landscapes |
We recommend starting from a corner, typically against the house, and working your way outward. It's absolutely essential to use string lines stretched tautly along the edges to keep your lines perfectly straight. Check your alignment every few rows. A small error at the beginning can become a glaring, ugly mistake by the time you reach the other side. Place the pavers gently onto the sand bed; don't slide them into place, as this will disrupt the sand. The goal is to set them straight down, leaving a small, consistent gap between them for the joint sand later.
Making the Cut: Edging and Detail Work
Unless your patio is a perfect rectangle built with pavers that require zero adjustments (which is almost never the case), you're going to have to make some cuts. This requires a wet saw with a diamond blade. Safety is paramount here—wear glasses, gloves, and a mask. Measure twice, cut once. A clean, precise cut makes all the difference in the final appearance. The ability to make these cuts flawlessly is a skill that takes practice, and it’s a big part of what gives a professional installation its polished look.
Once all the pavers, including the cut pieces along the edges, are in place, you must install edge restraints. This is another non-negotiable step. Edge restraints are typically made of plastic, steel, or aluminum and are spiked into the compacted base. They act like a frame, holding everything together and preventing the pavers from shifting or spreading apart over time. Without them, the edges of your patio will inevitably begin to creep outward, creating unsightly gaps and weakening the entire structure. Our About page talks about our commitment to longevity, and using proper edging is a perfect example of that principle in action.
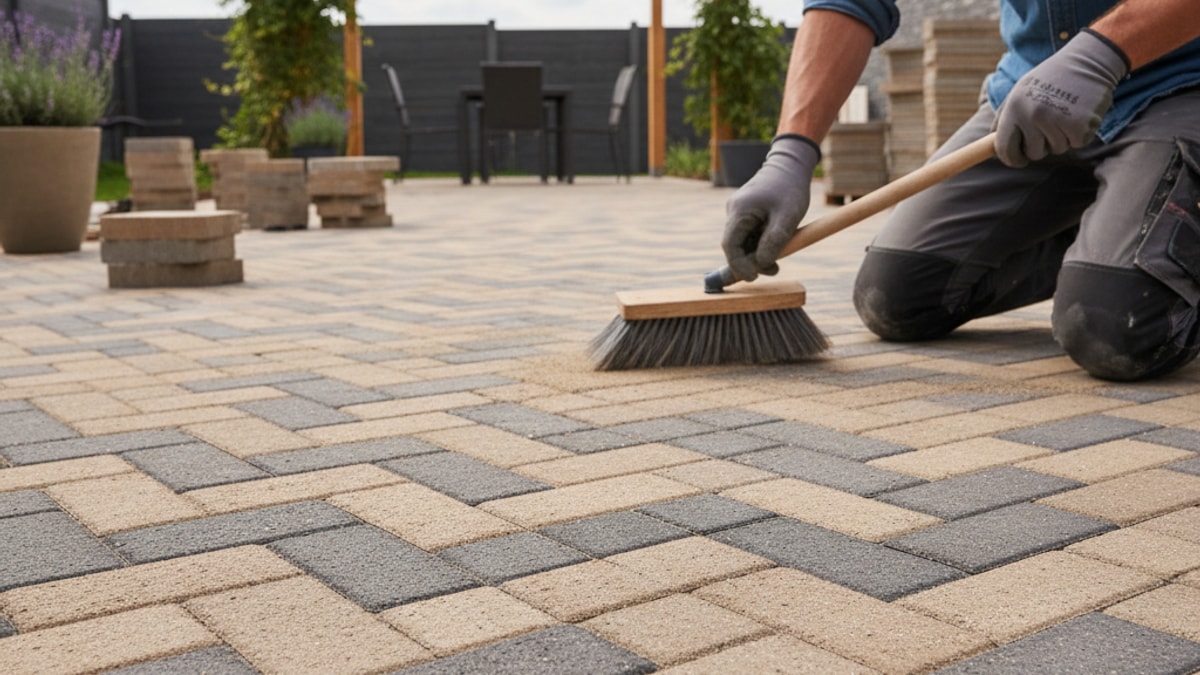
The Final Lock: Sand, Compaction, and Curing
Your patio is built, but it isn't finished. The final step is to lock everything together into a single, unified surface. This is done with jointing sand. While you can use regular fine sand, our team exclusively uses polymeric sand. This is a special blend of sand with a polymer additive that, when activated with water, hardens to form a firm yet flexible joint.
Here's the process: First, ensure the surface of your pavers is completely dry. Sweep the polymeric sand over the entire patio, working it into the joints with a push broom until they are completely full. Then, run your plate compactor over the top of the pavers. This vibrates the sand deep into the joints and does the final leveling of the pavers, seating them firmly into the sand bed. It's a good idea to use a protective pad on the bottom of the compactor to prevent scuffing the paver surface. After compaction, you'll likely need to sweep more sand into the joints as they will have settled.
Once the joints are full again, use a leaf blower on a light setting to blow all the excess sand off the paver surfaces. This is critical—any sand left on top of the pavers will harden into a hazy film when you add water. Finally, gently mist the patio with a garden hose. You want to shower the area, not blast it, to avoid washing the sand out of the joints. This water activates the polymers. Follow the manufacturer's instructions for curing time, which typically involves keeping the patio dry for 24-48 hours. The result? Tenacious, durable joints that resist weeds, deter ants, and prevent pavers from shifting. It’s an impeccable finish.
Knowing When to Call for Backup
So, how do you build a patio with pavers? As you can see, it's a formidable process. It's physically demanding, requires specialized tools, and has several stages where a small mistake can compromise the entire project. It's far more than just a weekend project.
That's not to say it's impossible for a dedicated DIYer. But it's important to be honest with yourself about the scope of the work and your own skill level. Think about the time commitment, the physical labor of moving tons of material, and the cost of renting equipment like a plate compactor and wet saw. Sometimes, the most cost-effective and stress-free solution is to bring in a professional team. We've built hundreds of paver patios across San Diego, and that experience allows us to work efficiently and avoid the common pitfalls that can derail a project. We handle everything from the initial design to the final cleanup, delivering a beautiful, durable outdoor space without you having to lift a finger.
If you’ve read through this and feel that professional guidance is the right path for you, we’re here to help. You can explore more of our projects and ideas on our Blog. When you're ready to transform your yard, we invite you to BOOK MY FREE CONSULTATION. Our design team would be happy to discuss your vision and show you what's possible. Feel free to Contact us anytime.
A paver patio is a significant investment in your home and your quality of life. Whether you decide to tackle it yourself or partner with a team like ours, the goal is the same: to create a beautiful, functional, and enduring space where you and your family can make memories for years to come. Getting the foundation right—both literally and figuratively—is the key to making that happen.


.webp)
.webp)