A classic brick patio. There’s something undeniably charming about it, isn’t there? It feels permanent, established, and perfectly at home under the San Diego sun. It’s the kind of outdoor space that invites long conversations, weekend barbecues, and quiet morning coffees. We’ve seen it time and time again—from Chula Vista to Oceanside, a well-built brick patio doesn't just add value to a property; it fundamentally changes how you live in your home. It extends your living space into the beautiful outdoors we’re so lucky to have.
But here’s the unvarnished truth we’ve learned after years of designing and building these spaces: the difference between a stunning patio that lasts for decades and a lumpy, weed-infested mess comes down to what happens before a single brick is even laid. It’s all in the preparation. Anyone can throw bricks on the ground. Building something that endures, however, requires a method. That’s what we’re here to talk about. We’re pulling back the curtain on how you build a brick patio that our own professional crews would be proud of.
Before You Dig: The Crucial Planning Phase
Honestly, this is where most DIY dreams either solidify into a viable plan or crumble into a weekend-long headache. Don't skip this. We can't stress this enough. Taking a few hours—or even a few days—to meticulously plan will save you an unbelievable amount of frustration later. It’s the difference between a smooth project and ten trips to the hardware store.
First, location. Where is this patio going? Consider sun exposure throughout the day. Do you want a blazing hot afternoon spot or a shaded retreat? Think about foot traffic. How will it connect to your house, your garden, or your outdoor kitchen? Use a garden hose or spray paint to outline the exact shape on the ground. Live with it for a day or two. Does it feel right? Is it big enough for your table and chairs, with room to walk around? It’s so much easier to adjust a hose than to start digging up bricks.
Next up is drainage. This is a formidable, non-negotiable element of patio construction, especially in areas that can get sudden downpours. Water is the enemy of a level patio. You absolutely must plan for a slight slope—we recommend a gradient of about one-quarter inch per foot—directing water away from your home's foundation. Ignoring this is a recipe for catastrophic water damage and a sinking, unstable patio. Our team has been called in to fix far too many projects where water was an afterthought. Don't let that be you.
Finally, you've got to check what’s underground. Before you even think about grabbing a shovel, call 811. It’s a free national service that will send someone out to mark the location of underground utility lines—gas, electric, water, you name it. Hitting one of those isn't just an inconvenience; it's incredibly dangerous and can be wildly expensive to repair. This is a critical safety step. Once you’ve got your layout, your drainage plan, and your utility lines marked, you’re ready to start calculating materials. Measure the length and width of your planned patio to get the square footage. This number is your new best friend—it will dictate how much gravel, sand, and brick you need to buy. And our professional tip? Always order about 10% extra of everything. You’ll need it for cuts, mistakes, and the occasional broken brick. Trust us on this.
Gathering Your Arsenal: Tools & Materials You'll Actually Need
Walking into a hardware store without a list is a daunting experience. Let's get you organized so you can get in, get out, and get to work. Having the right tools isn't just about making the job easier; it's about getting professional-grade results.
The Essentials (Non-Negotiable Tools):
- Shovel & Spade: For the initial excavation. A flat-head shovel is great for scraping the surface level.
- Wheelbarrow: You’ll be moving tons of material—literally. Don't try to do this with buckets.
- Tape Measure: Measure twice, cut once. It's an old saying for a reason.
- Level: A long 4-foot level is best for checking the surface, and a smaller torpedo level is handy too.
- Rubber Mallet: For tapping bricks into place without damaging them.
- Stakes and String Line: Your guide for keeping lines straight and elevations consistent.
- Hand Tamper or Plate Compactor: We strongly recommend renting a gas-powered plate compactor. A hand tamper works for very small areas, but for a truly solid, unshakeable base, the power of a compactor is unmatched. This is one of our key secrets to longevity.
- Brick Saw (Wet Saw) or Angle Grinder with Masonry Blade: You will have to cut bricks for the edges. A wet saw is cleaner and more precise, but an angle grinder can work if you’re careful. Safety glasses and a dust mask are mandatory here.
- Push Broom: For sweeping sand into the joints.
The Materials (The Building Blocks):
- Bricks: Obviously! But there are choices. Clay pavers are traditional and beautiful. Concrete pavers come in a wider variety of shapes and colors. Make sure you're buying pavers rated for patios, not wall bricks.
- Base Material: This is the foundation. It's typically a crushed rock aggregate.
- Bedding Material: Coarse sand is the standard for the 1-inch layer the bricks actually sit on.
- Jointing Sand: Polymeric sand is our go-to. It has polymers that harden when wet, which helps lock the bricks together and dramatically reduces weed growth and insect issues.
- Edge Restraints: These can be plastic, metal, or concrete strips that are staked into the ground to frame the patio and keep the bricks from shifting over time.
Here’s a quick breakdown of your base options, which is a frequent question we get from clients considering our landscape design services.
| Base Type |
Pros |
Cons |
Our Recommendation |
| Crushed Gravel & Sand |
Excellent drainage, cost-effective, industry standard for paver patios. |
Requires heavy compaction, labor-intensive. |
This is the method we use and recommend for most San Diego residential projects. It's durable and reliable. |
| Concrete Slab |
Extremely stable, no risk of settling if poured correctly. |
Poor drainage (must be sloped), expensive, less forgiving for DIY. |
Overkill for most patios and can lead to water issues if not expertly installed. We typically reserve this for specific structural needs. |
| Sand Only (No Gravel) |
Very cheap and fast to install. |
Prone to settling, poor stability, allows weed growth. Not a long-term solution. |
We would never, ever recommend this. It's a temporary fix at best and will fail within a few years. Avoid it. |
Step 1: Excavation—The Foundation of Everything
Alright, it's time to move some earth. This is the most physically demanding part of the job, but every ounce of sweat you put in here pays off tenfold. The goal is to dig out the entire patio area to a uniform depth.
How deep? You need to account for the thickness of your base, your sand bed, and the bricks themselves. A good rule of thumb is:
- 4-6 inches for the compacted gravel base.
- 1 inch for the sand bed.
- The height of your brick (usually about 2.25 inches).
So, you’re looking at a total excavation depth of around 7-9 inches. You want the final, finished patio to be at the correct height relative to your house and yard. Use your stakes and string lines to mark out the perimeter and the desired final height. Then, measure down from the string to ensure you're digging to a consistent depth across the entire area.
As you dig, it's critical to create that gentle slope for drainage we talked about earlier. Use your string lines and a line level to set this up. It’s a subtle but significant detail. Once the area is dug out, rake it smooth and tamp it down. Yes, you even tamp the soil before adding the base. We're building this thing from the ground up to be unflinching.
Step 2: Building the Unshakeable Base
This is it. This is the step that makes or breaks your entire project. The bricks are the beautiful face of the patio, but the gravel base is its heart and soul. A weak base guarantees a failed patio.
Start by laying down your crushed gravel base material. Don't just dump it all in at once. Our process (which we've refined over years of projects) is to add the gravel in 2-inch layers. Add a layer, rake it out evenly, and then—this is the key—compact it with the plate compactor. Go over the entire area several times, in overlapping passes, until the gravel is completely locked in and solid. Then, add the next 2-inch layer and repeat. Keep going until you've reached your desired base depth of 4-6 inches.
Why the layers? Because a compactor can only effectively compress about 2-3 inches of loose material at a time. Trying to compact a 6-inch pile of loose gravel all at once just hardens the top layer, leaving a soft, spongy mess underneath that will settle and shift later. This meticulous, layered approach is a hallmark of professional work.
Once the gravel base is compacted and solid as a rock, it's time for the sand bed. You'll need two parallel pipes or screed rails laid directly on top of your compacted base. These rails should be exactly 1 inch thick. Pour your coarse sand between the rails and then pull a straight 2x4 board across the top of the rails, dragging it toward you. This is called 'screeding'. It removes the excess sand and creates a perfectly smooth, perfectly level 1-inch bed for your bricks. Once an area is screeded, carefully remove the rails and fill in the voids with a little extra sand, smoothing it with a trowel. Now, here's a pro tip: do not walk on or compact the screeded sand. This is its final form before the bricks go down.
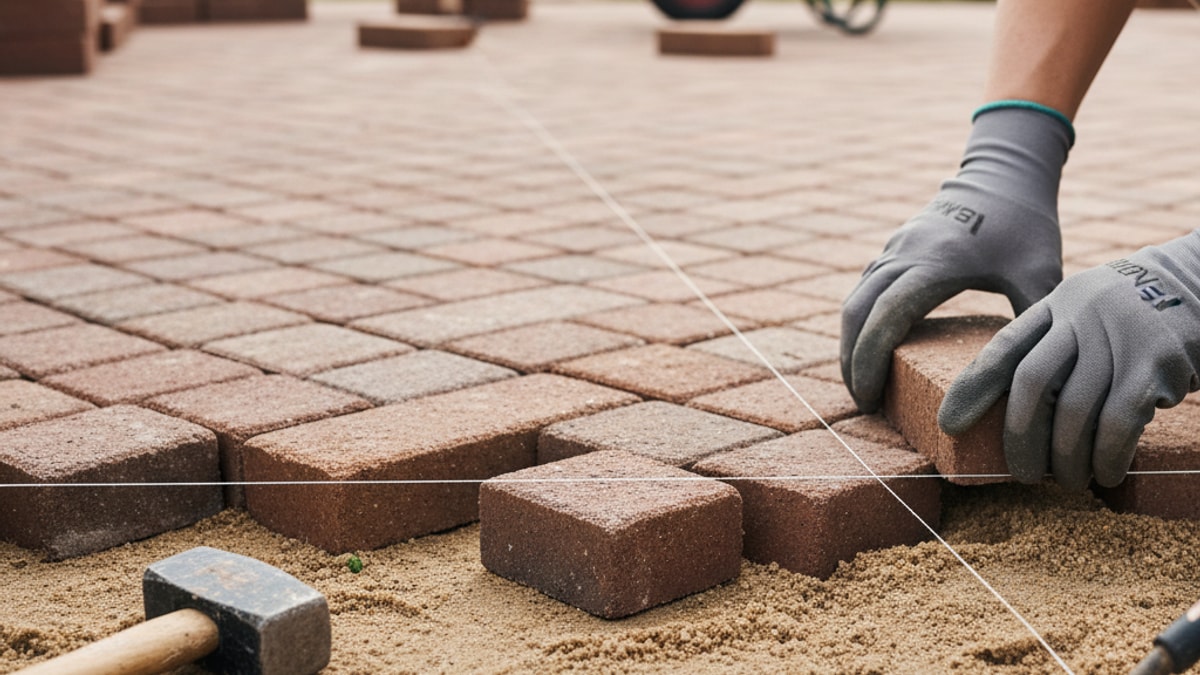
Step 3: The Art of Laying the Bricks
Now for the satisfying part. This is where your project starts to actually look like a patio. Choose a corner to start from, typically one against the house. Lay your first brick down gently onto the sand bed. Don't press it down or slide it around. Just set it in place.
Lay the next brick right next to it, leaving a tiny, consistent gap for the joint sand. Continue laying bricks according to your chosen pattern (running bond, basketweave, herringbone, etc.). We recommend using string lines stretched across the patio area as a guide to keep your rows perfectly straight. It’s amazing how quickly lines can start to wander without a guide. Every few feet, check your work with a level, both along the rows and across them.
If a brick is too high, you can gently tap it down with your rubber mallet. If it's too low, lift it out, add a pinch of sand underneath, and reset it. This process is methodical. It requires patience. Rushing here leads to an uneven surface you'll feel with every step. Work your way across the entire field of the patio, leaving the edges and any areas that require cuts for later. This is where your vision truly comes to life, brick by brick.
Step 4: Cutting Bricks for a Flawless Fit
Unless your patio is a perfect rectangle designed to fit whole bricks exactly (which is almost never the case), you're going to have to cut some. This is often the most intimidating step for a DIYer, but with the right tool and a bit of practice, it’s completely manageable.
Using a rented wet saw is the cleanest and most accurate method. It uses a diamond blade and a stream of water to cut through the brick like butter, minimizing dust and creating a sharp, clean edge. An angle grinder with a diamond masonry blade also works, but it's much dustier and harder to get a perfectly straight cut. Whichever you choose, safety is paramount. Wear your safety glasses, a good dust mask, and gloves. Measure the gap you need to fill, mark the brick carefully with a pencil, and make your cut. Take your time. A well-cut brick should fit snugly into place, completing the pattern and giving your patio a truly custom, professional look.
Step 5: Setting the Edge Restraints
Your patio is laid, but it's not secure yet. Without something to hold them in, the outer bricks will slowly spread and shift apart from the pressure of foot traffic and time. This is what edge restraints are for.
These are typically L-shaped pieces of heavy-duty plastic or metal. They are placed directly against the outside edge of your bricks, on top of the gravel base (you'll need to dig out the sand along the edge to do this). Secure them by driving long metal spikes through the provided holes and deep into the gravel base. This creates a formidable, invisible frame that locks the entire system together. Once the restraints are installed, you can backfill against them with soil and sod, and they'll completely disappear, leaving you with a clean, sharp edge.
Step 6: The Final Touches—Sand, Compaction, and Sealing
You're in the home stretch! The final step is to lock everything together. Pour your polymeric sand over the entire surface of the dry patio. Using a push broom, sweep the sand back and forth across the bricks until every single joint is filled to the top.
Now, run the plate compactor over the top of the bricks. This is a crucial step that many people skip. It does two things: it vibrates the sand deep into the joints, filling any hidden voids, and it settles the bricks for the final time into the sand bed, creating a perfectly level, interlocked surface. You may need to sweep more sand in after the first pass of the compactor. Once the joints are full again, use a leaf blower (on a low setting) or a soft broom to gently remove all the excess sand from the surface of the bricks. This is important—any polymeric sand left on the surface will harden into a hazy film when you add water.
Finally, following the manufacturer's instructions, gently mist the patio with a garden hose. This activates the polymers in the sand, causing it to harden over the next 24-48 hours. The result is a firm, durable joint that resists weeds and insects. Your patio is now complete. You can choose to apply a sealer after it has fully cured, which can help protect the bricks from stains and enhance their color, but this is an optional final touch.
Common Pitfalls We See (And How to Avoid Them)
At Modern Yardz, we've seen it all. Our team often gets called to consult on or repair DIY projects, and we see the same mistakes repeatedly. Here’s what we’ve learned—and how you can get it right the first time.
- The Skimpy Base: The single biggest mistake is not digging deep enough or not using enough compacted base material. A 2-inch base is not enough. It will settle, and your patio will become a lumpy hazard. Don't cut corners here. A 4-6 inch compacted base is the professional standard for a reason.
- Forgetting the Slope: A flat patio is a pool. We see this constantly. Without a slight, deliberate slope away from your house, water will sit on the surface and seep into your foundation. Plan for drainage from the very beginning.
- Ignoring Compaction: Just dumping gravel in a hole and covering it with sand is a recipe for disaster. Each layer must be mechanically compacted until it's solid. Rent the plate compactor. It’s the best money you'll spend on the entire project.
- Wobbly Edges: Without proper edge restraints, the sides of your patio will inevitably creep outwards, creating ugly gaps and loose bricks. They are a non-negotiable part of a lasting installation.
Building a brick patio is a significant undertaking, but it's also one of the most rewarding home improvement projects you can tackle. It requires more brute force than finesse, but a commitment to doing the prep work right will yield a beautiful, functional outdoor space that your family can enjoy for years. It's about building memories, and our team believes that's a foundation worth investing in. You can learn more about our philosophy on our website.
Of course, if you're reading this and thinking the process seems a bit too formidable for a weekend project, that's completely understandable. It’s a lot of work. That’s where we come in. Our team at Modern Yardz specializes in creating these kinds of timeless outdoor spaces without the homeowner having to lift a single shovel. If you’d like to explore how we can bring your vision to life, we’d love to talk. You can easily BOOK MY FREE CONSULTATION with one of our San Diego design experts.
For more ideas and inspiration on outdoor living, from fire pits to landscape lighting, be sure to check out our other articles on the Modern Yardz blog. We’re always sharing our team’s latest insights and project showcases. You can also follow our work on social media to see what we're building around San Diego this week!


.webp)
.webp)