A brick patio. It’s more than just a surface—it’s the foundation for countless memories. It’s the stage for summer barbecues, the quiet corner for your morning coffee, the spot where kids chase bubbles under the San Diego sun. Here at Modern Yardz, we’ve designed and built outdoor living spaces from Chula Vista to Oceanside, and we know the transformative power of a well-laid patio. It connects your home to your yard in a way that few other features can.
But you're here because you’re thinking about taking on the project yourself. You’ve typed “how do i lay a brick patio” into your search bar, and you’re looking for real answers, not just a quick summary. We get it. We respect the ambition. Building something with your own hands is incredibly rewarding. Our team is going to walk you through the entire process, sharing the insights and hard-won lessons we've gathered over years of professional installations. This isn't just a list of steps; it's our blueprint for doing it right.
Before You Even Dig: Planning is Everything
Honestly, the success or failure of your brick patio is determined long before the first shovel hits the dirt. Rushing this phase is the single biggest mistake we see homeowners make. A weekend of careful planning can save you weeks of frustration and—let’s be honest—a whole lot of money.
First, let's talk about design and location. Where will this patio live? Does it get morning sun or the full force of the afternoon heat? How will it flow with the rest of your home and yard? Grab a garden hose and lay out the shape on the ground. Live with it for a few days. See how the light hits it, how you walk around it. This simple trick gives you a tangible feel for the space that a drawing just can't capture. Think about function, too. Is this for a large dining table or a couple of cozy chairs next to a future fire pit? The purpose dictates the size and shape.
Now for the critical part—utilities. Before any excavation, you must call 811. It's a free service that marks the approximate location of underground utility lines. Hitting a water pipe is a bad day. Hitting a gas or electrical line can be catastrophic. We can’t stress this enough: do not skip this step.
Next up: choosing your bricks. This is where your personal style comes into play, but there are practical considerations. You're generally choosing between genuine clay bricks and concrete pavers shaped like bricks. Clay offers that classic, timeless look with rich, earthy colors. Concrete pavers, on the other hand, come in a massive variety of colors and styles and are engineered for incredible durability and uniformity. Our experience shows that for most modern San Diego homes, high-quality concrete pavers offer more design flexibility.
Then there's the pattern. This has a significant impact on both the look and the structural integrity of your patio.
- Running Bond: The classic, simple brick pattern. It's straightforward to lay and creates a clean, linear look.
- Herringbone: A dynamic, interlocking pattern that's incredibly strong. It's fantastic for driveways or high-traffic areas because the zig-zag design distributes weight very effectively. It does, however, require more cutting.
- Basket Weave: This pattern creates a beautiful, textured look reminiscent of old-world courtyards. It's a bit more complex but visually stunning.
Once you've settled on a design, it's time to calculate your materials. Measure the length and width of your planned patio to get the total square footage. When ordering bricks, always add 5-10% extra to account for cuts, mistakes, and any broken pieces. You'll also need to calculate the volume of your base materials—the gravel and sand—which we'll get into shortly. Don’t forget the edge restraints and the jointing sand. It's always better to have a little extra than to have to stop your project midway through for another supply run.
The Tools and Materials You'll Absolutely Need
Gathering everything you need before you start is non-negotiable. There's nothing worse than getting into a rhythm only to realize you’re missing a crucial tool. This isn't a quick trip to the hardware store kind of project; it requires some serious equipment. Some of these you can rent, which we highly recommend for one-off projects.
Essential Tools:
- Shovels (both pointed and flat-head)
- Wheelbarrow
- Tape Measure
- Stakes and String Line
- Line Level or Laser Level
- 4-foot Carpenter's Level
- Hand Tamper (for small areas)
- Plate Compactor (absolutely essential—rent this!)
- Rubber Mallet
- Trowel
- Push Broom
- Angle Grinder or a Wet Saw with a diamond blade (for cutting bricks)
- Safety Gear: Gloves, safety glasses, dust mask, and steel-toed boots.
Essential Materials:
- Bricks or Pavers (+10% extra)
- Class II Road Base (crushed rock aggregate)
- Coarse Concrete Sand (also called bedding sand)
- Paver Edge Restraints (plastic, metal, or concrete)
- 10-inch Steel Spikes (for the edging)
- Polymeric Sand (for the joints)
Let's talk about that base material for a second. It's the unsung hero of your patio. Choosing the right stuff is critical.
| Base Material |
Primary Use |
Our Professional Observation |
| Class II Base |
The main structural layer. Provides drainage and a stable foundation. |
This is the industry standard for a reason. Its mix of crushed rock sizes allows for incredible compaction, creating an unflinching foundation that resists shifting. |
| Decomposed Granite (DG) |
Sometimes used as a base layer or a top layer for pathways. |
We see this used a lot in San Diego, but for a paver patio, it can hold too much moisture and doesn't compact as rigidly as Class II. We'd stick to the proper base. |
| Pea Gravel |
Primarily for drainage or decorative purposes. |
Never use this as a structural base for a patio. The rounded stones just slide past each other and will never create a stable, locked-in surface. Your patio will fail. |
Step 1: The Foundation - Excavation and Base Prep
Here’s where the real work begins. And honestly, it’s the most important part of the entire project. A beautiful patio on a shoddy base is just a temporary installation. We've been called out to fix countless sinking, heaving patios, and 99% of the time, the culprit is a poorly prepared base.
First, you need to dig. You're going to be removing a lot of dirt. A lot. For a standard pedestrian patio, you need to excavate deep enough to accommodate 4-6 inches of compacted base, 1 inch of sand, plus the thickness of your brick (usually around 2 ⅜ inches). So, you're looking at digging down about 7-9 inches from your desired final patio height.
And—this is crucial—you need to account for slope. Your patio must slope away from your house foundation to ensure proper drainage. A good rule of thumb is a ¼ inch drop for every foot of run. So for a 12-foot patio, the far edge should be 3 inches lower than the edge against your house. Use your stakes and string lines, checked with a line level, to establish this grade before you start and as you dig.
Once the area is excavated, the next step is to compact the subgrade—the native soil at the bottom of your trench. This is where you bring in the plate compactor. Rent one. Don't try to get by with just a hand tamper. You want to run the compactor over the entire area until the soil is rock solid. This prevents the ground underneath your base from settling later on.
Now, you can start adding the Class II base. Don't just dump it all in at once. Add it in 2-3 inch layers (or "lifts"). After each lift, you need to lightly moisten it with a hose and then compact it thoroughly with the plate compactor. You’ll run the compactor over it multiple times in different directions until it feels like you're running it on concrete. Repeat this process until you've built up your 4-6 inch base. This meticulous layering and compacting process is what creates a truly stable, interlocking foundation that will last for decades. This is the part of the job that separates the pros from the amateurs, and our About page reflects our commitment to this kind of foundational quality.
Step 2: Setting the Stage - Edging and Screeding
With your rock-solid base in place, it’s time to install the edge restraints. These are absolutely essential for holding the bricks in place and preventing them from spreading and separating over time. They act like a frame for your patio puzzle. We typically use heavy-duty plastic or aluminum edging, secured into the compacted base with 10-inch steel spikes every 12 inches or so.
Place the edging along the perimeter of your patio shape. Make sure your corners are square and your curves are smooth. This edging defines the final shape, so take your time getting it perfect.
Next comes the sand bed. This is a 1-inch layer of coarse concrete sand that the bricks will sit in. Its purpose is not structural support—that's the job of the base—but to provide a setting bed that allows for tiny adjustments to get each brick perfectly level. To get this layer perfectly flat and uniform, you’ll use a technique called screeding.
Lay two parallel pipes (1-inch outer diameter metal conduits work great) across your base. The tops of these pipes should be at the correct height for the bottom of your bricks. Then, pour the sand between the pipes and pull a straight 2x4 board across the top of them. This will screed off the excess sand, leaving a perfectly smooth, 1-inch deep bed. Remove the pipes carefully and fill in the voids with a little extra sand, smoothing it with a trowel. Now you have a pristine surface ready for bricks. Whatever you do, don't walk on it!
Step 3: The Fun Part - Laying the Bricks
This is the moment you’ve been waiting for. It's time to start laying your bricks. Start in a corner—preferably against a straight edge like your house—and work your way out.
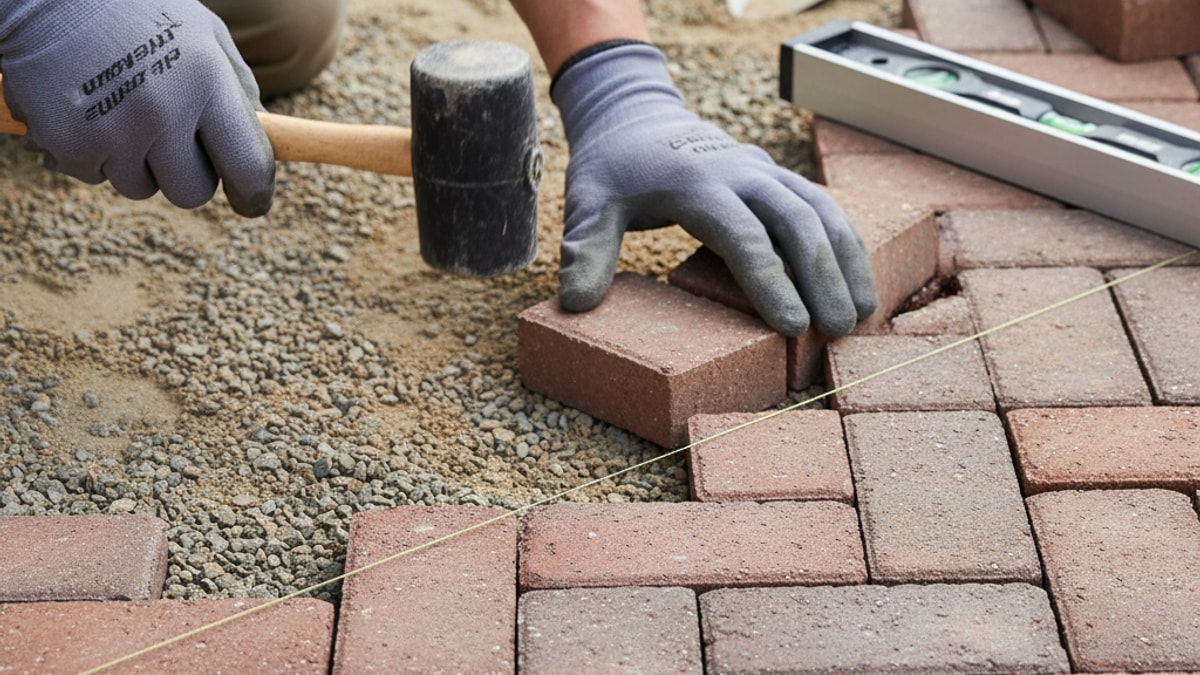
Place the bricks gently onto the sand bed. Don't press them or slide them around, as this will disturb the sand. Just set them straight down. Use the “click-and-drop” method: click the brick against the one you just laid and then drop it into place. This ensures tight joints. Our team has found that maintaining consistent, small gaps (about ⅛ inch) between bricks is key for a professional look and for allowing the jointing sand to lock everything together later.
Use your string lines, stretched across the patio, as a guide to keep your rows perfectly straight. Check your work frequently with your level, both across individual bricks and over larger sections. If a brick is too high, you can tap it down gently with a rubber mallet. If it's too low, you'll need to lift it, add a little sand underneath, and reset it.
This is a process that demands patience. Put on some music, get into a rhythm, and enjoy seeing your patio come to life. You'll inevitably need to cut bricks, especially around the edges or if you're doing a pattern like herringbone. This is where the angle grinder or wet saw comes in. Measure twice, cut once. And always wear your safety glasses and a dust mask—cutting masonry kicks up a lot of fine, nasty dust.
Step 4: Locking It All In - Jointing Sand and Compaction
Your bricks are all laid. It looks like a patio! But it’s not finished yet. The final steps are what lock the entire system together, turning a collection of individual bricks into a single, unified surface.
First, sweep the patio thoroughly to remove any debris. Then, spread polymeric sand over the entire surface. This isn't just regular sand; it's a fine sand mixed with a polymer adhesive that activates with water. When it hardens, it locks the bricks together, prevents weeds from growing in the joints, and helps deter ants.
Using a push broom, sweep the sand back and forth across the patio until every joint is completely filled. It’s important to take your time here and work from multiple angles to ensure there are no voids.
Now, you need to compact the bricks one last time. This settles them firmly into the sand bed and vibrates the jointing sand deep into the cracks. Run the plate compactor over the entire surface. Many rental places offer a protective pad that fits on the bottom of the compactor to prevent it from scuffing your new bricks—we highly recommend using one.
After compaction, you'll likely need to add a bit more polymeric sand and sweep it in again to top off the joints. Once you’re satisfied that the joints are full, use a leaf blower on a low setting (or a soft broom) to gently blow all the excess sand off the surface of the bricks. This is a critical, non-negotiable step. Any polymeric sand left on the surface will harden into a hazy film when you add water, and it’s incredibly difficult to remove.
Finally, it's time to activate the sand. Set your hose nozzle to a very fine mist or shower setting. Gently mist the entire patio, starting from the highest point and working your way down. You want to apply just enough water to saturate the joints without washing the sand out. Follow the specific instructions on the brand of polymeric sand you purchased, as wetting times and procedures can vary. Then, stay off the patio for at least 24-48 hours to allow the polymers to fully cure.
Why a DIY Brick Patio Might Not Be for Everyone
We've laid out the process, and as you can see, it's comprehensive. It's doable, but it’s also a formidable amount of physical labor. Digging and moving tons of soil and rock is grueling work. Renting and operating a plate compactor requires strength and care. It’s a project that can easily consume several full weekends.
There’s also a significant risk if things go wrong. Improper slope can lead to drainage nightmares, sending water pooling against your home's foundation. An inadequate base will lead to a sinking, uneven patio within just a few seasons. These aren't just cosmetic issues; they can be costly problems to fix. The precision required at every stage—from excavation depth to the final sweep—is something our crews have perfected over hundreds of projects.
At Modern Yardz, we specialize in creating these outdoor foundations. It's one of our core Services. We handle everything from the initial design to the final cleanup, ensuring every layer is built to last. We can integrate your new patio seamlessly with other features like landscape lighting, retaining walls, or even a full outdoor kitchen. If you're reading this and feeling a little overwhelmed by the scope of the project, that's completely normal. Sometimes, the best DIY decision is to know when to call a professional.
If you'd like to explore what's possible for your space without the back-breaking labor, we invite you to BOOK MY FREE CONSULTATION. Our design team can help you envision a patio that perfectly complements your home and lifestyle. It’s a no-obligation way to get expert advice tailored to your specific property.
Building a patio is a major investment, whether you do it yourself or hire a team like ours. The goal is the same: to create a beautiful, durable space that enhances your home and your life for years to come. While the satisfaction of DIY is huge, the peace of mind that comes from a professional installation is invaluable. We hope this guide has empowered you with the knowledge to make the right choice for your project. If you're looking for more inspiration, feel free to browse our Blog for other landscaping ideas.
Ultimately, a patio is about creating a place to connect—with family, with friends, and with the beautiful San Diego outdoors. Whether you build it yourself following these steps or decide to partner with us, we're excited for you to have that space. If you have any questions or want to get started, don't hesitate to Contact us. Our team is always here to help you bring your vision to life.


.webp)
.webp)