That first crisp autumn evening always feels like a signal. The days of spontaneous backyard barbecues are winding down, and the focus shifts indoors. But before you hang up your tongs for the season, there’s a critical task that demands your attention: protecting the significant investment you’ve made in your outdoor living space. Your outdoor kitchen, the heart of your backyard, is surprisingly vulnerable to the ravages of winter. We’ve seen firsthand how a little neglect can lead to catastrophic, and expensive, damage. That’s why understanding how to winterize outdoor kitchen spaces isn't just a helpful tip; it's an essential part of home ownership in 2026.
Here at Modern Yardz, we don't just build beautiful outdoor environments; we build them to last. Our experience in designing and constructing everything from sprawling Outdoor Kitchens SAN Diego to integrated entertainment areas has taught us a thing or two about resilience. The most resilient structures, however, still need proactive care. This guide is a distillation of our team's collective knowledge, a step-by-step playbook designed to walk you through the entire process. We’ll cover the non-negotiable steps, the common pitfalls, and the professional secrets to ensuring your kitchen emerges from winter unscathed and ready for that first sunny day of spring. This is the definitive guide on how to winterize outdoor kitchen areas for maximum protection.
The Unspoken Risk: Why Winterizing Your Kitchen Isn't Optional
Let’s be honest. After a long season of outdoor entertaining, the last thing you probably want to do is another big project. It's tempting to just throw a cover over the grill and call it a day. We can't stress this enough: that's a recipe for disaster. The core reason how to winterize outdoor kitchen fixtures is so critical comes down to one relentless force of nature: the expansion of freezing water.
Water left in your plumbing lines—your sink faucet, the refrigerator’s ice maker, your beer tap—will freeze, expand with formidable force, and crack pipes. These aren't just tiny hairline fractures. We're talking about burst copper lines, shattered PVC, and ruined valves that can lead to a deluge when you turn the water back on in the spring. This can cause immense water damage to the kitchen's structure, cabinetry, and the surrounding patio. The process of how to winterize outdoor kitchen plumbing is your primary defense against this silent destroyer. Ignoring this crucial procedure is a gamble, and the house always wins. The cost of replacing a high-end outdoor faucet or, worse, ripping out a wall to fix a burst pipe, dwarfs the time it takes to do this right.
But it's not just about the water. Moisture, ice, and relentless freeze-thaw cycles attack every surface. Expensive granite or concrete countertops can develop cracks. Stainless steel appliances can rust and corrode if not properly cleaned and protected. Wooden cabinets can warp and rot. Even the internal components of your grill can be ruined by moisture and nesting pests. Proper knowledge of how to winterize outdoor kitchen components is about safeguarding the entire ecosystem you’ve built. It’s an insurance policy against the elements, and it’s one you write yourself. The comprehensive approach for how to winterize outdoor kitchen spaces is the only way to guarantee peace of mind.
Your Game Plan: Gathering the Right Tools for the Job
Before you dive in, a little preparation goes a long way. The right supplies turn a daunting task into a manageable weekend project. You don't need a professional workshop, but having the essentials on hand prevents frustrating trips to the hardware store mid-task. Our team has refined this list over years of fieldwork. Think of this as your pre-winterization toolkit. The first step in how to winterize outdoor kitchen areas is always preparation.
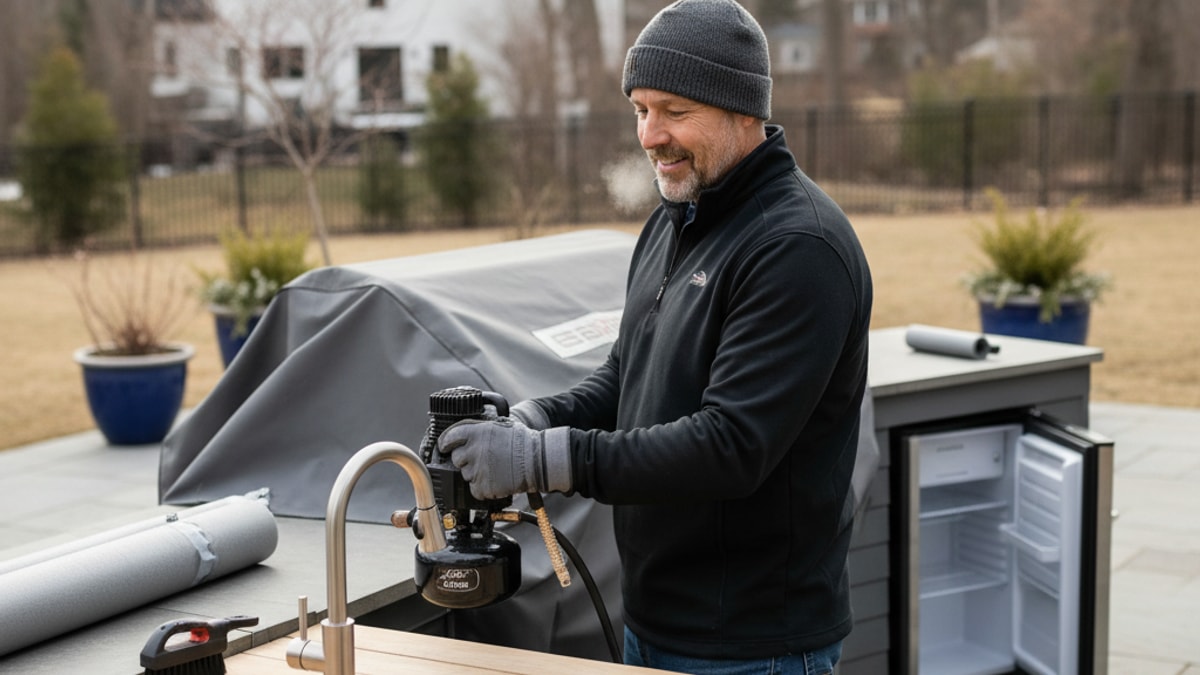
First, focus on cleaning. You'll need a good grill degreaser, a quality stainless steel cleaner and polish, a bucket, sponges, and some microfiber cloths. Don't skimp here; removing every bit of grease and food residue is your best defense against attracting rodents and insects looking for a warm winter home. For the plumbing, the star of the show is an air compressor. This is a game-changer. While you can drain lines passively, using an air compressor to blow out every last drop of water is the only way to be 100% certain your pipes are empty and safe. You’ll also want a shop-vac for sucking residual water out of sink drains and ice maker lines. A simple adjustable wrench will handle most fitting and hose disconnections. Many homeowners ask us how to winterize outdoor kitchen plumbing, and our answer always starts with an air compressor. It's that important.
Finally, think about protection. Heavy-duty, waterproof covers are non-negotiable for all your appliances and furniture. Ensure they are breathable to prevent moisture from getting trapped underneath, which can cause mildew and corrosion. For extra security, some bungee cords or straps will keep them snug during winter storms. You'll also want pest deterrents like rodent repellent pellets (place them inside cabinets and grill bases) and steel wool to plug any small gaps or openings where critters might sneak in. When clients ask how to winterize outdoor kitchen structures, we always emphasize the importance of high-quality covers. They are the final layer of armor.
Here’s a quick-glance table our team put together to help you organize your shopping list.
| Item Category |
Essential Supplies |
Why It's Needed |
| Cleaning Agents |
Degreaser, Stainless Steel Cleaner, Mild Soap, Water |
To remove food residue and grease that attract pests and cause corrosion. |
| Plumbing Tools |
Air Compressor, Shop-Vac, Bucket, Adjustable Wrench |
For completely clearing water lines to prevent freezing and catastrophic pipe bursts. |
| Protective Gear |
Heavy-Duty Waterproof Covers, Shrink Wrap, Bungee Cords |
To create a physical barrier against snow, ice, rain, and UV damage. |
| Pest Control |
Rodent Repellent Pellets, Steel Wool, Peppermint Oil |
To deter mice, squirrels, and insects from nesting in your appliances and cabinets. |
| Surface Care |
Countertop Sealer (Granite/Concrete), Wood Protectant |
To prevent moisture penetration which leads to cracking, staining, and warping. |
The Heart of the Matter: Shutting Down Water and Plumbing
This is it. The single most critical phase of the entire process. If you only do one thing, do this, and do it meticulously. Getting the water out of your system is the absolute cornerstone of how to winterize outdoor kitchen plumbing. A single mistake here can negate all your other efforts.
First, locate the main water shut-off valve for your outdoor kitchen. This is typically a separate valve from your home's main supply, often located in a basement, crawlspace, or an outdoor utility box near the kitchen. Turn it off completely. Once the supply is cut, go to your outdoor sink and open both the hot and cold taps fully to let all the water drain out. Leave them open. This allows for any expansion or contraction without building up pressure. This initial step is fundamental to how to winterize outdoor kitchen water lines effectively.
Now, it's time to get every last drop out. Disconnect the water supply lines from the faucet. Have a bucket ready to catch any remaining water. If you have a refrigerator with an ice maker or water dispenser, disconnect its supply line as well. This is a frequently overlooked step. That thin plastic tube is incredibly susceptible to freezing. After everything is disconnected, it's time for the air compressor. Using an adapter that fits your plumbing lines, blow compressed air through the system—start with a low pressure (around 20-30 PSI) to avoid damaging anything. You'll be amazed at how much more water comes sputtering out of the open faucet and disconnected lines. Do this for both the hot and cold lines until only air is coming out. This active blowout method is the professional secret to a truly foolproof process for how to winterize outdoor kitchen plumbing. Finally, pour a small amount of RV-specific (non-toxic) antifreeze into the sink drain to protect the P-trap. Do not use automotive antifreeze; it's highly toxic. This final detail completes the most important part of how to winterize outdoor kitchen systems.
Appliance Armor: Protecting Your Grill, Fridge, and More
With the plumbing secured, it's time to turn your attention to the expensive hardware that makes your kitchen functional. Each appliance has its own set of needs. A thorough approach to how to winterize outdoor kitchen appliances will extend their lifespan and ensure they fire up perfectly in the spring.
Let’s start with the grill. This is more than just wiping it down. First, give it a deep, deep clean. Remove the grates and burner covers. Scrape off all carbonized gunk and grease from inside the firebox. Clean the burners and ensure all the portholes are clear. Any leftover food particles are an open invitation for pests. Once it's spotless, coat the grates lightly with cooking oil to prevent rust. If you have a natural gas line, shut off the valve that supplies the grill. If you use a propane tank, disconnect it completely and store it in a safe, upright position away from your house (never in a garage or basement). Finally, place a high-quality, fitted cover over the entire grill. The process for how to winterize outdoor kitchen grills is all about clean and cover.
Next up: refrigerators, ice makers, and kegerators. These must be completely emptied. That means all food, all drinks, everything. Unplug the unit from its power source. Clean the interior thoroughly with a mild detergent or a baking soda solution to prevent mold and mildew growth. This is critical. Once it’s clean and dry, the most important step is to prop the door open slightly. You can use a small block of wood or a commercial door stop. This allows air to circulate and prevents the musty, sealed-in smell that can permanently ruin the appliance. Our experience shows that a sealed fridge is a moldy fridge by springtime. A key part of how to winterize outdoor kitchen refrigeration is ensuring airflow. For the ice maker, follow the manufacturer's instructions for draining the water reservoir completely. Don’t forget this! It’s a mini-plumbing system all on its own. The full scope of how to winterize outdoor kitchen equipment includes these often-forgotten details.
Surface and Structure Shield: Countertops, Cabinets, and Covers
Your kitchen’s structure and surfaces are constantly exposed to the elements. While they are built to be durable, the relentless freeze-thaw cycle of winter can be particularly brutal. Protecting them is a vital piece of the puzzle of how to winterize outdoor kitchen spaces.
Countertops are a major investment. For natural stone like granite or marble, autumn is the perfect time to apply a fresh coat of sealer. A good sealer prevents water from penetrating the stone's pores, where it can freeze and cause pitting or cracking. For concrete countertops, which are a beautiful and popular choice in many of our Concrete SAN Diego designs, sealing is absolutely essential to prevent spalling and staining. For stainless steel countertops, a simple clean and polish will suffice. The key is creating an impermeable barrier against moisture. The best method for how to winterize outdoor kitchen countertops is proactive sealing.
Cabinetry also needs attention. Wipe down all exterior and interior surfaces. Check that all doors and drawers close tightly and that the seals are in good condition. If you have wooden cabinets, you might consider applying a protectant or sealant to guard against moisture. For stainless steel or polymer cabinets, a thorough cleaning is usually sufficient. The goal is to ensure they are clean, empty, and securely closed. A major part of how to winterize outdoor kitchen storage is simply ensuring it's not a welcoming environment for pests or moisture.
Finally, think about the larger structures. If your kitchen is protected by one of our custom Patio Covers Pergolas SAN Diego, you already have a significant head start. But you should still inspect the structure for any needed repairs before winter storms hit. Any outdoor furniture, like bar stools or dining sets, should be cleaned and either stored indoors or protected with high-quality waterproof covers. Protecting the entire environment is the holistic approach to how to winterize outdoor kitchen areas.
The Final Lockdown: Pest Prevention and Secure Covers
You've cleaned, drained, and sealed. The final step is to button everything up securely for its long winter nap. This phase is all about creating a fortress against two final enemies: pests and precipitation. This is the last chapter in the story of how to winterize outdoor kitchen spaces for the year.
First, pests. Mice, squirrels, and other critters see your pristine outdoor kitchen as a luxury winter condo. It offers shelter and, if you haven't cleaned properly, a food source. After your deep clean, it's time for active deterrence. Place rodent repellent packs in discreet corners of your cabinets, inside the grill cabinet, and in any enclosed storage spaces. Do not use poison baits, as the animal could die inside your equipment, creating a horrendous problem in the spring. For any small gaps or holes—like where utility lines enter the structure—plug them securely with steel wool. Rodents can't chew through it. This proactive defense is an often-overlooked but crucial part of how to winterize outdoor kitchen setups.
Now, for the covers. We mentioned them before, but their application is the final act. Cover each appliance individually with a fitted, waterproof, and breathable cover. A common mistake is to try and drape one giant tarp over the entire kitchen. This is a bad idea. It traps moisture underneath, promotes condensation, and can create a greenhouse for mold and mildew. Individual covers allow for airflow around each component. Once the covers are on, secure them tightly with the built-in straps, or add a few bungee cords for extra peace of mind during high winds. A properly secured cover is the final handshake, the promise that you've done everything right in your quest on how to winterize outdoor kitchen areas. Your investment is now as safe as it can be.
Knowing When to Wave the White Flag (And Call Us)
We've laid out a comprehensive, step-by-step guide on how to winterize outdoor kitchen structures. For many homeowners, this is a perfectly manageable DIY project. It can even be a satisfying way to close out the season, knowing you’ve protected your space with your own two hands.
However, there are times when calling in professionals is the smarter, safer, and ultimately more cost-effective choice. If your outdoor kitchen has a particularly complex plumbing system—perhaps with a multi-tap beer dispenser, a commercial-grade ice maker, or an integrated dishwasher—the risk of missing a line or a valve increases dramatically. If you're not comfortable using an air compressor or you're unsure where all the shut-off valves are located, it's better to be safe than sorry. The knowledge of how to winterize outdoor kitchen plumbing in complex systems is highly specialized. Our team at Modern Yardz has the equipment and, more importantly, the experience to ensure every drop of water is evacuated from even the most intricate systems.
Moreover, life in 2026 is busy. Sometimes, you simply don't have a free weekend to dedicate to the task. That's okay. Investing in a professional winterization service is an investment in peace of mind. You know the job will be done correctly, thoroughly, and efficiently. When you're ready to create or upgrade your backyard, our Landscape Design SAN Diego services can help you plan a space that is not only beautiful but also designed for longevity and ease of maintenance. Let’s Design the Outdoor Space You’ve Been Dreaming Of. Don't hesitate to reach out to us for a consultation or for help with seasonal maintenance. Knowing how to winterize outdoor kitchen spaces is our business, and we're here to help protect your beautiful investment.
Taking these steps now ensures that when that first warm day of spring arrives, you're not dealing with costly repairs and cleanup. You're firing up the grill. You're stocking the fridge. You're ready to create another season of memories in the outdoor oasis you've worked so hard to build. It’s a small price to pay for a perfect start to a new season of outdoor living.


.webp)
.webp)