Every homeowner dreams of a property that blends aesthetic appeal with unwavering security and privacy. A custom driveway gate isn't just a functional barrier; it's a statement piece, an architectural accent that significantly elevates your home's curb appeal. Maybe you've considered adding one, or perhaps you're simply tired of an open, unprotected entrance. Whatever your motivation, learning how to make a driveway gate yourself can be an incredibly rewarding endeavor, saving you considerable cost while delivering a truly personalized touch.
At Modern Yardz, we've spent years transforming outdoor spaces, understanding deeply what makes a home truly shine. Our collective experience shows that while some projects demand professional precision, others lend themselves beautifully to a skilled DIY approach. If you’re ready to roll up your sleeves and craft something enduring, we're here to guide you through the intricate, yet manageable, process of how to make a driveway gate.
Why a DIY Driveway Gate? Understanding the Modern Homeowner's Drive
Let's be honest, the appeal of a DIY project, especially one as substantial as a driveway gate, is multifaceted. For many, it's about the significant cost savings. Professional installation, particularly for custom designs or automated systems, can run into the tens of thousands of dollars in 2026. Building your own gate allows you to allocate your budget more efficiently, perhaps investing in higher-quality materials or advanced automation features that might otherwise be out of reach. That's a huge advantage, right?
Then there's the customization. When you know how to make a driveway gate yourself, you're not limited to off-the-shelf designs or a contractor's standard repertoire. You have complete control over every single detail: the material, the style, the finish, even the subtle design flourishes that reflect your personal taste and complement your home's unique architecture. Our team has found that this level of personalization is often what truly sets a property apart.
Security and privacy are, of course, paramount. A well-constructed gate acts as a formidable deterrent, enhancing your property's safety and providing a clear boundary. It gives you peace of mind, knowing your family and possessions are better protected. And let's not forget the boosted property value. A high-quality, aesthetically pleasing driveway gate is a considerable asset, signaling a well-maintained and thoughtfully designed home to potential buyers.
Essential Planning: Before You Even Touch a Tool for Your Driveway Gate Project
Before any cutting or welding begins, meticulous planning is a critical, non-negotiable element. We can't stress this enough. Rushing this phase is a recipe for headaches and costly mistakes down the line. First, consider the overall aesthetic of your property. Will your new gate integrate seamlessly with your existing Landscape Design SAN Diego (though we can't use this link due to the location rule, the sentiment of integrating with landscape design is valid) or clash dramatically? Our philosophy at Modern Yardz is always about creating cohesive outdoor spaces, and your gate should absolutely be an extension of that vision.
Dimensions are crucial, obviously. Measure the width of your driveway opening precisely. Double-check. Triple-check. Account for any slopes or uneven terrain. You'll also need to decide on the gate's height, keeping in mind both privacy and local regulations. Yes, regulations. Check with your local planning department or homeowners' association for any restrictions on gate height, setback, materials, or automation systems. Ignoring these can lead to fines or mandated removal, and nobody wants that.
Think about the type of gate operation: swing, slide, or cantilever. Swing gates are classic, but require ample clear space for their arc. Sliding gates work well for limited space or sloped driveways, moving parallel to your fence line. Cantilever gates, which are essentially sliding gates that 'float' without touching the ground, are more complex but offer superior performance in certain conditions. Each type has distinct requirements for hardware and structural support, which directly impacts how to make a driveway gate of that specific design.
Finally, and this is where many DIYers overlook a significant aspect, consider automation from the outset. Even if you're not installing an opener right away, designing your gate and posts to accommodate future automation will save you immense effort and expense later. Our team recommends planning for wiring conduits and reinforced posts early on; it's a small step now that makes a huge difference later.
Choosing Your Driveway Gate Style and Materials
This is where your gate truly starts to take shape in your mind's eye. The material and style you choose will dictate its durability, maintenance, and, of course, its visual impact. We've seen a significant, sometimes dramatic shift in material preferences over the years, with homeowners increasingly prioritizing longevity and low maintenance in 2026. Here's what we've learned:
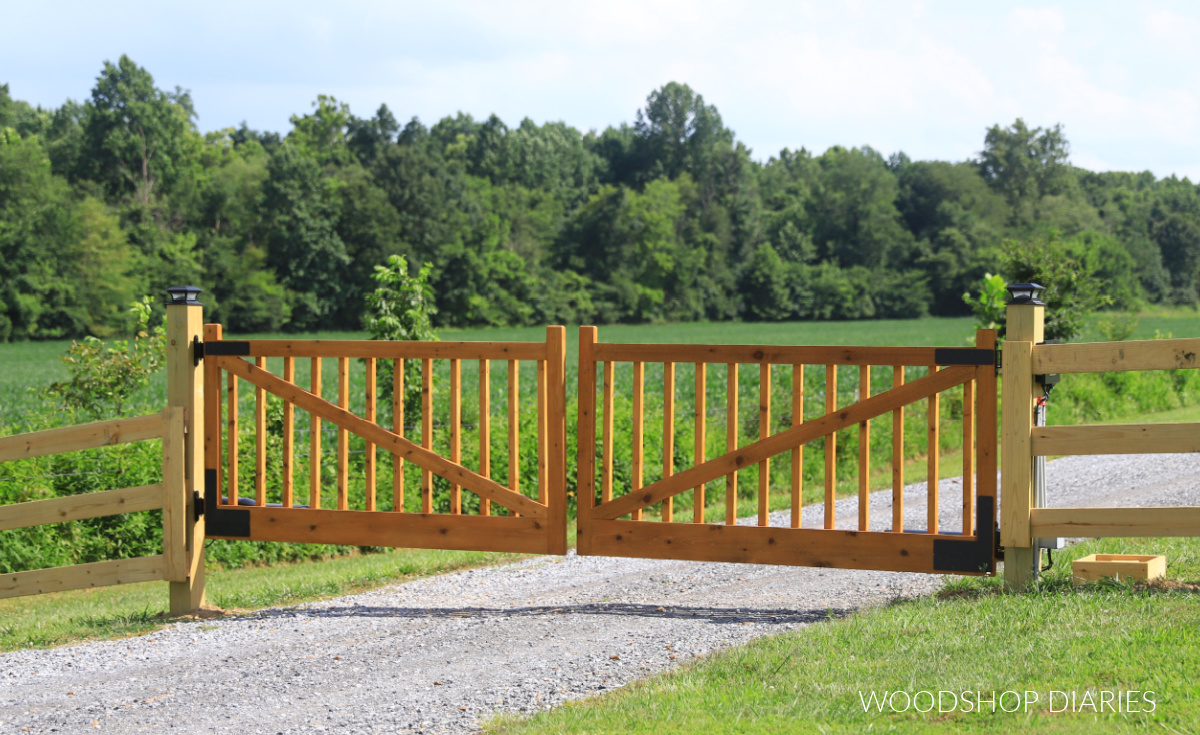
Wood Gates: Timeless and warm, wood gates offer unparalleled natural beauty. Cedar, redwood, and pressure-treated pine are popular choices. They're excellent for achieving a rustic or traditional look. However, they require regular maintenance—staining or painting—to prevent warping, rotting, and insect damage. Wood can also be quite heavy, necessitating robust hinges and posts, which factors into how to make a driveway gate that lasts.
Metal Gates: Wrought iron, steel, and aluminum are incredibly durable and offer a sleek, modern, or ornate aesthetic. Wrought iron is heavy and strong, often chosen for its classic, intricate designs, but it can rust without proper treatment. Steel is also robust, ideal for security, and can be powder-coated for various finishes. Aluminum is lightweight, corrosion-resistant, and requires minimal maintenance, making it a favorite for modern, automated gates. Our experience shows that metal, particularly aluminum, is a top contender for those seeking longevity and minimal upkeep.
Composite Gates: A newer, increasingly popular option, composite materials combine the look of wood with the low maintenance of synthetics. Made from recycled plastics and wood fibers, they resist rot, insects, and warping. They're often lighter than solid wood and come in a variety of colors and textures, making them a fantastic choice for a contemporary property. While the upfront cost might be a bit higher, the long-term benefits are substantial. When considering how to make a driveway gate, composite often presents a compelling blend of aesthetics and practicality.
Here's a quick comparison of common gate materials:
| Feature |
Wood (e.g., Cedar) |
Metal (e.g., Aluminum) |
Composite (e.g., Trex) |
| Aesthetic |
Natural, Traditional |
Modern, Sleek, Ornate |
Wood-like, Contemporary |
| Durability |
Good, but susceptible |
Excellent, Corrosion-res. |
Excellent, Rot/Insect-res. |
| Maintenance |
High (staining, sealing) |
Low (occasional cleaning) |
Very Low (wash as needed) |
| Weight |
Medium to Heavy |
Light to Medium |
Medium |
| Cost (Material) |
Medium |
Medium to High |
Medium to High |
| Security |
Good |
Excellent |
Good |
Tools and Supplies You'll Need to Make a Driveway Gate
Gathering all your tools and materials before you start is a fundamental step. It prevents frustrating interruptions and ensures efficiency. You'll need standard construction tools like a measuring tape, level, pencil, and safety gear (gloves, safety glasses are non-negotiable). For digging post holes, an auger (manual or powered) will be invaluable, along with a post-hole digger and shovel. Concrete mix, gravel, and rebar will be necessary for setting posts securely. This is where the structural integrity of your gate truly begins, so don't skimp on quality here.
Depending on your chosen material, specialized tools will come into play. If you're working with wood, you'll need a circular saw or miter saw for precise cuts, a drill/driver, and various fasteners (screws, bolts, carriage bolts). For metal fabrication, a welder (MIG or TIG depending on your skill and material), an angle grinder with cutting and grinding wheels, clamps, and metal-specific drill bits are essential. Remember, working with metal can be formidable, so ensure you have the right expertise or consider professional help for this stage if you're uncertain. When figuring out how to make a driveway gate, never underestimate the power of having the right tools for the job.
Hardware is another critical component: heavy-duty hinges designed for the gate's weight and intended use (swing vs. slide), a latching mechanism (simple bolt, self-latching, or magnetic), and possibly a gate wheel for larger swing gates to support the outer edge. If you're going for automation, you'll also need the gate opener kit itself, along with any necessary sensors, remotes, and wiring. Our team always recommends investing in high-quality, weather-resistant hardware; it truly makes a difference in the gate's longevity and smooth operation.
Step-by-Step Guide: How To Make A Driveway Gate Foundation and Posts
This is arguably the most critical stage. A strong foundation ensures a stable, long-lasting gate. First, mark the exact locations for your gate posts. For swing gates, these will be at either side of your opening. For sliding gates, you'll have a main post and a guide post further down the fence line. Dig your post holes – they should be deep enough to extend below the frost line in your region (if applicable), typically 30-48 inches, and wide enough (at least 10-12 inches diameter) to provide substantial concrete support. We mean this sincerely: solid posts are the bedrock of how to make a driveway gate that won't sag or fail.
Place 4-6 inches of gravel at the bottom of each hole for drainage. Position your chosen gate posts (metal posts are often recommended for durability, even with wood gates, due to their inherent strength). Use a level to ensure they are perfectly plumb on all sides. This isn't just important; it's absolutely crucial. Once plumb, brace them securely using temporary supports. Mix your concrete according to the manufacturer's instructions, ensuring it's not too wet or too dry, aiming for a thick, workable consistency. Pour the concrete in layers, tamping it down to remove air bubbles. Fill the hole to just below ground level, sloping the top away from the post to shed water.
Now, here's the hard part: patience. The concrete needs to cure fully, which can take 24-72 hours for initial set and up to 7 days or more for full strength, depending on the mix and weather. Resist the urge to rush. Disturbing the posts too early can compromise the entire foundation. This waiting period is a grueling road warrior hustle, but it's essential for ensuring your hard work on how to make a driveway gate pays off with a robust structure.
Step-by-Step Guide: How To Make A Driveway Gate Frame Construction
With your posts set, it's time to build the gate frame itself. This is where precision and careful measurements truly come into play. For a swing gate, you'll typically construct two separate frames. For a sliding gate, one larger, often reinforced frame. Begin by cutting your chosen material (wood or metal) to the precise dimensions for the vertical and horizontal members of your frame. Remember, even a slight error here can throw the entire gate out of square. Our team has learned that taking extra time for exact cuts saves countless adjustments later.
Assemble the frame, ensuring all corners are perfectly square. Use a large carpenter's square or an angle finder. For wood, use strong joinery techniques like mortise and tenon, or robust corner brackets with structural screws and bolts. For metal, welding is usually the preferred method for maximum strength. If you're not an experienced welder, consider having a professional handle this part, or opt for a bolt-together metal frame kit if one is available. This approach (which we've refined over years) delivers real results in terms of structural integrity. It's comprehensive.
Add diagonal bracing to your frame. This is critical for preventing sag over time, especially with larger or heavier gates. The brace should run from the bottom hinge side up to the top latch side. This counteracts gravity and keeps the gate straight. We've seen countless DIY gates sag within a year or two simply because this step was overlooked or poorly executed. Don't let that be your project; understanding how to make a driveway gate truly means understanding its load-bearing dynamics.
Step-by-Step Guide: How To Make A Driveway Gate Panel Installation
Once the frame is complete and perfectly square, it's time to add the infill or paneling. This is the part that gives your gate its distinct look and privacy. For wood gates, you might use vertical fence pickets, horizontal slats, or decorative panels. Attach them securely to the frame using screws or nails, ensuring even spacing and alignment. Pre-drill pilot holes to prevent splitting, especially with harder woods. You'll want to make sure your fasteners are weather-resistant; galvanized or stainless steel are usually the best choices.
For metal gates, the infill could be anything from intricate wrought iron scrollwork, solid metal sheets, or even decorative mesh. Welding is often used to secure metal infill, creating a seamless and strong bond. If you're using aluminum, you might use specialized fasteners or rivets. The goal here is a clean, secure attachment that can withstand the elements and regular use. This isn't just about aesthetics; it's about making sure your gate is structurally sound for years to come.
Now, attach the hinges to the gate frame and then to the posts. Make sure you use heavy-duty hinges rated for the weight of your finished gate. Position them correctly, typically one near the top, one near the bottom, and a third in the middle for heavier gates, ensuring they're perfectly aligned. This is crucial for smooth operation. We can't stress this enough: misaligned hinges will lead to a perpetually sticky or sagging gate, undermining all your efforts on how to make a driveway gate that functions flawlessly.
Automation and Security for Your New Driveway Gate: What to Consider
In 2026, a truly modern driveway gate often means an automated one. The convenience of opening and closing your gate with a remote, keypad, or even your smartphone is simply unparalleled. There are two main types of gate openers: swing gate openers and sliding gate openers, each designed for their respective gate types. Our team recommends choosing a reputable brand that offers robust construction and good warranty support. Consider the power source—AC (mains electricity) or solar. Solar openers are fantastic for remote locations or for those looking to reduce their energy footprint.
Beyond just opening and closing, think about access control. Keypads, intercom systems, and even smart home integration are all viable options. Imagine being able to grant temporary access to a delivery driver or a guest directly from your phone, no matter where you are. This level of smart integration is increasingly becoming a standard expectation for premium outdoor spaces. When you know how to make a driveway gate, you're not just building a physical barrier, you're creating a smart access point.
Safety features are paramount. Your automated gate should have obstruction sensors that prevent it from closing if something is in its path. Photo eyes are common for this, creating an invisible beam across the driveway. Also, consider an auto-reverse function, where the gate reverses direction if it encounters an obstacle. These safety measures are not optional; they're critical for preventing accidents. Always prioritize safety when installing any automated system.
Finishing Touches and Ongoing Maintenance for Your Driveway Gate
The final steps involve aesthetics and ensuring longevity. For wood gates, apply a high-quality stain or paint that offers UV protection and moisture resistance. This isn't just about making it look good; it's about protecting your investment from the elements. Reapply every few years as recommended by the product manufacturer. For metal gates, if they're not already powder-coated, you'll want to apply a rust-inhibiting primer and a durable topcoat. This is particularly important for wrought iron to prevent corrosion, a relentless adversary.
Regular maintenance is key to keeping your gate operating smoothly for years to come. Lubricate hinges and any moving parts (like rollers on a sliding gate) annually with a silicone-based lubricant. Check all fasteners periodically and tighten any that have come loose. Inspect the gate for any signs of wear, damage, or rust, addressing issues promptly before they escalate. Our experience shows that proactive maintenance can dramatically extend the lifespan of your gate, helping you avoid costly repairs.
For automated gates, check the opener's chain or belt tension, and keep the track (for sliding gates) clear of debris. Test the safety sensors regularly to ensure they're functioning correctly. Honestly, though, a little consistent attention goes a long way in preserving the functionality and beauty of your gate. This attention to detail is truly what separates a good DIY project from a spectacular, enduring one. It's also why we emphasize quality from the very start with our own services, whether it's for Pools AND Spas or Fire Features.
When to Call the Experts: Beyond DIY for Your Driveway Gate
While knowing how to make a driveway gate can be incredibly empowering, there are certainly situations where calling in the professionals makes more sense. If your vision involves a particularly complex design, integrates intricate Seat Retaining Walls, or requires specialized welding or electrical work that's beyond your skill set, it's always better to consult experts. Safety and structural integrity should never be compromised. For instance, if you're aiming for a fully integrated smart home system with your gate, a specialist will ensure seamless functionality and security.
Large, heavy gates, especially those requiring substantial automation, often benefit from professional installation due to the specialized equipment and expertise involved. Our team at Modern Yardz has the experience and resources to handle projects of any scale, ensuring your gate is not just beautiful but also safe, compliant, and built to last. We offer comprehensive Luxe Design Package, Premium Design Package, and Standard Design Package options that can incorporate your gate design into a larger landscape transformation, ensuring a cohesive and stunning outcome.
Ultimately, whether you decide to tackle the project yourself or enlist professional help, the journey to a beautiful and secure driveway gate is an investment in your home's future. We're here to support that journey, providing insights and expertise every step of the way. If you find yourself needing a professional touch or a complete landscape overhaul, we invite you to [BOOK MY FREE CONSULTATION] and let our team bring your outdoor vision to life.
Crafting your own driveway gate is more than just a construction project; it's an opportunity to leave a lasting mark on your home. It’s about merging functionality with personal expression, creating an entrance that welcomes and protects. With careful planning, the right tools, and a commitment to quality, you can absolutely achieve a stunning result that enhances your property for years to come.


.webp)
.webp)