How to Build a Wood Retaining Wall on a Slope?
Most wood retaining walls fail within five years — not from rot, but from water pressure no one planned for. The slope you're trying to hold back exerts exponential force with every inch of height, and without proper drainage and anchoring, even pressure-treated lumber won't save you from eventual collapse. We've rebuilt dozens of these walls after homeowners learned this lesson the expensive way.
Here's what separates walls that last from walls that lean: proper grading behind the structure, engineered drainage solutions, and anchoring systems that account for lateral soil pressure. Skip any of these three elements and you're not building a retaining wall — you're building a temporary dam that will eventually burst.
How do you build a wood retaining wall on a slope?
To build a wood retaining wall on a slope, excavate into the hillside to create a level base, install drainage behind the wall with gravel and perforated pipe, anchor vertical posts at least 3 feet deep in concrete footings, and use horizontal boards secured with galvanized hardware. Walls over 4 feet require engineered plans and building permits in most jurisdictions.
Why Slopes Demand Different Construction Than Flat Ground
The angle of your slope determines everything about wall design. A 15-degree grade exerts roughly half the lateral pressure of a 30-degree slope at the same height. That pressure translates directly into load-bearing capacity requirements for your posts, footer depth, and anchoring method.
Pressure-treated lumber rated for ground contact is non-negotiable. Anything less will decompose within three years when buried. Look for wood stamped "UC4B" or higher — that's the treatment specification for soil contact in critical structural applications. Cedar and redwood resist rot naturally but lack the structural strength for walls exceeding 2 feet in height.
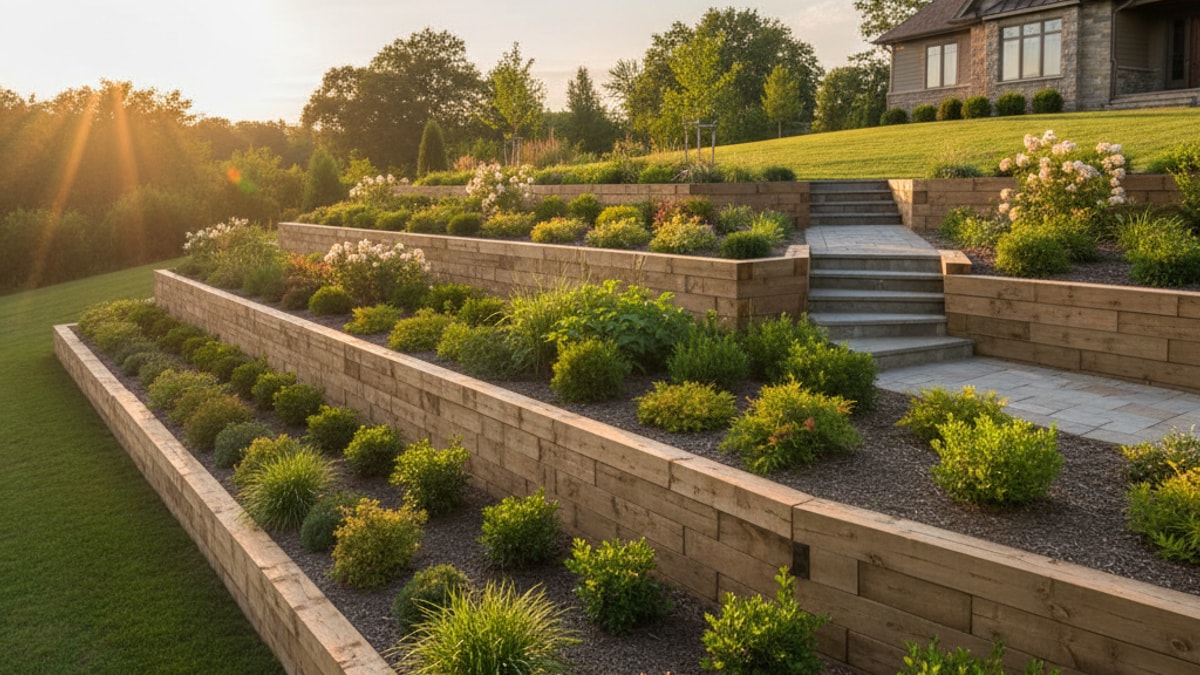
Slope construction requires cutting into the hillside rather than stacking against it. You're creating a terrace, not a barrier. This means excavation work before a single post goes in. The back of your wall should sit against undisturbed soil — never against fill dirt, which compresses unevenly and creates point-load failures.
Material Specification and Load-Bearing Requirements
For walls up to 3 feet tall, use 6x6 posts spaced no more than 6 feet apart. Between 3 and 4 feet, upgrade to 8x8 posts at 4-foot intervals. Anything taller requires engineering drawings and typically transitions to alternative materials like concrete block or steel-reinforced systems.
Horizontal boards can be 2x6, 2x8, or 2x10 pressure-treated lumber depending on wall height and span between posts. Thicker boards reduce flexing under lateral soil pressure. Each board should be secured with two 3-inch galvanized or stainless steel screws at every post — nails work loose over time as wood expands and contracts.
Gravel for drainage must be crushed angular rock, not rounded river stone. Angular gravel locks together and won't shift. You'll need 12 to 18 inches of depth behind the entire wall, running from footer to top. Perforated drainage pipe — 4-inch diameter minimum — sits at the base of this gravel layer and exits downslope at both ends.
| Wall Height |
Post Size |
Post Spacing |
Footer Depth |
Gravel Depth Behind Wall |
Drainage Pipe Required |
| Up to 2 feet |
4x4 treated |
8 feet maximum |
24 inches minimum |
12 inches |
Recommended |
| 2 to 3 feet |
6x6 treated |
6 feet maximum |
30 inches minimum |
12 to 15 inches |
Mandatory |
| 3 to 4 feet |
8x8 treated |
4 feet maximum |
36 inches minimum |
15 to 18 inches |
Mandatory |
| Over 4 feet |
Engineered spec |
Engineered spec |
Engineered depth |
Engineered system |
Engineered system |
Site Assessment and Installation Method Step-by-Step
Start by marking your wall line with stakes and string. Use a line level to establish the finished height at multiple points — slopes rarely run uniformly, and you'll need to account for grade changes along the wall's length. Measure the slope angle with a digital level if you're uncertain whether you're dealing with a minor grade or something requiring engineered plans.
Excavate the hillside in a stepped pattern if the slope exceeds 20 degrees. You're creating a shelf for the wall to sit on, with the back edge sitting against solid earth and the front edge level. Dig post holes at your predetermined spacing using a post-hole digger or auger. Each hole should be 8 to 12 inches wider than the post dimension and extend below the frost line for your region — this prevents heaving during freeze-thaw cycles.
Set posts in concrete footings, not compacted soil. Mix an 80-pound bag of concrete per post for 4x4s, two bags for 6x6s, and three bags for 8x8s. Pour 6 inches of concrete at the bottom of each hole, set the post plumb using a level on two adjacent faces, then fill the remaining hole volume. Brace each post temporarily with scrap lumber until concrete cures — 48 hours minimum before attaching horizontal boards.
Here's the honest answer: most DIY builders skip the drainage layer because they don't see water accumulation during dry-weather construction. That's exactly when failure begins. Soil behind a retaining wall holds moisture year-round, and when it saturates during storms, hydrostatic pressure can exceed 60 pounds per square foot. No amount of structural lumber withstands that without drainage relief.
Once posts are set and cured, install your first horizontal board at ground level. This board must be perfectly level along its length — use shims beneath it if necessary. Subsequent boards stack upward with each course checked for level. Leave 1/4-inch gaps between boards for drainage weepage — water needs escape routes or it builds pressure.
Backfill behind the wall in layers. Place landscape fabric against the back of the boards first — this prevents soil from migrating into the gravel drainage layer and clogging it. Add 6 inches of gravel, compact lightly, then another 6 inches. Install perforated drainage pipe on top of the first gravel layer with holes facing down. The pipe should slope at least 1/4 inch per foot toward its outlet points.
Finish the gravel layer to within 6 inches of the top of the wall, then cap with topsoil. This creates a planting zone for erosion control. Groundcover plants with shallow root systems work best — deep roots can eventually compromise drainage layers.
Drainage Solutions That Prevent Hydrostatic Failure
Perforated pipe alone isn't sufficient drainage for slopes steeper than 25 degrees. Add weep holes through the lowest horizontal board every 4 to 6 feet. Drill 1-inch diameter holes angled slightly downward through the board face, then insert short sections of PVC pipe to keep soil from plugging the opening.
The drainage pipe outlet must daylight downslope where water can disperse without pooling. If your wall runs across a slope rather than perpendicular to it, you may need multiple outlet points. Water trapped at a dead-end will back up and saturate the soil behind your wall.
Some situations demand French drains running parallel to the wall 2 to 3 feet behind it. This captures water before it reaches the retaining structure. The French drain trench should be 12 inches wide, 18 to 24 inches deep, lined with landscape fabric, filled with gravel, and contain its own perforated pipe leading to a separate outlet.
Key Takeaways
- Walls exceeding 4 feet in height require engineered plans and building permits in nearly all jurisdictions — attempting these without professional drawings risks structural failure and code violations.
- Hydrostatic pressure from saturated soil generates more lateral force than the soil's dry weight — drainage systems aren't optional, they're structural necessities.
- Post footings must extend below the frost line depth for your region, typically 30 to 42 inches, to prevent seasonal heaving that destabilizes the entire wall.
- Pressure-treated lumber rated UC4B or higher is the minimum specification for ground-contact applications — lower ratings decompose within 36 months when buried.
- Angular crushed gravel placed 12 to 18 inches deep behind the wall prevents soil migration and maintains drainage pathways that rounded stone cannot provide.
What If: Wood Retaining Wall Scenarios
What If the Slope Is Too Steep for a Single-Tier Wall?
Build terraced walls instead of one tall structure. Multiple 2 to 3-foot walls stepped into the hillside distribute pressure and reduce engineering complexity. Space each tier at least 6 feet apart horizontally — closer spacing causes the upper wall to load the lower wall, defeating the purpose of terracing.
What If You Hit Rock During Post Hole Excavation?
Shallow bedrock within 24 inches of grade changes your approach entirely. You can't achieve proper footer depth, so you'll need to drill into the rock and epoxy rebar anchors, then form concrete footings around them. This requires specialized equipment and usually means calling professionals. Alternatively, switch to a deadman anchor system where horizontal timbers extend back into the hillside perpendicular to the wall face, transferring load into stable soil or rock layers.
What If Local Building Codes Prohibit Wood Retaining Walls Over a Certain Height?
Many jurisdictions restrict wood walls to 3 or 4 feet maximum due to lifespan and maintenance schedule concerns. Verify local building code requirements before purchasing materials. If your slope requires greater height, you'll need to transition to concrete, stone, or engineered block systems — or build terraced walls as described above.
What If the Wall Needs to Curve to Follow Property Lines?
Curved walls require angled post placement and custom-cut boards. Posts should fan outward from the curve's center point. Horizontal boards won't bend significantly, so you'll need to cut each board at incremental angles to approximate the curve. Tighter radius curves become impractical with standard dimensional lumber — below a 10-foot radius, consider segmented straight sections instead.
What If You Need to Integrate Steps or Access Points?
Plan openings before setting posts. Frame the opening with doubled posts on each side and add a header beam across the top if the wall height exceeds 2 feet. The header transfers load around the opening to the flanking posts. Steps should be built as separate structures anchored independently, not cantilevered from the retaining wall itself.
When Professional Help Justifies the Cost
Let's be direct about this: if your wall exceeds 4 feet, involves unstable soil, sits near a property line, or supports a structure like a driveway or patio, hire licensed professionals. The cost difference between DIY and professional installation narrows considerably when you factor in equipment rental, material waste from mistakes, and the time required to learn proper technique.
We've seen too many homeowners spend $2,000 on materials and 40 hours of labor only to hire us six months later to demolish the failed wall and rebuild it correctly. Professional installation includes site assessment, proper drainage design, code-compliant construction, and a workmanship warranty — typically 2 to 5 years depending on the contractor.
Grade changes exceeding 4 feet usually require geotechnical evaluation before any retaining wall goes in. Soil composition, groundwater levels, and seismic considerations all affect design. Sandy soils drain well but lack cohesion. Clay soils hold water and exert greater lateral pressure. Organic soils compress unpredictably. A geotechnical engineer identifies these factors and specifies appropriate foundation systems.
Certain slopes require tie-backs or soil anchors — cables or rods extending deep into the hillside and tensioned to counteract outward soil pressure. This level of engineering exceeds typical residential DIY capability and enters the domain of licensed contractors with specialized equipment.
Maintenance Schedule and Longevity Expectations
Inspect your wall twice annually — spring after frost heave season and fall before winter. Look for leaning, board separation from posts, and soft spots in the soil behind the wall. Minor lean can sometimes be corrected by adding cross-bracing or installing deadman anchors. Significant lean means structural failure is already underway.
Check drainage outlets after heavy rain. If water isn't flowing from the perforated pipe outlets, the system is clogged. This requires excavating behind the wall to clean or replace the pipe — exactly why proper installation with landscape fabric is critical initially.
Pressure-treated lumber in ground contact lasts 15 to 25 years depending on treatment level and soil conditions. Horizontal boards exposed to sun and weather degrade faster than buried posts. Expect to replace boards before posts in most cases. When boards show significant checking, splitting, or soft spots, replacement becomes necessary before structural failure occurs.
Clear vegetation within 2 feet of the wall face. Tree roots can displace posts and boards. Vines hold moisture against wood surfaces and accelerate decay. Regular trimming extends wall lifespan significantly.
Common Mistakes That Lead to Expensive Failures
Using untreated or incorrectly rated lumber is mistake number one. Standard pressure-treated deck boards aren't rated for ground contact. They'll rot from the inside out within 24 months when buried. The UC4B stamp isn't a suggestion — it's the minimum durability specification.
Skipping concrete footings and setting posts directly in compacted soil is mistake number two. Posts shift under lateral pressure without concrete anchoring. What feels solid during installation becomes loose within one freeze-thaw cycle.
Backfilling with excavated soil instead of gravel is mistake number three. Native soil compacts against the wall, eliminates drainage pathways, and creates the exact hydrostatic pressure situation that causes failure. The gravel layer is as critical as the posts themselves.
Installing boards tight without drainage gaps traps water behind the wall face. Those 1/4-inch gaps between boards aren't aesthetic — they're functional weep points that relieve pressure.
Building during wet weather is mistake number five. Excavated slopes become unstable when saturated. Post holes fill with water, preventing proper concrete curing. Schedule wall construction during dry periods when soil conditions are stable and workable.
Related Services
Retaining walls often integrate with broader landscape transformations. Our Seat Retaining Walls service combines structural slope management with functional outdoor seating — especially effective for terraced yards where multiple wall tiers create natural gathering zones.
Proper Landscape Lighting transforms retaining walls from purely functional elements into design features after dark. Low-voltage LED fixtures mounted at post caps or aimed upward from the base create dramatic shadows and highlight the texture of natural wood grain.
Sloped properties benefit tremendously from comprehensive Landscape Design that addresses drainage, erosion control, and usable space creation as integrated systems rather than isolated projects. What appears to be a simple retaining wall question often reveals opportunities for terraced patios, rain gardens, or multi-level outdoor living zones.
If your project involves creating level areas for specific features, consider how Artificial Turf performs on terraced slopes — modern systems drain efficiently and eliminate the erosion problems natural grass suffers on graded surfaces.
The timeline for professional installation varies with wall length and complexity, but most residential retaining walls between 2 and 4 feet tall can be completed within one week — that includes excavation, drainage installation, structural construction, and backfilling. Your project timeline should account for permit approval if required, material delivery lead times, and weather delays.
Don't underestimate the curb appeal impact of a well-executed retaining wall. Before-and-after transformations show that properly terraced slopes increase usable yard space by 30 to 50 percent while creating visual interest that flat lots lack. The ROI on home improvement projects that expand functional outdoor space consistently outperforms cosmetic upgrades.
If the wall's purpose includes creating a level foundation for future hardscaping — patios, outdoor kitchens, or fire features — coordinate that planning now. Our Patio Covers Pergolas and Fire Features projects regularly begin with retaining wall construction to establish the necessary grade.
Slope stabilization isn't just about holding soil in place. Done correctly, it transforms unusable hillside into terraced garden beds, multi-level entertainment zones, and outdoor rooms with views that flat properties can't match. The investment in proper construction — whether DIY or professional — pays dividends in usability and property value for decades.
If you're uncertain whether your slope demands professional assessment, reach out through our Contact page. We offer site consultations that evaluate grade, soil conditions, drainage requirements, and permit implications before you commit to a construction method. Sometimes the most valuable thing we provide is clarity about which projects suit DIY execution and which justify professional installation from the start.


.webp)
.webp)