Let's be honest. That narrow strip of concrete or asphalt the builder originally installed just isn't cutting it anymore. You're juggling cars, your teenager just started driving, or you're simply tired of the daily parking puzzle. The question of how to widen a driveway isn't just about convenience; it's about reclaiming your home's functionality and boosting its curb appeal for 2026 and beyond. It’s a project that feels straightforward on the surface, but the devil, as our team has learned over decades of landscape construction, is always in the details.
We've seen it all—the ambitious DIY projects that end in drainage nightmares and the poorly planned expansions that crack and heave after one season. This isn't just about pouring more concrete. It's a nuanced process involving regulations, material science, and expert site preparation. That’s why we put together this definitive guide. We want to pull back the curtain on the professional process of how to widen a driveway, giving you the insights we use every day to create beautiful, durable, and functional outdoor spaces for homeowners.
Is Widening Your Driveway Even a Good Idea?
Before you start digging, it’s worth asking if this project is the right move. For most homeowners, the answer is a resounding yes, but let's weigh the pros and cons. The primary benefit is obvious: more space. No more street parking, no more shuffling cars around. It provides safe, off-street parking for family members and guests, which is a significant quality-of-life improvement. A thoughtfully executed driveway expansion also dramatically enhances your home's curb appeal. It creates a more stately, welcoming entrance. This isn't just about looks; it directly translates to increased property value. A home with ample, attractive parking is simply more desirable on the market. That's a fact.
Of course, there are considerations. The cost is the most significant factor. This is a real construction project, involving materials, labor, and potentially heavy equipment. You'll also lose some of your yard's green space, which might be a concern if you have a smaller lot. Then there's the potential for bureaucratic headaches. Almost every project involving how to widen a driveway will require some level of permitting and adherence to local zoning codes. Our experience shows that navigating these regulations can be one of the most challenging parts of the process for homeowners. You have to consider the total investment—not just in money, but in time and effort. For many, the long-term functional and aesthetic gains far outweigh these initial hurdles.
The Critical First Step: Planning and Permits
We can't stress this enough: do not move a single shovel of dirt until you have a rock-solid plan. This is the phase where projects succeed or fail spectacularly. The very first thing you need to do when considering how to widen a driveway is to investigate your local municipal codes and homeowner association (HOA) rules. There are almost always regulations governing impervious surface coverage (how much of your lot can be covered by non-porous material), setbacks (how close you can build to your property lines), and driveway apron requirements. Ignoring these can lead to fines and, in the worst-case scenario, being forced to tear out your brand-new driveway. Catastrophic.
Your next call should be to 811, the national call-before-you-dig number. They will mark the location of all underground utility lines—gas, water, electric, and communications. Accidentally hitting one of these lines is incredibly dangerous and monumentally expensive. You also need a precise understanding of your property lines. A property survey is often the best way to confirm this. You absolutely do not want to accidentally build on your neighbor's property. That’s a dispute nobody wants to have. This is where professional planning really proves its worth. A comprehensive site analysis, which is a core component of our Landscape Design SAN Diego service, documents all these critical elements—from easements to utility locations—creating a blueprint for success. This initial planning is the non-negotiable foundation for the entire project.
Choosing Your Weapon: Driveway Materials Breakdown
Once the planning is handled, the fun part begins: choosing your materials. The surface you choose impacts cost, durability, maintenance, and the overall aesthetic. The question of how to widen a driveway is deeply connected to what you use to widen it. As of 2026, homeowners have some fantastic options that blend performance with style.
Poured Concrete: This is the classic, go-to choice for a reason. It's incredibly durable, long-lasting, and offers a clean, modern look. The cost is generally moderate, and when installed correctly, it can last for decades with minimal maintenance. However, concrete can be prone to cracking over time, especially with freeze-thaw cycles, and it can stain from oil and other leaks. We often use specialized reinforcements and control joints to mitigate cracking, a critical step that's part of our professional Concrete SAN Diego installations.
Interlocking Pavers: This is where curb appeal truly comes to life. Pavers offer a sprawling range of colors, shapes, and textures, allowing for completely custom designs—from herringbone patterns to intricate inlays. They are immensely strong, and a key advantage is repairability. If a few pavers get damaged or stained, you can simply lift them out and replace them. It's a simple fix. Permeable paver options are also an excellent solution for managing stormwater runoff, which is an increasingly important consideration. While the upfront cost for high-quality Pavers SAN Diego can be higher than concrete, their longevity and aesthetic value often provide a superior long-term return on investment.
Asphalt: Often seen as a budget-friendly option, asphalt is flexible and less prone to cracking than concrete. It's a popular choice in colder climates for this reason. However, it requires significant maintenance. It needs to be sealed every few years to prevent deterioration and can get extremely hot in the summer. Aesthetically, it offers a very basic, uniform black look that doesn't provide the design versatility of pavers or even stamped concrete.
Gravel or Crushed Stone: This is by far the most affordable option and provides excellent drainage. It's a good choice for a rustic look or for very long driveways where paving would be prohibitively expensive. The downside is the relentless maintenance. Gravel shifts, gets kicked into the yard, and needs to be raked and replenished regularly. Weeds can also become a formidable issue. It's a functional solution, but not a low-maintenance one.
Here’s a quick comparison our team put together to help visualize the options:
| Feature |
Poured Concrete |
Interlocking Pavers |
Gravel / Crushed Stone |
| Avg. Cost (2026) |
$8 - $18 per sq. ft. |
$12 - $30+ per sq. ft. |
$2 - $5 per sq. ft. |
| Durability |
Very High (25-40 years) |
Extremely High (40-60+ years) |
Low (requires regular top-ups) |
| Maintenance |
Low (occasional sealing) |
Low (spot repairs are easy) |
High (raking, weeding, refilling) |
| Aesthetics |
Clean, Modern |
Highly Customizable, Elegant |
Rustic, Casual |
| Repairs |
Difficult (patching is obvious) |
Easy (replace individual units) |
Easy (add more stone) |
How to Widen a Driveway: The Step-by-Step Process
Alright, you've done your planning and selected your material. Now, let's get into the nitty-gritty of the construction itself. Understanding how to widen a driveway from a construction standpoint demystifies the process and helps you appreciate why professional execution matters so much.
Step 1: Mark, Measure, and Excavate
The first physical step is to precisely mark out the new driveway extension area using stakes and string lines. Once the layout is confirmed, the excavation begins. This involves removing all topsoil, grass, and any existing landscaping in the expansion area. You need to dig down to a specific depth—typically 8 to 12 inches below the final grade—to accommodate the new base material and the surface material. It’s absolutely critical that the excavated area has a slight, consistent slope away from your home's foundation to ensure proper drainage. A slope of at least 1/4 inch per foot is standard. This is not a step to eyeball. It demands precision.
Step 2: Build and Compact the Sub-Base
This is the most important step for the longevity of your driveway. We can't say it enough. A solid foundation is everything. The excavated area is filled with a layer of crushed aggregate (gravel). This sub-base material is spread in layers, with each layer being thoroughly compacted using a heavy plate compactor. A typical base is 4 to 8 inches thick, depending on soil conditions and the expected vehicle load. Skimping here—by not going deep enough or by failing to compact the material properly—is the number one cause of future sinking, heaving, and failure. This is where professional-grade equipment makes a monumental difference.
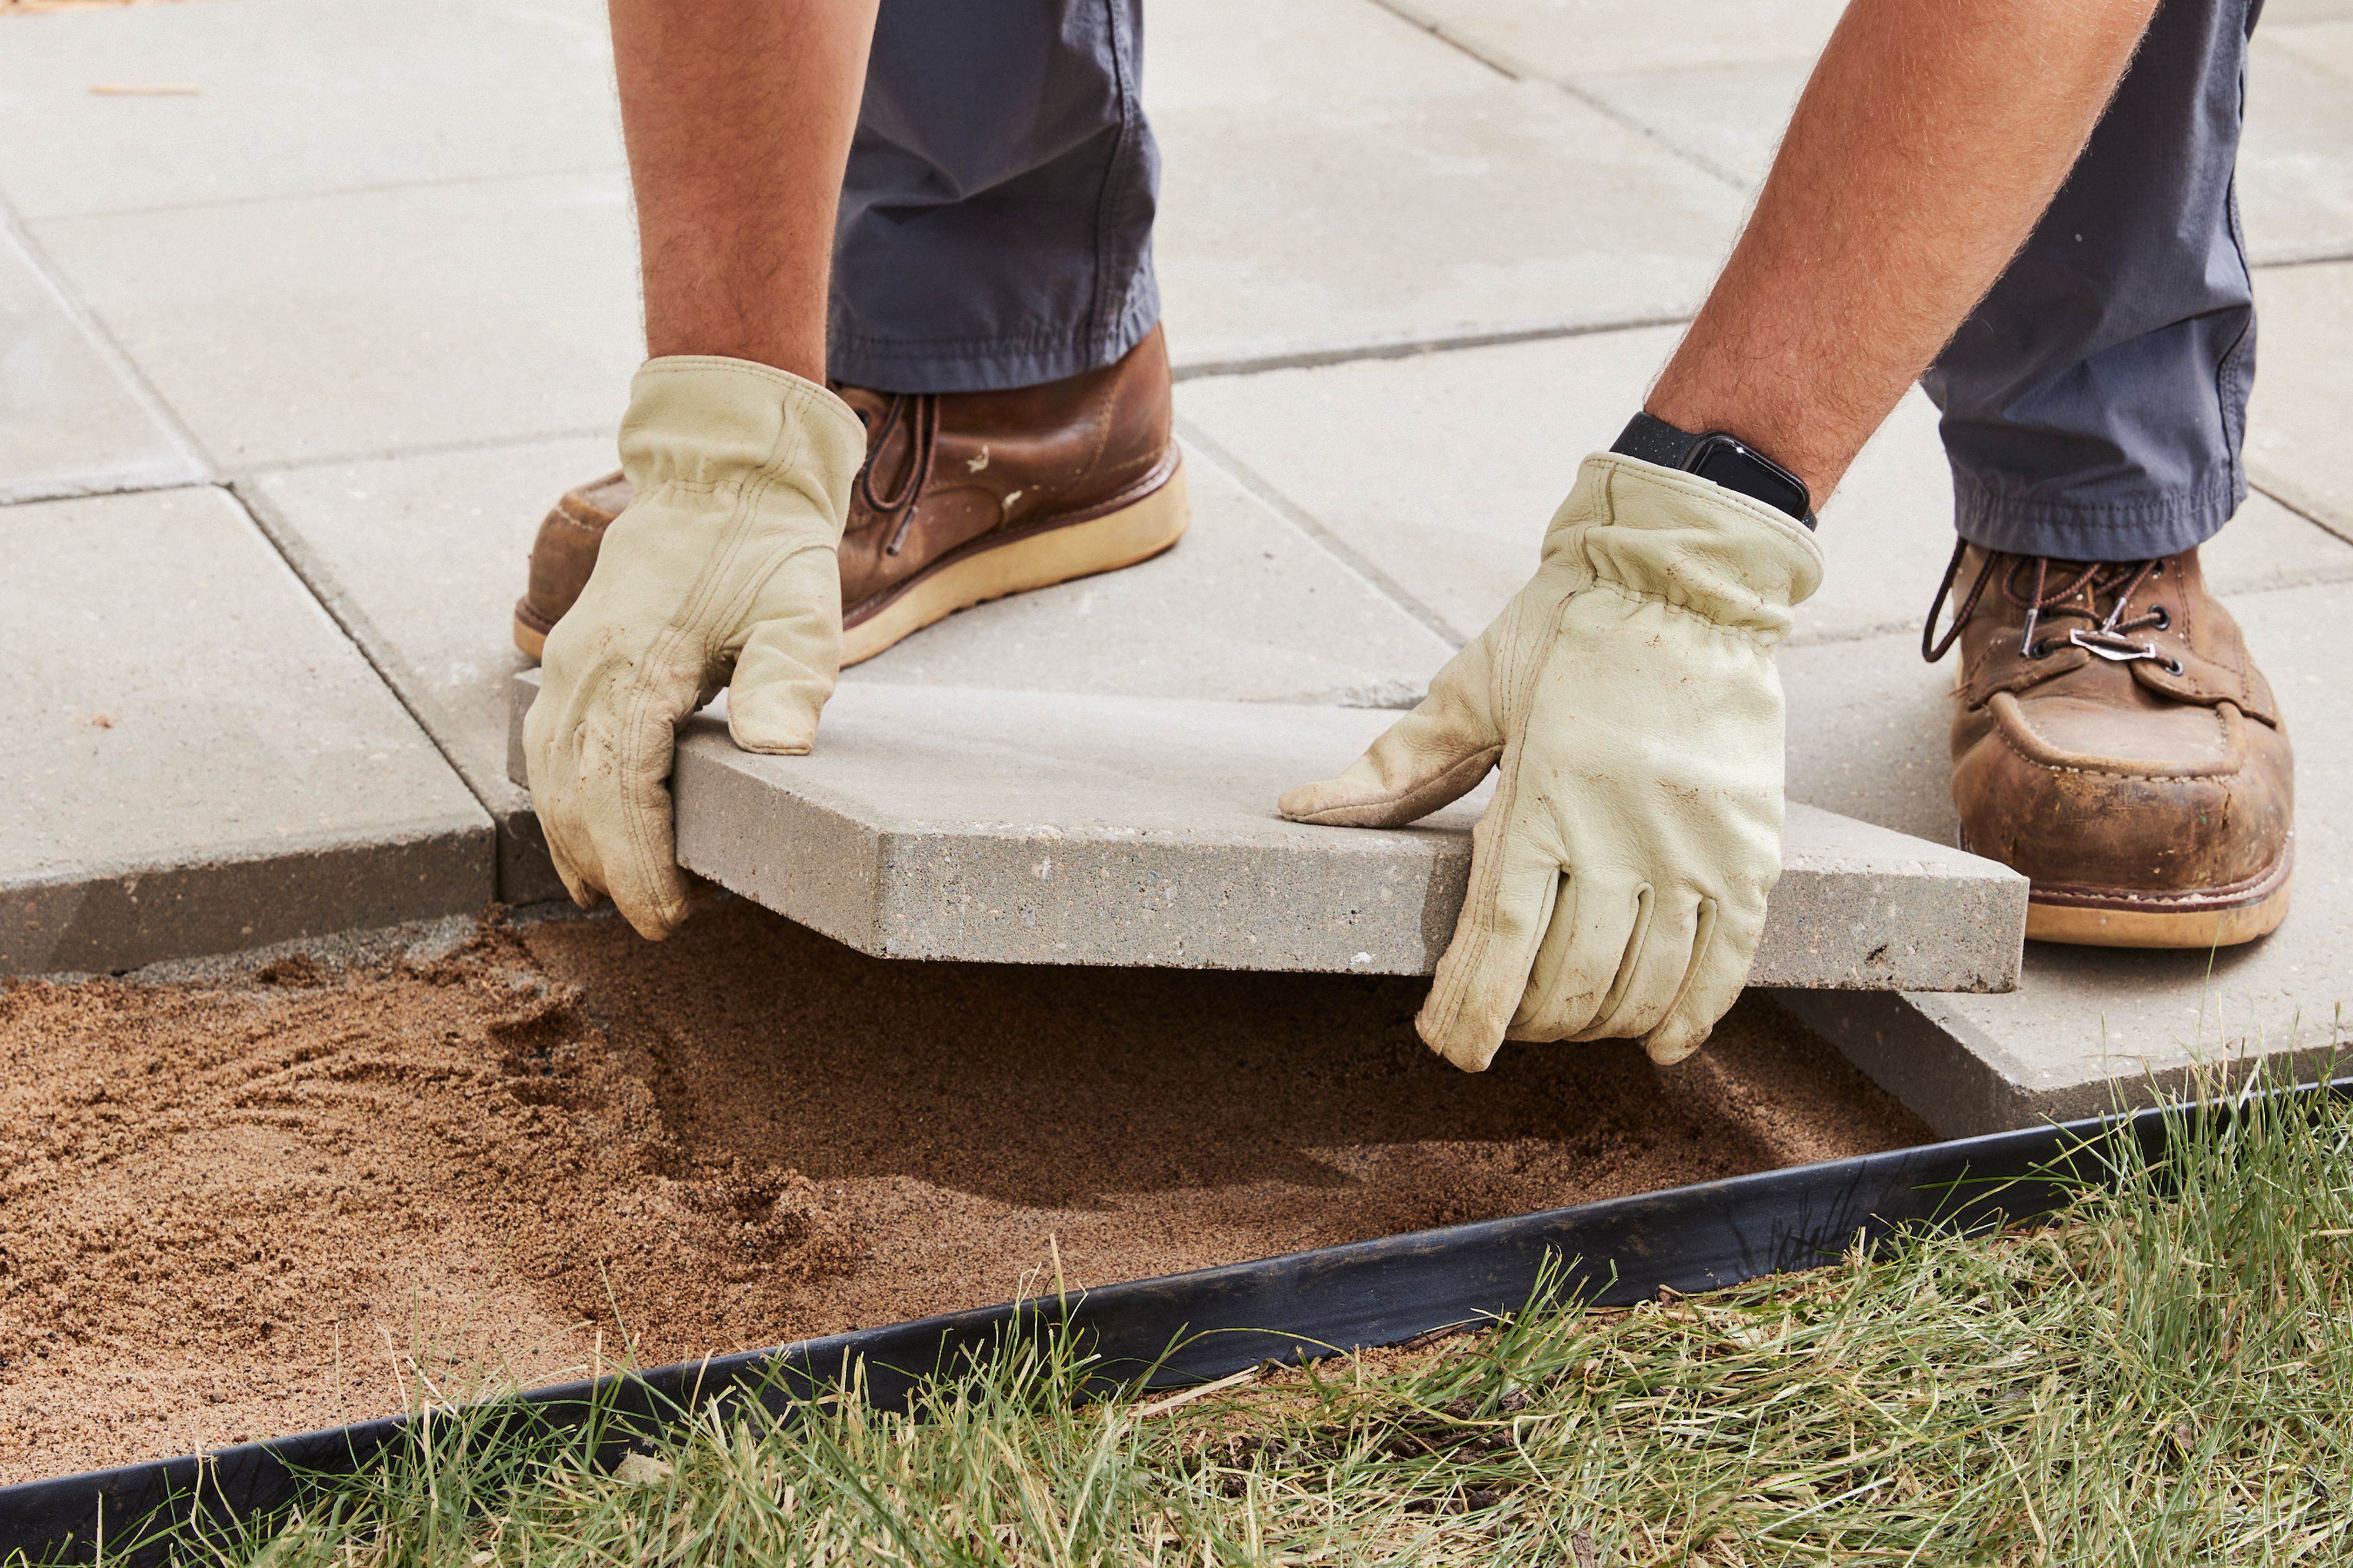
Step 3: Install Edging and Surface Material
For pavers, a restraining edge is installed around the perimeter to hold them in place. This is often made of plastic, metal, or a concrete curb. A thin layer of sand is then spread and screeded to create a perfectly level bed for the pavers. The pavers are then laid in the desired pattern. For a concrete extension, wooden or metal forms are built around the perimeter to hold the wet concrete. Reinforcing steel mesh (rebar) is placed within the forms to add tensile strength and prevent cracking. Then, the concrete is poured, spread, and smoothed.
Step 4: The Finishing Touches
Once the primary surface is installed, the job isn't quite done. For a paver driveway, fine sand is swept into the joints between the pavers. This 'jointing sand' locks them together, creating a strong, interconnected surface. The entire area is then compacted one last time to settle the pavers firmly into the sand bed. For concrete, this is the stage where a finish is applied (like a broom finish for texture) and control joints are cut into the surface to manage inevitable cracking. The concrete must then cure, a process that takes several days to a week before it can handle foot traffic, and up to a month for its full strength to bear the weight of vehicles.
Step 5: Seamless Landscape Integration
A widened driveway doesn't exist in a vacuum; it has to merge with the rest of your landscape. How you finish the edges is crucial for a professional look. You might backfill with topsoil and plant grass right up to the edge. A more elegant solution we often recommend is installing a mowing strip or a decorative border. For properties on a slope, the excavation for the driveway might necessitate a small retaining wall to manage the grade change. This can be turned into a beautiful design element, like our integrated Seat Retaining Walls, that adds both function and style. You should also consider how the new, larger paved surface affects your home's nighttime appearance and safety. Adding strategic Landscape Lighting SAN Diego along the new edges can create a stunning visual effect and ensure safe navigation. And for a truly low-maintenance border, pairing the new driveway with a crisp edge of Artificial Turf SAN Diego provides a perfect, year-round green without the hassle of mowing right up to the pavement.
DIY vs. Hiring a Pro: An Honest Look
The allure of a DIY project is strong. We get it. The potential for cost savings is tempting. But when it comes to a project like how to widen a driveway, you have to be unflinchingly honest about the scope of work. This isn't a weekend project like building a garden bed. It involves serious earthmoving. You'll need to rent (and know how to operate) heavy equipment like a skid-steer for excavation and a heavy plate compactor for the base. It’s physically grueling, back-breaking work.
Beyond the physical labor, there's the technical expertise. Do you know how to calculate the correct slope for drainage to protect your home's foundation? Are you confident in building a sub-base that won't fail in two years? Do you know the proper techniques for screeding sand or finishing concrete? A mistake in any of these areas can lead to a result that not only looks amateurish but also fails structurally, costing you far more in the long run to fix. Frankly, the complexity of how to widen a driveway correctly puts it outside the scope of most DIY enthusiasts. If reading through the steps above felt overwhelming, it’s because the process is genuinely demanding. This is a perfect time to BOOK MY FREE CONSULTATION with our team. We can walk you through the options and provide a clear picture of what a professional installation entails, saving you the immense headache and risk of a failed DIY attempt.
Common Mistakes We See (And How to Avoid Them)
Over the years, our team has been called in to repair or completely redo countless driveway expansions gone wrong. These experiences give us a unique insight into the common pitfalls. Here are the biggest mistakes you need to avoid when planning how to widen a driveway.
Ignoring Drainage: This is the cardinal sin of any paving project. Water is the enemy. A driveway that pools water or, even worse, directs it toward your house foundation is a catastrophic failure. Proper grading from the very beginning of excavation is non-negotiable.
Skimping on the Base: We've already said it, but it bears repeating. A shallow or poorly compacted base is a guarantee that your driveway will sink, develop ruts, and heave. The surface material is only as good as the foundation it's built on. We recommend a minimum of 4-6 inches of compacted aggregate, and often more for clay-heavy soils.
Creating an Ugly Seam: When you're adding to an existing driveway, how you manage the joint between the old and new sections is critical. Simply pouring new concrete next to old concrete will almost always result in a conspicuous, ugly crack. A better approach is to cut a clean, straight edge on the existing driveway. An even better one, which we often suggest, is to introduce a decorative border of contrasting pavers between the two sections. This turns a potential eyesore into a deliberate, beautiful design feature.
Mismatched Aesthetics: Your driveway is a dominant feature of your home's facade. The expansion shouldn't look like an afterthought. The new section needs to complement the existing driveway and your home's overall architectural style. This involves carefully selecting materials, colors, and textures that create a cohesive, unified look. This is another area where professional design input can make a world of difference in the final outcome.
Embarking on a project to widen your driveway is a substantial undertaking, but it's one that pays dividends in daily convenience and long-term property value. The key is to approach it with careful planning, a respect for the technical requirements, and an eye for design. Whether you choose the durability of concrete or the endless design possibilities of pavers, getting the foundation right is the secret to a beautiful, lasting result. By understanding the full scope of how to widen a driveway, you're empowered to make the best decisions for your home, ensuring your new, expanded entrance is a source of pride for years to come.


.webp)
.webp)