Building a retaining wall with landscape ties can be one of the most rewarding and impactful improvements you make to your outdoor space. It's a project that, when done correctly, doesn't just manage soil erosion or level a sloped yard; it truly transforms the aesthetic and functionality of your property. Our team understands this intimately; we've seen firsthand the significant, sometimes dramatic shift a well-designed and expertly constructed retaining wall can bring to a landscape.
For homeowners contemplating how to build a retaining wall with landscape ties in 2026, the sheer volume of information out there can be a little overwhelming, frankly. That's where our collective expertise at Modern Yardz comes in. We've spent years honing our craft, refining our techniques, and mastering the nuances of creating durable, beautiful outdoor features. We're here to provide clarity, sharing the knowledge we've gained through countless projects, ensuring you have a definitive resource for tackling this important endeavor.
Why Choose Landscape Ties for Your Retaining Wall?
It's a valid question, right? When considering how to build a retaining wall, you've got options: natural stone, concrete blocks, even gabion cages. But landscape ties, often made from treated lumber, offer a distinct set of advantages that make them a compelling choice for many homeowners. They're typically more cost-effective than natural stone, and their uniform dimensions make them significantly easier to work with than irregular materials, which can save a substantial amount of time and effort during installation. This is crucial for DIY enthusiasts, but even for our professional crews, efficiency matters.
Beyond the practicality, landscape ties lend a warm, rustic, and natural aesthetic that many people adore. They blend seamlessly into a garden setting, creating a visual continuity that complements existing greenery. Our experience shows that for many clients, this organic look is a primary driver. Plus, they're incredibly versatile, allowing for curved designs or tiered structures that might be more challenging with other materials. We've used them to create everything from subtle garden borders to substantial, multi-level terraces, showcasing their adaptability. Knowing how to build a retaining wall with landscape ties effectively unlocks a world of design possibilities for your yard.
Planning Your Project: The Blueprint for Success
Before you even think about lifting a landscape tie, meticulous planning is paramount. Seriously, we can't stress this enough. A well-thought-out plan is the critical, non-negotiable element that separates a stable, long-lasting retaining wall from one that will fail prematurely. This initial phase involves several key considerations, and honestly, this is where we see many DIY projects falter without proper guidance. Our team, for example, dedicates significant time to Landscape Design because it dictates the entire project's success.
First, assess your site's topography. What's the slope like? Where does water naturally flow? Understanding these dynamics is fundamental to designing an effective wall and, crucially, its drainage system. Then, there's the height. For walls over a certain height (often 3-4 feet, depending on local regulations), you'll likely need engineering plans and permits. This isn't just bureaucratic red tape; it's about safety and structural integrity. Our professional observation is that ignoring these requirements can lead to catastrophic failure, not to mention legal headaches. Always check with your local planning department before you commit to any significant construction. We mean this sincerely: it runs on genuine connections and proper compliance.
Consider the wall's purpose. Is it purely aesthetic, defining a garden bed, or is it holding back a significant amount of earth? The latter requires a much more robust design. We often integrate retaining walls with other features, like Fire Features or outdoor seating, which impacts the wall's design and structural requirements. Sketch out your design, measure everything precisely, and calculate the materials you'll need. Err on the side of over-estimating slightly; it's always better to have a few extra ties than to run short mid-project. Our Standard Design Package is a great starting point for those who want professional planning without the full build commitment, laying out exactly how to build a retaining wall with landscape ties that meets your vision and the site's demands.
Essential Tools and Materials: Gearing Up for the Build
Having the right tools isn't just about making the job easier; it's about making it possible and ensuring a professional finish. We've compiled a list of what you'll absolutely need to know when considering how to build a retaining wall with landscape ties. Don't skimp on quality here; reliable tools are an investment that pays dividends in efficiency and frustration avoidance. Also, remember safety gear – gloves, eye protection, and sturdy footwear are non-negotiable.
Here's a quick rundown of the essentials:
| Category |
Essential Tools |
Key Materials |
| Measuring/Layout |
Measuring tape, string line, stakes, level (long) |
Marking paint, grade stakes |
| Digging/Grading |
Shovel, digging bar, pickaxe, tamper (manual/plate) |
Gravel (drainage), sand (leveling) |
| Cutting |
Circular saw (with appropriate blade), miter saw |
Landscape ties (treated lumber), rebar/spikes |
| Fastening |
Drill, hammer, impact driver |
Construction adhesive (landscape block adhesive) |
| Safety |
Gloves, eye protection, ear protection |
|
Regarding materials, the landscape ties themselves are obviously critical. We recommend using pressure-treated lumber rated for ground contact. This ensures longevity against rot and insect damage, which is vital for any outdoor structure, especially one retaining soil. You'll also need plenty of gravel for the drainage trench, and coarse sand or paver base for the leveling pad. Don't forget rebar or heavy-duty landscape spikes for securing the ties, and a high-quality construction adhesive formulated for landscape materials. Our professional observation is that combining mechanical fasteners with adhesive creates a formidable, unyielding bond.
Site Preparation: The Unsung Hero of Wall Stability
This step is where the rubber meets the road, or more accurately, where the base meets the earth. Properly preparing your site is the absolute bedrock of a stable retaining wall. Ignore this, and you're essentially building on quicksand. Our team consistently emphasizes that inadequate site prep is the primary culprit behind prematurely failing walls. Honestly, though, it's not the most glamorous part of the job, but it's arguably the most important when learning how to build a retaining wall with landscape ties.
Begin by clearing the area. Remove all vegetation, rocks, and debris. You need a clean slate. Then, excavate a trench for your first course of landscape ties. This trench needs to be wide enough to accommodate the ties plus your drainage gravel, and deep enough so that at least one-third of the first course is below grade. For higher walls, you might even bury the entire first course. The goal here is stability; embedding the base helps prevent the wall from shifting or toppling forward under the immense pressure of retained soil.
Once your trench is dug, it's time to create a level, compact base. Lay down a few inches of compacted gravel, followed by a layer of coarse sand or paver base. This leveling pad is absolutely crucial. Use a long level and a straightedge to ensure it's perfectly level from side to side and front to back. We often use a plate compactor for this step; it ensures maximum compaction, which is essential. Simple, right? But the difference between a meticulously leveled base and a hastily prepared one is often the difference between a wall that stands for decades and one that starts to lean within a few years. This foundational work truly sets the stage for how to build a retaining wall with landscape ties that will endure the elements and the test of time.
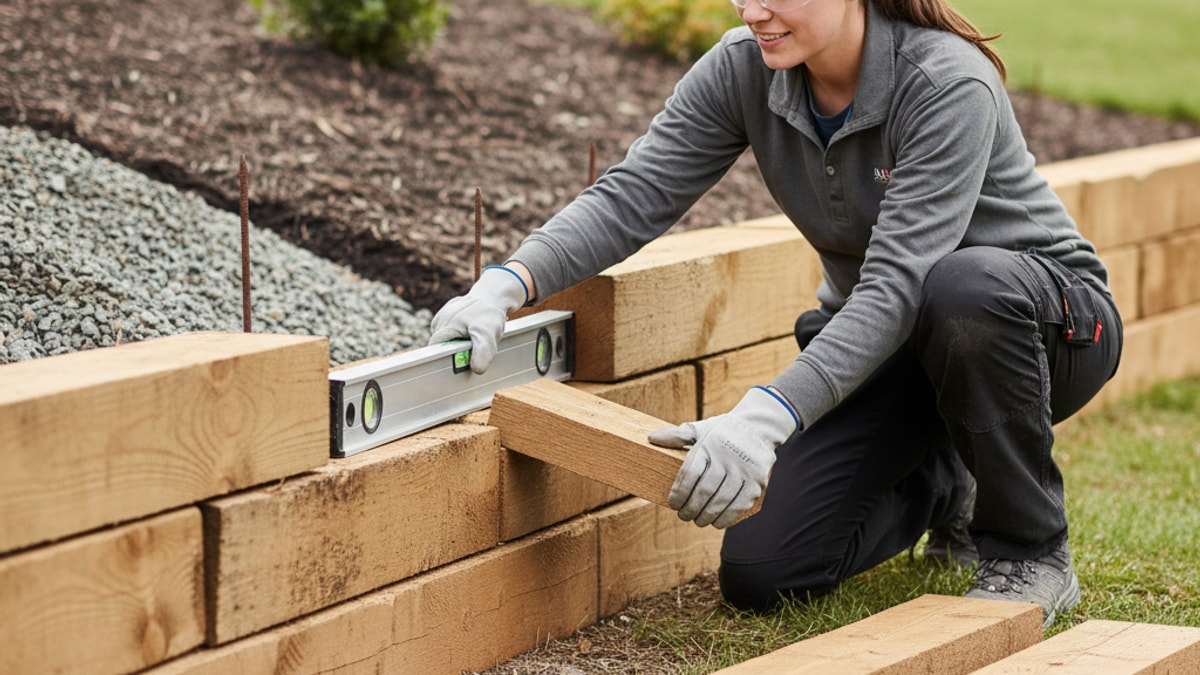
Laying the First Course: Precision is Power
With your base prepared, it's time to start laying those landscape ties. This first course is incredibly important because it sets the alignment and level for the entire wall. Get this wrong, and every subsequent course will compound the error. Our approach, which we've refined over years, delivers real results because we never rush this stage. We've seen it work.
Start at one end and lay your first tie directly on your prepared leveling pad. Check it with your level, both lengthwise and widthwise. Make any necessary adjustments by adding or removing sand beneath it. Once it's perfect, lay the next tie, ensuring it's level with the first and tightly butted against it. Continue this process along the entire length of your wall. For walls that will experience significant pressure, we recommend burying the first course entirely, or at least two-thirds of it, below the final grade. This acts as a formidable anchor against forward movement. Understanding this foundational step is key to mastering how to build a retaining wall with landscape ties that are truly robust.
Once the first course is laid and perfectly level, secure each tie. You can use long landscape spikes (10-12 inches) driven through pre-drilled pilot holes, or rebar. For really substantial walls, rebar driven deep into the ground through multiple courses offers superior anchoring. Our team often uses a combination of rebar and construction adhesive for maximum stability, particularly for higher Seat Retaining Walls that might also serve as garden seating. This creates a monolithic structure that's incredibly resistant to movement. Remember, the stronger the foundation, the more resilient your wall will be.
Stacking Subsequent Courses: Building Up and Back
Now for the satisfying part: watching your wall take shape! As you stack subsequent courses, there are a few critical principles to follow to ensure structural integrity. This isn't just about piling ties; it's about creating a strong, interconnected system. This nuanced approach is what allows us to deliver exceptional outdoor spaces.
First, always stagger your joints. Never stack ties directly on top of each other with vertical seams aligning. This creates weak points. Think of it like bricklaying; you want an offset pattern, distributing the load and creating a stronger bond. Our team often alternates between full ties and half ties to achieve this effective staggering. Second, and this is truly crucial for stability, set each subsequent course back slightly from the one below it. This is called 'battering' or 'setting back the wall.' A common recommendation is a 1/2 to 1-inch setback for every foot of wall height. This slight lean into the retained soil helps the wall resist the outward pressure, significantly improving its long-term stability. It's a subtle detail that makes a profound difference when you consider how to build a retaining wall with landscape ties that truly last.
As you lay each course, apply a generous bead of construction adhesive along the top of the ties below before placing the next layer. This adhesive acts as a powerful bond, preventing individual ties from shifting or separating over time. Additionally, for walls taller than 2-3 feet, we strongly recommend securing each course to the one below with landscape spikes or rebar, driving them through two courses at once. This mechanical fastening, combined with the adhesive, creates a remarkably strong, unified structure. Our Premium Design Package includes detailed construction drawings that specify these exact fastening patterns for optimal stability.
Integrating Drainage: The Lifeblood of Your Retaining Wall
Without proper drainage, even the most robust retaining wall is doomed to fail. Water is the relentless enemy of any retaining structure. It builds up hydrostatic pressure behind the wall, pushing it outward, and can also lead to soil erosion behind the wall and premature rot of the landscape ties. Our professional observation is that inadequate drainage is a recurring theme in wall failures. This is not just important; it's absolutely non-negotiable for longevity. This is critical for knowing how to build a retaining wall with landscape ties that stand the test of time.
As you build up your wall, you'll need to create a drainage system directly behind it. This typically involves a perforated drainpipe (often called a 'French drain') laid at the base of the wall, behind the first course. The pipe should be sloped gently towards one or both ends of the wall, directing water away from the structure. Cover the drainpipe with a layer of gravel, then continue to backfill behind the wall with coarse gravel or crushed stone. This creates a permeable zone that allows water to percolate down to the drainpipe instead of saturating the soil directly behind the wall.
To prevent soil and silt from clogging your drainpipe and gravel backfill, wrap the drainpipe in a filter fabric before covering it with gravel. You can also line the back of the wall with filter fabric, extending it up the height of the wall before backfilling with gravel. This fabric allows water to pass through but keeps fine soil particles out, ensuring your drainage system remains effective for years to come. We can't stress this enough: a well-executed drainage system is an investment in your wall's future, safeguarding against the relentless forces of nature. Sometimes, we'll even recommend incorporating Concrete elements for superior water management in certain applications.
Backfilling and Finishing Touches: Bringing it All Together
Once your wall is built to its final height and your drainage system is in place, it's time for backfilling and adding those critical finishing touches. This is where your vision truly comes to life, and the landscape ties seamlessly integrate into your overall outdoor design.
Carefully backfill behind the gravel drainage layer with the excavated soil. Compact the soil in layers, typically 6-8 inches at a time, using a hand tamper or plate compactor. Compacting prevents future settling, which could create depressions in your yard or put uneven pressure on your wall. Be mindful not to apply excessive force directly against the wall during compaction, especially with heavy machinery, as this could shift the ties before the soil behind them is fully stabilized. This methodical approach is essential for how to build a retaining wall with landscape ties that maintains its integrity.
On the front side of the wall, you can now grade the soil up to the level of your first buried course, blending it naturally into the surrounding landscape. This is also the perfect opportunity to consider enhancing your new wall. Perhaps you'd like to integrate Landscape Lighting to highlight its texture at night, or plant some cascading greenery along the top to soften its lines. Our team often helps clients envision these final details, turning a functional structure into a stunning focal point. Ready to Upgrade Your Backyard? These finishing touches are what elevate a good project to an extraordinary one. We've found that these thoughtful additions make all the difference, especially when you're proud of how to build a retaining wall with landscape ties that truly reflects your personal style.
Long-Term Maintenance for Your Landscape Tie Wall
Even the most meticulously constructed retaining wall needs a little love and attention over time. Regular maintenance ensures its longevity and continues to protect your investment. Let's be honest, this is crucial. Our team advises clients that while landscape ties are durable, they're not indestructible, and proactive care can prevent minor issues from becoming major, costly repairs.
Periodically inspect your wall for any signs of shifting, bowing, or deterioration of the ties. Look for loose spikes, cracks in the adhesive, or areas where the soil behind the wall might be settling excessively. Address these issues promptly. Re-drive loose spikes, reapply adhesive if needed, and fill any settled areas with compacted soil. Inspect your drainage system as well; ensure the outflow is clear of debris and functioning properly. A clogged drain can quickly lead to water buildup behind the wall, which is exactly what you've worked so hard to prevent.
Depending on the type of treated lumber used, you might consider reapplying a wood preservative or sealant every few years. This extra layer of protection can significantly extend the life of your ties, especially in climates with harsh weather cycles. While they're designed for ground contact, an ounce of prevention here is truly worth a pound of cure. This proactive approach ensures that your well-executed project, showcasing how to build a retaining wall with landscape ties, remains a source of pride for years, even decades, to come. Transform Your Outdoor Space Into Something Extraordinary – maintenance is a key part of that ongoing transformation.
When to Call the Professionals
Knowing how to build a retaining wall with landscape ties is a fantastic skill, and many homeowners can successfully tackle smaller projects. However, there are definitely times when bringing in the pros is not just a good idea, but an absolute necessity. Our collective expertise at Modern Yardz means we're uniquely positioned to advise on these situations, ensuring safety and structural integrity above all else.
If your proposed wall is particularly tall (generally over 3-4 feet), if it's retaining a significant load (like a driveway or a large structure), or if your site has complex drainage issues or extremely unstable soil, a professional consultation is imperative. These scenarios often require specialized engineering, heavier equipment, and a deeper understanding of soil mechanics and structural design than a typical DIYer possesses. Attempting these larger, more complex walls without professional guidance can lead to dangerous and costly failures. We can't stress this enough.
Our team specializes in Seat Retaining Walls and other landscape structures, bringing years of practical experience and design acumen to every project. We handle every step of the process, from initial design concepts through precise construction, ensuring your vision is brought to life safely and beautifully. If you're feeling overwhelmed, unsure about permits, or simply want the peace of mind that comes with expert execution, reach out to us. Let’s Design the Outdoor Space You’ve Been Dreaming Of – sometimes, that means knowing when to trust the experts who do this every single day. We're here to help you understand not just how to build a retaining wall with landscape ties, but how to build the right one for your unique property.
FAQs


.webp)
.webp)