Dealing with utility lines, irrigation pipes, or even new Landscape Lighting can often mean crossing a major obstacle: your driveway. Tearing up a perfectly good driveway isn't just a massive headache; it's an expensive, often unnecessary, disruption to your outdoor space. No one wants to see their meticulously crafted Pavers or pristine Concrete ripped apart for a simple pipe. That's precisely why understanding how to bore under a driveway is such a critical skill, one our team at Modern Yardz has honed over years of dedicated practice.
It's 2026, and homeowners are savvier than ever about preserving their property's aesthetic and structural integrity. They're seeking solutions that are both effective and non-invasive. We've seen a significant, sometimes dramatic, shift towards methods that minimize disturbance, especially when it comes to existing hardscapes. Knowing how to bore under a driveway properly means you can install new utilities, irrigation lines, or even conduit for smart home tech without leaving a scar on your property. It's about precision, planning, and employing the right techniques. Let's delve into the definitive guide to mastering this formidable task.
Why Even Consider Boring Under a Driveway?
Honestly, though, why go through the trouble? Why not just cut a trench? Well, for starters, cutting and patching a driveway — whether it's Concrete or Pavers — rarely looks seamless. You're almost always left with a visible, often unsightly, scar. Beyond aesthetics, there's the structural integrity to consider. A patched driveway is inherently weaker than an unblemished one, prone to cracking or settling differently over time. That's a huge problem, especially with heavy vehicle traffic.
Our clients often reach out to us with various needs that necessitate learning how to bore under a driveway. Perhaps they're installing a new Outdoor Kitchens and need gas or water lines. Maybe it's a new irrigation system for a lush garden, or conduit for low-voltage Landscape Lighting that requires crossing the main access point. We've also seen increased demand for running electrical lines for new Pools AND Spas or even dedicated circuits for electric vehicle charging stations. In every scenario, the goal remains the same: get the utility from point A to point B without damaging the existing infrastructure. This is where truly understanding how to bore under a driveway becomes an invaluable asset.
The Critical First Steps: Planning and Preparation
Before any digging or boring begins, thorough planning is absolutely non-negotiable. This isn't a task you just jump into. Our team can't stress this enough: proper preparation dictates the entire project's success or catastrophic failure. It really does.
Site Assessment and Utility Locates
First, you've got to know what's already beneath the surface. This means contacting your local utility companies to mark existing lines – gas, electric, water, sewer, communication cables. Always. We've found that neglecting this step is the quickest route to disaster, risking serious injury, service disruptions, and hefty fines. In 2026, there are advanced ground-penetrating radar (GPR) services available that can offer even more precise mapping, which we often recommend for complex projects. Knowing exactly where not to bore under a driveway is just as important as knowing how.
Choosing Your Path
Once utilities are marked, it's time to plot the boring path. We always aim for the shortest, straightest route, which minimizes resistance and potential for deviation. However, you'll need to factor in existing utilities, landscape features, and any other underground obstacles. Sometimes, a slight curve is unavoidable, but it complicates the boring process significantly. This initial planning phase, often part of our comprehensive Landscape Design process, is where we make decisions that save time, money, and headaches down the line.
Permits and Regulations
Don't forget the paperwork! Depending on your location and the scope of work, you might need permits for utility installations or even for boring under public easements. Always check with your local authorities. Skipping permits can lead to delays, fines, and even a forced rework of your project. Our experience shows that being proactive here saves considerable hassle.
Essential Tools and Methods for Boring Under a Driveway
Now, for the practical side of things: the tools. There isn't a single 'best' way; rather, it's about matching the method to the specific conditions and project requirements. We utilize a range of equipment, from simple manual tools to sophisticated pneumatic systems. Understanding these options is key to successfully learning how to bore under a driveway.
Manual Boring Tools
For shorter distances and softer soils, manual boring can be surprisingly effective. This typically involves a sturdy steel pipe with a sharpened or augered end, driven by hand or with a sledgehammer. It's labor-intensive, no doubt, but it's also low-cost and requires minimal specialized training. Our team often uses this for small irrigation lines or low-voltage Landscape Lighting conduits where the run is only a few feet.
Water Jet Boring (Hydraulic Boring)
This is a popular method for learning how to bore under a driveway, especially for medium distances in various soil types. It uses highly pressurized water to cut through the soil, creating a path for the pipe. A hose, typically attached to a rigid pipe, is fed through the soil, and the water jet washes the soil out. It's faster than manual methods and causes less ground disturbance than excavation. However, it does create a mud slurry that needs to be managed, and it's not ideal for rocky or extremely dense soils.
Pneumatic Boring (Mole or Missile Boring)
For longer distances, tougher soils, or when precision is paramount, pneumatic boring tools (often called 'moles' or 'missiles') are our go-to. These self-propelled tools use compressed air to hammer their way horizontally through the ground, creating a perfectly sized bore. They're incredibly efficient, precise, and can handle a surprising amount of resistance. While the equipment is an investment, the speed and accuracy it offers often make it the most cost-effective solution for larger projects, especially when you need to bore under a driveway that's particularly wide or made of challenging substrate.
Here's a quick comparison of these common methods:
| Method |
Best For |
Advantages |
Disadvantages |
| Manual Boring |
Short runs (up to 10-15 ft), soft soil |
Low cost, simple equipment, easy to learn |
Labor-intensive, slow, limited distance, hard soil |
| Water Jet Boring |
Medium runs (up to 30-50 ft), various soils |
Faster than manual, less disruptive, adaptable |
Creates mud slurry, not for rocky soil, can deviate |
| Pneumatic Boring |
Long runs (50+ ft), tough soils, high precision |
Fast, highly accurate, handles resistance well |
High equipment cost, requires air compressor, noisy |
The Step-by-Step Process: How to Bore Under a Driveway Like a Pro
Once you've done your planning and selected your tools, it's time to get to work. This sequence (which we've refined over years) delivers real results when you need to bore under a driveway.
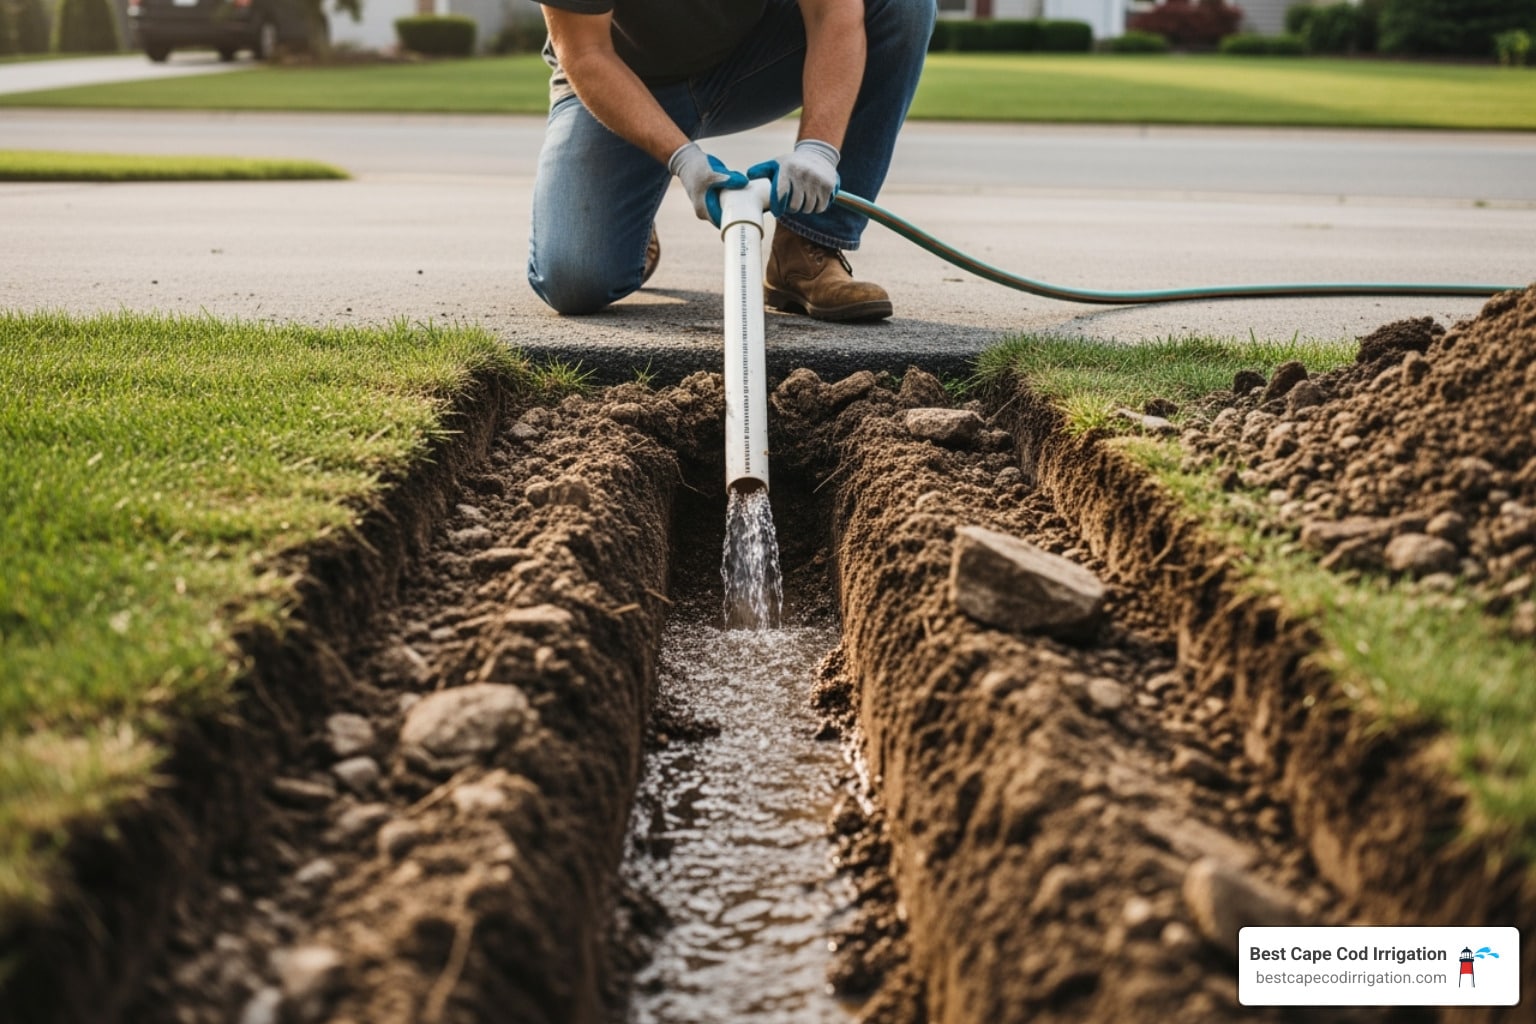
Step 1: Excavate Access Pits
You'll need two pits: a launch pit on one side of the driveway and a reception pit on the other. These pits should be large enough to comfortably accommodate your boring equipment and allow you to work. Typically, they're at least 2-3 feet deep, and wide enough for safe access. The bottom of the pits should be level and at the desired depth for your conduit or pipe. This is where the precision begins. We often use sturdy shoring to prevent collapses, ensuring a safe working environment. Never underestimate the importance of stable pits when you're preparing to bore under a driveway.
Step 2: Set Up the Boring Equipment
Carefully position your chosen boring tool in the launch pit. For manual and water jet methods, this means aligning your pipe precisely. With pneumatic moles, you'll set up the aiming stake and launch cradle, ensuring the tool is perfectly level and directed at the center of your reception pit. This alignment is absolutely critical. A slight miscalculation here can send your bore off course, potentially damaging utilities or emerging in the wrong spot. Our team double-checks these alignments using surveying levels, sometimes even laser guidance, to ensure pinpoint accuracy before we ever start to bore under a driveway.
Step 3: The Boring Process Itself
This is the moment of truth. If you're using a manual method, you'll drive the pipe incrementally, clearing soil as you go. For water jet boring, you'll feed the hose, letting the water do the work, and managing the mud. With a pneumatic mole, you'll engage the air compressor, and the mole will begin its relentless journey. It's comprehensive. We monitor progress closely, listening for changes in resistance, and making minor adjustments if necessary. For longer bores, we might use a locator tool to track the mole's position underground, ensuring it stays on course as it continues to bore under a driveway.
Step 4: Running Conduits or Pipes
Once the bore is complete, the next step is to pull your conduit or pipe through the newly created tunnel. For smaller pipes, you might be able to push them directly. For larger or longer runs, we'll often attach a pulling head to the pipe and use a winch or heavy-duty rope to pull it through from the reception pit side. It's crucial to use appropriate lubricants to reduce friction and prevent damage to the pipe during this process. This smooth transition is what makes learning how to bore under a driveway so rewarding; the pipe is in, and the driveway is untouched.
Step 5: Backfilling and Restoration
With the conduit or pipe in place, it's time to restore the site. Carefully backfill both the launch and reception pits, compacting the soil in layers to prevent future settling. This is a critical, non-negotiable element. We often use a vibratory plate compactor for optimal results. Once the soil is properly compacted, you can restore any disturbed landscaping, whether it's replacing Artificial Turf, replanting, or simply laying down new sod. The goal is to leave the site looking as if no work was ever done, making the seamless installation a testament to knowing how to bore under a driveway the right way.
Safety First: Crucial Considerations
Safety isn't just a recommendation; it's the bedrock of every project our team undertakes. When you're dealing with underground work, especially when learning how to bore under a driveway, the risks are significant, sometimes dramatic. Always wear appropriate personal protective equipment (PPE), including hard hats, safety glasses, gloves, and steel-toed boots. Ensure proper ventilation in confined spaces, and never work alone in hazardous conditions.
Always assume live utilities until proven otherwise. Even after marking, proceed with caution. Hand-digging near marked utility lines (the 'potholing' method) is often recommended to physically verify their location before heavy equipment is used. We can't stress this enough: cutting a gas line or an electrical conduit can have catastrophic consequences. It's a grueling road warrior hustle, but safety is paramount.
Common Mistakes to Avoid When You Bore Under a Driveway
Our collective expertise has taught us a lot, often from seeing others (or ourselves, early on) make common errors. Here's what we've learned: success depends on avoiding these pitfalls:
- Skipping Utility Locates: We mentioned it, but it bears repeating. This is the number one mistake, leading to dangerous and costly accidents. Always call 811 (or your local equivalent) before you dig, every single time you plan to bore under a driveway.
- Poor Pit Preparation: Unstable or too-small pits make the job harder, less safe, and increase the risk of the bore going off course. Give yourself ample, safe working space.
- Improper Tool Selection: Trying to use a manual boring tool in rocky soil is an exercise in futility and frustration. Matching the tool to the ground conditions is key to efficiency and preventing damage.
- Lack of Alignment: A deviation of even a few degrees at the start can lead to the bore emerging meters off target on the other side. Precision is paramount when you're trying to bore under a driveway.
- Neglecting Backfill Compaction: If you don't compact the soil properly in your access pits, you'll end up with depressions and uneven surfaces later, creating drainage issues or even structural problems for your adjacent Concrete or Pavers.
Professional vs. DIY: When to Call in the Experts
While understanding how to bore under a driveway is empowering, it's also a task with considerable risks and complexities. For homeowners, especially those tackling longer runs, challenging soil conditions, or sensitive utility installations, it’s often far wiser to entrust the job to professionals. We mean this sincerely: it runs on genuine connections. At Modern Yardz, we're equipped with specialized tools, extensive experience, and a deep understanding of local regulations. We can efficiently and safely execute even the most challenging underground boring projects. Plus, we integrate these services seamlessly into larger Landscape Design plans, ensuring your entire outdoor vision comes to life without a hitch. That's the reality. It all comes down to expertise.
Our team regularly handles projects requiring precise boring for everything from new Fire Features to comprehensive Outdoor Kitchens. We ensure that every aspect of the project, including the often-hidden underground work, meets the highest standards of quality and safety. We've seen it work. We recommend reaching out for a consultation if you're unsure about tackling this yourself. You can easily [BOOK MY FREE CONSULTATION] through our website.
Maintenance and Longevity of Your Bored Utilities
Once your utilities are successfully installed through boring, you might think the job's done forever. Not quite. While boring helps preserve the integrity of your driveway and surrounding landscape, ongoing vigilance is still a smart play. We always advise our clients to keep detailed records of where new lines were bored. This includes measurements from fixed points, diagrams, and photos. This documentation becomes invaluable years down the line if future work is needed, preventing accidental strikes. It’s a simple step, yet so often overlooked, and it dramatically improves long-term maintenance. That's the key. Knowing exactly how you chose to bore under a driveway, and where, pays dividends.
Our team also focuses on using high-quality conduit and piping materials, designed for longevity and resistance to environmental factors. For instance, when installing electrical lines for Landscape Lighting, we ensure the conduit is robust, often schedule 80 PVC, which stands up to more pressure and protects the wiring better than thinner alternatives. This proactive material selection means fewer future headaches and less chance you'll need to revisit that underground run. It’s part of our commitment to building durable, beautiful outdoor spaces. When we help you bore under a driveway, we're thinking decades ahead, not just tomorrow.
Consider the surrounding landscape, too. Tree roots, for example, can be a formidable, relentless force. If you've bored near existing trees, it's a good idea to periodically check for signs of root encroachment, especially if the conduit or pipe isn't root-proof. Some advanced piping materials now offer root-resistant properties, which are excellent for long-term peace of mind. Anyway, here's what makes the difference: attention to detail, from the initial Landscape Design to the final backfill. A well-executed boring project, combined with smart material choices and good documentation, ensures your utilities remain trouble-free for years, upholding the pristine condition of your driveway and the overall beauty of your outdoor living area. Our team consistently applies this level of care, whether we’re working on a small conduit for a Fire Features or a complex network for Pools AND Spas. We've found that this comprehensive approach truly sets us apart.
Understanding how to bore under a driveway is more than just a construction technique; it's a strategic approach to preserving the beauty and functionality of your property. It allows for seamless integration of modern amenities without compromising existing hardscapes. Whether you’re a dedicated DIY enthusiast or planning a major Landscape Design overhaul, the principles of careful planning, appropriate tool selection, and rigorous safety protocols remain paramount. For those daunting projects, or when you simply want the assurance of expert craftsmanship, our team at Modern Yardz stands ready to transform your outdoor vision into a stunning reality, ensuring every aspect, even the unseen, is handled with impeccable precision. We invite you to visit our website to learn more about how we can help create the outdoor space of your dreams.


.webp)
.webp)