That first impression your home makes? It starts at the curb. And let's be honest, a tired, stained, or cracked driveway can seriously undermine the entire look, no matter how beautiful the landscaping is. It's the welcome mat to your property, and when it looks neglected, it sends a message. That's why the question of how to paint a driveway has become such a popular topic among homeowners looking for a high-impact, budget-conscious upgrade in 2026.
But this isn't a simple weekend paint job like a bedroom wall. It's a demanding project where the details make all the difference between a spectacular, long-lasting finish and a peeling, catastrophic mess in six months. Our team at Modern Yardz has seen both outcomes. We've been called in to fix DIY jobs gone wrong and to integrate beautifully finished driveways into larger landscape designs. We've learned that understanding the proper process for how to paint a driveway is the critical, non-negotiable element for success. This isn't just about adding color; it's about adding value, protection, and a whole new level of curb appeal.
Why Even Bother Painting Your Driveway?
It's a fair question. Your driveway is functional, so why go through the trouble? The answer is multifaceted. First and foremost is the dramatic aesthetic uplift. A freshly coated driveway looks clean, intentional, and modern. It can tie together the colors of your home's exterior, your trim, and your landscaping. It makes everything look sharper. This is the core of how to paint a driveway for visual impact.
Beyond looks, though, there's a crucial protective element. A quality driveway coating acts as a barrier, sealing the porous surface of concrete or asphalt. This helps prevent damage from water penetration, freeze-thaw cycles that cause cracking, and stains from oil, gasoline, and other chemicals. It essentially extends the life of the surface. We've found that a well-executed paint job can delay the need for much more expensive repairs or replacement down the line. The long-term strategy for how to paint a driveway is as much about preservation as it is about presentation. Finally, it's about value. A pristine driveway significantly boosts curb appeal, which is a major factor in a home's perceived value. It's one of those projects that looks far more expensive than it actually is, delivering a fantastic return on investment.
Before You Start: Is Your Driveway a Good Candidate?
Before you get excited about colors and rollers, you need to play detective. Not every driveway is ready for paint. Applying a coating over a failing surface is like putting a band-aid on a broken leg. It's pointless. The first step in how to paint a driveway is a brutally honest assessment.
First, what's the material? Most residential driveways are either concrete or asphalt. The products and preparation methods are different for each. Concrete is generally the better candidate for painting and staining, offering more options. Asphalt (or blacktop) can be coated, but you'll need products specifically designed for bituminous surfaces. Trying to use concrete paint on asphalt will fail. Guaranteed.
Next, assess the condition. Are there minor hairline cracks or sprawling, deep fissures? Minor cracks can be filled and painted over. We can't stress this enough: large, structural cracks or significant crumbling (spalling) are signs of a deeper problem. Painting over them is a temporary fix that will quickly fail as the underlying issue worsens. In these cases, the conversation shifts from how to paint a driveway to whether you need professional repair. Sometimes, the best solution is a new surface, and our expertise in Concrete SAN Diego can provide a solid foundation that will last for decades. A driveway with severe drainage issues or heaving sections also needs to be addressed professionally before any coating is considered.
Finally, check for existing sealers. If your concrete driveway has a slick, glossy sealer on it, paint won't adhere properly. You can test this by pouring a little water on the surface. If it beads up, you have a sealer that needs to be chemically stripped or mechanically abraded before you can proceed. Overlooking this is a common reason why a project on how to paint a driveway goes wrong.
Choosing the Right Arsenal: Paint & Primer Deep Dive
The paint aisle can be overwhelming. You can't just grab any can of 'exterior paint.' You need a coating specifically engineered to withstand foot traffic, the immense weight and friction of vehicles (including 'hot tire pickup,' which we'll get to later), and relentless UV exposure. This choice is central to how to paint a driveway successfully.
Here’s a breakdown of the top contenders our team recommends for 2026. This is where you separate the amateur results from the professional-grade finish.
| Coating Type |
Key Feature |
Durability |
Application Difficulty |
Best For... |
| 1-Part Epoxy |
Ease of Use |
Good |
Easy (Pre-mixed) |
DIYers wanting a step up from standard acrylic paint. Good for moderate traffic. |
| 2-Part Epoxy |
Extreme Durability |
Excellent |
Moderate (Requires mixing) |
Garage floors and driveways with heavy use. Resists chemicals and abrasion. |
| Acrylic Latex |
Breathability/UV |
Good |
Easy |
Concrete driveways in sunny climates. Less prone to yellowing but not as tough as epoxy. |
| Polyurethane |
UV & Chemical Resistance |
Excellent |
Difficult (Often pro-level) |
A topcoat over epoxy for the ultimate protection. High gloss and superior color retention. |
Our experience shows that for most residential driveways, a high-quality 1-part or 2-part epoxy offers the best balance of durability and accessibility. Acrylics are a solid choice, but they just don't have the same toughness against wear and tear. A critical part of learning how to paint a driveway is matching the product to your specific needs and climate. Don't forget the primer! For bare, porous concrete, a dedicated concrete and masonry primer is essential. It ensures proper adhesion and a uniform finish, preventing the topcoat from soaking in unevenly. This is a non-negotiable step in the process of how to paint a driveway.
The Non-Negotiable Step: Impeccable Preparation
If you take one thing away from this guide, let it be this: preparation is everything. We estimate that 90% of driveway paint failures are due to improper prep work. It’s tedious, but it’s the absolute foundation of the entire project. Rushing this stage is a recipe for disaster. The most important lesson in how to paint a driveway has nothing to do with painting at all—it's about the cleaning and repair that comes before.
First, the cleaning. Your driveway is dirtier than you think. It's covered in dirt, grime, oil spots, grease, and possibly mold or mildew. You need to remove all of it. Start by sweeping away loose debris. Then, tackle oil stains with a dedicated concrete degreaser and a stiff brush. This might take a few applications. For general grime, a pressure washer is your best friend. A machine with at least 3000 PSI is ideal. Work systematically, holding the nozzle at a consistent angle to avoid leaving streaks or 'wand marks.' This thorough cleaning is the first real task in how to paint a driveway.
Next, repairs. Now that the surface is clean, every flaw will be visible. Fill any hairline cracks with a flexible concrete crack filler. For larger cracks or small potholes, use a vinyl concrete patching compound, troweling it smooth. Allow all repairs to cure completely according to the manufacturer's instructions. This might take a few days. Patience is key. This meticulous approach to how to paint a driveway ensures a smooth, professional-looking final surface.
For smooth, bare concrete (like what you'd find in a garage or on a new pour), you must etch the surface. This process uses a mild acid solution (often citric acid-based products are available and safer) to open up the pores of the concrete, giving the primer something to grip onto. It creates a texture similar to medium-grit sandpaper. This step is absolutely crucial for proper adhesion. Without it, the paint will likely peel right off. Always follow the safety instructions, wearing gloves and eye protection. The science behind how to paint a driveway is all about creating a mechanical bond between the surface and the coating.
Finally, the most overlooked step: let it dry. Completely. After pressure washing and rinsing your etcher, the concrete will hold a surprising amount of moisture. You need to wait at least 24-48 hours of dry, sunny weather before you even think about opening a can of primer. Trapped moisture is the enemy; it will bubble up under your new paint and cause it to fail.
The Main Event: How To Paint A Driveway Like a Pro
With a perfectly prepped surface, the application process is actually the most straightforward part. But there are still professional techniques that make a world of difference. Your research on how to paint a driveway pays off here.
First, become a weather fanatic. You need a window of several days with no rain in the forecast and moderate temperatures—ideally between 50°F and 90°F (10°C and 32°C). Avoid painting in direct, scorching sunlight, as it can cause the paint to dry too quickly, leading to brush marks and poor adhesion. An overcast, dry day is perfect.
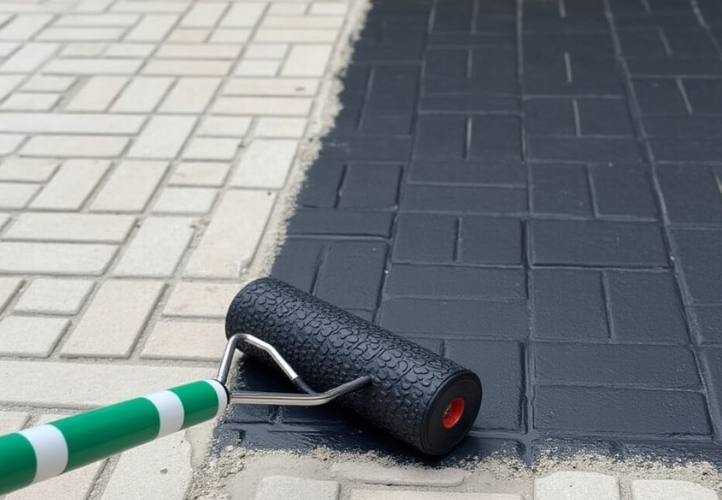
Start by 'cutting in' around the edges of the driveway (where it meets your house, lawn, or sidewalk) with a 4-inch brush. This gives you a clean border. Then, apply your primer using a 1/2-inch nap roller on a long extension pole. Work in 4x4 foot sections, maintaining a wet edge to avoid roller marks. Apply a thin, even coat. Don't try to get complete coverage with the primer; its job is to seal and bond, not to provide color. Let the primer dry for the time recommended on the can, which is typically 4-8 hours. Properly executing this stage is what makes the difference in how to paint a driveway for a lasting finish.
Now for the topcoat. Mix the paint thoroughly. If you're using more than one gallon, mix them all together in a larger bucket (a technique called 'boxing') to ensure consistent color throughout the entire project. Apply the first coat just like you did the primer, working in small sections with a consistent pattern. Our team often uses a 'W' pattern and then fills it in to ensure even coverage. The first coat will likely look a bit thin or uneven. Don't worry. This is normal. Resist the urge to apply it too thickly, which can lead to drying issues. The essence of how to paint a driveway is about building thin, strong layers.
Most driveway paints require a second coat for full coverage and durability. Check the product's recoat window—usually between 4 and 12 hours. Applying the second coat too soon can re-wet the first layer, causing it to pull up. Waiting too long can sometimes create adhesion problems. Follow the instructions precisely. The second coat will bring the color to life and provide that uniform, professional sheen. If you want a non-slip surface, you can add a non-skid additive to your final coat. It’s a fine grit that provides texture and is a smart addition, especially in wet climates. This small detail elevates the process of how to paint a driveway from just aesthetic to functional and safe.
Common Pitfalls and How to Sidestep Them
Even with the best intentions, things can go wrong. Here are the most common issues our team sees and how to avoid them.
Hot Tire Pickup: This is the number one enemy. It happens when you drive onto the painted surface, and the heat and pressure from your tires soften the paint, causing it to lift off and stick to the rubber. The cause? Usually, it's either inadequate curing time or using a low-quality paint not designed for driveways. To avoid it, you must respect the cure time. Most coatings need 24-48 hours before foot traffic and a full 5-7 days before you park a car on them. Yes, a whole week. It’s inconvenient, but it’s essential for a successful project. A deep understanding of how to paint a driveway means understanding the chemistry of curing.
Peeling and Flaking: This is almost always a preparation problem. It means the paint never properly adhered to the surface. The culprit is usually leftover dirt, oil, moisture, or a glossy sealer that wasn't removed. It can also happen if you didn't etch the concrete. There's no shortcut here; the only fix is to scrape off the failed paint and start the prep process all over again. It’s a painful lesson in the importance of diligence.
Inconsistent Color/Sheen: This often results from not mixing the paint well enough or failing to 'box' multiple gallons together. It can also be caused by applying the paint in direct sunlight, where some spots dry faster than others. Following the proper application techniques for how to paint a driveway is the best prevention.
Beyond Paint: Integrating Your Driveway into a Cohesive Design
A beautifully painted driveway shouldn't exist in a vacuum. It's a powerful design element that should complement your entire property. This is where we at Modern Yardz get really excited, because the driveway is just the beginning. The process of how to paint a driveway can be the catalyst for a total front-yard transformation.
Think about the color. A charcoal gray or deep tan can create a stunning contrast with lush green Artificial Turf SAN Diego or complement the earthy tones of modern Pavers SAN Diego used for a walkway. The clean lines of your newly painted surface can be amplified with strategic Landscape Lighting SAN Diego, making your home look spectacular after dark. A comprehensive Landscape Design SAN Diego considers all these elements, ensuring the driveway, plantings, walkways, and lighting all work in harmony.
This single project might inspire you to think bigger. Perhaps the walkway leading from the driveway to your front door could be upgraded. Or maybe this is the year you finally add that stunning outdoor seating area with custom Seat Retaining Walls and a cozy fire feature. Knowing how to paint a driveway is a great skill, but knowing how to make it part of a holistic, breathtaking landscape is our specialty.
This project is a perfect example of how a well-executed plan can completely redefine your home’s exterior. It requires patience and a commitment to doing things the right way, but the payoff is immense. Your driveway becomes more than just a functional slab; it becomes a statement piece, the first chapter in your home's story.
And if you find yourself standing back, admiring your work, and wondering what’s next for your outdoor space, we’re here to help you dream bigger. From a simple consultation to a full-scale redesign, our team has the expertise to bring your vision to life. Ready to see the possibilities? You can always BOOK MY FREE CONSULTATION to get started.


.webp)
.webp)