Investing in your property's entrance is a decision that pays dividends in both security and curb appeal. A well-chosen, expertly installed driveway gate does more than simply mark your boundary; it creates a formidable first impression, enhances privacy, and provides a crucial layer of protection. Many homeowners, understandably, ask themselves: "How to install a driveway gate effectively and without undue stress?" It's a significant undertaking, one that requires careful planning and precise execution.
Here at Modern Yardz, we've dedicated ourselves to transforming outdoor spaces, understanding that every element, right down to the gate at your property's edge, contributes to the overall aesthetic and functionality. Our team has years of collective experience integrating robust, beautiful gates into comprehensive Landscape Design SAN Diego projects. We're not just about building; we're about building right, ensuring longevity and seamless operation. This guide is designed to demystify the process, offering you a clear, actionable roadmap for understanding how to install a driveway gate that stands the test of time, reflecting the quality and care we champion in all our work.
Why A Driveway Gate Is a Non-Negotiable Asset in 2026
In an increasingly dynamic world, the value of a secure and aesthetically pleasing home entrance has never been higher. By 2026, we're seeing a significant, sometimes dramatic shift in homeowner priorities, with security and property value topping the list. A thoughtfully installed driveway gate is a critical, non-negotiable element for addressing both these concerns. It immediately elevates your property's perceived value, often by a substantial margin, making it a wise investment if you're thinking about future resale.
Beyond the financial uplift, there's the undeniable peace of mind. Knowing your property has an additional barrier against unwanted intrusion, whether it's solicitors or more serious threats, profoundly impacts daily living. Our experience shows that clients often report a dramatic reduction in unsolicited visitors and a heightened sense of personal security after a gate installation. It's a tangible improvement to your daily life. And honestly, though, let's not forget the sheer elegance. A custom gate can transform a mundane entrance into a grand statement, perfectly complementing your home's architecture and the surrounding Pavers SAN Diego or other hardscaping elements.
Planning Your Driveway Gate Project: The Critical First Steps
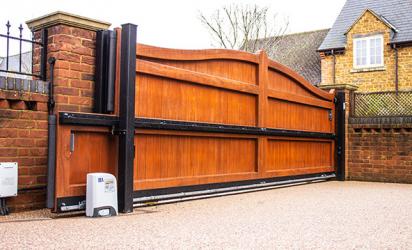
Before you even think about the physical act of how to install a driveway gate, comprehensive planning is paramount. This isn't just about picking a gate you like; it's about making informed decisions that ensure functionality, safety, and compliance. We always start with a thorough site assessment, a step many eager DIYers unfortunately rush. First, consider the type of gate: swing gates (single or double) are classic and often more affordable, but require ample clear space for their arc. Sliding gates, ideal for shorter driveways or sloped terrain, operate parallel to your fence line, needing less space but often more complex installation mechanisms. Cantilever gates are a type of sliding gate that doesn't touch the ground, reducing friction and wear, but they demand even more structural support.
Next, materials matter. Wrought iron offers classic elegance and robust security. Aluminum is lighter, rust-resistant, and comes in various styles, often requiring less maintenance. Wood gates provide a natural, warm aesthetic but demand more upkeep against the elements. We've found that combining materials, like an iron frame with wood infill, can offer the best of both worlds. The choice should align with your home's architectural style and your budget. Then, there's automation. Do you want remote access, keypad entry, or sensor-based opening? This impacts wiring, power sources, and the complexity of your installation significantly.
Our team always emphasizes understanding local regulations and obtaining any necessary permits before breaking ground. Ignoring this can lead to costly delays, fines, or even having to remove your newly installed gate. Also, critically, identify all underground utilities. You absolutely don't want to accidentally sever a water line or electrical conduit. Call 811 (in the US) or your local utility notification center well in advance. Getting clear on all these foundational details is the only way to truly understand how to install a driveway gate without catastrophic missteps. It's comprehensive, yes, but it ensures a smooth journey.
Essential Tools and Materials for a Seamless Installation
Approaching a project like how to install a driveway gate without the right arsenal of tools and materials is like trying to build a castle with a spoon. You're going to struggle, and the results won't be what you envisioned. We always prepare meticulously, and we urge you to do the same. Here's a breakdown of what you'll typically need:
Tools:
- Measuring Tape & Level: Absolutely critical for precision. We're talking about perfect plumb and level, no compromises.
- Post-hole Digger or Auger: For digging deep, stable post holes. Our team prefers power augers for efficiency and consistent depth.
- Shovel & Trowel: For finer adjustments and mixing concrete.
- Wheelbarrow: For transporting concrete and dirt.
- Concrete Mixer (optional but recommended): For larger projects, it's a lifesaver.
- Wrenches & Sockets: For assembling hardware.
- Welder (for certain gate types): If you're custom fabricating or reinforcing metal gates.
- Power Drill & Bits: For fastening hinges, latches, and automation components.
- Grinder (for metal gates): To smooth welds or cut metal precisely.
- Safety Gear: Gloves, safety glasses, hearing protection – always, no exceptions.
Materials:
- Gate Posts: Heavy-duty steel or robust wood, sized appropriately for your gate's weight and span. These are the anchors, the unwavering sentinels of your entrance.
- Cement/Concrete Mix: High-strength, fast-setting varieties are often preferred. Our Concrete SAN Diego expertise really comes into play here; proper mixing and pouring are paramount.
- Gravel/Crushed Stone: For drainage at the bottom of post holes.
- Gate Itself: Pre-fabricated or custom-built.
- Hinges, Latches, Stops: Heavy-duty, weather-resistant hardware.
- Automation Kit (if desired): Motor, control box, remote, sensors, wiring. This makes the day-to-day operation smooth as silk.
- Electrical Conduit & Wiring: To protect automation wiring from the elements and physical damage. This is where attention to detail really shines.
Here's a quick comparison of common gate types and their typical installation demands:
| Gate Type |
Space Required (Opening) |
Complexity of Installation |
Typical Material Options |
Automation Integration |
| Single Swing |
Wide Arc (1x Gate Width) |
Moderate |
Wood, Aluminum, Wrought Iron |
Standard Swing Gate Openers |
| Double Swing |
Wide Arc (1/2x Gate Width per side) |
Moderate |
Wood, Aluminum, Wrought Iron |
Dual Swing Gate Openers |
| Sliding |
Length equal to Gate Width + Counterbalance |
High |
Aluminum, Wrought Iron, Chain Link |
Sliding Gate Openers (Track/Cantilever) |
Preparing Your Site: Foundations for Success
Site preparation is the unsung hero of a successful driveway gate installation. Our team knows that skimping on this stage inevitably leads to problems down the line – misaligned gates, structural failures, or drainage nightmares. We can't stress this enough: take your time here. First, clear the entire area where the gate will be installed, including the path of its swing or slide. This means removing any vegetation, rocks, or debris that might impede operation. You'll need a clean, level working surface.
Next, proper grading is essential, especially for swing gates. Any unevenness in the driveway or surrounding landscape will cause the gate to drag, jam, or open improperly. We often recommend a slight slope away from the gate opening to ensure efficient water runoff, preventing pooling that could damage the gate's base or automation components over time. This is where our expertise in Concrete SAN Diego and general site preparation becomes invaluable. We ensure the ground is stable and ready to support the immense weight and forces a gate exerts. Remember those utility markings? Double-check them now. You're about to dig deep, and hitting a buried line isn't just an inconvenience; it can be incredibly dangerous and costly. This meticulous preparation is a foundational aspect of understanding how to install a driveway gate that performs flawlessly for years.
Installing Gate Posts: The Backbone of Your Entrance
The gate posts are, without exaggeration, the most critical structural components when you're considering how to install a driveway gate. If they're not set correctly, everything else will fail. We're talking about posts that are plumb (perfectly vertical), properly spaced, and deeply anchored. For most residential driveway gates, we recommend digging holes that are at least 30-36 inches deep and 10-12 inches in diameter. The depth helps ensure the posts are below the frost line in colder climates, preventing ground heave that can shift and destabilize them. Even in more temperate areas, that depth provides unparalleled stability.
Once your holes are dug, place 4-6 inches of gravel or crushed stone at the bottom for drainage. This prevents water from pooling around the post base and causing premature corrosion or rot. Then, carefully set your gate posts. Use a level – a long, accurate one – to ensure they are absolutely plumb on all sides. This is where a second pair of hands becomes incredibly helpful. Brace the posts securely in position with temporary supports (2x4s staked into the ground work well) before pouring the concrete. Mix your concrete according to the manufacturer's instructions, ensuring a consistent, strong mixture. Fill the holes completely, mounding the concrete slightly at the top to shed water away from the post. Allow the concrete to cure fully, which can take 24-72 hours depending on the mix and weather, before attempting to hang your gate. Rushing this step is a recipe for disaster; patience here is genuinely a virtue when learning how to install a driveway gate with lasting integrity.
Assembling and Mounting the Gate Frame: Precision is Paramount
With your posts firmly set and cured, the next major step in how to install a driveway gate involves assembling and mounting the gate itself. This phase demands extreme precision. For swing gates, you'll first attach the hinges to the gate posts. The type of hinge matters: heavy-duty, adjustable hinges are often preferred as they allow for minor tweaks to alignment after the gate is hung. Ensure the hinges are spaced appropriately along the post to distribute the gate's weight evenly. We recommend pre-drilling pilot holes where possible to prevent splitting wood or damaging metal. Lift the gate into position – this will almost certainly require multiple people, perhaps even a small lift or hoist, depending on the gate's size and weight. Carefully align the gate with the hinges and fasten it securely.
For sliding gates, the process differs. You'll install a track along the ground or a cantilever system that supports the gate without ground contact. The track must be perfectly level and aligned along the full travel path of the gate. Rollers are then attached to the bottom of the gate, allowing it to glide smoothly along the track. Cantilever systems use a series of rollers on the gate that engage with a track mounted on the posts, effectively suspending the gate. Regardless of the type, once the gate is mounted, check its swing or slide. Does it move freely? Is there any binding? Are the gaps even? Minor adjustments to hinges, rollers, or post alignment might be necessary. This iterative process of mount, test, and adjust is fundamental to achieving impeccable operation when you're trying to figure out how to install a driveway gate that works flawlessly.
Wiring and Automation: Bringing Your Gate to Life
If you've opted for an automated driveway gate, this section is absolutely critical. Bringing power and intelligence to your gate transforms it from a static barrier into a dynamic, convenient access point. This often involves running electrical conduit underground from a power source to the gate operator's location. Our team has extensive experience with this, often integrating gate power with existing Landscape Lighting SAN Diego plans to ensure a seamless, aesthetically pleasing installation. All wiring must be housed in appropriate, weather-rated conduit to protect it from moisture, rodents, and accidental damage. Safety is paramount here; if you're not comfortable with electrical work, this is definitely a job for certified professionals.
Once the power is run, you'll mount the gate operator motor and control box. For swing gates, the operator arms attach to the gate and its post, pushing or pulling the gate open and closed. For sliding gates, a chain or rack-and-pinion system moves the gate along its path. Carefully follow the manufacturer's instructions for wiring the motor to the control board and connecting any safety sensors. Safety sensors, often photo-eyes, are crucial; they detect obstructions in the gate's path and prevent it from closing on people, vehicles, or pets. We can't stress enough the importance of these safety features. Finally, you'll program your remote controls, keypads, or smart home integration systems. Testing every aspect of the automation—from opening and closing to emergency stops and sensor activation—is non-negotiable for anyone who needs to understand how to install a driveway gate that's both convenient and unequivocally safe.
Final Adjustments and Testing: Ensuring Impeccable Operation
You're almost there! Once the gate is physically mounted and any automation is installed, the final adjustments and rigorous testing phase begins. This is where we fine-tune everything to ensure optimal performance, safety, and longevity. Start by checking the gate's alignment one last time. Does it close smoothly and latch securely? Are there any gaps that shouldn't be there? For swing gates, ensure both leaves (if you have a double gate) meet perfectly in the middle and that the latch engages without effort. For sliding gates, confirm it glides effortlessly along its track and that the end stops are correctly positioned.
Next, thoroughly test all safety features. Activate the photo-eye sensors by placing an object in their path; the gate should immediately stop and reverse. Test any manual override mechanisms, ensuring you can open the gate even if the power fails. Check that all emergency stop buttons are functional and easily accessible. We often run the gate through several full cycles, listening for any unusual noises, observing any hesitation, or noticing any uneven movement. This meticulous process helps us catch potential issues before they become major problems. It's a critical component of truly mastering how to install a driveway gate that provides both security and seamless daily function. Any minor issues identified now are far easier and less costly to rectify than waiting until they escalate.
Maintaining Your New Driveway Gate: Longevity and Performance
Having invested the time and effort into understanding how to install a driveway gate, neglecting its maintenance would be a disservice to your hard work. Regular upkeep isn't just about aesthetics; it's about preserving functionality, extending its lifespan, and ensuring safety. We recommend establishing a simple maintenance routine right from the start. Annually, at minimum, inspect all hinges, rollers, and moving parts. Apply a high-quality lubricant (like silicone spray or grease, depending on the component) to keep everything operating smoothly and prevent corrosion. Rust is the enemy, especially for metal gates. Address any developing rust spots promptly with a wire brush and touch-up paint.
Check all fasteners and bolts; over time, vibrations and use can cause them to loosen. Tighten anything that feels wobbly. Inspect the gate's structure for any signs of wear, warping (for wood gates), or damage. Look at the gate posts as well – are they still plumb? Is the concrete foundation intact? If you have an automated gate, clean the photo-eye lenses to ensure they remain clear and functional. Test your remote controls and keypads to confirm they're still communicating effectively. Batteries in remotes often need replacing. Ensuring your gate remains in top condition protects your investment and maintains the integrity of your property's entrance. Our team, with its deep roots in crafting exceptional outdoor spaces, can also provide guidance on comprehensive care plans, helping you keep your entire outdoor living area, including your gate, looking its best for years to come.
When to Call the Experts: Professional Assistance for Your Gate
While this guide provides a thorough overview of how to install a driveway gate, we understand that not every homeowner has the time, specialized tools, or comfort level to tackle such a significant project. And honestly, that's perfectly fine. Some projects inherently benefit from professional expertise. If your vision includes a custom-fabricated gate, complex automation integrated with a smart home system, or if your site presents challenging terrain or access issues, bringing in professionals isn't just a convenience; it's a shrewd decision. Our Modern Yardz team specializes in managing complex outdoor transformations, from initial Landscape Design SAN Diego all the way through construction. We're accustomed to handling everything from intricate Outdoor Kitchens SAN Diego to grand entrances, understanding the nuances of how to install a driveway gate that perfectly complements your property.
We bring not only the right tools and expertise but also the invaluable experience to foresee and mitigate potential problems before they arise. Our collective knowledge ensures compliance with local codes, proper electrical connections, and a finish that elevates your entire property. We've seen firsthand the pitfalls of hurried or inexperienced installations, and frankly, rectifying those issues often costs more than hiring professionals from the outset. If you're seeking impeccable results, unmatched reliability, and a gate that genuinely enhances your property's value and security, sometimes the smartest move is to let our experts handle the heavy lifting. We invite you to [BOOK MY FREE CONSULTATION] to discuss how we can bring your dream gate, and indeed, your entire outdoor vision, to life. We're here to help you create spaces where memories are made, starting right at your property's impressive entrance.


.webp)
.webp)