How to Build a Brick Retaining Wall? (Step-by-Step)
Most brick retaining walls fail within seven years — not because the brick crumbles, but because builders skip the drainage layer that prevents soil pressure from cracking the structure. Without proper footing depth and a continuous weep system, even expertly-laid brickwork becomes a liability.
We've designed and built retaining walls across every soil type and slope condition imaginable. The gap between a wall that holds for decades and one that buckles after two wet winters comes down to three structural decisions most guides gloss over entirely.
How do you build a brick retaining wall?
Building a brick retaining wall requires excavating below the frost line, pouring a reinforced concrete footing at least twice the wall width, installing drainage aggregate behind the wall, and laying brick courses with proper mortar joints and rebar reinforcement. Walls over three feet tall typically require engineering approval and a building permit to meet local building code requirements for load-bearing capacity.
This guide walks through every structural decision — from footing dimensions to weep hole spacing — using the same material specification and installation method we apply on every retaining wall project. You'll learn where most DIY attempts fail, what building inspectors actually check, and when professional design becomes non-negotiable.
Understanding Load-Bearing Capacity and Structural Requirements
Every retaining wall fights the same battle: soil behind the wall constantly pushes outward while gravity pulls downward. That combined lateral and vertical load determines everything about how you build.
For walls under three feet, most jurisdictions allow homeowner-built structures without engineering stamps. The moment you cross that three-foot threshold, you're entering territory where soil mechanics, hydrostatic pressure calculations, and structural engineering matter more than bricklaying skill. We've seen beautifully laid brick walls crack within months because the builder didn't account for the exponential increase in soil pressure as wall height increases.
Brick itself isn't the limiting factor — it's the footing and reinforcement system. A standard clay brick can handle 3,000 to 5,000 PSI of compression, but lateral soil pressure doesn't push straight down. It pushes horizontally, which means your wall needs tensile strength through rebar, not just compressive strength through brick.
The honest answer: if your wall exceeds 36 inches in exposed height or retains a slope, hire a structural engineer before you order materials. The cost of a site assessment and stamped drawing — typically $800 to $1,500 — is a fraction of what you'll spend rebuilding a failed wall or repairing foundation damage to adjacent structures. Licensed and insured contractors carry this requirement for a reason: retaining wall failures cause expensive, dangerous collapses.
Your local building code will specify footing depth, rebar spacing, and drainage requirements based on frost line depth and soil classification. Sandy soils drain quickly and exert less pressure. Clay soils hold water and push harder. If you're building without a soil report, you're guessing at the forces your wall needs to resist.
Site Assessment and Material Specification
Before you touch a shovel, walk the site with a specific checklist. Mark underground utilities using your local 811 service — hitting a gas line or fiber optic cable turns a weekend project into a five-figure nightmare. Check HOA compliance requirements if you're in a managed community; some associations restrict retaining wall height, setback distance, or even brick color.
Measure the slope angle. If it exceeds 30 degrees, you're dealing with significant lateral load and should pause to consult a professional. Identify where water currently flows during rain. Your wall will interrupt that flow, and if you don't redirect it properly, hydrostatic pressure will build up behind the wall until something gives.
Brick selection matters more than aesthetics. Standard modular bricks (3⅝" × 2¼" × 8") work for most applications, but you'll want Grade SW (severe weathering) bricks if you're in a freeze-thaw climate. These cost about 15% more than standard grade but won't spall and crack when moisture freezes inside the brick.
For mortar, specify Type S — a medium-strength blend of portland cement, hydrated lime, and sand designed specifically for below-grade and structural applications. Type N mortar, common in non-structural brick veneers, doesn't provide adequate bond strength for retaining walls. Expect to use approximately 8 to 10 bags of mortar mix per 100 square feet of wall face.
Rebar requirements depend on wall height, but #4 rebar (½-inch diameter) spaced vertically every 16 to 24 inches is standard for walls up to four feet. Horizontal rebar runs through every third or fourth course. Your footing will need two continuous horizontal #4 bars running the full wall length, positioned in the lower third of the concrete pour.
Drainage aggregate goes behind the wall — not optional. Use ¾-inch crushed stone, not river rock. Crushed stone locks together and won't settle. Plan for a layer at least 12 inches wide extending from the footing to within 6 inches of final grade. Install 4-inch perforated drain pipe at the base, sloped to daylight or a drainage sump.
How to Build a Brick Retaining Wall: Footing Installation
The footing is the single most critical component. Get this wrong and nothing else matters.
Excavate to a depth below your local frost line — typically 12 to 48 inches depending on climate. In frost-prone regions, shallow footings heave during freeze-thaw cycles, cracking the entire wall. Your trench width should be at least twice the wall thickness. For a standard 8-inch-thick brick wall (two wythes), that means a 16-inch-wide footing minimum.
Footing thickness depends on wall height. For walls under three feet, a 12-inch-thick footing works. Taller walls need 18 to 24 inches. The footing must extend at least 6 inches beyond each end of the finished wall.
Pour the concrete directly onto undisturbed soil or compacted aggregate base — never onto loose backfill. If you hit soft spots during excavation, dig deeper until you reach stable ground or add 6 inches of compacted crushed stone. We've fixed walls where builders poured footings onto loose fill; they settled unevenly and the brick cracked within the first year.
Place your rebar before the concrete pour. Two #4 bars run horizontally, positioned about 3 inches from the bottom of the footing. Use rebar chairs to hold them in position. Vertical rebar stubs should extend upward from the footing, spaced according to your structural plan — typically every 16 to 24 inches. These stubs will eventually run through the hollow cores of the brick wall.
Here's the detail most guides miss: position your vertical rebar stubs slightly toward the retained soil side of the footing, not dead center. This places the steel where tensile forces are greatest. The offset should be subtle — about 2 inches toward the high side for an 8-inch wall.
After pouring, strike the top surface level and allow at least 48 hours of cure time before laying brick. In hot weather, cover the concrete with plastic sheeting and keep it damp. Concrete that cures too quickly loses strength.
First Course Layout and Drainage Integration
Your first course establishes everything that follows. Snap a chalk line on the footing marking the front face of the wall. Double-check that it's straight and parallel to your property line or design curve.
Before laying the first brick, install your drain pipe. Position 4-inch perforated pipe at the base of the footing, perforations facing down. Slope the pipe at least ¼ inch per foot toward an outlet. Wrap the pipe in filter fabric to prevent silt from clogging the perforations over time.
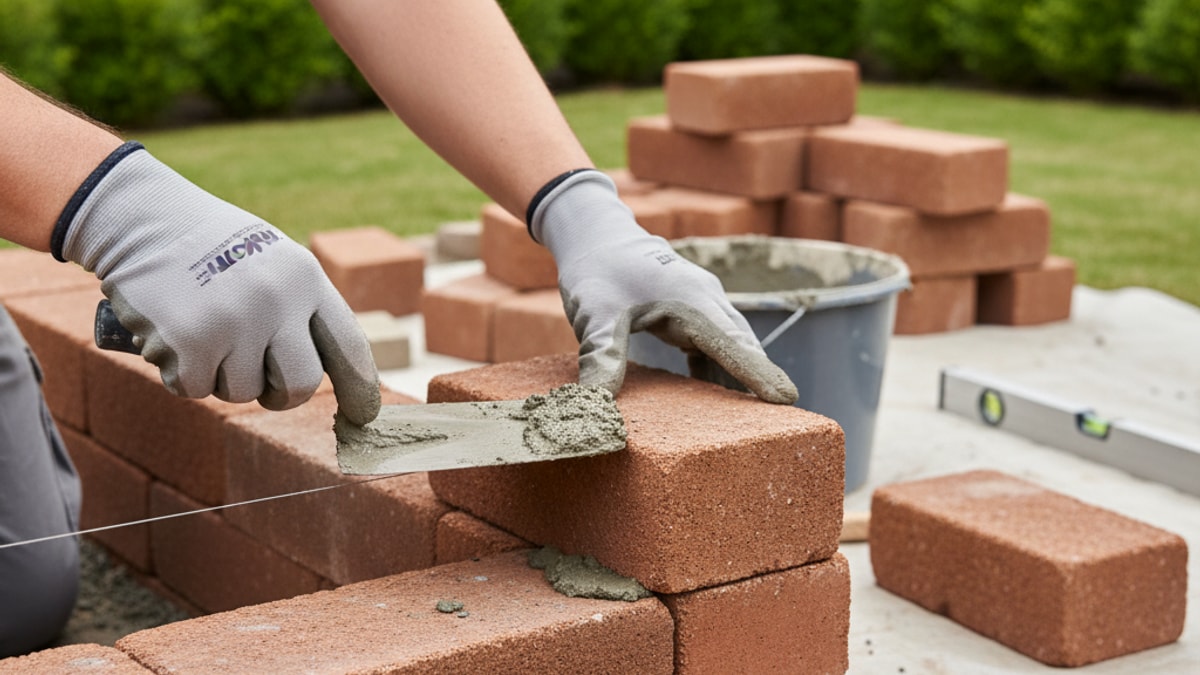
Now mix your Type S mortar. Proper consistency feels like thick peanut butter — wet enough to spread smoothly but stiff enough to hold its shape under the weight of a brick. Add water gradually. A mortar that's too wet won't support the brick and will squeeze out excessively. Too dry and it won't bond.
Spread a full mortar bed on the footing for your first course. Thickness should be about ⅜ to ½ inch. Press the first brick firmly into place, checking level in both directions. Tap with a rubber mallet if needed, but don't shift bricks after mortar starts to set — you'll break the bond.
As you lay the first course, thread each brick over the vertical rebar stubs if your design calls for reinforced hollow-core bricks. Standard bricks won't have cores large enough for rebar; you'll need to use special reinforcement bricks or a bond beam system.
Leave weep holes every 24 to 32 inches along the first course. The easiest method: temporarily insert 3-inch sections of ½-inch PVC pipe through the mortar joint, angled slightly downward toward the front face. These allow water to escape rather than building pressure behind the wall. After mortar sets, you can leave the pipe in place or remove it — either works.
Brick Courses: Mortar Joints and Running Bond Pattern
Every subsequent course follows a running bond pattern — each brick overlaps the joint between two bricks below it by half a brick length. This overlap distributes load and prevents vertical cracks from propagating through the wall.
Apply mortar to the top of the previous course and to the end of each brick (called "buttering") before setting it in place. Your joints should maintain consistent ⅜-inch thickness. Use a story pole — a straight board marked at brick-plus-mortar intervals — to check that courses stay level as you build upward.
Work in sections no more than four feet long and no more than four courses high before moving to the next section. This prevents the weight of fresh brick from squeezing mortar out of lower joints before it sets.
Here's the honest answer about mortar joints: if you're not tooling them properly, you're creating failure points. After laying three or four bricks, use a jointing tool (a concave metal or plastic tool) to compress and smooth the mortar joint. This forces mortar tight against the brick and sheds water away from the joint. Untooled joints crack and allow water penetration, which leads to freeze-thaw damage.
Every third or fourth course, embed horizontal rebar into the mortar joint if your design requires it. The bar should sit in the mortar bed, fully covered by the next course. Overlap horizontal bars by at least 12 inches at joints.
Check plumb frequently with a 4-foot level. Retaining walls should have a slight batter — a backward lean of about 1 inch per foot of height — which helps the wall resist soil pressure. This isn't optional for tall walls; it's structural necessity. Most DIY walls fail because builders construct them perfectly plumb, ignoring the physics of lateral earth pressure.
Backfill, Drainage Layer, and Compaction
Don't backfill until mortar has cured at least 72 hours. Premature backfill pressure can shift the wall while mortar is still soft.
Place filter fabric against the back of the finished wall, extending from the base to within 6 inches of the top. This prevents fine soil particles from migrating into your drainage aggregate and clogging it over time.
Fill the space behind the wall with ¾-inch crushed stone to a width of at least 12 inches. This aggregate layer is your primary drainage solution — it allows water to percolate downward to the drain pipe rather than building hydrostatic pressure against the wall.
Compact the stone in 6-inch lifts using a plate compactor. Don't skip this step. Uncompacted backfill settles over time, creating voids and allowing the wall to shift.
Top the crushed stone layer with 6 to 8 inches of topsoil if you're planting above the wall. Don't bring soil right up against the brick; leave the top course exposed to allow moisture to escape.
If your wall includes integrated planters or seating areas — a popular feature we incorporate into many seat/retaining walls projects — ensure those sections have independent drainage paths. Standing water in planters accelerates mortar deterioration.
Capping, Sealing, and Final Details
Your top course deserves special attention. Many builders finish with standard bricks laid flat, but this leaves horizontal mortar joints exposed to weather. A better approach: install soldier course caps (bricks turned upright) or purpose-made concrete wall caps. These shed water more effectively and add visual weight to the top of the wall.
If using brick caps, set them in a full mortar bed and tool the joints carefully. The top surface is where water penetrates first; sloppy joints here compromise the entire structure.
Consider applying a breathable masonry sealer after the wall has cured for at least 28 days. Quality sealers reduce water absorption without trapping moisture inside the wall. Reapply every 3 to 5 years depending on climate exposure.
Clean mortar smears and efflorescence (white mineral deposits) from the brick face using a masonry brush and water. For stubborn efflorescence, use a diluted muriatic acid solution (1 part acid to 10 parts water), but test on an inconspicuous area first and rinse thoroughly afterward. Always wear eye protection and gloves when working with acid.
Key Takeaways
- Footing depth must extend below the frost line and be at least twice the wall width to resist lateral soil pressure and prevent frost heave
- Type S mortar provides the bond strength required for structural retaining walls, unlike Type N which is designed only for non-load-bearing applications
- Drainage aggregate and perforated pipe behind the wall are mandatory — hydrostatic pressure from trapped water is the leading cause of retaining wall failure
- Weep holes spaced every 24 to 32 inches along the first course allow water to escape rather than building pressure behind the wall
- Walls exceeding 36 inches in height typically require engineering approval and building permits to meet local building code for load-bearing capacity
- A slight batter (backward lean) of 1 inch per foot helps resist the outward push of retained soil and dramatically increases wall stability
What If: Brick Retaining Wall Scenarios
What If the Wall Develops Cracks After the First Winter?
Stop any further construction and assess whether the cracks are cosmetic hairline cracks in mortar joints or structural cracks running through bricks. Mortar cracks can often be repointed — rake out the damaged mortar to a depth of ¾ inch and fill with fresh Type S mortar. Structural cracks running through bricks indicate foundation movement, inadequate reinforcement, or drainage failure requiring professional assessment before the wall deteriorates further.
What If Local Code Requires an Engineer's Stamp?
Contact a licensed structural engineer before purchasing materials. They'll perform a site assessment, evaluate soil conditions, and provide stamped drawings showing footing dimensions, rebar placement, and drainage specifications. Most jurisdictions won't issue a building permit without these documents for walls over three feet. The engineering cost — typically $800 to $1,500 — prevents costly rebuilds and ensures your wall meets load-bearing capacity requirements for your specific soil type and slope angle.
What If the Wall Needs to Curve or Step to Follow the Terrain?
Curved walls require careful planning during footing layout. Use a garden hose or flexible marking paint to establish the curve, then excavate following that line. Bricks can accommodate gentle curves through slightly wedged mortar joints, but tight radius curves may require cutting bricks or using specialized curved units. For stepped walls on slopes, each level needs its own independent footing, and the lower footing should extend beneath the upper wall by at least 12 inches to prevent undermining.
What If Water Pools Behind the Wall After Heavy Rain?
Your drainage system has failed — either the drain pipe is clogged, crushed, or improperly sloped. Excavate the backfill to expose the drainage layer and check that the perforated pipe still flows freely. Verify the pipe outlets to daylight or into a functional drainage sump. If fine soil has infiltrated the crushed stone layer, you may need to install or replace filter fabric and add fresh drainage aggregate. Standing water creates hydrostatic pressure that will eventually crack even properly built walls.
What If You're Building in a Freeze-Thaw Climate?
Specify Grade SW bricks rated for severe weathering exposure — these contain lower porosity and resist moisture absorption that causes spalling when water freezes. Your footing must extend below the local frost line to prevent heaving. Use Type S mortar with an air-entraining additive, which creates microscopic air pockets that accommodate ice expansion without cracking. Schedule construction during dry weather with temperatures consistently above 40°F, and protect fresh mortar from freezing for at least 72 hours after laying.
Inspection Points and Code Compliance
If your project requires a building permit, expect at least two inspections: footing inspection before concrete pour, and final inspection after wall completion. Schedule the footing inspection before you pour — failing at this stage means breaking out hardened concrete.
Inspectors check footing depth, width, and rebar placement. They verify that vertical rebar stubs are properly positioned and that the concrete mix meets specified strength (typically 3,000 PSI minimum). They'll also confirm that your drainage system is in place and that weep holes are spaced according to code.
Final inspection confirms that the wall matches the approved plans, that joints are properly tooled, and that backfill and drainage installation meets specifications. Some jurisdictions require a licensed contractor to perform the work regardless of wall height — check before you start.
Document your project with before-and-after photos showing the footing installation, rebar placement, and drainage system. If you ever sell the property, this documentation proves the wall was built to code and adds value during home inspections.
When Professional Help Becomes Non-Negotiable
Here's the bottom line: if your wall exceeds three feet in height, retains a slope steeper than 30 degrees, sits within 10 feet of a structure's foundation, or is located in expansive clay soils, hire a professional. The structural complexity and liability risk exceed typical homeowner skill and insurance coverage.
Retaining wall failures damage adjacent foundations, flood neighboring properties, and in extreme cases, cause injuries. We've rebuilt walls where well-meaning homeowners skipped the engineering phase and discovered — after the first heavy rain — that their wall was fundamentally undersized for the load. The cost of demolition and proper reconstruction exceeded three times what professional design and build would have cost initially.
Even for shorter walls, consider professional design if you're uncertain about any structural component. The workmanship warranty and licensed and insured protection that comes with professional installation provides peace of mind that DIY projects can't match. Many homeowners find that the ROI on home improvement projects like proper retaining walls pays back through increased curb appeal and avoided repair costs over the structure's lifespan.
Our team evaluates soil conditions, slope angles, and drainage patterns during every site assessment before we specify materials or break ground. That upfront analysis prevents the failures we're frequently called to repair. If you're serious about a retaining wall that performs for decades rather than years, reach out to discuss your specific site conditions and project timeline.
Maintenance Schedule for Long-Term Performance
Retaining walls aren't install-and-forget structures. Annual inspection prevents small issues from becoming structural failures.
Every spring, walk the wall and check for cracks, displaced bricks, or mortar erosion. Look for signs of water staining below weep holes — if weeps aren't draining, your backfill is saturated and exerting excessive pressure. Clean debris from weep holes using a stiff wire or compressed air.
Check the area above the wall for settling or depression, which indicates voids forming behind the wall due to soil washout. Fill any depressions promptly with compacted soil to prevent further erosion.
Repoint damaged mortar joints as soon as you notice deterioration. Waiting allows water penetration to accelerate, leading to brick spalling and structural compromise. Repointing is straightforward: rake out damaged mortar to ¾-inch depth, wet the joint, pack in fresh Type S mortar, and tool it to match existing joints.
Every 3 to 5 years, reapply breathable masonry sealer to reduce water absorption and extend wall life. Avoid film-forming sealers that trap moisture — look for penetrating silane or siloxane products designed for below-grade masonry.
If you've integrated landscape lighting into the wall, inspect fixtures annually for moisture intrusion and verify that wiring remains protected within conduit. Water and electricity don't mix, and retaining walls create particularly harsh environments for electrical components.
Comparing DIY vs. Professional Installation
The decision between DIY and professional installation comes down to wall complexity, your skill level, and the consequences of failure.
| Factor |
DIY Installation |
Professional Installation |
Bottom Line |
| Wall Height |
Best for walls under 3 feet with minimal slope |
Required for walls over 3 feet or retaining steep slopes |
Height dramatically increases complexity and code requirements |
| Project Timeline |
3-5 weekends for a 20-foot wall assuming good weather |
5-7 working days including cure time and inspections |
Professionals work faster but you'll pay for that efficiency |
| Material Cost |
$15-25 per square foot for brick, mortar, rebar, and drainage materials |
$40-75 per square foot including labor and workmanship warranty |
DIY saves on labor but assumes you own or rent proper equipment |
| Code Compliance |
Your responsibility to research and meet all requirements |
Contractor handles permits, engineering, and inspection coordination |
Failing inspection means redoing work at full cost |
| Structural Risk |
Full liability falls on homeowner if wall fails and causes damage |
Licensed and insured coverage protects against structural failure and property damage |
Consider your homeowner's insurance deductible in this calculation |
| Long-Term Outcome |
Success depends entirely on proper footing, drainage, and reinforcement execution |
Workmanship warranty typically covers 1-3 years; structural issues caught early |
Professional installation includes accountability that DIY lacks |
For smaller decorative walls under 30 inches on level ground, DIY makes sense if you have masonry experience and proper tools. For anything taller, steeper, or closer to structures, the risk-reward calculation tilts heavily toward professional installation.
Integrating Retaining Walls into Complete Outdoor Designs
Retaining walls rarely exist in isolation. They're typically part of a larger landscape strategy involving grading, drainage management, and hardscape features.
We frequently integrate retaining walls with paver patios to create level outdoor living areas on sloped lots. The wall holds back soil while the patio provides usable space below. This combination requires careful coordination — the patio base must be properly compacted and the wall footing must not undermine patio stability.
Retaining walls also create opportunities for vertical interest in flat yards. A low 18-inch wall with integrated planter space adds dimension without requiring permits or complex engineering. These decorative walls follow the same construction principles but with reduced material specification — you can often skip rebar reinforcement for walls under 24 inches.
If you're planning comprehensive landscape design work, consider how retaining walls interact with other features. A wall that doubles as a seat wall around a fire pit creates functional gathering space. Walls positioned to block wind make outdoor spaces more comfortable. Strategic wall placement can even improve drainage across your entire property, directing runoff away from foundations and into appropriate collection points.
The ROI on home improvement projects involving well-designed retaining walls typically exceeds the installation cost, particularly when walls solve drainage problems or create usable space from previously unusable slopes. Buyers recognize quality hardscape work and factor it into property valuations.
Final Structural Considerations
Brick retaining walls succeed or fail based on decisions made before the first brick is laid. Footing depth, drainage design, and reinforcement placement determine structural performance far more than bricklaying technique.
If your project exceeds your comfort level at any point — during excavation, when you hit unexpected groundwater, or when the math on load-bearing capacity doesn't make sense — pause and get professional input. A consultation costs far less than repairing a failed wall or dealing with property damage.
The walls we build carry the same workmanship warranty regardless of size because we follow the same structural principles on every project: footings sized for the load, drainage designed to eliminate hydrostatic pressure, and materials specified for the actual conditions they'll face. That consistency comes from treating every wall as a structural element, not just a decorative feature.
Your retaining wall will be in place for decades. Build it right the first time by respecting the physics of soil pressure, water management, and frost action. If you'd like a site assessment or want to discuss your specific project before you commit to DIY or professional installation, reach out and we'll walk you through what your particular site conditions require.


.webp)
.webp)