A brick driveway isn't just a functional path; it's a statement. It’s an investment in your home's aesthetic, a tangible commitment to quality, and, honestly, a significant upgrade from standard Concrete SAN Diego options or simple asphalt. For homeowners dreaming of that classic, robust, and undeniably beautiful entrance, understanding how to build a brick driveway correctly is absolutely paramount. It's a project that demands precision, a keen eye for detail, and a real grasp of structural integrity.
Here at Modern Yardz, we've spent years transforming outdoor spaces, crafting everything from serene Pools AND Spas to intricate Outdoor Kitchens SAN Diego and, yes, countless stunning driveways. Our collective experience has taught us that while the idea of a DIY brick driveway can be appealing, the execution requires professional-level knowledge. We're going to walk you through the definitive process of how to build a brick driveway, sharing the insights and best practices our team employs daily, ensuring a result that's not just beautiful but genuinely built to endure the rigors of 2026 and beyond.
Why Choose Brick for Your Driveway?
So, why brick? It’s a fair question, especially with so many paving options available. For us, the answer is multi-faceted. First, there's the aesthetic appeal. Bricks offer a timeless elegance, a warmth, and a texture that other materials simply can't replicate. They come in a vast array of colors and styles, allowing for incredible customization that perfectly complements your home's architecture and your overall Landscape Design SAN Diego. Our team has found that this versatility is a huge draw for homeowners looking for something truly unique.
Then, consider durability. A properly installed brick driveway, using the right techniques we'll outline, can withstand heavy traffic, harsh weather, and the test of time far better than many alternatives. We've seen brick driveways that are decades old still looking magnificent, holding their value remarkably well. It’s an unflinching, robust surface. Maintenance, too, often involves individual brick replacement rather than patching large sections, which can be a significant advantage. This longevity is a critical, non-negotiable element for any outdoor hardscaping project we undertake, and it’s a key reason why we often recommend brick for those asking how to build a brick driveway that truly lasts.
Essential Planning Before You Dig
Before any shovel hits the dirt, meticulous planning is absolutely crucial. Honestly, though, this phase is where many DIY projects falter. You wouldn't just start building a house without blueprints, right? The same principle applies here. We're talking about permits, design, accurate measurements, and, perhaps most importantly, drainage. You don't want water pooling on your new driveway, eroding your base, or creating ice hazards in colder months.
Our first step always involves a comprehensive site assessment. We're looking at the existing topography, soil conditions, and potential runoff paths. Understanding these elements is fundamental to designing an effective drainage system, which might involve a slight slope, permeable Pavers SAN Diego, or even installing subsurface drainage. We recommend consulting with local authorities regarding any necessary permits for driveway construction; rules vary wildly, and skipping this step can lead to significant headaches down the line. As for design, consider patterns like herringbone, basketweave, or running bond. Each offers a distinct look and structural strength. Knowing how to build a brick driveway with a specific pattern in mind will guide your material estimates and cutting strategy.
Gathering Your Arsenal: Tools and Materials
Okay, so you've planned, you've permitted, and you've got a design etched in your mind. Now, it's time to gather everything you'll need. Don't skimp on quality here; inferior materials or inadequate tools can compromise the entire project, leading to costly repairs later. Our team can't stress this enough: invest wisely at this stage.
Here's a breakdown of the essentials for how to build a brick driveway:
| Category |
Essential Items |
Professional Recommendation |
| Excavation |
Shovels, pickaxe, wheelbarrow, tamper/compactor |
Rent a plate compactor (at least 200 lbs) for efficiency. |
| Grading & Leveling |
String line, stakes, measuring tape, level |
Use a long, straight 2x4 for screeding sand. |
| Base Materials |
Crushed aggregate (e.g., gravel, decomposed granite), geotextile fabric |
Choose angular aggregate for better compaction and drainage. |
| Bedding & Edging |
Washed concrete sand, plastic/steel edging |
Use polymeric sand for joints; it's a game-changer for stability. |
| Paving |
Paving bricks (pavers), brick hammer, brick saw |
Rent a wet-saw for clean, precise cuts. |
| Safety |
Gloves, safety glasses, hearing protection |
Prioritize safety; it's not worth the risk. |
Regarding the bricks themselves, you'll want to use interlocking concrete pavers designed for driveways, not standard building bricks. These pavers are manufactured to withstand vehicular loads and freeze-thaw cycles, making them the critical component for how to build a brick driveway that stands strong. We've found that choosing a high-quality paver from a reputable supplier makes all the difference in the finished product's longevity and appearance.
The Foundation: Prepping Your Site
This is where the real work begins, and frankly, it's the most physically demanding part. A solid foundation is, without exaggeration, everything. Without it, your beautiful brick driveway will inevitably settle, shift, and crack. We’re talking about excavation, grading, and compacting the subgrade with unflinching attention to detail.
First, mark out your driveway area accurately using stakes and string lines. Then, excavate the area to the required depth. This depth depends on your paver thickness and base material, but typically, you're looking at 8 to 12 inches for a residential driveway. This accounts for the sub-base, base, and bedding layers, plus the pavers themselves. Remove all organic material, roots, and soft spots. Our experience shows that any organic matter left behind will decompose, creating voids that lead to settlement. Once excavated, ensure the subgrade is properly sloped for drainage – a minimum of 1/8 to 1/4 inch per foot is standard. Now, compact that subgrade with your plate compactor until it's incredibly dense. This step is critical. We mean it sincerely: it runs on genuine connections to the earth beneath. Lay down a layer of geotextile fabric to separate the subgrade from your base material, preventing intermixing and improving drainage. This is a small investment that pays massive dividends in preventing future issues when learning how to build a brick driveway that lasts for decades.
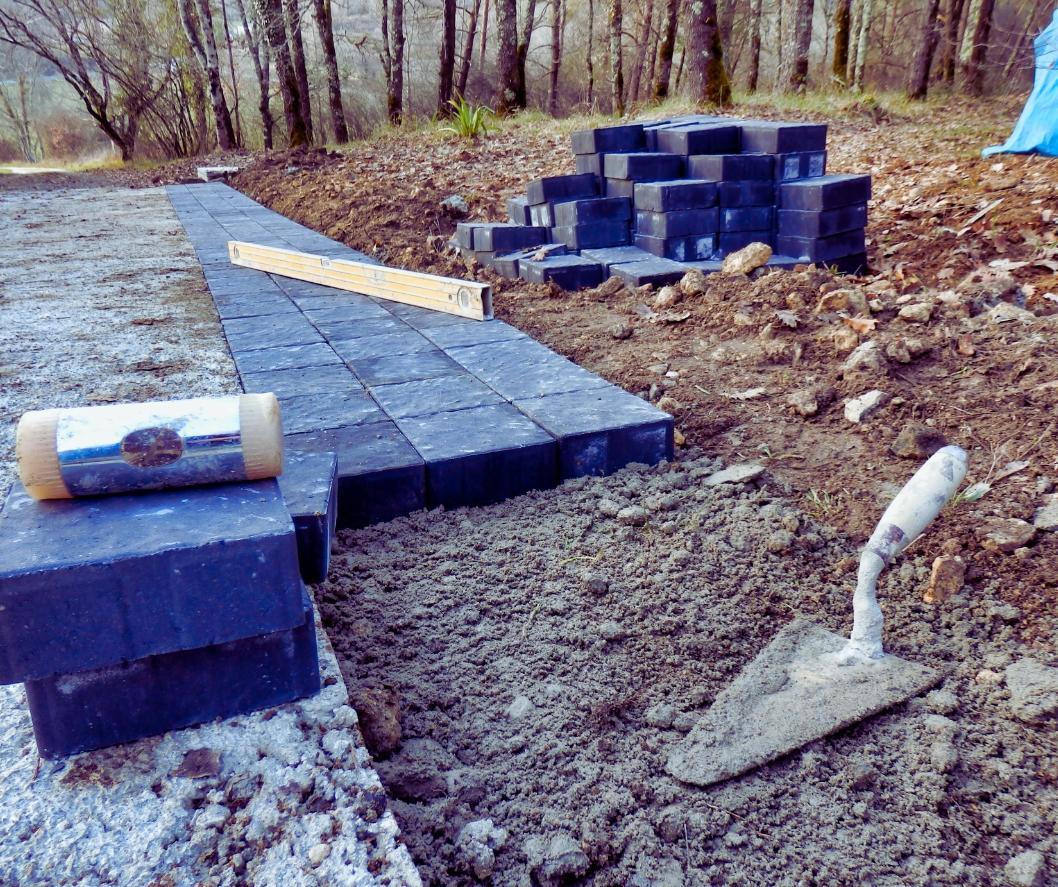
Laying the Groundwork: Sand Bedding and Edging
With your compacted subgrade and geotextile fabric in place, it’s time for the base layer. This typically consists of 4 to 8 inches of crushed aggregate. Spread this material evenly, making sure to maintain your desired slope. Then, compact it in lifts – meaning, you spread a few inches, compact it thoroughly, then add more, and compact again. This multi-stage compaction is vital for achieving a truly stable base. Our team always aims for at least 95% compaction, a demanding, often moving-target objective.
Next comes the bedding layer, usually 1 inch of washed concrete sand. This sand shouldn't be too fine or too coarse. The key here is to screed the sand to a perfectly uniform thickness and grade. Use a long, straight 2x4 or aluminum screed board, resting it on guide pipes or rails set at the correct elevation. Pull the screed board across the sand, removing excess and filling low spots. Do not compact this sand layer! It needs to be loose to allow the pavers to settle into it. This level, consistent bedding layer is absolutely essential for a smooth, even surface, which is a critical, non-negotiable element for how to build a brick driveway that looks professional.
Finally, before laying the bricks, install your edge restraints. These can be plastic or steel and are typically anchored with long spikes into the compacted base. Edge restraints are fundamental; they prevent the pavers from migrating laterally, maintaining the integrity and shape of your driveway. We've found that without proper edging, even the best-laid pavers will eventually spread and lose their tight interlocking bond. It's a simple step, but one that drastically impacts the long-term performance.
The Art of Placement: Laying Your Bricks
Now for the satisfying part: laying the pavers! This is where your chosen pattern comes to life. Begin laying bricks from a fixed edge, such as an existing house foundation or a precisely installed edge restraint. Work your way across the driveway, placing pavers tightly together but not forcing them. Our team recommends working from several open bundles of pavers to achieve a natural color blend, as slight variations are common.
Maintaining straight lines and consistent spacing is paramount. Use a string line stretched across your work area as a guide, frequently checking alignment with a straightedge. For cutting pavers to fit edges, curves, or obstacles, a brick saw (wet-saw is best for clean cuts) is indispensable. Always wear appropriate safety gear when operating power tools. As you lay the pavers, stand or kneel on the already-laid bricks to avoid disturbing the screeded sand bed. This approach (which we've refined over years) delivers real results. It ensures the integrity of the bedding layer and prevents uneven settlement later on. For those wondering how to build a brick driveway with impeccable precision, this patient, methodical approach is the secret.
Finishing Strong: Compaction and Joint Sand
Once all the pavers are laid, it’s time to lock them into place. This involves two crucial steps: initial compaction and applying joint sand. First, run your plate compactor over the entire surface of the newly laid pavers. We recommend using a vibratory plate compactor with a protective rubber mat on the bottom to prevent chipping or scratching the pavers. This initial pass (or two) will settle the pavers firmly into the sand bed, achieving that critical interlock and correcting any minor variations in height. You'll literally see the driveway become more stable, more solid. It’s a remarkable transformation.
After compaction, spread a generous amount of polymeric sand over the entire driveway surface. Polymeric sand is a finely graded sand mixed with special additives that, when activated by water, bind together, creating a flexible, yet firm, joint. This prevents weed growth, insect infestation, and sand washout. Sweep the sand into all the joints using a stiff broom, making sure every crevice is completely filled. We recommend sweeping in multiple directions to ensure maximum penetration. Once the joints are filled, gently remove any excess sand from the paver surface with a leaf blower or a very fine broom. Then, mist the driveway with water, following the polymeric sand manufacturer's instructions precisely. The water activates the polymers, setting the sand into a formidable bond. This final step is often overlooked but is a critical, non-negotiable element for how to build a brick driveway that truly stands the test of time.
Ongoing Care: Maintaining Your Brick Driveway
Even the most meticulously installed brick driveway requires some ongoing care to maintain its pristine appearance and structural integrity. Think of it as protecting your investment. Regular sweeping to remove debris, leaves, and dirt prevents staining and keeps the joints clear. We also recommend periodic sealing, typically every 2-3 years, depending on traffic and local weather conditions. A good quality paver sealer will enhance the brick's color, protect against stains, and further stabilize the joint sand, adding another layer of defense against the elements. Our team has learned that proactive maintenance significantly extends the lifespan of any hardscaping, including a brick driveway.
Should individual pavers become damaged or stained, one of the significant advantages of brick is the ease of repair. Unlike asphalt or Concrete SAN Diego, you can carefully remove and replace individual bricks without tearing up large sections of the driveway. This means your driveway can look impeccable for decades with minimal fuss. This ease of repair is a key benefit when considering how to build a brick driveway that's practical for the long haul. Remember, a little attention now saves a lot of hassle later.
When to Call the Experts: Professional Insight
While we've outlined how to build a brick driveway in detail, we understand this is a formidable undertaking. For many homeowners, the sheer scale of excavation, precise grading, and heavy lifting can be overwhelming. That's perfectly understandable. Our team at Modern Yardz specializes in turning complex landscaping visions into stunning realities, without the grueling road warrior hustle on your part. We handle every step, from initial Landscape Design SAN Diego to final construction, with care and precision, ensuring the highest quality results.
Whether you're looking for a new brick driveway, a new Patio Covers Pergolas SAN Diego, or even comprehensive Outdoor Kitchens SAN Diego integration, we've got the expertise. We’re not just building yards; we’re building spaces where memories are made. If the thought of tackling how to build a brick driveway on your own feels like too much, or if you simply want the assurance of a professional, long-lasting installation, we encourage you to connect with us. We're here to help you create outdoor spaces that are as functional as they are beautiful. You can always visit our website for more information or to see examples of our work. When you're ready to discuss your project, we invite you to BOOK MY FREE CONSULTATION.
A brick driveway is a truly timeless addition to any home, offering unparalleled curb appeal and enduring functionality. By following these expert guidelines on how to build a brick driveway, you're well on your way to creating an entrance that will impress for generations. Remember, precision in planning and execution makes all the difference. We're confident that with the right approach, your brick driveway will be a source of pride for years to come. It’s an investment that truly pays off, enhancing both the beauty and value of your property. We're here to support that vision, every step of the way.


.webp)
.webp)