Sloped yards, while offering intriguing design possibilities, also present some significant challenges. Erosion, soil instability, and unusable space are common issues that homeowners contend with. That's where a well-constructed retaining wall becomes not just a functional necessity but a pivotal design element, transforming problematic grades into beautiful, tiered landscapes. Our team at Modern Yardz has spent years perfecting the art of shaping outdoor spaces, and we’ve seen firsthand the dramatic impact a properly built retaining wall can have.
Building a robust, visually appealing stone retaining wall on a slope isn't a simple weekend project. It demands careful planning, a deep understanding of engineering principles, and a meticulous approach to execution. But when done right, it adds incredible value, stability, and aesthetic charm to any property. We're here to walk you through the comprehensive process, sharing our hard-won insights and professional recommendations for tackling this formidable, yet incredibly rewarding, endeavor. Let's dive into how to build a stone retaining wall on a slope that stands the test of time.
The Crucial First Steps: Planning and Site Assessment
Before any stone is moved or any dirt is dug, the initial planning phase is absolutely critical. Honestly, it's the bedrock of the entire project. We can't stress this enough: cutting corners here will inevitably lead to costly, sometimes catastrophic, failures down the line. Our experience shows that a thorough site assessment and a well-thought-out design save immense headaches later on. When considering how to build a stone retaining wall on a slope, you're really starting with the land itself.
First, you'll need to accurately measure the slope's grade, understand the soil composition, and identify any existing drainage patterns. Is the soil primarily clay, sand, or loam? Clay soils, for instance, retain more water and exert greater pressure when saturated, which is a vital consideration for wall stability. You'll also need to determine the wall's height and length. Taller walls, generally anything over four feet, often require professional engineering review and permits, a regulatory hurdle that varies by location but is increasingly common across many jurisdictions in 2026. Ignoring these requirements isn't just risky; it can lead to legal complications and mandated demolition.
Our team often begins with a detailed Landscape Design SAN Diego consultation. This allows us to meticulously evaluate the site, consider the overall aesthetic vision for your outdoor space, and develop a comprehensive plan that accounts for both functionality and beauty. It's about more than just a wall; it's about integrating it seamlessly into a cohesive outdoor environment. We mean this sincerely: a great retaining wall enhances the entire landscape, complementing elements like Pavers SAN Diego or even a future Pools AND Spas installation. Thinking holistically from the outset is our guiding principle. That's the key. This upfront investment in planning is indispensable when you're learning how to build a stone retaining wall on a slope with enduring integrity.
Choosing Your Stone: Material Matters
The choice of stone isn't just an aesthetic decision; it's fundamental to the wall's structural integrity and longevity. Different types of stone offer varying degrees of durability, weight, and workability. We've found that homeowners often gravitate towards natural stone for its timeless appeal and ability to blend harmoniously with the environment. But which type is best for how to build a stone retaining wall on a slope?
Here's a quick comparison of common stone types we often recommend:
| Stone Type |
Characteristics |
Best Use Cases |
Pros |
Cons |
| Fieldstone |
Irregular, rounded, rustic appearance |
Informal, naturalistic walls, garden beds |
Natural look, readily available, cost-effective |
Irregular shapes can be challenging to stack, less structural |
| Limestone |
Versatile, various colors, often cut or dressed |
Formal or informal walls, durable, easy to work with |
Good compressive strength, aesthetic appeal |
Can be susceptible to acid rain erosion over long term |
| Granite |
Extremely hard, dense, speckled appearance |
High-load bearing walls, formal designs |
Exceptional durability, weather-resistant, strong |
Very heavy, difficult to cut, higher cost, requires heavy machinery |
| Sandstone |
Softer, layered texture, earthy tones |
Decorative walls, less structural pressure areas |
Easy to cut and shape, natural warm colors |
Softer, more porous, can weather more quickly |
| Lava Rock |
Porous, lightweight, dark, irregular |
Decorative, low-height walls |
Unique texture, good drainage, lightweight |
Less structural strength, prone to crumbling over time |
We recommend selecting a stone that's locally sourced if possible. This not only supports local economies but often means the stone is naturally suited to the regional climate. When you're figuring out how to build a stone retaining wall on a slope, remember that the stone's weight and interlocking capabilities are paramount. Heavier, more angular stones tend to interlock better and provide greater stability, which is exactly what you need on a challenging incline. Our team often guides clients through this selection process, ensuring the chosen material aligns with both their vision and the practical demands of the site.
Foundation First: The Unseen Strength
No matter how beautiful your chosen stone, if the foundation isn't impeccable, your wall won't last. Period. This is where many DIY projects falter, resulting in leaning, cracking, or even collapsing walls within a few years. When thinking about how to build a stone retaining wall on a slope, the foundation is the critical, non-negotiable element. It's comprehensive.
Start by excavating a trench that's wider than your wall (typically 2-3 times the width of your base stones) and deep enough to get below the frost line in your region. This depth prevents frost heave, a significant cause of wall failure. The trench bottom must be level, compacted, and free of organic matter. We're talking about a perfectly level base here, not 'close enough.' Use a tamper to compact the soil thoroughly.
Next, lay a base of crushed gravel or angular stone, typically 6-12 inches deep. This granular material provides excellent drainage and a stable, non-shifting platform for your first course of stones. Compact this base layer rigorously. Our team often uses a plate compactor for this step, ensuring maximum density. This base is essentially distributing the immense weight of your future stone retaining wall on a slope, preventing differential settlement that can quickly compromise its integrity. It's an investment in the wall's future, really.
Drainage: The Silent Guardian
Water is the archenemy of any retaining wall. Hydrostatic pressure – the force exerted by water trapped behind a wall – is a primary culprit in wall failures. A wall without proper drainage is, quite frankly, a ticking time bomb. Our experience unequivocally shows that integrating robust drainage is just as important as the structural components when you're determining how to build a stone retaining wall on a slope.
The most effective drainage strategy involves several layers. First, a perforated drainpipe (often a French drain) should be laid at the base of the wall, just behind the first course of stones. This pipe, wrapped in a filter fabric to prevent clogging, collects water percolating through the backfill. It should be sloped gently towards an outlet, directing water away from the wall's base and into a storm drain or a designated drainage area.
Behind the drainpipe, you'll need a generous layer of clean, coarse gravel or angular aggregate (at least 12-18 inches thick) extending up the entire height of the wall. This gravel backfill allows water to move freely down to the drainpipe. On the soil side of this gravel, a geotextile fabric acts as a separation layer, preventing fine soil particles from migrating into the gravel and clogging the drainage system over time. We've seen projects without this fabric fail within a few seasons, and it's a simple, cost-effective addition that makes all the difference. This meticulous attention to water management is paramount when mastering how to build a stone retaining wall on a slope that's built to last.
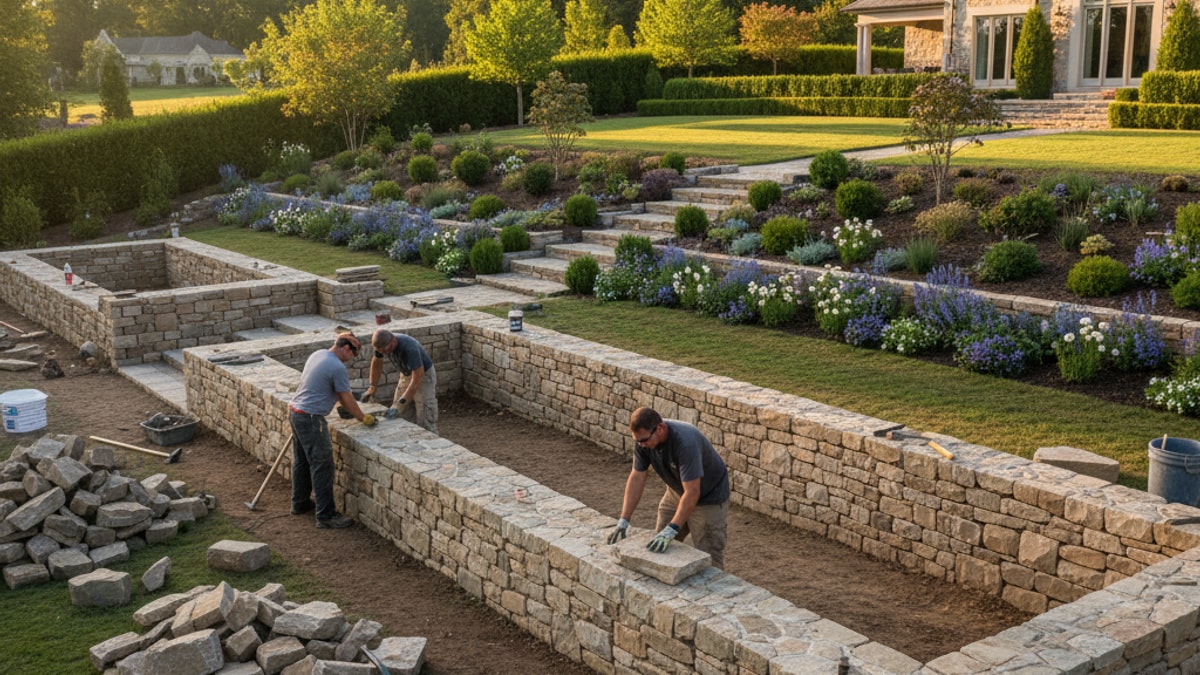
Laying the Stones: Art and Engineering Combined
Now, for the satisfying part: laying the stones! This is where the artistry meets the engineering. When considering how to build a stone retaining wall on a slope, remember that the goal isn't just to stack stones; it's to create a self-supporting, interlocking structure.
Start with your largest, flattest stones for the base course. These 'footer' stones provide a broad, stable platform. Lay them directly on your compacted gravel base. Each stone should be seated firmly, without rocking. Use a rubber mallet to tap them into place. As you lay each course, ensure a slight backward slope (or 'batter') of about 1 inch for every 12 inches of wall height. This batter leans the wall into the slope, significantly increasing its stability against the earth's pressure. It's a crucial detail.
Interlocking is key. Avoid creating continuous vertical joints (stacking stones directly on top of each other). Instead, stagger the joints like brickwork, ensuring each stone bridges the joint of the stones below it. This distributes the load and ties the wall together. Use smaller stones (shims or spalls) to fill any significant gaps between larger stones, ensuring tight contact points and preventing movement. Our team meticulously dry-stacks these Seat Retaining Walls with precision, ensuring every stone contributes to the overall strength.
As you build up the courses, consistently check for levelness (side-to-side) and batter (front-to-back) with a level. Don't eyeball it; precision here is paramount. Every few courses, we recommend incorporating 'deadman' anchors – large stones or timbers extending horizontally into the slope, perpendicular to the wall face. These anchors are buried in the backfill and provide additional resistance against the wall tipping forward. They’re essentially tying the wall back into the earth, a smart strategy for how to build a stone retaining wall on a slope, especially for taller structures. It's a foundational technique we rely on.
Backfilling and Compaction: Reinforcing the Structure
Backfilling isn't just about throwing dirt behind the wall; it's a critical step in reinforcing the structure and ensuring proper drainage. As you lay each course of stone, you'll simultaneously backfill behind it, creating layers of drainage aggregate and compacted soil. It’s a rhythmic process.
Behind the wall, directly against the geotextile fabric, place your drainage gravel. This should extend up to the level of the current stone course. Beyond this gravel layer, you'll backfill with native soil, free of large rocks or organic debris. It's vital to compact this soil in thin layers, typically 6-8 inches at a time. Using a hand tamper or a jumping jack compactor (for larger projects) ensures that the soil is dense and stable, minimizing future settlement and reducing the likelihood of pressure buildup against the wall. We cannot emphasize compaction enough. Inadequate compaction is a silent killer of retaining walls.
This layered approach of stone, drainage gravel, and compacted soil works synergistically. The stones bear the vertical load, the gravel manages water, and the compacted soil provides lateral support. This systematic backfilling is integral to how to build a stone retaining wall on a slope that can withstand the forces of nature year after year. It's a testament to robust engineering and careful execution.
Finishing Touches: Capstones and Aesthetics
Once your wall reaches its desired height, it's time for the capstones. These are the finishing stones that sit on top of the last course, providing a clean, finished look and often adding an extra layer of stability by tying the top course together. Capstones can be flat, uniform pieces, or more irregular, depending on the overall aesthetic you're aiming for. Sometimes, we'll use a mortar to secure capstones, particularly if the wall is also serving as a seating area or if added stability against dislodgement is desired.
Beyond the capstones, consider how the surrounding landscape will integrate with your new retaining wall. This is where the initial Landscape Design SAN Diego truly comes to fruition. Will you plant drought-tolerant groundcovers on the slope above, or perhaps incorporate Landscape Lighting SAN Diego to highlight the wall's texture and form in the evenings? The retaining wall itself might become a feature for a new Outdoor Kitchens SAN Diego or complement a cozy Fire Features area. These are the kinds of details that elevate a functional structure into a truly extraordinary outdoor space.
Essential Tools and Safety Considerations
Successfully tackling how to build a stone retaining wall on a slope requires the right tools and, more importantly, a steadfast commitment to safety. This isn't a project to take lightly. Heavy lifting, uneven terrain, and the risk of falling stones demand vigilance.
Essential Tools:
- Shovels and Picks: For excavation.
- Wheelbarrow: For moving stones, gravel, and soil.
- Rubber Mallet: For seating stones.
- Spirit Level (long and short): For ensuring levelness and batter.
- String Line and Line Level: For maintaining straight lines and consistent heights.
- Tape Measure: For precise measurements.
- Plate Compactor or Hand Tamper: For compacting base and backfill.
- Stone Hammer and Chisels: For shaping and splitting stones (if necessary).
- Gloves: Heavy-duty, for hand protection.
- Safety Glasses: To protect eyes from stone chips.
- Knee Pads: For comfort during prolonged kneeling.
- Heavy-Duty Pry Bars: For leveraging heavy stones.
- Come-along or Block and Tackle: For maneuvering very heavy stones.
Safety First, Always:
Always wear appropriate personal protective equipment (PPE), including steel-toed boots, heavy gloves, and eye protection. Lift with your legs, not your back, and never attempt to lift stones that are too heavy. Enlist help for larger stones – it’s not worth risking injury. Be aware of your surroundings, especially on a slope, where footing can be precarious. If using power tools like stone saws, follow all manufacturer safety guidelines. We've seen injuries occur when these fundamental safety protocols are overlooked. It’s just not worth it.
Common Pitfalls and How to Avoid Them
Even with the best intentions, building a stone retaining wall on a slope can present unexpected challenges. Our team has encountered (and resolved) countless issues over the years, and we're happy to share some common pitfalls and how to steer clear of them.
- Inadequate Foundation: As we've emphasized, a shallow or poorly compacted foundation is a recipe for disaster. Always dig deep enough to accommodate the base material and account for the frost line. Compact, compact, compact!
- Poor Drainage: Without proper drainage, hydrostatic pressure will eventually push your wall outwards. Don't skimp on the drainpipe, gravel backfill, or geotextile fabric. It’s an investment, not an expense, when learning how to build a stone retaining wall on a slope.
- Insufficient Batter: A vertical or outwardly sloped wall will quickly fail. Maintain that crucial backward slope (batter) into the hill to ensure stability. It’s a simple geometric principle that provides immense structural advantage.
- No Interlocking Stones: Stacking stones directly on top of each other creates weak points. Staggering joints and using smaller stones to fill gaps ensures a strong, cohesive structure. Think of it like a puzzle, where every piece supports the next.
- Skipping Permits/Engineering: For taller walls, ignoring local regulations can lead to fines, demolition, and significant liability. Always check with your local planning department before starting. This isn't just a recommendation; it's a legal necessity in many areas in 2026.
- Rushing the Process: Building a durable retaining wall takes time and patience. Rushing through steps, especially compaction or proper stone placement, will compromise the wall's longevity. Slow and steady truly wins the race here. Our collective expertise has shown this time and again.
The Long-Term Perspective: Maintenance and Care
Once your magnificent stone retaining wall on a slope is complete, a little ongoing care will ensure it performs its job beautifully for decades. Generally, stone retaining walls are remarkably low-maintenance, a testament to their inherent durability. However, it's wise to conduct periodic inspections, especially after heavy rains or significant freeze-thaw cycles.
Look for any signs of shifting stones, bulging sections, or areas where the soil behind the wall might be eroding. Ensure your drainage outlets remain clear of debris. Clear away any plant growth that might root into the wall's joints, as this can eventually cause damage. If you notice any significant issues, it's always best to consult with professionals who specialize in Seat Retaining Walls to address them promptly before they escalate. Proactive care is truly the best approach.
This robust, thoughtfully constructed stone retaining wall isn't just a barrier; it's a testament to good planning, skilled craftsmanship, and a deep understanding of landscape dynamics. It'll transform your sloped yard from a challenge into a stunning, functional asset. Ready to Upgrade Your Backyard? Let’s Design the Outdoor Space You’ve Been Dreaming Of. Our team is here to help you Transform Your Outdoor Space Into Something Extraordinary.
Frequently Asked Questions About Building Stone Retaining Walls
How important is professional design for a retaining wall on a slope?
Professional design is incredibly important, especially for taller walls or complex slopes. Our team can assess soil conditions, calculate loads, and ensure the design meets local building codes, preventing costly mistakes and ensuring long-term stability. It’s a foundational step that secures your investment.
What's the ideal slope for a stone retaining wall?
There isn't one 'ideal' slope, as walls are designed to accommodate various grades. The key is that the wall's design, foundation, and drainage are engineered to counter the specific forces exerted by that particular slope. Taller walls are needed for steeper slopes, requiring more rigorous construction.
Can I use salvaged stones for my retaining wall?
Yes, absolutely, salvaged stones can be a fantastic, eco-friendly option. Just ensure they are structurally sound, free of significant cracks, and of a consistent enough type to allow for proper interlocking and stability. We've seen beautiful walls built with reclaimed materials.
How do I prevent weeds from growing in the joints of a dry-stacked wall?
While some weed growth is natural, a good foundation and tightly fitted stones minimize opportunities. You can also add a layer of landscape fabric behind the wall and fill joints with gravel or small spalls to deter weeds. Occasional manual weeding is usually sufficient.
What's the difference between a dry-stacked and mortared stone wall?
Dry-stacked walls rely on the weight and friction of stones for stability, allowing excellent drainage. Mortared walls use mortar to bind stones, offering a more rigid structure but requiring weep holes for drainage. For retaining walls, dry-stacked or gravity walls are often preferred for their inherent flexibility and drainage properties.
How long does it typically take to build a stone retaining wall on a slope?
The timeline varies dramatically based on wall size, site conditions, stone type, and crew size. A smaller, simpler wall might take a few days, while a large, complex one could span several weeks. Proper planning and preparation can significantly streamline the process.
Do I need a permit to build a stone retaining wall?
For most walls over a certain height (often 3-4 feet, depending on local regulations), a building permit is required. Walls supporting significant loads or near property lines also typically need permits. Always check with your local planning department in 2026 before starting any construction to avoid issues.
How do I ensure proper drainage behind the wall?
Proper drainage involves a perforated drainpipe at the base, a substantial layer of clean gravel directly behind the wall, and geotextile fabric separating the gravel from the native soil. This system works to channel water away, preventing hydrostatic pressure buildup.
What are 'deadman' anchors and why are they important?
Deadman anchors are large stones or timbers embedded horizontally into the slope, extending perpendicular from the wall face. They're critical for tying the wall back into the earth, providing crucial resistance against the wall tipping forward, especially on steeper slopes. They reinforce stability.
Can I build a curved stone retaining wall on a slope?
Yes, absolutely! Curved walls can be incredibly beautiful and are often more stable than straight walls due to their arching strength. However, they require even more meticulous planning and precise stone placement to maintain consistent curves and batter. It's a more advanced technique but yields stunning results.
What if my soil has a high clay content?
Clay soil retains water, increasing pressure on the wall. For high-clay sites, enhance drainage by using a thicker layer of drainage gravel, ensuring the drainpipe is highly effective, and potentially incorporating additional backfill techniques. Compaction becomes even more critical with clay.
How does a retaining wall on a slope impact my property value?
A well-built, aesthetically pleasing stone retaining wall on a slope significantly enhances curb appeal, prevents erosion, and creates usable tiered spaces, all of which generally increase property value. It's a smart, long-term investment in your home's outdoor functionality and beauty.
What's the best way to get heavy stones to the build site on a slope?
Moving heavy stones on a slope requires careful planning and often specialized equipment. Options include using a wheelbarrow with strong tires, a hand truck, a small skid steer (if accessible), or even a system of ramps and levers. Prioritizing safety during transport is paramount.
How do I calculate the amount of stone and gravel I'll need?
To estimate materials, calculate the wall's volume (length x height x average width). For stones, you'll need to know the average volume or weight per stone. For gravel, calculate the volume of the drainage layer. Always add 10-15% for waste and cuts. Our team provides precise material estimates for all our projects.


.webp)
.webp)