A sloped yard, persistent erosion, or simply the desire for a more structured, usable outdoor space often leads homeowners to one indispensable solution: the retaining wall. And when it comes to durability, versatility, and sheer aesthetic potential, concrete stands as a formidable champion. It's not just about holding back earth; it's about redefining your landscape, creating terraces, or even providing integrated seating.
Here at Modern Yardz, we've helped countless clients transform their properties, and we understand the burning questions that arise when considering such a significant project. You're likely wondering, 'how to build concrete retaining wall?' It's a question with layers, demanding careful planning and precise execution. We're here to break it all down, drawing from our extensive experience in landscape design and construction, to guide you through every critical step in 2026 and beyond. Let's make sure your next outdoor project is built to last, providing both function and beauty for years to come.
Why a Concrete Retaining Wall is a Game Changer for Your Outdoor Space
Before we dive into the nitty-gritty of how to build concrete retaining wall, let's explore why concrete is often the material of choice. Our team has found that concrete offers unparalleled strength and longevity, critical factors when you're dealing with substantial earth retention. Unlike other materials that might degrade or shift over time, a properly constructed concrete wall is a bulwark against the elements, designed to withstand the relentless forces of soil and water pressure.
It's also incredibly versatile. We're not just talking about utilitarian grey slabs here. Modern concrete techniques allow for a vast array of finishes, colors, and textures. You can stamp it, stain it, or even veneer it with stone or Pavers SAN Diego for a completely customized look that seamlessly integrates with your overall Landscape Design SAN Diego. Imagine a sleek, minimalist wall defining a contemporary patio, or a textured, earthy one blending into a natural garden setting. The possibilities are truly expansive, allowing us to create unique outdoor spaces that reflect individual style and enhance property value. Honestly, though, the structural integrity is what truly separates concrete, offering peace of mind where other materials might fail.
Beyond its strength and aesthetic flexibility, concrete retaining walls offer practical benefits like creating level areas on sloped sites, preventing soil erosion, and even forming raised garden beds. They can become integral features of your outdoor living area, doubling as seating or as the base for Fire Features or Outdoor Kitchens SAN Diego. We've seen these walls transform previously unusable inclines into vibrant, multi-functional zones. It's a significant investment, yes, but one that consistently delivers substantial returns in both utility and visual appeal.
Planning Your Retaining Wall Project in 2026: The Unflinching Essentials
Any successful construction project, especially one as structurally significant as a retaining wall, hinges on meticulous planning. This isn't a step you can rush, and frankly, it's where many DIY projects falter. Knowing how to build concrete retaining wall correctly starts long before you even mix the first bag of cement. Here's what we've learned: success depends on thoughtful foresight.
First, and perhaps most critically, consider local regulations and permits. In 2026, building codes are more stringent than ever, particularly for structures that bear significant load or are above a certain height (often around 4 feet, but this varies wildly). Failing to secure the necessary permits can lead to costly delays, fines, or even the dreaded demand to dismantle your hard work. Our team always advises checking with local authorities early in the process. It's a critical, non-negotiable element of any outdoor construction. Seriously, don't skip this.
Next, the design. This involves calculating the wall's height, length, and crucially, its structural requirements. What's the soil type like? How much load will it bear? Will there be hydrostatic pressure from trapped water? These aren't trivial questions. A professional engineer's input is often essential for walls over 4 feet tall or those supporting substantial structures above them. We can't stress this enough: an improperly designed wall is a catastrophic failure waiting to happen. Our Landscape Design SAN Diego experts can help you navigate these complexities, ensuring your design is sound, safe, and stunning.
Drainage is another paramount consideration. A retaining wall's worst enemy is hydrostatic pressure – water building up behind it. Without proper drainage, that pressure can crack or even topple your wall over time. We're talking about subsurface drainage systems, gravel backfill, weep holes, and possibly even a perforated pipe (a 'French drain') at the base. It's comprehensive. Ignoring drainage is like building a dam without a spillway; it's going to burst eventually. We've found that proper drainage is often the single most overlooked, yet vital, component for a truly lasting concrete retaining wall. When we're considering how to build concrete retaining wall, drainage is always at the forefront of our minds.
Lastly, material estimation. Once the design is finalized, you'll need to calculate the precise quantities of concrete, rebar, gravel, formwork lumber, and other supplies. Over-ordering wastes money; under-ordering wastes time. Our experience shows that it's always better to slightly overestimate materials to avoid last-minute trips to the supplier, especially for concrete, which isn't something you can easily pause and restart. We recommend adding a 5-10% buffer to your calculations.
Essential Tools and Materials You'll Need
Building a concrete retaining wall is a demanding task, and having the right tools makes all the difference. You wouldn't attempt a precision surgery with a butter knife, right? The same principle applies here. Here's a rundown of what you'll need, beyond the obvious raw materials like cement, aggregate, and rebar:
- Excavation Equipment: Shovels, picks, and potentially a mini-excavator or skid steer for larger projects. Trust us, digging a trench for a substantial wall by hand is a grueling road warrior hustle.
- Formwork Materials: Lumber (plywood, 2x4s), stakes, screws, nails, form ties, and form oil. These are what give your wall its shape and hold the wet concrete.
- Concrete Mixing & Handling: A concrete mixer (renting one is often cost-effective), wheelbarrows, concrete hoes, shovels, vibrators (internal or external) to remove air bubbles, and floats/trowels for finishing.
- Reinforcement Tools: Rebar cutters, rebar benders, and tie wire tools.
- Measuring & Layout: Tape measures, string line, levels (spirit level, laser level), plumb bob, and marking paint.
- Safety Gear: Gloves, safety glasses, steel-toed boots, and ear protection.
When it comes to the concrete itself, you'll need bags of ready-mix concrete or the individual components (cement, sand, gravel) if you're mixing from scratch. For reinforcement, rebar (reinforcing steel bars) is critical, typically #4 or #5 rebar, and often a mesh or grid for added strength. Don't forget gravel for drainage backfill and a drainage pipe. We've found that skimping on material quality or tool effectiveness never pays off in the long run. It always leads to headaches, rework, or a less robust final product. A truly well-built concrete retaining wall needs sound materials, period.
The Groundwork: Preparing the Foundation
This is where the rubber meets the road, or rather, where the earth meets the wall. A retaining wall's stability begins and ends with its foundation. A weak or improperly prepared base will eventually lead to settling, cracking, or outright failure. It's the absolute bedrock of how to build concrete retaining wall successfully.
1. Layout and Excavation: First, mark out the exact footprint of your wall. Use stakes and string lines to ensure straight lines and accurate angles. Then, the excavation begins. You'll need to dig a trench for the footing that's wider than your wall and extends below the frost line in your region (this varies, but our climate generally requires a deeper trench to prevent shifting from freeze-thaw cycles). The depth of the trench will accommodate the footing, a layer of compacted gravel, and typically about 6-12 inches of the wall itself below grade. This embedded portion is crucial for stability, anchoring the wall firmly in the earth. The trench bottom must be perfectly level and compacted rigorously. We mean this sincerely: a level foundation is non-negotiable.
2. Gravel Base: Once excavated and compacted, lay down a 6-12 inch layer of crushed gravel (typically 3/4-inch clean stone). This layer serves multiple purposes: it provides a stable, free-draining base for your footing, helping to distribute the wall's weight evenly and preventing water from accumulating directly beneath the concrete. Compact this gravel layer thoroughly using a plate compactor. Our team always emphasizes compaction; it's critical for preventing future settlement. A well-compacted base ensures that your concrete retaining wall has a solid, unyielding platform upon which to stand.
3. Formwork for the Footing: With the gravel base in place, you'll construct the formwork for the concrete footing. This typically involves using lumber to create a sturdy box within your trench. Ensure these forms are perfectly level and plumb, secured with stakes and bracing. Remember, any imperfections here will be magnified in the finished wall. It's a foundational, often underestimated, step in how to build concrete retaining wall. We've seen projects go sideways simply because the footing forms weren't absolutely precise.
4. Rebar Placement: Before pouring the footing, you'll install the steel reinforcement. This involves laying horizontal rebar within the footing forms and often vertical rebar that extends upwards, ready to be tied into the main wall's reinforcement. The rebar should be properly spaced, elevated off the ground (using 'chairs' or 'dobies') to ensure it's fully encapsulated by concrete, and securely tied together. This network of steel is what gives the concrete its tensile strength, preventing cracking and providing crucial resistance to the lateral forces of the soil. This approach (which we've refined over years) delivers real results, ensuring structural integrity.
Pouring and Curing: Mastering the Concrete
Now, the moment of truth: mixing and pouring the concrete. This stage requires coordination, speed, and precision. It's a messy job, but incredibly rewarding when done right. This is the tangible part of learning how to build concrete retaining wall.
1. Mixing the Concrete: Whether you're using bagged ready-mix or mixing from scratch, follow the manufacturer's instructions for water-to-cement ratio strictly. Too much water weakens the concrete significantly; too little makes it unworkable. We recommend a slump test if you're mixing large batches to ensure consistency. A good rule of thumb for retaining walls is usually a 3000-4000 psi concrete mix. For projects where you need a significant amount of concrete, like a large retaining wall or a new Concrete SAN Diego patio, it often makes sense to have a ready-mix truck deliver the concrete. This ensures consistent quality and saves immense labor.
2. Pouring the Footing: Pour the concrete into your footing forms, working systematically. Use a concrete vibrator (or a shovel/rebar to 'rod' it) to consolidate the concrete, removing air bubbles and ensuring it flows into every corner of the form and fully encapsulates the rebar. Over-vibrating can lead to segregation of materials, so a light touch is key. Once poured, level the surface of the footing with a screed board and allow it to set sufficiently before proceeding to the wall forms.
3. Building the Wall Forms: This is arguably the most complex part of how to build concrete retaining wall. You'll construct the wall forms directly on top of the cured footing, ensuring they are perfectly plumb, straight, and securely braced. These forms must withstand immense pressure from the wet concrete. Our team utilizes specific techniques for bracing and tying forms to prevent blowouts, which can be messy and costly. You'll need to leave openings for any weep holes or drainage pipes you planned.
4. Installing Vertical Rebar and Tie-Ins: As you build the wall forms, you'll weave in the vertical rebar, tying it securely to the horizontal rebar extending from the footing. This creates a monolithic, reinforced structure. Additional horizontal rebar will be placed within the wall forms at specified intervals, again, tied securely. This lattice of steel reinforcement is what gives the wall its incredible strength and resistance to lateral forces. We can't stress this enough: proper rebar placement and tying is critical.
5. Pouring the Wall: This requires even more care than the footing. Pour the concrete in lifts (layers) of 1-2 feet at a time, consolidating each lift with a vibrator. This gradual approach helps prevent excessive pressure on the forms and ensures proper consolidation. Watch for any bulges or leaks in the forms, and address them immediately. Once the forms are full, level the top surface of the wall with a float or trowel.
6. Curing: Concrete doesn't just dry; it cures. This chemical process strengthens the concrete over time, but it requires moisture. Keep the concrete damp for at least 7 days (or longer in hot, dry conditions) by misting it with water, covering it with plastic sheeting, or using a curing compound. Our experience shows that proper curing is absolutely essential for achieving the concrete's full design strength and durability. Rushing this stage will compromise the wall's longevity. We've seen it happen, and it's never a good outcome. In our current climate, especially, maintaining moisture is key.
| Feature |
DIY Approach (Small Scale) |
Professional Service (Large/Complex) |
| Height Limit |
Typically under 4 feet |
Virtually limitless with engineering |
| Permits |
Often overlooked, potentially problematic |
Always secured, fully compliant |
| Engineering |
Rarely involved, relies on basic knowledge |
Standard for walls over 4 feet, complex sites |
| Equipment |
Basic hand tools, rented mixer |
Heavy machinery, specialized concrete equipment |
| Labor |
Manual, time-intensive, physically demanding |
Efficient, skilled crew, specialized expertise |
| Risk Factor |
Higher risk of failure, injury |
Minimized through expertise and insurance |
| Drainage |
Basic pipe and gravel, can be insufficient |
Engineered, comprehensive, integrated systems |
| Finish Quality |
Varies widely, depends on skill and patience |
Consistent, high-quality, diverse aesthetic options |
| Cost |
Lower initial material cost, high time cost |
Higher initial cost, long-term value, peace of mind |
| Timeline |
Extended due to learning curve, limited resources |
Efficient, structured, timely completion |
Finishing Touches and Long-Term Care
Once your concrete has cured sufficiently, it's time to remove the forms. Do this carefully to avoid chipping or damaging the freshly exposed surfaces. Any minor imperfections can often be patched or ground down. Now, let's talk about the aesthetics and the critical, sometimes dramatic shift, toward long-term functionality.
1. Drainage Backfill: This step is crucial and must happen quickly after form removal. Backfill the trench behind the wall with coarse, free-draining gravel (again, 3/4-inch clean stone) for at least 12-18 inches. This gravel allows water to percolate down to your drainage pipe, preventing hydrostatic pressure. Place a layer of geotextile fabric between the gravel and the native soil to prevent soil particles from clogging your drainage system over time. We've found this fabric to be a small investment with significant long-term benefits.
2. Weep Holes and Drainage Pipe: Ensure any weep holes are clear and your drainage pipe (perforated pipe wrapped in fabric) is properly sloped towards an outlet. This outlet could be daylighted at the end of the wall, connected to a storm drain, or directed to a dry well. This system works as a team, ensuring water doesn't get trapped. Remember, a dry wall is a happy wall.
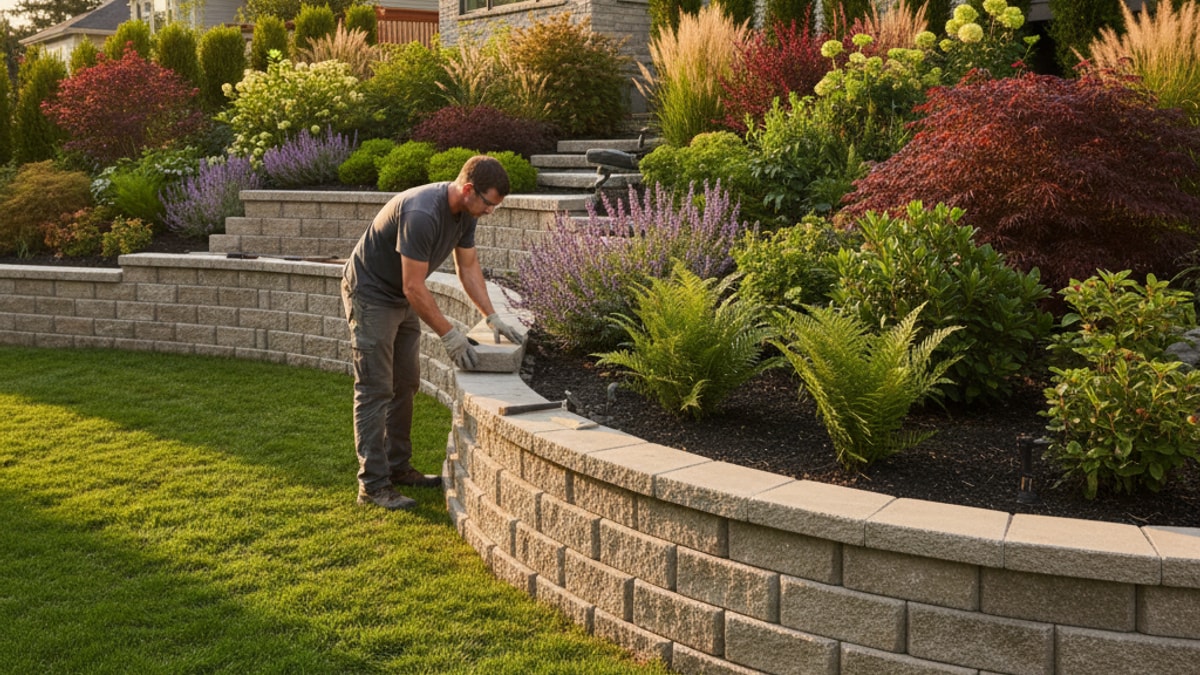
3. Aesthetic Finishes: This is where your wall truly becomes a design element. You can leave the concrete exposed for a raw, industrial look. Alternatively, consider staining it, painting it, or applying a decorative finish. Many clients opt for a veneer of natural stone, brick, or even Pavers SAN Diego to match other elements of their outdoor design. This truly customizes the look. This is where our Landscape Design SAN Diego expertise really shines, helping you choose finishes that complement your home and existing landscape features, creating a cohesive, stunning outdoor environment. We're not just building a concrete retaining wall; we're crafting an experience.
4. Topsoil and Planting: Finally, backfill the remaining trench with topsoil, ensuring proper grading away from the wall to direct surface water runoff. Consider planting appropriate vegetation on top of and around the wall. Plants with deep, fibrous root systems can further help stabilize the soil, but avoid large trees or shrubs directly behind the wall whose roots could eventually compromise its structure. We recommend consulting with us for plant selection that enhances both beauty and function.
Long-term care for a concrete retaining wall is fairly minimal, assuming it was built correctly. We recommend annual inspections for any signs of cracking, settling, or drainage issues. Address minor problems promptly before they escalate. Keeping drainage outlets clear of debris is essential. This proactive approach ensures your investment provides decades of reliable service. That's the reality. It all comes down to building it right the first time.
When to Call the Experts: Beyond DIY Ambition
While understanding how to build concrete retaining wall is a fantastic skill, it's also important to recognize when a project extends beyond the scope of a typical DIY endeavor. There's a fine line between a challenging home improvement and a complex engineering feat requiring professional oversight. We've seen it all, and sometimes, the smartest decision is to bring in the pros.
For walls over 4 feet tall, or those supporting critical structures like a driveway, a house foundation, or a Pools AND Spas deck, professional engineering and construction are not just recommended, they're mandatory for safety and longevity. The forces involved in retaining large amounts of earth are immense and can be incredibly dangerous if miscalculated. Our team has the specialized equipment, experience, and knowledge of specific building codes to tackle these formidable projects. We're talking about heavy machinery, precise calculations, and an unflinching commitment to safety protocols.
Furthermore, if your soil conditions are particularly challenging (e.g., expansive clay, very loose soil, or areas prone to seismic activity), a professional assessment is vital. Our experts understand the nuances of various soil types and how they impact retaining wall design and construction. We account for these factors in every project, ensuring that your Seat Retaining Walls or larger structural walls are engineered specifically for your site's unique characteristics. It's becoming increasingly challenging to get this right without deep, localized expertise.
Consider the time commitment as well. Building a concrete retaining wall is not a weekend project. It requires significant physical labor, careful attention to detail at every stage, and often, multiple days or even weeks of work. If you have demanding schedules and high expectations for your outdoor space, entrusting the project to professionals like Modern Yardz ensures efficient execution and a flawless finish. We handle every step, from initial Landscape Design SAN Diego to final construction, with care and precision, allowing you to enjoy the transformation without the grueling physical toll.
Ultimately, whether you're looking to redefine a small garden bed or undertake a major landscape overhaul, knowing how to build concrete retaining wall is empowering. But knowing when to partner with seasoned professionals? That's true wisdom. We're here to help you navigate those decisions and bring your vision to life. Ready to Upgrade Your Backyard? We believe your outdoor space should be an extension of your home, a place of beauty and relaxation. Let's Design the Outdoor Space You've Been Dreaming Of.
Building a concrete retaining wall is a substantial undertaking, one that can dramatically reshape your property and enhance its functionality and beauty. From the initial layout and meticulous foundation work to the precise concrete pour and thoughtful finishing, every step plays a crucial role in the wall's longevity and performance. We've seen too many homeowners regret cutting corners, and that's precisely why we've put together this comprehensive guide on how to build concrete retaining wall. When done right, with careful planning and execution—or the expert hand of a professional team like ours—your concrete retaining wall won't just hold back earth; it'll anchor a stunning, enduring outdoor legacy. We invite you to explore our full range of services and see how we can help Transform Your Outdoor Space Into Something Extraordinary.


.webp)
.webp)