Every homeowner, at some point, gazes upon a sloped yard or an uneven landscape and imagines a better, more functional space. It's a common scenario, honestly. That's precisely where understanding how to build a garden retaining wall becomes not just a DIY project, but a transformational endeavor for your property. We're not talking about a simple border; we're talking about a structure that can redefine your outdoor living areas, prevent erosion, and add significant aesthetic value.
Here at Modern Yardz, our collective expertise spans decades, guiding countless individuals and families through the intricate dance of landscape design and construction. We've seen the dramatic impact a well-constructed retaining wall can have, from creating usable tiers in a challenging incline to simply adding a sophisticated visual element. This isn't just theory for us; it's hands-on experience, project after project. So, if you're ready to learn how to build a garden retaining wall, we're here to walk you through every critical step, ensuring your project stands strong and looks impeccable for years to come.
Why Even Bother with a Retaining Wall?
Before we dive into the nitty-gritty of how to build a garden retaining wall, let's briefly touch on why these structures are so invaluable. Beyond the obvious aesthetic upgrade, retaining walls serve several crucial, often overlooked, purposes. They're formidable defenders against soil erosion, especially on sloped terrains, preventing valuable topsoil from washing away during heavy rains—a significant concern in many regions, even in 2026's increasingly unpredictable weather patterns. Moreover, they create flat, usable land in areas that would otherwise be impractical, perfect for planting beds, patios, or even the foundation for a new Outdoor Kitchens SAN Diego. Imagine transforming a steep, inaccessible slope into a series of beautiful, planted terraces. That's the power we're discussing here. It's about maximizing your outdoor footprint and ensuring its longevity. We've found that homeowners often underestimate the sheer utility until they experience it firsthand.
Planning Your Retaining Wall: The Unflinching First Step
Honestly, planning is the bedrock of any successful outdoor project, especially when you're figuring out how to build a garden retaining wall. Skip this, and you're inviting a cascade of future headaches, trust us. Our team always emphasizes meticulous planning, which encompasses understanding your site's unique characteristics, local regulations, and your ultimate vision. First, assess your site's slope. Is it gentle, moderate, or steep? The steeper the slope, the more engineered the wall needs to be, potentially requiring professional input, especially for walls exceeding four feet in height. Always check local building codes and obtain any necessary permits before you even think about breaking ground. This isn't a suggestion; it's a non-negotiable requirement. Ignoring this could lead to costly rebuilds or fines, something we've seen happen far too often. We often assist clients with this initial Landscape Design SAN Diego phase, ensuring all regulatory hurdles are cleared.
Next, consider the wall's purpose. Is it primarily for erosion control? Or are you aiming to create a raised garden bed or a level pad for a new Patio Covers Pergolas SAN Diego? This informs material choices, height, and overall design. Think about drainage too; proper water management is critical for the wall's stability. Our experience shows that overlooking drainage is a catastrophic error. We'll delve deeper into that, but for now, just know it's a colossal factor. This comprehensive planning stage is where you truly lay the groundwork for how to build a garden retaining wall that performs impeccably.
Choosing Your Materials: More Than Just Aesthetics
When contemplating how to build a garden retaining wall, material selection is paramount, extending far beyond simple aesthetics. It impacts durability, cost, and the complexity of installation. We've worked with nearly every material imaginable for Seat Retaining Walls, and each brings its own set of advantages and considerations. Interlocking concrete blocks are incredibly popular for DIY projects due to their ease of installation and versatility. They come in various colors and textures, mimicking natural stone, and their design often incorporates a lip or pin system that locks them together, providing inherent stability. These are fantastic for most garden applications.
Natural stone, while beautiful and timeless, generally requires more skill and often specialized mortar, making it a more labor-intensive and expensive option. Timber walls are another choice, offering a rustic appeal, but they're susceptible to rot and insect damage over time, particularly in damp environments. We often recommend using pressure-treated lumber for increased longevity, but even then, their lifespan is typically shorter than concrete or stone. For a sleek, modern look, poured Concrete SAN Diego can be an excellent, incredibly durable option, though it requires professional forming and pouring expertise. Let's be honest, this is where professional guidance can really save you time and money. Our team can guide you through these choices to align with both your vision and practical needs. Understanding these material differences is a critical component of learning how to build a garden retaining wall effectively.
Here's a quick comparison of common retaining wall materials:
| Material Type |
Pros |
Cons |
Ideal Use Cases |
| Interlocking Blocks |
DIY-friendly, versatile, durable, varied styles |
Can be heavy, limited height for DIY |
Garden beds, low to medium height walls, aesthetic accents |
| Natural Stone |
Aesthetically pleasing, timeless, strong |
Expensive, requires skill, heavy, often needs mortar |
High-end landscapes, traditional designs, robust structures |
| Treated Timber |
Cost-effective, natural look, relatively easy |
Prone to rot/insects over time, shorter lifespan |
Rustic designs, temporary walls, low height, budget-friendly |
| Poured Concrete |
Extremely strong, durable, customizable |
Requires professional forms/pour, higher upfront cost |
Tall walls, structural support, modern minimalist designs |
Tools of the Trade: Equipping for Success
No expert project on how to build a garden retaining wall would be complete without the right arsenal of tools. You wouldn't attempt a chef's masterpiece with dull knives, would you? The same principle applies here. You'll need some basic excavation tools: a shovel, pickaxe, and possibly a mini-excavator if your wall is particularly long or tall. For leveling, a long level (4-foot minimum), a string line, and line level are indispensable. A rubber mallet will be your best friend for seating blocks, and a tamper (manual or plate compactor) is crucial for compacting the base and backfill. Don't skimp on this; proper compaction is a non-negotiable element for wall stability. You'll also need a tape measure, utility knife, safety glasses, and heavy-duty gloves. For cutting blocks, a wet saw with a diamond blade can make quick, clean work, though a hammer and chisel can suffice for smaller, less precise cuts. We've found that investing in quality tools makes the entire process smoother and safer. Having everything prepped before you start digging truly streamlines the entire process of how to build a garden retaining wall.
The Crucial Foundation: Where Stability Begins
Now, let's get into the actual construction. The foundation is, without exaggeration, the most critical step when learning how to build a garden retaining wall. A poorly prepared foundation guarantees future failure, no matter how perfectly you lay the blocks above. Our team can't stress this enough. First, dig a trench for your wall. This trench needs to be wide enough to accommodate your wall blocks plus about 6 inches on either side for drainage material, and deep enough to bury at least one full course of block (the 'footer course') below grade, plus 6-8 inches for your gravel base. For a 4-foot tall wall, for example, your trench might be 12-16 inches deep. This buried portion is vital for stability, preventing the wall from pushing forward or settling unevenly.
Once dug, compact the trench bottom thoroughly. This is where your tamper comes in. You want a firm, level base. Next, add 6-8 inches of coarse gravel or crushed stone (typically 3/4-inch clean stone) to the trench. This granular base provides excellent drainage and a stable, frost-resistant footing. Compact this gravel layer meticulously. Really get in there and make it solid. Then, using your level and string line, ensure this gravel base is perfectly level, both front-to-back and along the entire length of the wall. This truly demanding precision here dictates the success of every subsequent course. We often see DIYers rush this, and it's always a point of concern. For us, ensuring a flawless foundation is a primary concern with any project, including how to build a garden retaining wall.
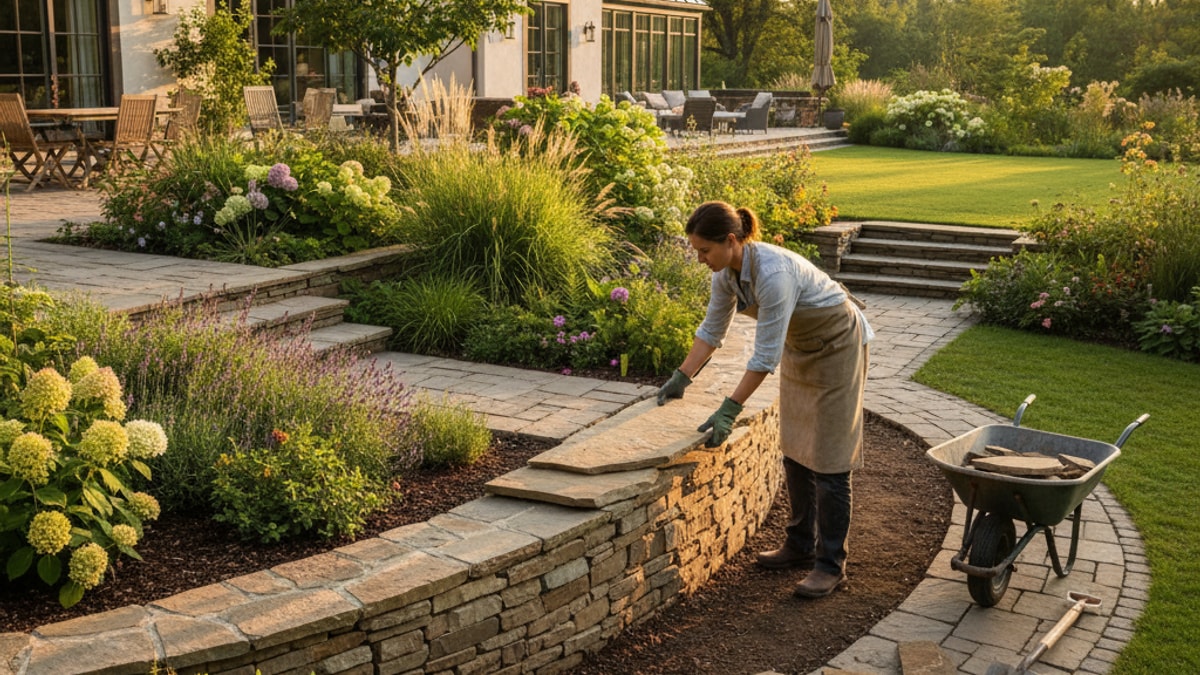
Laying the First Course: Precision is Paramount
With your foundation meticulously prepared, you're ready to lay the first course of blocks—the footer course. This is arguably the most important layer, as every subsequent block will follow its lead. Place your first block at one end of the trench, ensuring it's perfectly level both front-to-back and side-to-side. Use your rubber mallet to gently tap it into place, adjusting as needed. This takes patience, sometimes a lot of it. Once the first block is set, lay the next, ensuring it's level with the first and tightly abutted. Continue this process across the entire length of the wall. We recommend frequently checking for levelness and straightness. It's comprehensive, yes, but vital. You might need to add or remove small amounts of gravel beneath blocks to achieve perfect alignment.
Once the entire first course is laid and perfectly level, you'll want to check the overall straightness using your string line. Make any final adjustments. This initial course dictates the entire appearance and structural integrity of your wall. Don't be afraid to take your time here. Honestly, though, rushing this step will only lead to compounding errors later on. Learning how to build a garden retaining wall well means embracing methodical work. We've found this attention to detail early on saves immense frustration down the line.
Stacking Subsequent Courses and Integrating Drainage
Now, the rhythm picks up! For the second course and all subsequent courses, you'll stack the blocks in a running bond pattern, similar to brickwork, offsetting the vertical joints. This means each block should straddle the joint of the two blocks below it. This staggering provides crucial stability and distributes the weight more evenly. As you lay each course, pull the blocks back slightly, about 1/2 to 3/4 of an inch, to create a slight batter (backward slope) in the wall. This batter helps the wall lean into the earth, increasing its resistance to soil pressure. Most interlocking blocks have a built-in lip for this, which makes learning how to build a garden retaining wall significantly easier.
At the same time you're stacking blocks, you'll need to think about drainage. This is a critical, non-negotiable element. Water buildup behind a retaining wall is its worst enemy. It increases hydrostatic pressure, which can lead to bulging, cracking, or even catastrophic failure. That's the reality. To combat this, install a perforated drainage pipe (a 'weeping tile') behind the first course of blocks, running along the entire length of the wall. Ensure the pipe has a slight slope (about 1/8 inch per foot) towards an outlet point, where water can safely drain away from the wall's base. This outlet could be a daylight drain leading to a lower part of your yard or connected to a storm drain system. Covering the pipe with a filter fabric prevents soil and silt from clogging it. We can't stress this enough; proper drainage is fundamental to a long-lasting Seat Retaining Walls structure.
Backfilling and Compaction: The Hidden Strength
As you lay each course of blocks, you'll also be backfilling behind the wall. This isn't just about filling space; it's about providing stable support and ensuring effective drainage. We recommend using clean, coarse gravel or crushed stone (again, 3/4-inch clean stone is ideal) for the first 12-18 inches directly behind the wall. This granular material allows water to flow freely down to your drainage pipe. Beyond this gravel layer, you can use compacted native soil or a blend of soil and gravel. It's comprehensive.
Compaction is absolutely crucial at every stage of backfilling. After adding each 6-8 inch layer of backfill material, compact it thoroughly with your tamper. This prevents future settling and ensures the wall has solid support from behind. If you're not compacting properly, the soil behind the wall will eventually settle, creating voids and uneven pressure points that can compromise your wall's integrity. We've seen it work. This meticulous compaction, paired with thoughtful drainage, is how you build a garden retaining wall that stands the test of time against immense pressures. It's a demanding, sometimes grueling process, but the results speak for themselves.
Finishing Touches: Caps, Aesthetics, and Beyond
Once your wall reaches its desired height, it's time for the finishing touches. This is where your wall truly transforms from a functional structure into a beautiful landscape feature. Most retaining wall systems offer specific capstones designed to fit perfectly on top of the last course of blocks. These caps provide a finished look, protect the top course from erosion, and can even be used as informal seating. We adhere these capstones using a high-strength landscape adhesive. Apply a generous bead of adhesive to the top of the last course of blocks before setting the capstones in place. This ensures they're secure and won't shift over time.
Beyond the caps, consider incorporating other elements to enhance your wall. Landscape Lighting SAN Diego can dramatically highlight your retaining wall, extending its beauty and functionality into the evening hours. Imagine subtle uplighting accentuating the texture of the blocks or path lights illuminating steps built into the wall. You might also integrate planting pockets or terraced garden beds above the wall, softening its lines with lush greenery. For a truly cohesive outdoor space, consider how your retaining wall connects with other elements, perhaps complementing new Pavers SAN Diego for a patio or enhancing the area around a new Pools AND Spas installation. This holistic approach is central to our philosophy at Modern Yardz.
We often encourage our clients to envision the retaining wall as part of a larger outdoor tapestry. It's not just about the wall itself, but how it contributes to the overall ambiance and functionality of your yard. Perhaps you're looking for a built-in bench along the top, or a seamless transition to an Artificial Turf SAN Diego area. These considerations elevate a simple project into a truly custom outdoor space. That's the key. This approach (which we've refined over years) delivers real results, transforming ordinary backyards into extraordinary havens. It's a significant, sometimes dramatic shift in how you experience your own property, and it all starts with understanding how to build a garden retaining wall from the ground up.
The Modern Yardz Difference in 2026
While this guide provides a comprehensive overview of how to build a garden retaining wall, we recognize that not everyone has the time, tools, or inclination for such a demanding project. And that's perfectly okay. In 2026, demanding schedules and high expectations mean many homeowners prefer to entrust complex landscaping endeavors to seasoned professionals. Our team at Modern Yardz specializes in turning your outdoor visions into tangible realities, handling every step from initial Landscape Design SAN Diego to the final construction with unparalleled precision and care. We've built countless retaining walls, each tailored to the specific needs and aesthetic desires of the homeowner, ensuring structural integrity and stunning visual appeal. We mean this sincerely: it runs on genuine connections and impeccable craftsmanship.
We understand the nuances of different terrains and the critical importance of proper engineering, drainage, and material selection. We're here to offer expert insights, professional execution, and a seamless experience, ensuring your outdoor space is not only beautiful but also built to last. Our commitment is to create spaces where memories are made, spaces that reflect your unique lifestyle. We invite you to visit our website to explore our portfolio and see how we've transformed other properties. Ready to Upgrade Your Backyard? Let’s Design the Outdoor Space You’ve Been Dreaming Of. We're confident that once you understand the intricacies of how to build a garden retaining wall, you'll appreciate the value of true professional expertise even more.
Frequently Asked Questions About Building Retaining Walls
What's the ideal height for a DIY garden retaining wall?
We generally recommend keeping DIY garden retaining walls under 3-4 feet in height. Taller walls exert significantly more soil pressure and often require engineering calculations, permits, and professional installation for safety and structural integrity. Always check your local building codes first.
How important is drainage for a retaining wall?
Drainage is critically important; we can't stress this enough. Without proper drainage, water can build up behind the wall, creating hydrostatic pressure that can cause it to bulge, crack, or even collapse. A perforated pipe and gravel backfill are essential.
Can I use any type of gravel for the base and backfill?
No, not just any gravel will do. We recommend using clean, coarse gravel or crushed stone, typically 3/4-inch, that allows water to pass through freely. Avoid gravel with too much fine sand or silt, as this can impede drainage and lead to clogging over time.
How do I ensure the first course of blocks is perfectly level?
Achieving a perfectly level first course is paramount. Use a long level (4-foot minimum) and a string line stretched taut across the length of the trench. Adjust blocks by adding or removing small amounts of gravel beneath them, tapping gently with a rubber mallet until everything is spot-on.
What if my soil is very clay-heavy?
Clay-heavy soils present unique challenges due to their expansive nature when wet. This makes proper drainage even more critical. We recommend a more extensive gravel backfill zone behind the wall and potentially a professional assessment for taller walls in such conditions.
Do I need a permit to build a garden retaining wall?
In most areas, yes, especially for walls exceeding a certain height (often 3 or 4 feet). Regulations vary by location, so always check with your local planning or building department before starting any project. Our team can help you navigate these requirements.
How long does it typically take to build a garden retaining wall?
The timeline for how to build a garden retaining wall varies greatly based on its size, complexity, and your experience level. A small, simple wall might take a weekend, while a larger project could span several weeks. Professional installation is often quicker due to specialized equipment and expertise.
What's the best way to cut retaining wall blocks?
For clean, precise cuts, a wet saw with a diamond blade is the most effective tool. For smaller adjustments or rough cuts, a hammer and chisel can work, but it requires more effort and may not yield as clean an edge. Always wear appropriate safety gear.
Can I build a curved retaining wall?
Absolutely! Many interlocking block systems are designed to accommodate curves. You'll typically use standard blocks and adjust their position slightly to create the desired radius. This can add a beautiful, flowing aesthetic to your garden design.
What are capstones, and why are they important?
Capstones are the finishing blocks placed on the very top course of a retaining wall. They provide a neat, finished appearance, protect the wall from weather erosion, and can create a functional surface, like a seat. We adhere them with landscape adhesive for security.
How often should I check the wall for stability after it's built?
We recommend regular visual inspections, especially after heavy rain or significant weather events. Look for any signs of bulging, cracking, shifting, or excessive water runoff. Addressing minor issues early can prevent major problems down the line.
Is it possible to integrate steps into a retaining wall?
Yes, integrating steps is a popular and functional design choice, especially for terraced gardens. This requires careful planning and construction to ensure the steps are safe, sturdy, and aesthetically integrated with the wall. It's a fantastic way to enhance accessibility.
What's the difference between a retaining wall and a garden border?
A garden border is typically a low, decorative edge for a flower bed, offering minimal structural support. A retaining wall, conversely, is engineered to hold back significant soil mass, manage elevation changes, and prevent erosion, making it a much more robust structure. It's a critical, non-negotiable element for proper landscaping.
So, whether you're taking on the challenge of how to build a garden retaining wall yourself or considering professional assistance, remember that careful planning, proper execution, and attention to detail are your greatest allies. A well-built retaining wall is more than just a structure; it's an investment in the beauty, functionality, and longevity of your outdoor living space. Transform Your Outdoor Space Into Something Extraordinary.


.webp)
.webp)