A stone retaining wall is so much more than a pile of rocks. It's a functional work of art, a piece of structural engineering that can transform a sloped, unusable yard into a series of stunning, level terraces. It can be the difference between a lawn that washes away and a garden that thrives. But let's be honest, the process of how to build a stone retaining wall is a formidable undertaking. It demands patience, planning, and a whole lot of sweat. Get it right, and you’ve built a legacy feature that will stand for decades. Get it wrong? Well, you’ve built a very heavy, very expensive problem.
Here at Modern Yardz, we've spent years designing and constructing these beautiful, brawny structures. We've seen the triumphant successes and the catastrophic failures. Our team has learned that the secret isn't just in the stacking; it's in the unseen preparation, the meticulous groundwork that happens long before the first stone is ever placed. We're going to pull back the curtain and share the professional insights you need to understand exactly how to build a stone retaining wall that is not only beautiful but structurally impeccable. This is the deep-dive you’ve been looking for in 2026.
Before You Even Touch a Stone: The Planning Phase
Jumping straight into digging is the number one mistake we see homeowners make. A successful wall is born on paper, not in the dirt. Before you even think about renting a tamper, you need a comprehensive plan. Why are you building this wall? Is it purely for aesthetics, to create a raised garden bed? Or are you fighting a serious erosion problem on a steep grade? The 'why' dictates the 'how'. The engineering required for a four-foot wall holding back a massive slope is dramatically different from a one-foot decorative border. This initial stage is where a professional Landscape Design SAN Diego can be invaluable, creating a blueprint that integrates function with the overall vision for your space.
This is also the time for due diligence. We can't stress this enough: call 811 to have underground utility lines marked. Hitting a gas or water line is a disastrous, and entirely avoidable, setback. You also need to check local building codes. Many municipalities have height restrictions (often around 3-4 feet) above which a permit and a licensed engineer's approval are required. This isn't just red tape; it's about safety. Understanding these rules is a critical, non-negotiable element of how to build a stone retaining wall. You also need to be crystal clear on your property lines. A dispute with a neighbor over an encroaching wall is a headache you simply don't need. Take the time now to get every single detail sorted out. It will save you a world of pain later.
Dry-Stacked vs. Mortared: Choosing Your Method
Once you have a plan, you need to decide on the construction method. This is a fundamental choice that impacts the tools, skills, and timeline of your project. The two main approaches are dry-stacked and mortared. They look similar from a distance, but they are worlds apart in their construction. A key part of knowing how to build a stone retaining wall is choosing the right technique for your skill level and goals.
Dry-stacked walls, also known as gravity walls, rely on the immense weight of the stones and the friction between them for stability. They are slightly more flexible and allow water to pass through naturally, which can be a huge advantage for drainage. Mortared walls, on the other hand, use mortar to bind the stones together into a single, monolithic structure. They are incredibly strong but less forgiving of mistakes and absolutely require a robust concrete footing and sophisticated drainage system to prevent cracking from frost heave or hydrostatic pressure. Our professional Seat Retaining Walls are often mortared for the sleek, solid finish they provide, but it's a technique that requires significant experience.
Here's a breakdown our team put together to help clarify the choice:
| Feature |
Dry-Stacked Wall |
Mortared Wall |
| Skill Level |
DIY-Friendly (for walls under 3 ft) |
Professional Recommended |
| Foundation |
Compacted gravel trench |
Poured concrete footing |
| Drainage |
Naturally permeable |
Requires dedicated pipe & backfill |
| Flexibility |
High (can shift slightly with ground) |
Low (rigid and prone to cracking) |
| Repair |
Relatively easy (replace a stone) |
Difficult (requires chiseling, new mortar) |
| Aesthetic |
Rustic, natural, organic |
Formal, solid, structured |
For most DIYers in 2026, we recommend a dry-stacked approach for walls under three feet. It’s more forgiving and the learning curve is less steep. But if you're envisioning a taller, more formal wall, or one that will serve as seating, a mortared wall built by professionals is the superior choice.
Gathering Your Arsenal: Tools and Materials
Alright, you've got your plan and you've chosen your method. Now it's time to gear up. Having the right tools isn't just about convenience; it's about safety and precision. You're moving heavy objects, and you need to do it correctly.
Your essential tool list should include:
- Heavy-Duty Wheelbarrow: Don't even try this with a garden cart.
- Shovels: Both a round-point for digging and a square-head for moving gravel.
- Hand Tamper: Absolutely critical for compacting the base. A wobbly base means a wobbly wall.
- 4-Foot Level: For ensuring your courses are perfectly horizontal.
- String Line and Stakes: To keep your wall straight and true.
- Safety Gear: Steel-toed boots, heavy-duty gloves, and safety glasses are non-negotiable.
- Small Sledgehammer or Mason's Hammer: For making minor adjustments to stones.
Now, for the materials. The star of the show is, of course, the stone. The type you choose will define the wall's character. Fieldstone offers a rustic, irregular look, while quarried stone like limestone or granite provides more uniform shapes that are easier to stack. Think about the overall aesthetic of your home and landscape. When it comes to how to build a stone retaining wall, the stone choice is your primary design decision. Just as important are the unseen materials: a high-quality, tear-resistant landscape fabric, crushed gravel (usually 3/4-inch), and a 4-inch perforated drainage pipe. Skimping on these is like building a house with a leaky roof. It will inevitably fail.
The Foundation: The Unsung Hero of Your Wall
We've said it before, and we'll say it again: a retaining wall is only as good as its foundation. This is where the real work begins. The trench you dig is the literal bedrock of your entire project. For a dry-stacked wall, a good rule of thumb is to dig a trench that is about half the height of the first course deep, plus about 6 inches for the gravel base. So, for a 12-inch-tall stone, you'd want a trench about 12 inches deep. The width should be enough to accommodate the full depth of your largest base stones plus a few inches of working room.
Once the trench is excavated and the bottom is level, it's time for the gravel. Lay down 4-6 inches of crushed gravel. Don't just dump it in. Spread it in 2-inch layers, and after each layer, use the hand tamper to compact it relentlessly. You want this base to be as solid as concrete. Seriously. Pound it until the tamper bounces back. This compacted gravel base provides a stable platform for your stones and, crucially, allows water to drain away from the base of the wall. This single step is the most physically demanding part of learning how to build a stone retaining wall, but it's also the most important. A poorly compacted base is a guarantee of future failure.
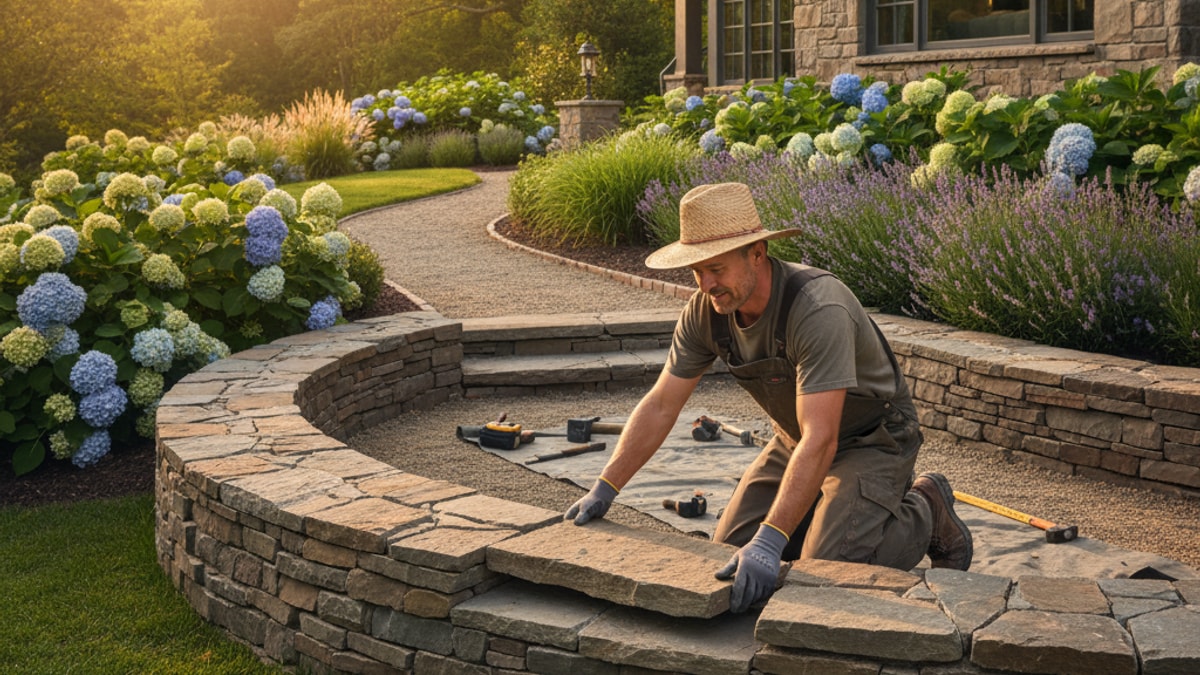
Laying the Courses: The Art and Science of Stacking
With your foundation set, the puzzle-like process of stacking begins. The first course is the most critical. It must be perfect. Select your largest, flattest stones for this base layer. Set them firmly into the gravel base, wiggling them until they are solid and don't rock. Use your level constantly—both front-to-back and side-to-side. If the first course isn't level, the error will magnify with every subsequent layer, resulting in a dangerously unstable wall. We recommend burying about half of this first course below grade for maximum stability.
As you build upward, follow two golden rules. First, stagger the joints. Never place a seam directly on top of a seam from the course below it. Think of it like a brick pattern. This interlocking method distributes the weight and pressure across the entire structure, making it exponentially stronger. Second, incorporate a 'batter.' This means setting each course back slightly (about 1-2 inches for every foot of height) from the course below it. This slight backward lean uses gravity to its advantage, pushing the wall back into the hill it's retaining. It's a subtle but powerful engineering principle that is fundamental to how to build a stone retaining wall that lasts.
Use smaller stones as shims to fill gaps and prevent larger stones from wobbling. Every single stone should be solid before you move on to the next. Take your time. This is a process of patience and precision, not speed. As you work, you’ll also need to backfill behind the wall with gravel as you go, which brings us to the next critical component.
Don't Forget Drainage: The Secret to Longevity
Water is the arch-nemesis of a retaining wall. The soil behind your wall will absorb rainwater, and the resulting hydrostatic pressure can build up with enough force to literally push your wall over. It’s an unflinching, relentless force. Our team has been called to repair countless walls built by others, and we've found that failed drainage is the culprit in at least 90% of cases. It's a heartbreakingly common and entirely preventable mistake.
Here’s how to manage it properly. After your first course is laid, lay your landscape fabric against the back of the trench, up the hillside. This fabric will act as a barrier, preventing soil and silt from clogging your drainage system. Now, lay your 4-inch perforated drain pipe (holes facing down) at the base of the wall, right behind your first course. As you build each subsequent course of your wall, backfill the space behind it with more crushed gravel. This creates a vertical drainage channel. Water seeping through the soil will hit the fabric, trickle down through the gravel, enter the perforated pipe, and be safely carried away to daylight at the ends of your wall. This system effectively relieves the hydrostatic pressure, ensuring your wall isn't fighting a losing battle against the power of water. This drainage system is the life insurance policy for your project, a critical step in how to build a stone retaining wall for the long haul.
Finishing Touches: Capping It Off
Once your wall has reached its desired height, it's time for the final flourish: the capstones. These are typically wider, flatter, and more uniform stones that create a finished, level surface on top of the wall. They tie the whole structure together aesthetically and help lock the final course in place. Select your capstones carefully for the best fit and appearance.
Secure them using a specialized landscape construction adhesive. Apply the adhesive in a zigzag pattern on the top of the last course of stones, then press the capstones firmly into place. This will prevent them from shifting or being accidentally knocked off. Once the capstones are set, you can complete the backfilling process, adding topsoil over the last bit of gravel behind the wall. Finally, grade the soil on both sides of the wall to ensure water flows away from the structure, not toward it. This final step is where the wall truly becomes part of the landscape, ready to be integrated with surrounding features like beautiful Pavers SAN Diego for a new patio or a stunning array of plants highlighted by our Landscape Lighting SAN Diego systems.
When to Call the Pros (And Why It's Often the Smartest Move)
We've laid out the comprehensive process for how to build a stone retaining wall, and it's a lot. There are moments when the DIY spirit is best channeled into calling for professional help. If your planned wall is over three or four feet tall, the engineering forces at play become immense, and a miscalculation can lead to a dangerous collapse. Complex soil conditions, like heavy clay, or extremely steep slopes also dramatically increase the project's complexity. These situations require the expertise of a team that does this day in and day out.
Furthermore, if you're envisioning a wall that seamlessly integrates with other hardscape elements—like built-in seating, an Outdoor Kitchens SAN Diego, or one of our custom Fire Features—the design and construction need to be flawless. This isn't an admission of defeat; it's a strategic decision to protect your investment and ensure your safety. Ready to Upgrade Your Backyard? Sometimes, the smartest move is letting a dedicated crew handle the heavy lifting while you focus on the vision.
Building a stone retaining wall is a journey. It's a test of strength, planning, and artistry. Whether you tackle it yourself or bring in a team like ours, the result is a permanent, powerful addition to your property. It's a structure that holds back the earth, creates new possibilities for your outdoor space, and stands as a testament to a job done right. It's a project that, when complete, offers a profound sense of accomplishment. Let’s Design the Outdoor Space You’ve Been Dreaming Of, one stone at a time.


.webp)
.webp)