Terraced landscapes, stable slopes, and visually appealing garden beds—these aren't just dreams. They're tangible results of smart landscape design, often anchored by a well-constructed retaining wall. In 2026, homeowners and property managers alike are still looking for durable, cost-effective solutions to manage soil erosion, create usable flat areas, and add architectural interest to their outdoor spaces. Among the myriad of options available, learning how to build a retaining wall with cross ties stands out as a particularly robust and accessible choice for many. It's a method our team at Modern Yardz has refined over years, delivering both structural integrity and a distinctive aesthetic.
We know what you're thinking: isn't this a complex project? It can be, yes, but with the right guidance, the proper tools, and an understanding of fundamental construction principles, it's entirely within reach. Our goal today is to demystify the process, offering you a definitive, step-by-step guide on how to build a retaining wall with cross ties that will stand the test of time. We're talking about more than just stacking timbers; we're talking about creating a foundational element for your landscape that performs beautifully and looks fantastic. So, let's dive in.
Understanding the 'Why' Behind Your Retaining Wall Project
Before you even think about grabbing a shovel, it's critical to understand the primary purpose of your retaining wall. Are you battling severe soil erosion? Do you need to create a level patio space on a sloped yard? Or perhaps you're envisioning a raised garden bed that defines zones within your outdoor area? Each 'why' influences the 'how.' Our experience shows that clarity on this initial objective saves immense time and resources down the line. A retaining wall isn't just a decorative feature; it's a structural necessity that holds back significant amounts of soil, often under considerable pressure. Knowing how to build a retaining wall with cross ties effectively means understanding these pressures.
Cross ties, also known as railroad ties, are an enduring material choice for retaining walls because of their inherent strength and resistance to rot (due to creosote treatment, though newer, untreated alternatives are available for certain applications). They offer a rustic, natural aesthetic that blends seamlessly into many landscape designs. This material choice is often more economical than stone or modular blocks, making them a popular option for those looking to maximize impact without breaking the bank. Honestly, though, their heavy-duty nature is what truly sets them apart. When properly installed, a wall built using this method can handle substantial earth retention, making the investment in learning how to build a retaining wall with cross ties incredibly worthwhile.
Choosing the Right Materials: More Than Just Cross Ties
While the focus here is clearly on how to build a retaining wall with cross ties, these aren't the only materials you'll need. A successful retaining wall project is a symphony of components working in harmony. For the ties themselves, you'll generally find two main types: reclaimed railroad ties (which are often creosote-treated and incredibly durable but might have environmental considerations for certain applications) and landscape timbers. Landscape timbers are typically pressure-treated pine or fir, often less bulky, and easier to work with, but may not offer the same span of durability as a true railroad tie without proper maintenance.
When our team plans a project that involves retaining walls, like the ones we design as part of our comprehensive Seat Retaining Walls services, we always consider the specific environmental factors and the desired lifespan. We've found that for longevity, especially in areas with significant moisture or soil movement, the quality of your ties is paramount. Beyond the ties, you'll need crushed gravel or clean stone for drainage, rebar for structural reinforcement, and heavy-duty landscape fabric to prevent soil migration. Don't forget appropriate fasteners, like long landscape spikes or timber screws, and potentially specialized timber connectors. This robust combination ensures that when you learn how to build a retaining wall with cross ties, you're learning to build it right.
Essential Planning and Design Considerations
Planning is, without question, the most critical phase. We can't stress this enough: a well-thought-out plan dictates the entire project's success. This is where you determine the wall's height, length, and curvature, if any. Generally, walls over four feet tall require professional engineering and, in many areas, specific permits. Even shorter walls might necessitate permits depending on local regulations. Our team's collective expertise in Landscape Design SAN Diego (though this advice is universally applicable) always starts with a thorough site assessment.
Consider the slope of the land, existing drainage patterns, and any underground utilities. You'll need to mark out the wall's footprint precisely. This isn't just about aesthetics; it's about structural integrity. A slight miscalculation here can lead to catastrophic failure. We recommend sketching your design, perhaps even creating a small scale model, to visualize the finished product. Think about how the wall will integrate with other elements, like Fire Features or a future outdoor kitchen. Our experience shows that a detailed plan, including material lists and cut diagrams, makes learning how to build a retaining wall with cross ties a much smoother, less stressful endeavor. It's comprehensive.
Comparison of Retaining Wall Material Strengths
| Material Type |
Durability Rating |
Aesthetic Appeal |
Installation Complexity |
Cost (relative) |
Best Use Case |
| Cross Ties |
High |
Rustic, Natural |
Moderate |
Medium |
Sloped yards, garden beds, moderate heights |
| Modular Blocks |
High |
Varied, Modern to Traditional |
Moderate |
Medium-High |
DIY-friendly, curved walls, taller structures |
| Natural Stone |
Very High |
Organic, Premium |
High (skilled labor) |
High |
Luxury landscapes, long-term stability, erosion control |
| Poured Concrete |
Very High |
Modern, Industrial |
High (professional) |
High |
Commercial, very tall walls, maximum stability |
| Timber (non-cross-tie) |
Medium |
Casual, Garden-like |
Easy |
Low |
Small garden beds, decorative edging, low heights |
Gathering Your Tools and Supplies for Success
Once your plan is meticulously crafted, it's time to assemble your arsenal. Having the right tools on hand prevents frustrating delays and ensures precision. Our team always emphasizes preparation. You'll need standard landscaping tools: shovels, picks, a wheelbarrow, and a tamper or plate compactor for the base. For the ties themselves, you'll definitely want a powerful circular saw or a chainsaw (with appropriate safety gear, of course) for cutting. A level, measuring tape, string line, and stakes are non-negotiable for ensuring everything is plumb and perfectly aligned.
Don't forget safety gear: heavy-duty gloves, eye protection, and sturdy work boots are essential. When you're dealing with heavy timbers and power tools, safety isn't optional; it's paramount. For fastening, a heavy-duty drill with appropriate bits for pre-drilling and a sledgehammer for driving spikes will be necessary. If you're wondering how to build a retaining wall with cross ties that lasts, understand that quality tools contribute significantly to quality workmanship. Investing in good equipment isn't just about making the job easier; it's about making it safer and more accurate.
The Groundwork: Preparing Your Site for the Retaining Wall
With your plan in hand and tools at the ready, site preparation begins. This is where the real work of learning how to build a retaining wall with cross ties truly starts. First, clear the area of any vegetation, rocks, or debris. You'll need a clean slate. Then, excavate a trench for the wall's base. The depth of this trench is crucial; it needs to be below the frost line in colder climates to prevent shifting due to freeze-thaw cycles. Even in milder areas, a substantial trench (at least 6-12 inches deep) is necessary to provide a stable footing. The width of the trench should be at least twice the width of your cross ties.
Once excavated, compact the soil at the bottom of the trench thoroughly. This provides a stable, unyielding foundation. We recommend using a plate compactor for larger projects; for smaller walls, a hand tamper can suffice, though it's more labor-intensive. Proper compaction prevents future settling, which can compromise the wall's integrity. Remember, the earth beneath your wall is its ultimate support. A weak foundation means a weak wall. This groundwork is foundational to knowing how to build a retaining wall with cross ties that offers enduring stability.
Laying the Foundation: Crucial for Longevity
After compacting the soil, it's time to lay the base material. This typically involves a layer of crushed gravel or clean stone, roughly 4-6 inches deep. This gravel layer serves multiple purposes: it provides excellent drainage, further distributes the weight of the wall, and acts as a leveling bed. Spread the gravel evenly within the trench and then compact it again, meticulously. A well-compacted, level gravel base is a non-negotiable element for any retaining wall, especially when you're learning how to build a retaining wall with cross ties. It's the unsung hero of the entire structure.
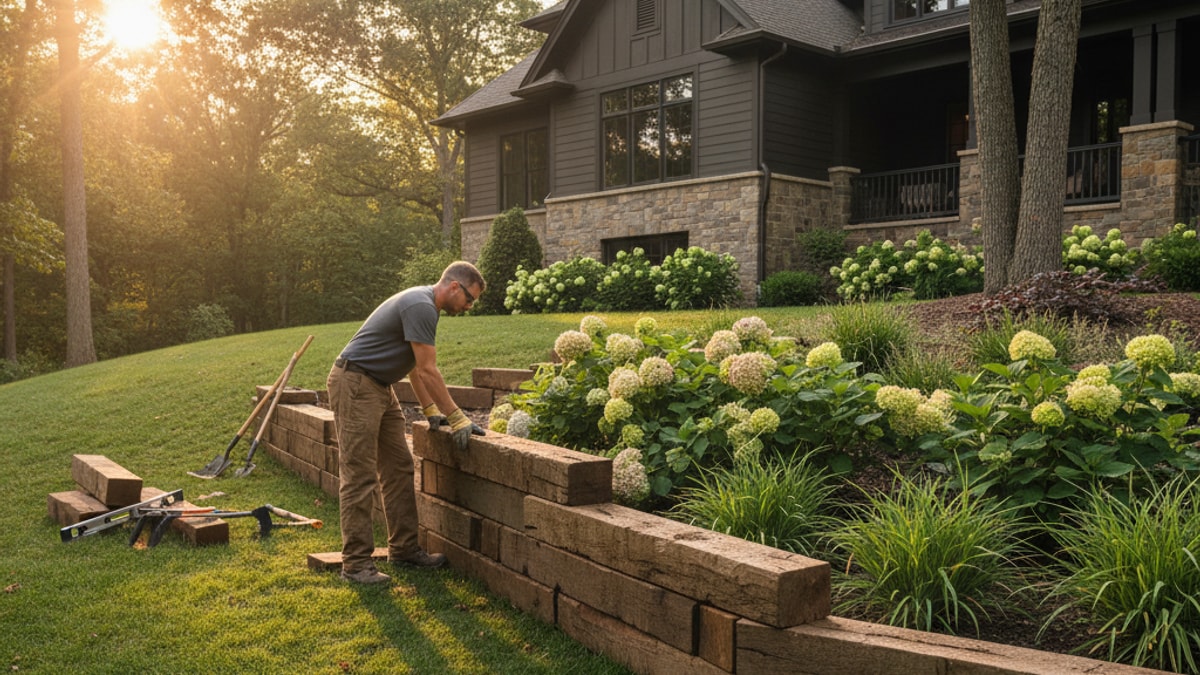
Now, start laying your first course of cross ties directly onto this level gravel bed. Ensure each tie is perfectly level, both front-to-back and side-to-side. This first course is incredibly important because every subsequent course will build upon it. Any error here will compound as the wall gets taller. Use your string line to maintain a straight alignment, or your design's intended curve. We've seen projects go awry simply because the first course wasn't given the meticulous attention it deserved. That's the key. Simple, right? But easily overlooked. Understanding this critical step is fundamental to how to build a retaining wall with cross ties that performs flawlessly.
Building Up: Step-by-Step Construction with Cross Ties
With the first course firmly in place, you're ready to build upwards. This is where the cross-tie method really shines. Each subsequent course of ties should be offset from the one below it, much like brickwork, to create an interlocking pattern. This staggering distributes pressure more effectively and enhances the wall's structural integrity. Before placing a new tie, our team always backfills the space behind the previous course with more gravel, ensuring continuous drainage. This is a subtle yet significant detail in how to build a retaining wall with cross ties effectively.
Secure each new tie to the course below it. For this, you'll use long landscape spikes or timber screws. Drive them through the upper tie, angled slightly inwards, and deep into the lower tie. For taller walls, or those retaining significant soil, we often incorporate rebar. Drill holes through the ties and drive rebar vertically through multiple courses, sinking it deep into the ground below. This creates a formidable, reinforced structure that resists outward pressure. As you build, remember to continuously check for level and alignment. Each course contributes to the overall strength, and precision at every step is paramount. Building a wall like this is a testament to careful, deliberate work.
Ensuring Proper Drainage: A Non-Negotiable Element
We cannot stress this enough: drainage is the absolute most critical, non-negotiable element of any successful retaining wall. Without adequate drainage, hydrostatic pressure (the pressure from water accumulating behind the wall) will eventually push your wall over, regardless of how well it's constructed. This catastrophic failure can be avoided with proper planning. After each course of ties is laid, and before backfilling with soil, you must include a layer of crushed gravel directly behind the wall. This creates a French drain effect, allowing water to percolate down.
At the bottom of the wall, consider installing a perforated drain pipe (weeping tile) within the gravel layer, pitched slightly to direct water away from the wall's base and out to a safe discharge point. Cover this pipe with landscape fabric to prevent soil from clogging it. Then, cover the entire gravel backfill area with landscape fabric before adding your final soil backfill. This fabric acts as a filter, allowing water to pass through but keeping soil particles from migrating into your drainage system. Our experience shows that overlooking drainage is the single biggest mistake people make when attempting how to build a retaining wall with cross ties. Don't let it be yours. It’s a foundational principle of Landscape Design SAN Diego that applies everywhere.
Finishing Touches and Long-Term Maintenance
Once the last course of ties is in place, and your drainage is robustly installed, it's time for the finishing touches. Backfill the remaining area behind the wall with native soil, compacting it gently in layers. You'll want to grade the top of the backfill slightly away from the wall to encourage surface water runoff, further reducing hydrostatic pressure. Then, consider how you want to cap the wall. Some prefer to leave the top course exposed, while others opt for a decorative capstone or a continuous timber cap. This is where the aesthetic vision really comes to life. Maybe you're thinking about integrating some Landscape Lighting SAN Diego to highlight the wall's texture in the evenings.
Long-term maintenance for a cross-tie retaining wall is relatively straightforward but essential. Regularly inspect the wall for any signs of shifting, rot, or erosion behind it. Address drainage issues promptly if they arise. If you've used untreated landscape timbers, consider applying a wood preservative every few years to extend their lifespan. For creosote-treated ties, maintenance is minimal, but you should still monitor for any structural changes. Our team has found that proactive maintenance significantly extends the life and beauty of any outdoor structure, helping preserve the hard work you put into learning how to build a retaining wall with cross ties. This approach delivers real results.
When to Call the Professionals: Modern Yardz Expertise
While this guide provides a comprehensive overview of how to build a retaining wall with cross ties, we're also realistic. Some projects are simply too large, too complex, or too demanding for a DIY approach. If your wall needs to be exceptionally tall, if the slope is severe, or if you're dealing with challenging soil conditions, professional expertise becomes invaluable. There's a significant, sometimes dramatic shift in complexity when moving from a small garden bed wall to a substantial earth-retaining structure.
That's where our team at Modern Yardz comes in. We specialize in creating custom outdoor spaces, handling every step from initial Landscape Design SAN Diego to precise construction. We've built countless Seat Retaining Walls and other structural elements, ensuring they're not only functional but also seamlessly integrated into a cohesive, beautiful landscape. We understand the nuances of soil mechanics, drainage, and structural engineering that are paramount for long-lasting results. Perhaps you’re envisioning a complete outdoor transformation, including new Pools AND Spas or an elegant Outdoor Kitchens SAN Diego. We handle projects of all scales, from concept to completion. Let’s be honest, this is crucial.
We've all seen DIY projects that didn't quite pan out, right? A leaning wall, a collapsing slope—these are not just aesthetic failures; they can be safety hazards. Our commitment to quality and precision means you get a retaining wall that’s built to code, built to last, and built to enhance your property for decades to come. Whether you're considering a small decorative wall or a major structural undertaking, our expertise ensures peace of mind. If you’re feeling overwhelmed by the thought of tackling how to build a retaining wall with cross ties on your own, or if your project demands a higher level of professional execution, we’re here to help. We're not just building yards; we’re building spaces where memories are made. For those considering a comprehensive overhaul, our Luxe Design Package offers a full-service approach to transforming your outdoor environment into something truly extraordinary. Ready to Upgrade Your Backyard? We encourage you to explore our full range of services and see how we can bring your vision to life. Let’s Design the Outdoor Space You’ve Been Dreaming Of.
Frequently Asked Questions


.webp)
.webp)