Laying a new patio can transform your outdoor space, creating the perfect spot for entertaining, relaxing, or enjoying a meal. To get started on this rewarding project, having the right tools and materials is essential. Think of it like a recipe; if you miss a key ingredient, the final dish just won't come out right. The same is true for a patio. Before you even think about putting down the first stone, you need to gather everything you’ll need to ensure a smooth and successful how to lay patio paving project. This isn't just about the pavers themselves, but also about the underlying layers that give your patio strength and durability.
First, you’ll need a solid base. This begins with a sub-base material like crushed stone or MOT Type 1. This is the foundation of your patio, and it's crucial for drainage and stability. We recommend a layer of at least 100mm, compacted thoroughly. For the laying of paving stones, you will also need a bedding layer, which is typically a mix of sharp sand or a specialized mortar. This layer is what the pavers will actually sit on, and getting it right is key to preventing movement and future issues. A professional patio paving installation relies on these layers to ensure a long-lasting and beautiful result. For any type of hardscape project, from concrete to pavers, the foundation is the most important part. When thinking about your overall yard, you can also consider adding a new landscape design to your property.
Next, you need to consider the tools. A shovel and a wheelbarrow are a must for moving materials. A rake will help you spread the sub-base and bedding layers evenly. For compacting the ground, a plate compactor is the best choice, but for smaller areas, a hand tamper will work. You'll also need a level to ensure your patio has the correct slope for drainage. This is a step many people overlook, but it’s critical to prevent standing water, which can damage your patio over time. Measuring tools like a tape measure and a straightedge are also non-negotiable for making sure everything is square and aligned. We also work with a variety of materials, including concrete, that can completely change the feel of your outdoor space.
For the actual laying paving stones, a rubber mallet is invaluable for gently tapping the stones into place without cracking or chipping them. A string line and stakes will help you maintain straight lines and a consistent level across the entire patio area. Don't forget safety gear—gloves, safety glasses, and sturdy boots are a must to protect yourself while you work. We at Modern Yardz understand the importance of having the right tools for the job. Our team uses top-of-the-line equipment to ensure every patio paving installation is done to the highest standard, delivering a patio that not only looks great but is built to last. Our work extends beyond just laying paving stones; we also specialize in creating stunning outdoor kitchens for entertaining. We also offer to build a beautiful new design for you.
- To ensure you have all the tools and materials you need, consider this checklist:
- A shovel and a wheelbarrow for moving materials.
- A rake to spread the sub-base and bedding layers.
- A plate compactor or hand tamper for proper ground compaction.
- A level, tape measure, and straightedge for accuracy.
- A rubber mallet for placing stones without damage.
- Safety gear, including gloves and safety glasses.
- A string line and stakes to maintain straight lines.
If you’re ready to get started on your dream space, you can contact us for a free estimate.
How Do I Prepare The Ground Before Patio Paving Installation?
The success of any patio project, big or small, rests on the quality of the ground preparation. This is the most labor-intensive part of the job, but it is absolutely non-negotiable for a durable and long-lasting patio. Rushing this step will lead to future problems like uneven surfaces, sinking pavers, and poor drainage. A great how to lay patio paving project starts with meticulous attention to detail on the ground you're building on. We understand that this part of the process can seem daunting, but with the right approach, you can create a foundation that will support your beautiful new patio for years to come.
The first step in ground preparation is excavation. You need to dig out the area to the correct depth, which is determined by the combined thickness of your sub-base, bedding layer, and pavers. Generally, this means excavating around 6 to 8 inches of soil. During this process, you should also remove any large rocks, roots, or other debris that could compromise the stability of your base. Once the area is cleared, the next step is to ensure the subgrade is firm and level. You can use a hand tamper or a plate compactor to compact the existing soil. This prevents the ground from settling unevenly later on, which is a common issue for DIY enthusiasts who overlook this crucial stage of a patio paving installation. You can see how we transform outdoor spaces by visiting our build portfolio. A proper foundation is essential for everything we build, whether it's a paver patio or an artificial turf installation.
Once the subgrade is properly compacted, you'll need to create a trench around the perimeter for your edge restraints. Edge restraints are vital for containing the pavers and preventing them from shifting or moving over time. They can be made of plastic, concrete, or metal and are usually installed before you add the sub-base material. This is a critical step in how to lay patio paving, as it provides the structural integrity that holds your patio together. A patio paving installation without proper edge restraints is far more likely to fail. We at Modern Yardz always install professional-grade edge restraints to ensure your patio stays put. The same care goes into our other services, such as adding a new landscape lighting plan or a stylish patio cover to protect your space.
- To properly prepare the ground for your patio, follow these key steps:
- Excavate the area to the correct depth (6-8 inches).
- Remove any rocks, roots, or other debris.
- Compact the subgrade with a plate compactor or hand tamper.
- Install edge restraints around the perimeter.
- Add and compact the sub-base material (4 inches of crushed stone).
- Spread and level the bedding layer of sharp sand.
After the edge restraints are in place, it’s time to add the sub-base. A minimum of 4 inches of compacted gravel or crushed stone is recommended. This layer is crucial for drainage and provides the primary support for the pavers. Spread the material evenly and then compact it thoroughly using a plate compactor. For a professional how to lay patio paving result, you may need to add and compact the sub-base in multiple layers. Finally, you will add the bedding layer of sharp sand. This layer is usually about 1-1.5 inches deep and will be leveled with a screed board to create a perfectly flat surface for the laying paving stones. Our work at Modern Yardz is to bring your landscape design to life. This preparation is critical to a long-lasting and beautiful yard. If you’re not sure where to start with your project, we can help you with the design process. You can start your project by requesting a quote from our team.
What Is The Correct Method For Laying Paving Stones Evenly?
Once the base is perfectly prepared and compacted, you can finally begin the most satisfying part of the project: the laying paving stones. This is where your careful planning and hard work on the foundation really pay off. The key to a professional finish is patience and precision. Rushing this step can lead to a patio with uneven gaps, wobbly stones, and a less-than-perfect appearance. Following a systematic approach for how to lay patio paving will ensure a beautiful, uniform surface that will be a source of pride for years.
Start from one corner of the area and work your way out. This approach prevents you from disturbing the already leveled sand bedding layer. Place each paver gently onto the sand, making sure it fits snugly against the adjacent pavers. Avoid pushing or sliding the stones, as this can create ridges in the sand and lead to unevenness. After placing a few pavers, use your rubber mallet to gently tap them into the sand. You should tap them down until they are level with the surrounding stones and the desired finished height. This tapping process is crucial for a smooth and even patio paving installation. This attention to detail is something we pride ourselves on at Modern Yardz for every project, whether it's a new paver patio or a custom pool.
As you continue laying paving stones, it's important to constantly check your work with a level. Place the level across multiple stones to ensure they are all on the same plane and maintain the correct slope for drainage. This is a step you should never skip. A small deviation at the beginning can become a major problem later on, leading to a visible hump or dip in your finished patio. For a precise how to lay patio paving result, you might also use a string line pulled taut across the top of the pavers to guide you and ensure a perfectly straight line. We at Modern Yardz use these techniques on every project to guarantee our clients receive a flawless and professional patio. You can see the results of our professional paving services by exploring our paving portfolio. We also provide other services to complete your outdoor space, like fire pits or new retaining walls.
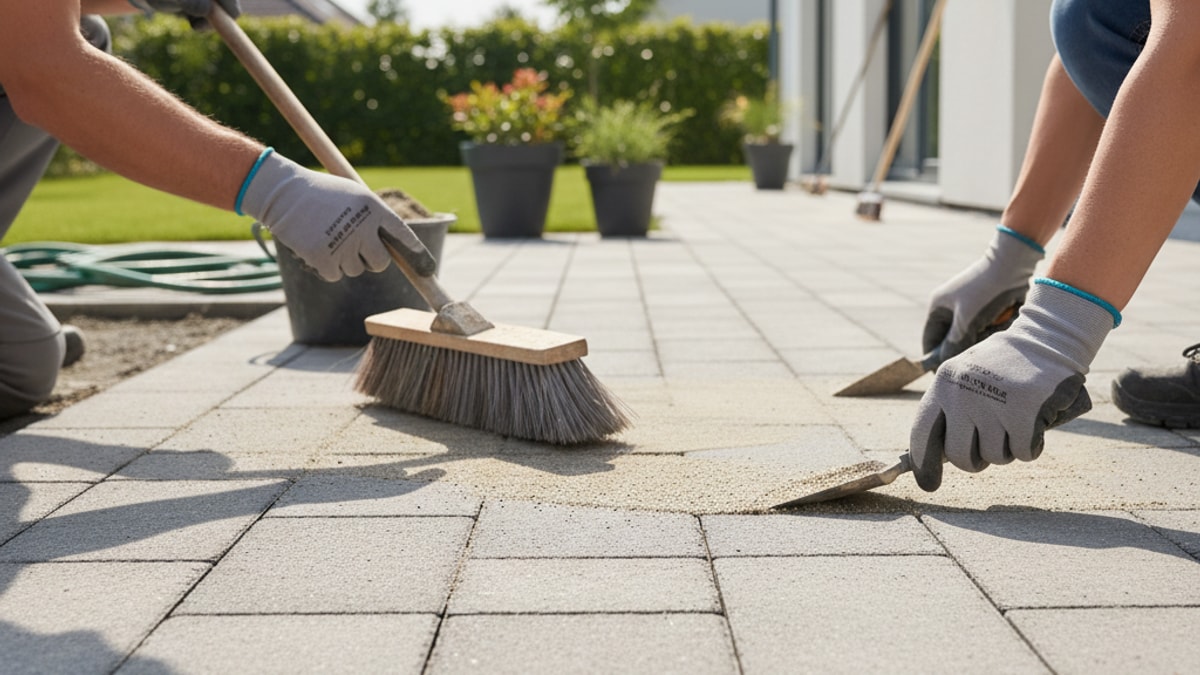
Once all the pavers are in place, the final step is to fill the joints. This is a critical part of the patio paving installation process. You will need to spread a jointing material, such as polymeric sand, over the surface of the patio. This sand is a special mix that hardens when wet, locking the pavers in place and preventing weeds from growing between them. Use a broom to sweep the sand into all the gaps. For a truly professional finish, use a plate compactor with a protective pad over the surface to vibrate the sand deep into the joints. This ensures every gap is completely filled. Finally, lightly mist the patio with water to activate the polymeric sand, allowing it to harden and lock the stones in place. We can handle all aspects of your project from the initial landscape design to the final build.
- When laying your paving stones, be sure to:
- Start from one corner and work your way out to avoid disturbing the sand.
- Gently place each paver and use a rubber mallet to tap it into place.
- Use a level frequently to ensure the surface is flat and has the correct slope.
- Use a string line to keep rows perfectly straight.
- Fill the joints with polymeric sand and mist with water to lock the pavers in place.
If you want to see our full range of services, you can explore our offerings or get in touch with our team for more information. A beautifully laid paver patio can be the perfect starting point for building a complete outdoor oasis. Get in touch with Modern Yardz today to bring your vision to life.
How Do I Cut Paving Stones to Fit Edges and Corners?
Cutting paving stones to fit around edges, corners, and obstacles is an essential part of a professional-looking patio. While it might seem intimidating, it's a straightforward process with the right tools and a little bit of care. A well-laid patio that fits perfectly will have a much cleaner look and better structural integrity. The last thing you want is a beautiful new outdoor space with jagged or poorly fitting pieces. When you are learning how to lay patio paving, mastering this skill is key to achieving that polished finish. The process of cutting also applies to other hardscape projects, from a new concrete driveway to custom fire features.
The most common tool for cutting paving stones is a diamond-blade wet saw. This tool makes precise, clean cuts through even the toughest materials, and the water helps keep dust down and the blade cool. You can rent a wet saw from a local equipment rental store for a reasonable price. For smaller jobs or to create curved cuts, an angle grinder with a diamond blade can also be used. It’s important to remember safety first: always wear safety glasses, gloves, and a dust mask when cutting any kind of stone or concrete. We at Modern Yardz always prioritize safety on our job sites, ensuring our team is protected while they work on your patio paving installation.
Before you make a cut, you need to mark the stone accurately. Place the paver in its final position, use a straightedge or a chalk line to mark the cut line directly on the stone, and then double-check your measurements. It is always a good idea to cut a little bit at a time, especially for tricky angles, rather than trying to get it perfect on the first try. Once the stone is marked, you can use the wet saw to make the cut. Remember to feed the stone slowly and steadily to avoid chipping the edges. For circular cuts, like for a fire feature or around a pool, you can use a small angle grinder to make several shallow cuts before breaking the piece to size. This technique is often used for creating a beautiful outdoor living space that incorporates multiple elements.
- Here are the essential steps for cutting pavers:
- Mark the paver accurately with a straightedge.
- Use a diamond-blade wet saw for straight cuts.
- For curved cuts, use an angle grinder with a diamond blade.
- Always wear appropriate safety gear.
- Make slow, steady cuts to avoid chipping.
- Use our expertise to build a stunning new landscape for your home.
The process of cutting and fitting is what takes a patio from good to great. When you’re laying paving stones, it’s these little details that make all the difference in the final product. A professional patio paving installation will have clean, tight joints and a flawless layout. When you work with our team at Modern Yardz, we handle all the intricate cuts and measurements, ensuring a perfect finish every time. If you’re considering a new patio or another hardscape project, we can help with the initial landscape design for your home. We also specialize in other projects, like pools and spas, which require precise cuts to fit. Let us help you get started on your project by requesting a quote from us today.
Should I Use Sand or Mortar Under Patio Paving?
This is a common question when planning a new patio paving installation, and the answer depends on your project goals and the type of pavers you are using. Both sand and mortar have their specific uses, and understanding the difference is key to a long-lasting and durable patio. The right choice will ensure your patio remains stable, even with heavy use and changing weather conditions. For anyone wondering how to lay patio paving correctly, this decision is a critical step in the process. We at Modern Yardz work with both methods to achieve the best results for our clients.
For most residential projects, a sand bedding layer is the preferred and most popular choice for laying paving stones. Sharp sand, not regular play sand, is used for this layer. It provides a flexible, permeable base that allows for proper drainage and minor adjustments to the pavers during installation. This flexibility is beneficial because it accommodates the natural freeze-thaw cycles that can cause movement in the ground. A sand-set patio is also easier to repair; if a paver gets damaged, it can be lifted and replaced without having to chip away hardened mortar. This method is what gives paver patios their classic, long-lasting appeal. For more information on the types of hardscapes we can build, including seat retaining walls or custom fire features, we have a list of our services available.
Mortar is a mixture of cement, sand, and water that hardens to create a rigid, permanent bond. This method is often used for laying natural stone or for projects where a very solid, non-permeable surface is required, such as on a porch or an entryway. A mortar-set patio is less forgiving than a sand-set patio. Once the mortar cures, the pavers are locked in place, making repairs more difficult. Proper drainage is also more complicated, as the water cannot pass through the joints. Mortar is often used for projects like a new driveway or patio covers where a more solid and permanent solution is needed. It’s also often used for accent features in a larger landscape design.
- Here's a quick guide to help you decide:
- Use Sand When: You are using standard concrete pavers, you need good drainage, and you want a flexible, easy-to-repair surface.
- Use Mortar When: You are using natural stone, you need a rigid, permanent surface, and you are installing in a high-traffic area.
- The bottom line: For the average DIY homeowner, a sand-set method is a more forgiving option when learning how to lay patio paving.
The final decision of whether to use sand or mortar for your patio paving installation is an important one. We at Modern Yardz have extensive experience with both methods and can recommend the best approach for your specific project. We also offer professional concrete services for projects that require a solid slab base. To see examples of our work and how we use different materials, you can check out our design portfolio. We can help you decide what method is best for your unique needs. We can help you start your project with a well-thought-out plan, so contact us to discuss your options.
How Do I Maintain Patio Paving After Installation for Durability?
Your new patio is an investment in your home and outdoor lifestyle, and proper maintenance is key to keeping it looking beautiful and performing well for years to come. While a quality patio paving installation is built to last, a little bit of regular care goes a long way in ensuring its durability and preventing future issues. Once you’ve completed your project or had our team handle the job for you, knowing how to maintain it is the final step in a successful how to lay patio paving journey. We also offer guidance on maintaining other projects, from landscape lighting to beautiful artificial turf.
The most important aspect of maintaining a patio is keeping the joints filled. Over time, the jointing sand can settle or wash away. When you are laying paving stones, filling these joints with polymeric sand and misting it with water will keep your patio locked and stable. This prevents the pavers from shifting and also helps to deter weeds from growing up between the cracks. A simple sweep with a stiff-bristled broom once or twice a year is a good way to keep the joints full and the surface clean. For tougher stains, a power washer can be used on a low setting, but be careful not to blast out the jointing sand. We also offer guidance for the care of your new patio covers and pergolas.
Another important aspect of maintenance is sealing the pavers. While not always necessary, sealing can provide an extra layer of protection against stains from oil, grease, or leaves. It can also help to prevent fading from UV rays, keeping the color of your patio vibrant for longer. Sealing is a simple process that can be done every few years. You just need to clean the patio thoroughly and then apply the sealant with a roller or sprayer. This is an extra step that ensures your patio paving installation remains a beautiful focal point of your outdoor space.
- Here is a quick maintenance checklist for your patio:
- Regularly sweep the surface to remove debris.
- Keep the joints filled with polymeric sand to prevent shifting and weeds.
- Use a low-pressure power washer for occasional deep cleaning.
- Consider sealing the pavers every few years to protect against stains and fading.
- Check for and address any drainage issues promptly.
Proper maintenance is the secret to a long-lasting and beautiful patio. By taking a little time each year to care for your patio, you will ensure it remains a place you love to spend time in for decades to come. We at Modern Yardz are experts in creating and maintaining stunning outdoor spaces, from intricate paver patios to full landscape lighting systems. We have completed many projects similar to yours and can provide you with a high-quality finished product. If you need help with your project, whether it's a new fire pit or a complete outdoor remodel, we have the experience to help. We are happy to help you create a space you love. To learn about all the services we provide, you can view our wide range of offerings. We can help you get started on your dream project with a well-thought-out plan.


.webp)
.webp)